Update and Configuration of the opsi-server
In this chapter, the installed opsi-server is configured.
Proxy Entry in apt-configuration File
If necessary please adapt the file /etc/apt/apt.conf to your network configuration (enter the correct proxy or comment/delete unnecessary lines). You can edit your file with a program like midnight commander:
mcedit /etc/apt/apt.confUpdate of the opsi-server
Bring the opsi-server up to date by executing the following commands one after the other in a terminal window:
apt update
apt upgrade
If you are asked during the update whether the smb.conf should be overwritten, you have to confirm this. If the smb.conf has already been changed, you should keep the default and compare the files later. If this question has already been answered with no, you can do this later on the opsi-server by running opsi-setup --auto-configure-samba.
|
Backend Configuration
Opsi supports different backends for data storage.
These are essentially:
-
file - data storage in files
-
mysql - data storage in a MySQL database
Besides these there are some backends for special purposes:
-
opsipxeconfd - the service used for network booting with opsi
-
dhcpd - used for configuring and restarting the dhcp service on the opsi-server
-
jsonrpc - for forwarding all requests to another server
By default the mysql-Backend is used for inventory data. The usage of the file-Backend for inventory data is possible but noticeably slower and therefore not recommended.
|
The use of the mysql-Backend for inventory data is free and does not require activation. More information about the activation can be found in the opsi manual. |
|
Some distributions use MariaDB instead of MySQL. The mysql backend also functions with MariaDB. |
We will now configure the mysql-Backend. It is assumed that a MySQL server is installed and configured, and that the credentials for a database administrator are known. For specific information on installation and configuration of the database please refer to the manuals of your distribution.
For the initial configuration of the mysql-Backend use the command:
opsi-setup --configure-mysqlThe command will ask for the credentials for database access, to create a database for opsi and to create an user with appropriate rights to access that database.
The following screenshots show examples for the MySQL configuration setup:
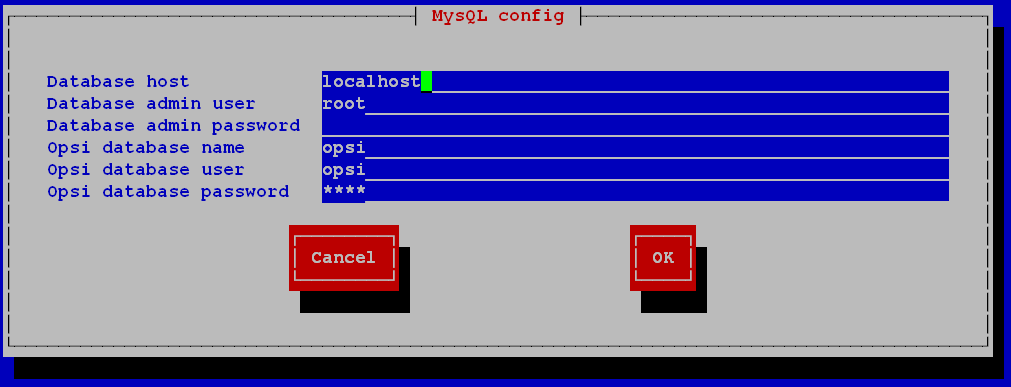

You may accept the defaults for all questions except the 'Database Admin Password'.
The 'Database Admin Password' is linux123 on the pre-installed opsi-VM, otherwise it is the password you entered during the mysql-server installation.
Different kinds of data may be stored in different types of backends.
For some actions (such as method calls) more than one backend is involved.
For this purpose, the different opsi method calls are assigned to the backends.
This is configured in the file /etc/opsi/backendManager/dispatch.conf.
Here an example:
# = = = = = = = = = = = = = = = = = = = = = = = = = = = = = = = = = = = = = =
# =      backend dispatch configuration                                     =
# = = = = = = = = = = = = = = = = = = = = = = = = = = = = = = = = = = = = = =
#
# This file configures which methods are dispatched to which backends.
# Entries has to follow the form:
# <regular expression to match method name(s)> : <comma separated list of backend name(s)>
#
# Backend names have to match a backend configuration
# file basename <backend name>.conf beneath /etc/opsi/backends.
# For every method executed on backend dispatcher
# the first matching regular expression will be decisive.

# Recommended standard configuration (dhcpd not at the opsi server)
#    file as main backend, mysql as hw/sw invent
#     and license management backend and opsipxeconfd backend:
backend_.*         : file, mysql, opsipxeconfd
host_.*            : file, opsipxeconfd
productOnClient_.* : file, opsipxeconfd
configState_.*     : file, opsipxeconfd
license.*          : mysql
softwareLicense.*  : mysql
audit.*            : mysql
.*                 : file
At the top of this file information and examples are given.
In the first column is the name of the opsi method being called (with wildcard .) and after the colon is the list of backends used by that opsi method.
For every called method procedure the first column of this list is checked to determine which backend has to be used.
The first line that matches the method name is used.
The last line (.) matches all opsi method calls.
The default configuration after the installation is the usage of the file-Backend as main backend and the mysql-Backend for license management and inventory data.
Make sure that all used backends are listed in the line starting with backend_.*.
|
Whenever the file dispatch.conf is changed, the following commands should be executed.
Even if you have not changed the file during the initial setup execute these commands now.
opsi-setup --init-current-config
opsi-set-rights
systemctl restart opsiconfd.service
systemctl restart opsipxeconfd.service
Set Samba Configuration and Change Passwords
Opsi requires certain samba shares. To ensure that they are available please enter the following command:
opsi-setup --auto-configure-sambaPlease restart the samba services using the following commands:
systemctl restart smbd.service
systemctl restart nmbd.service|
If the server is updated and it asks if the file smb.conf should be overwritten, you have to confirm this. If the smb.conf has been customised before, you should keep the default and merge the files later. If this question has already been answered with no, you can repeat this later on the opsi-server by running opsi-setup --auto-configure-samba.
|
A 'pcpatch' pseudo-user is created on the system. Clients login with this user to install software and to get access to the installation files on the samba shares. The user 'pcpatch' must be created with a correct password - simultaneously as a system user, as a samba user and as an opsi user.
In a terminal window the program 'opsi-admin' should be executed, which will set the pcpatch-password (for the opsi, unix and samba user).
opsi-admin -d task setPcpatchPasswordAfter executing the command you are asked to enter the password.
Create users and configure the groups opsiadmin and opsifileadmins
Administrative control of opsi is only allowed for members of the UNIX-group 'opsiadmin'.
In the following example, we create the user 'adminuser'.
Firstly we create the user:
useradd -m -s /bin/bash adminuserWe then set the unix password:
passwd adminuserand now the samba password:
smbpasswd -a adminuser| Do not use the character '§' in the passwords, because this character is not permitted when connecting to the opsi service. |
Now we create and test the group membership with these commands:
usermod -aG opsiadmin adminuser
getent group opsiadmin
The getent command should show a result like this:
opsiadmin:x:1001:opsiconfd,adminuser|
When 'root' is not a member of the opsiadmin, then 'root' will not be able to use all administrative opsi commands! |
To perform everyday tasks on your opsi server, it is usually not necessary to be logged in as 'root'.
Our recommendation is to use a normal user and use the sudo command whenever administrative privileges are required.
All users who build opsi packages (opsi-makepackage), install opsi packages (opsi-package-manager), or manually edit the configuration files also have to be members of the group 'opsifileadmins' :
usermod -aG opsifileadmins adminuserTest the results by entering:
getent group opsifileadminsThe result should look like
'opsifileadmins:x:998:adminuser'
To make sudo opsi-set-rights available for users of the group 'pcpatch', please execute:
opsi-setup --patch-sudoers-fileAfterwards opsi-set-rights, which does the same as opsi-setup --set-rights, can be executed not only as root, but also with sudo by members of the group 'opsi-file-admins':
Example:
sudo opsi-set-rights .DHCP Configuration
A correctly working name resolution and DHCP are essential for the correctly functioning of opsi. To simplify the setup the opsi-server VM is supplied with a working DHCP server. On the other hand, in many environments there often already exists a DHCP server, which will be used with opsi. Both alternatives are described below.
Using a DHCP Server at the opsi-server
The preconfigured opsi VM already has a DHCP server installed.
The DHCP server on the opsi-server VM is configured with no free leases, so no unknown clients will get an IP address from this DHCP server.
If you create a client on the opsi-server using opsi-configed, you must supply the IP address and MAC address of the client. This will be entered into /etc/dhcp/dhcpd.conf and the DHCP service will be restarted.
If you want to use the opsi server as a DHCP server, you have to install the corresponding DHCP server package.
e.g.
apt install isc-dhcp-serverAfter the installation the dhcp configuration file has to be adjusted. This is done by the following command:
opsi-setup --auto-configure-dhcpdTo restart the DHCP server, as described in /etc/opsi/backends/dhcpd.conf, an entry in /etc/sudoers is required. This is created using the command:
opsi-setup --patch-sudoers-fileThe permissions for the dhcpd configuration file should look similar to this:
-rw-r--r-- 1 opsiconfd opsiadmin 80174 Dec 22 14:37 /etc/dhcp/dhcpd.confUsing an External DHCP Server
If you use an external DHCP server, then you can uninstall the DHCP server on the opsi-server.
This is done by entering this command:
apt remove isc-dhcp-serverSince opsi 4.0.3 a DHCP server will not be installed automatically in this situation.
You have to configure the external DHCP server, so a PXE boot from the opsi-server is possible. If your external DHCP runs on Linux, then you need the following entries for the clients in the DHCP daemon configuration file (i.e. etc/dhcp/dhcpd.conf):
next-server <ip of opsi-server>;
filename "linux/pxelinux.0";
Replace '<ip of opsi-server>' with the IP address of your opsi-server.
If the opsi server runs on openSUSE or SLES, then filename=opsi/pxelinux.0.
If the opsi server runs on UCS, then filename=pxelinux.0.
If you are using a Windows DHCP server, then the corresponding entries are 'bootserver (Option 66)' and 'bootfile (Option 67)'.
If you create a client on the opsi-server, then you only have to supply the MAC-address, but not the IP address.
Checking the Backend Configuration for DHCP Entries
Regardless of whether or not you use an external DHCP server, the configuration of the opsi-server must be changed.
The file /etc/opsi/backendManager/dispatch.conf defines which backends are used (i.e. 'file', 'mysql').
The lines with the backend_. and host_. entries configure whether or not the opsi-server should work with the local DHCP configuration.
If you are using the DHCP server on the opsi-server, then the backend dhcpd has to be added here. The corresponding entry with file backend must then look like this:
backend_.*         : file, opsipxeconfd, dhcpd
host_.*            : file, opsipxeconfd, dhcpd
If the local DHCP service on the opsi-server isn’t used (because another server in the local network performs this task, and is also used for the opsi-clients), then the backend dhcpd is not required:
backend_.*         : file, opsipxeconfd
host_.*            : file, opsipxeconfd
After editing the backend configuration, the configuration has to be initialised and the opsiconfd service has to be restarted:
opsi-setup --init-current-config
opsi-set-rights
systemctl restart opsiconfd.service
systemctl restart opsipxeconfd.service
Configuration of the name resolution
To install software on the clients before login, generally only the clients have to know how to contact the opsi-server.
However, opsi also has a number of 'push' features such as 'on_demand' events, sending messages, starting remote control software, and retrieving session information.
For all these functions the server must be able to reach the client and therefore needs to determine the IP address of the client. How this works best depends on the specific configuration of DNS and DHCP. There are a large number of possible configurations.
Therefore we show two typical extremes:
-
The clients are not known by the DNS, and they have dynamically assigned frequently changing IP addresses.
-
The DNS always provides the correct IP address of a client.
To adapt the opsi server to different situations, you may change the following parameters:
-
The entry resolveHostAddress in the file
/etc/opsi/backends/hostcontrol.conf
If this option is set to 'True', when connecting from the opsi-server to an opsi-client, the IP address of the client is first determined via the name resolution. To give preference to the IP address stored in the opsi backend, the option must be set to 'False'. -
The entry update ip in the file
/etc/opsi/opsiconfd.conf
If this entry is set to 'yes', whenever the opsi-server receives an IP address from a client (e.g. on every connection the client makes) the IP address stored in the backend will be updated. The default is 'yes'.
For the first variant, then you should probably set resolveHostAddress to 'False' and update ip to 'yes'.
FOr the second variant, then the best configuration is to set resolveHostAddress to 'True' and update ip to 'no'.
You should decide for yourself which combination fits your situation best.
If you changed anything in these files, then you should restart the opsiconfd:
systemctl restart opsiconfd.service