opsi-Server
Overview
The functionality of an 'opsi-server' can be installed on many standard Linux distributions.
There are two different major roles, which can be combined on one server:
-
'opsi-configserver'
The functionality of the configserver includes the storage and processing of the configuration data in different backends and provisioning this via a web service and on the command line. -
'opsi-depotserver'
The functionality of the 'opsi-depotserver' includes storing the actual installation files of the software to be distributed, operating systems, boot images and making them available to the client via smb/cifs, https, tftp.
The hardware requirements for these services are generally low, so operating an opsi-server in a virtualization environment is not a problem.
Since version 4.2 the opsi-server is using the in-memory database redis (https://redis.io/). The following data is saved in redis:
-
Session data
-
Log outputs are written as MessagePack data into a redis stream. This stream is then read by the Logviewer, for example (https://msgpack.org/).
-
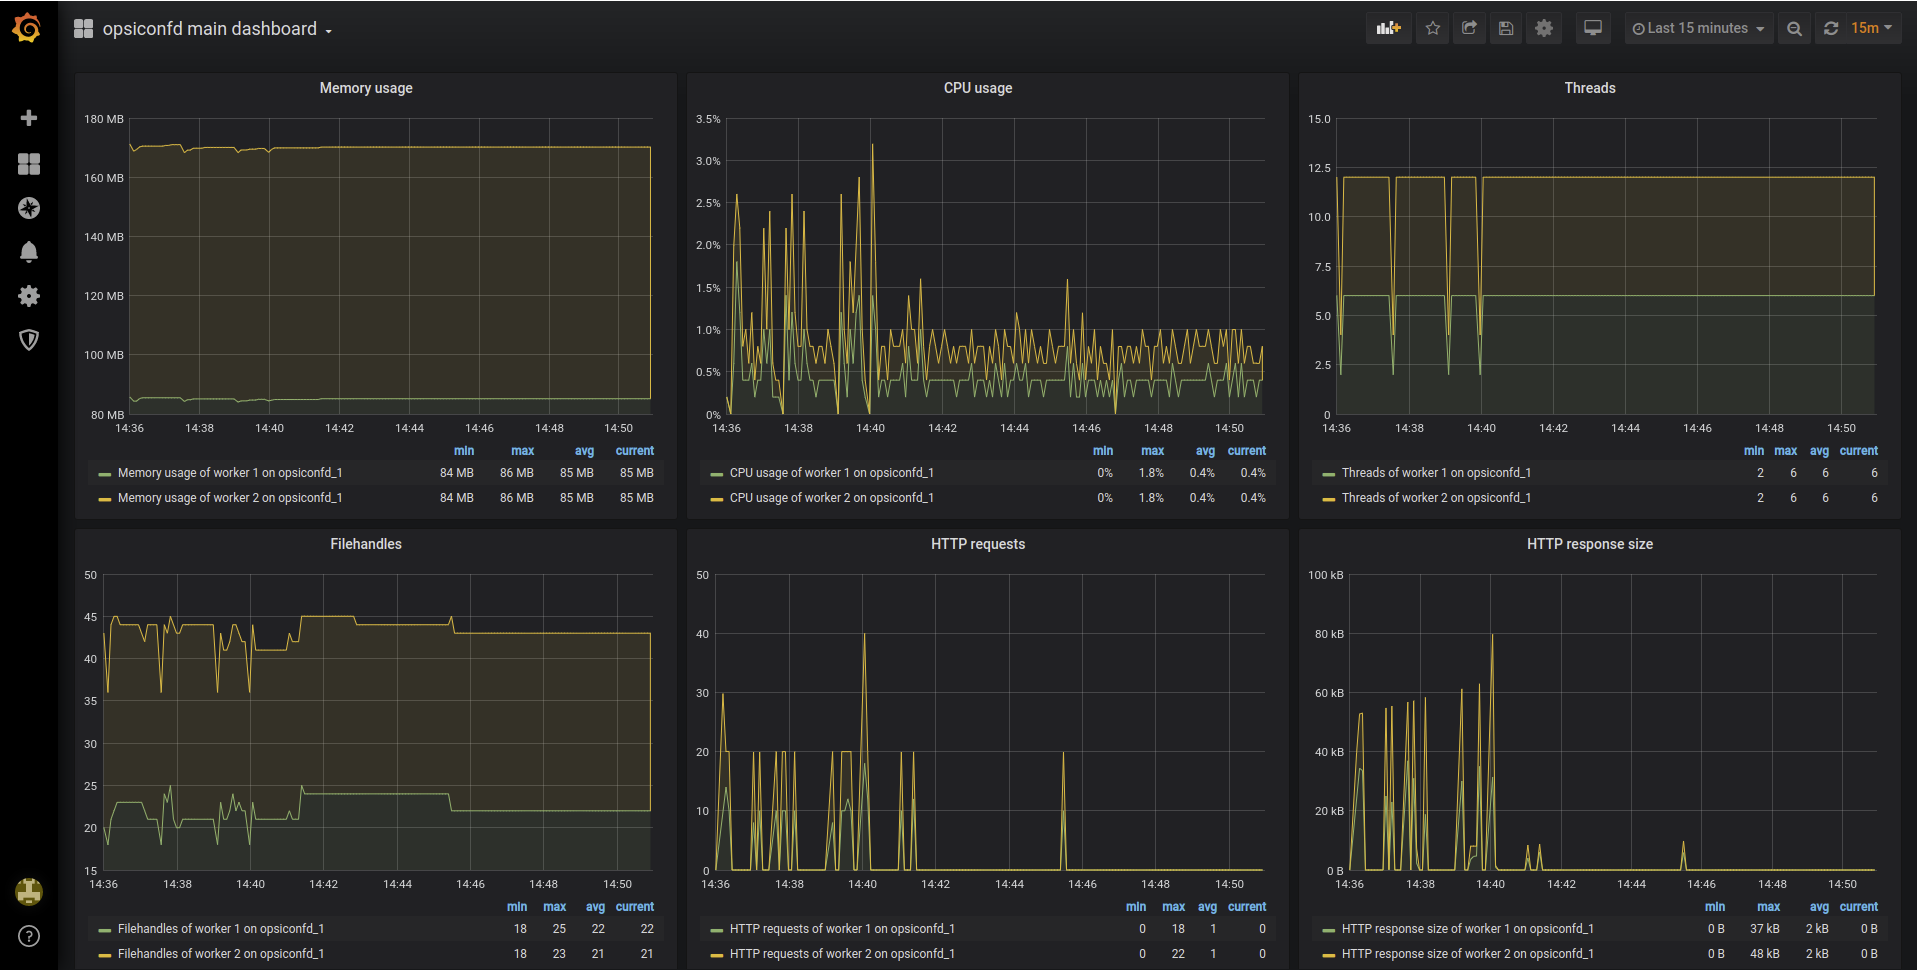
Statistics such as CPU usage are stored as Time Series in Redis. For this purpose the module RedisTimeSeries is used (https://github.com/RedisTimeSeries/RedisTimeSeries).
The Statistics are read and displayed by Grafana (https://grafana.com/). The grafana dashboard can be reached at the following URL https://<opsi-server>:4447/admin.
Installation and initial operation
The installation and starting of a 'opsi-server' is explained in detail in the separate 'opsi-getting-started' manual.
Samba Configuration
In order to give the client computers access to the software packages, the opsi-server provides shares that can be mounted by the clients as network drives. For Windows Clients the shares are provided by Samba. To configure your samba according to the needs of opsi (or to repair) call:
opsi-setup --auto-configure-sambaAfter changing the Samba configuration it is necessary to restart the Samba service (systemctl restart smbd.service).
The opsiconfd daemon
'Opsiconfd' is the central configuration daemon of opsi.
All client components (opsi-client-agent, opsi-configed, opsi-linux-bootimage, …) connect to this service to access the configurations in the backends.
The 'opsiconfd' is configured via the file /etc/opsi/opsiconfd.conf, environment variables or command line parameters.
The individual configuration options can be queried using the opsiconfd --help command. To use options every time the opsiconfd is started, the option from the help text can be entered into the configuration file without the --.
Furthermore it is possible to use the environment variables as shown in the helptext.
If the individual approaches are combined, the following sequence applies: Entries in the configuration file overwrite defaults, environment variables overwrite entries in the configuration file, command line parameters overwrite environment variables.
Required system user accounts and groups
-
User 'opsiconfd'
This is the user under which the opsiconfd daemon runs. -
User 'pcpatch'
This is the user the 'opsi-client-agent' uses to mount and read from the 'depotshare'. By default this user has the home directory/var/lib/opsi. The password of the user can be set byopsi-admin -d task setPcpatchPassword. -
Group 'opsifileadmins'
Members of this group have access to opsi package data, such as depot, repository and workbench. The system administrators of the opsi server should therefore be members of this group.
Formerly this group was called 'pcpatch', since opsi 4.2 'opsifileadmins' is used as group name by default. If an existing opsi environment is updated to opsi 4.2 the used group name will be kept.
When connecting the opsi server to an Active Directory the group name 'opsifileadmins' must be used in any case.
-
Group 'opsiadmin'
The members of this group can authenticate themselves to the opsi-webservice and thus e.g. work with opsi-configed. Therefore, all opsi administrators should be a member of this group.
Required shares
-
'Depotshare' with software packages ('opsi_depot')
The software packages prepared for installation by the opsi-winst program are located on the depot share.
By default, this directory is located on the opsi server as/var/lib/opsi/depot.
Below this directory there is a directory for each software package with the name of the software package.
The installation scripts and files are then below these directories.This directory is shared read-only as 'opsi_depot'.
In older versions of opsi the corresponding directory was /opt/pcbinand the share was called 'opt_pcbin'. -
Working directory to build packages ('opsi_workbench')
At/var/lib/opsi/workbenchyou will find the area to create new packages and from where you should install packages with the opsi-package-manager. This directory is shared as 'opsi_workbench'.Since opsi 4.1 the path can be configured per depot through the attribute workbenchLocalUrl. -
Configuration files of the file-backend ('opsi_config')
The configuration files of the file backend are located under/var/lib/opsi/config. This directory is shared as 'opsi_config'.If you work on the files via this share, do not use editors that change the file encoding (Unix/DOS), and remove backup files such as * .bak.
opsi PAM Authentication
opsi uses various PAM-modules for user authentication. So far, different PAM modules have been used for different distributions. The PAM modules used are listed in the following list:
Default: common-auth
openSUSE / SLES: sshd
CentOS and RedHat: system-auth
RedHat 6: password-auth
As you can see from the list, various PAM configurations were used, but these can change again depending on the local PAM configuration. Since these adjustments always required an intervention in the sourcecode, you can now create the opsi-auth file under: /etc/pam.d/ and save your own PAM configuration for opsi. If this file exists, opsi automatically uses this configuration.
The following simple example should clarify the behavior: If you run a Debian/Ubuntu system and receive a PAM error message when logging on to 'opsi-configed', although an SSH connection to the server can be opened with the same user data, you can create the file /etc/pam.d/opsi-auth with the following content:
@include sshdAfter restarting opsiconfd, opsi will automatically use the sshd-PAM module for authentication.
| Please note that the application of the ACL uses case-sensitive interfaces, whereas authentication via PAM can be case-insensitive. This can result in the fact that despite successful authentication, it is not possible to work with the service because the ACL prevents this. |
opsi LDAP/Active Directory Authentifizierung
Instead of using PAM for authentication it is also possible to use an LDAP server or an Active Directory directly. For this the opsi extension 'opsi directory connector' is necessary. This module is currently a link:https://opsi.org/extensions/ [co-funded opsi extension].
The configuration takes place via the file /etc/opsi/opsi.conf.
In the section 'ldap_auth' the option 'ldap_url' must be set.
The ldap_url has the following structure:
ldap[s]://<address-of-ldap-server>[:port]/<base-dn>.
Additionally, if necessary, the option username can be used. This can be used to define which user name should be passed when authenticating to the LDAP/AD. Here the placeholders {username} and {base} can be used.
Example for the connection to an Active Directory or Samba 4:
[ldap_auth]
ldap_url = ldaps://ad.company.de/dc=ad,dc=company,dc=en
Example of connection to an OpenLDAP:
[ldap_auth]
ldap_url = ldaps://ldap.company.org:636/dc=company,dc=org
username = uid={username},dc=Users,{base}
The opsiconfd must be restarted for the changes to take effect.
Please make sure, that the group defined in admingroup is also available in the Active Directory.
|