opsi Software On Demand - opsi-client-kiosk (free)
Introduction
With the module "Software-on-Demand" opsi administrators may give their users access to install a range of software-products. These software products may be selected and installed user-driven without the administrator needing to do anything. This documentation shows how the module "Software-on-Demand" works, describes it’s functions and how to configure it.
Conventions: When the opsi-client-kiosk/agent in general is mentioned, it refers to all OS versions (Windows/Linux) unless stated otherwise. When talking about packages or products then the opsi-client-kiosk/agent package/product is the Windows package/product and the l-opsi-client-kiosk or opsi-linux-client-agent package/product is the Linux package/product.
Prerequisites
There are some preconditions needed for the usage of this extension. The product-groups are needed, available with opsi 4.0. Furthermore the opsi-client-agent and the opsi-configed at version 4.0.1 are needed.
| Windows: Starting with opsi-client-agent version 4.1.1.6-5 the kiosk is available as a standalone package (opsi-client-kiosk). It will be however installed during the installation of the opsi-client-agent if it’s not already present. For more details please check New opsi-client-kiosk application |
| opsi-package | version |
|---|---|
opsi-client-agent / opsi-linux-client-agent |
>=4.1.0.0-36, >=4.1.1.6-5** / >= 4.1.1.11-1 |
opsi-winst / opsi-script |
>=4.10.8.12 |
python-opsi |
>=4.1.1.71-1 |
opsi-server |
>=4.0.1-2 |
opsi-configed |
>=4.0.1.6-1 |
(l-)opsi-client-kiosk |
>=4.1.1.7-6 |
**opsi-client-kiosk as a standalone package
Configuration
The configuration of this extension is based on product-groups and config-variables. The used config-variables are:
-
software-on-demand.active
-
software-on-demand.product-group-ids
-
software-on-demand.admin-mode
-
software-on-demand.installation-now-button
These config-variables are created with installing the opsi-server-package.
Since tne Kiosk version 4.1.1.11 and opsi-client-agent version 4.2.0.11-1 it’s now possible to configure which event (timer or on_demand) should be triggered via the Kiosk for installations.
If necessary, the Config must first be created on the server side, e.g. via Configed in Server Configuration.
The value for the Config opsiclientd.control_server.process_actions_event can then be set via Configed (e.g. to on_demand).
Possible values are auto, on_demand and timer. auto is the default value. If auto is set then timer is used for WAN/VPN clients and on_demand for other clients.
Starting from kiosk version >= 4.1.1.11 and opsi-client-agent version >= 4.2.0.11-1 the kiosk uses by default the caching and synchronization methods of the WAN/VPN-client if running on a WAN/VPN-client and with the timer event. In this case the config-variable software-on-demand.installation-now-button has to be set to false. Otherwise display and messages of the kiosk are not synchronized with the current client status.
To restore the old behaviour for WAN/VPN clients, the config opsiclientd.control_server.process_actions_event must be explicitly set to on_demand. Then WAN/VPN clients will also be triggered again by the on_demand event.
|
Managing product-groups
The most comfortable way to create and manage product-groups is using the opsi-configed.
There you have to change to the tab product configuration.
Since version 4.0.1.6 of the opsi-configed you can change to product configuration without choosing a client.
|
The product-group menu is above the product list.
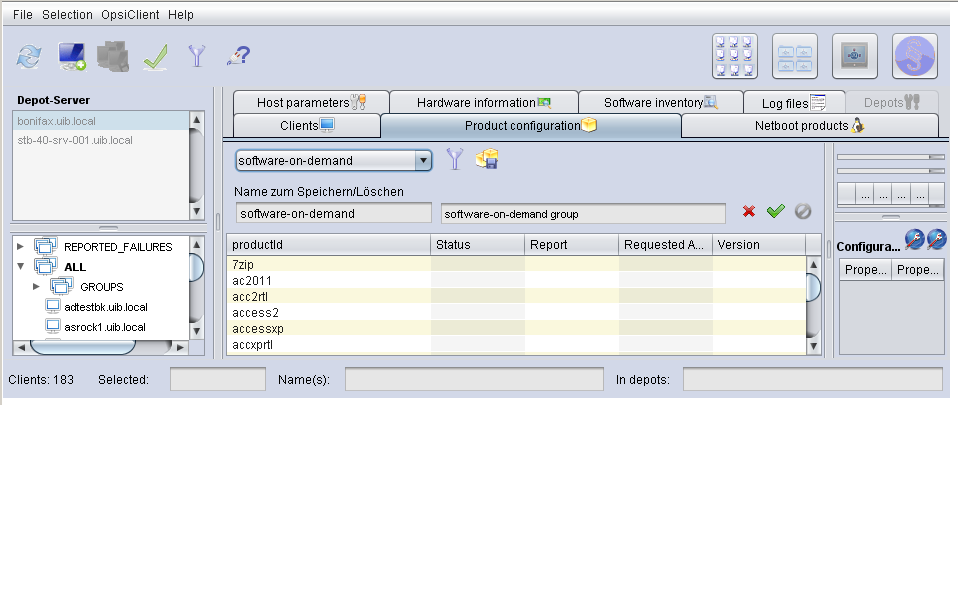
With the drop down menu you can choose a product-group to edit it.
If you have chosen a group, the corresponding products will be highlighted.
With a second icon, filter can be activated or deactivated.
When a filter was activated, only the products of the activated product-group are seen.
Product-groups can be edited after activating the icon with the yellow packets (show editor / hide editor) next to the icon with the filter.
In this view, a new group and it’s description can be added. Save the editing by activating the red check icon.
If some more products should be added to a group, select them and press the red check icon. (Press the <ctrl> button and select the products).
configure the module Software-On-Demand
The module can be configured, as mentioned above, with the config-variables described in the following table:
| Configuration | Description | Values |
|---|---|---|
software-on-demand.active |
activates or deactivates the module, is used as a flag for the migration (Nur Windows: Installation über einen alten opsi-client-agent der den alten Kiosk noch enthält). It’s irrelevant for the opsi-client-kiosk with version >=4.1.1.6-5. |
true/false |
software-on-demand.product-group-ids |
Product-groups with software-products, that can be used for Software-on-Demand. |
List of product-groups |
software-on-demand.admin-mode |
Enables specific functionality for admistrative purpose/setting icons/screenshots. Should be enabled only if needed (client-specific) |
true/false |
software-on-demand.installation-now-button |
Enables to install products immediately. Do NOT use on WAN/VPN-clients |
true/false |
There are two ways to use these configuration objects. For the whole system or for each client. The following 2 chapters will explain both ways.
Using the kiosk (Version>= 4.1.1.11) on a WAN/VPN-client the config-variable software-on-demand.installation-now-button has to be set to false. Otherwise display and messages of the kiosk are not synchronize with the current client status.
|
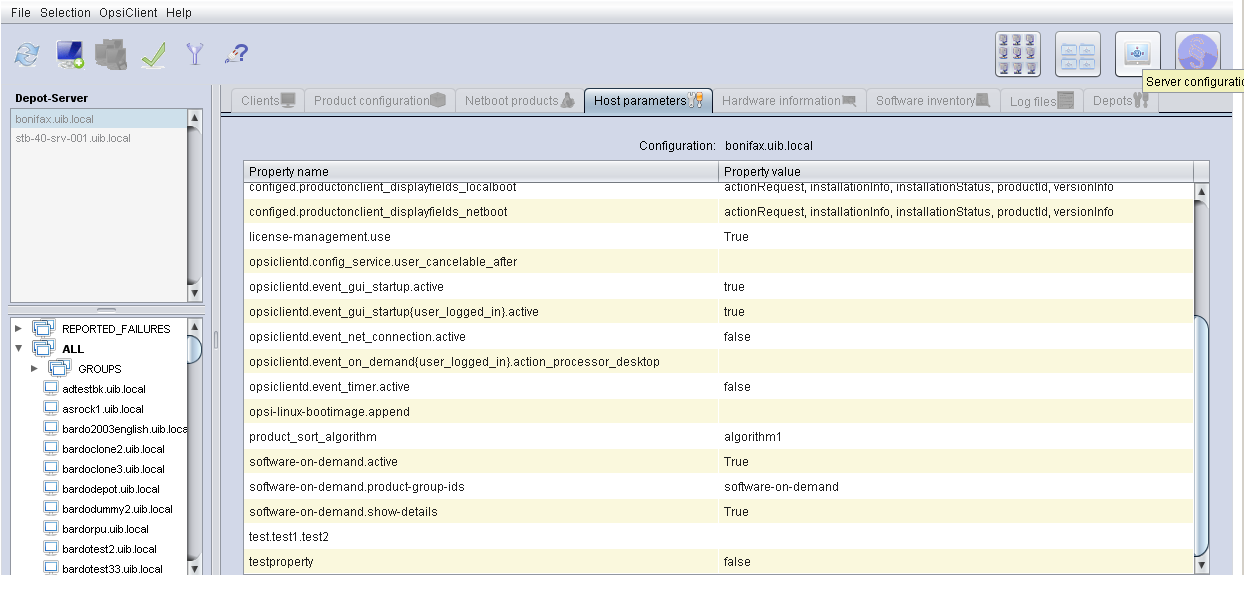
Configuration for the whole system
The configuration here is the default system wide for every client.
The configuration can be edited in the opsi-configed. Push the Button Server Configuration and change to the tab Host Parameter
Another possibility is to change the server-configuration with the following command:
opsi-setup --edit-config-defaults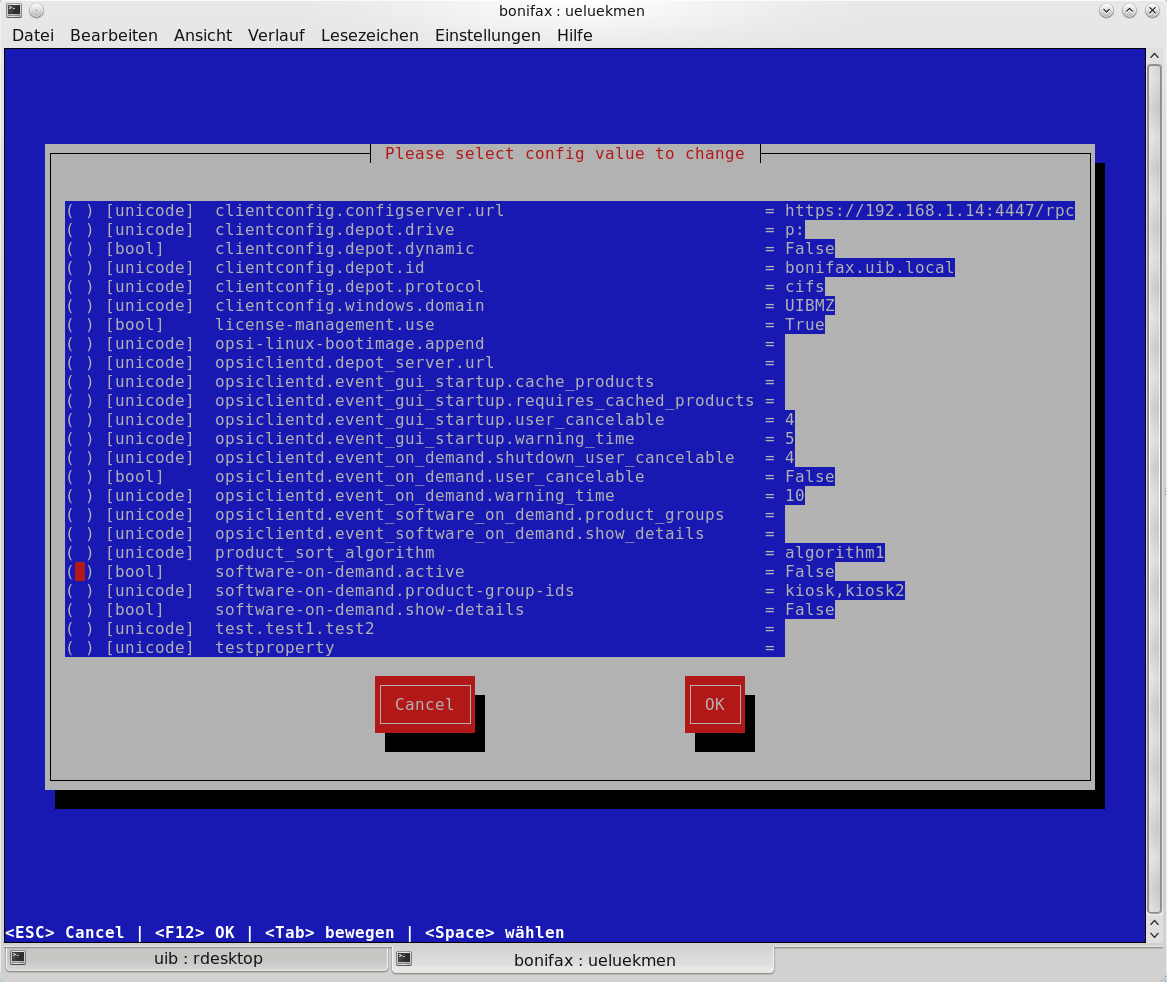
| Administration is also possible with the opsi-python-API or with 'opsi-admin' |
Configuration for a single client
The configuration for a single client - or client specific configuration - is useful if, for example, only some of the clients should have access to the Software-on-Demand extension. Or if you want to make several product groups available to some clients.
The configuration of the client specific host parameters can be edited in different ways:
The most comfortable way to edit the configuration is via 'opsi-configed'. Choose one or several clients (even all clients of a client group if you want to) and then navigate to the tab "Host parameters".
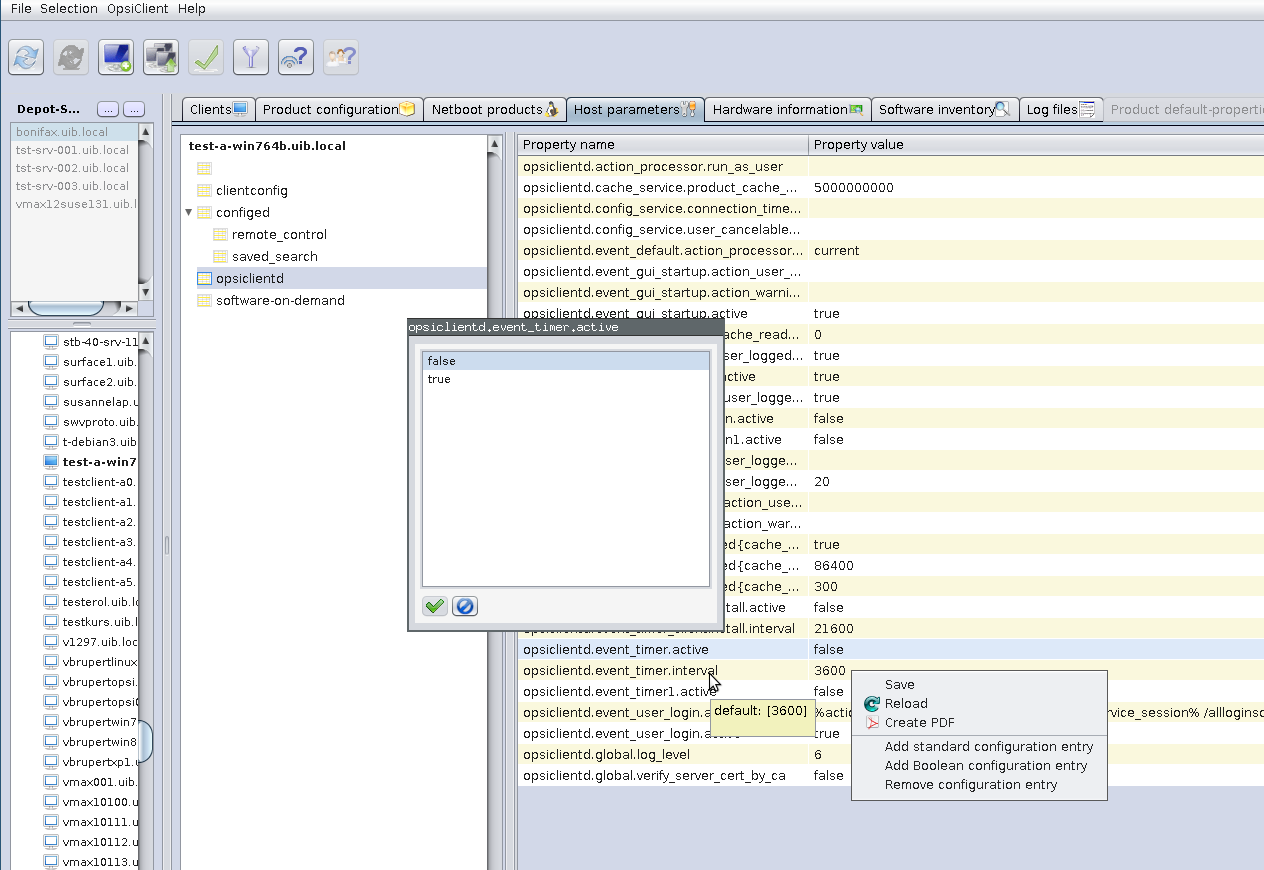
This editing overrides the system wide defaults.
New opsi-client-kiosk application
Windows
With the opsi-client-agent version (>=4.1.1.6-5) the kiosk is available as a standalone product (opsi-client-kiosk) and will be installed as such when installing the opsi-client-agent. It tries to migrate the existing kiosk settings.
Background of this changes are:
-
simpler maintenance of the opsi-client-agent package
-
Changes to the kiosk can be published independently from the opsi-client-agent package
-
Allows to apply new settings of the kiosk to the clients without the need to reinstall the opsi-client-agent
| When installing the opsi-client-agent (>=4.1.1.6-5) on the depot, the opsi-client-kiosk package will be installed as well if necessary. For clients, when installing the opsi-client-agent (>=4.1.1.18-1) on the afore mentioned, the opsi-client-kiosk product is set to setup if necessary. For details see Installation über einen alten opsi-client-agent der den alten Kiosk noch enthält. |
| The old (web based) Kiosk client no longer works with the new opsi-client-agent/opsiclientd. |
Linux
The opsi-client-kiosk is also available under Linux as l-opsi-client-kiosk package or product.
opsi-client-kiosk: Installation on a depot
If you invested time into customizing the kiosk, it’s recommended to backup the custom directory before installing a new opsi-client-kiosk/opsi-client-agent on the depot:
Kiosk as a standalone package (opsi-client-kiosk or l-opsi-client-kiosk): /var/lib/opsi/depot/(l-)opsi-client-kiosk/files/app/ock_custom
Kiosk still integrated in opsi-client-agent package (only windows):
/var/lib/opsi/depot/opsi-client-agent/files/opsiclinetkiosk/app/ock_custom or /var/lib/opsi/depot/opsi-client-agent/files/opsiclinetkiosk/ock_custom
In rare cases also /var/lib/opsi/depot/opsi-client-agent/files/opsiclinetkiosk/files_to_copy/ock_custom
First installation / installation over an already existing (l-)opsi-client-kiosk product
Install the current (l-)opsi-client-kiosk package (available at download.uib.de) on the desired depot and update the opsi-(linux)-client-agent package if needed.
| opsi-client-agent package >=4.1.1.6-5 had to be installed on the depot as well as on the respective client. |
Windows only: Installation through an old opsi-client-agent which still contains the old kiosk (i.e. contains the directory opsiclientkiosk, or <=4.1.0.0)
To minimize the number of manual changes or interactions, it is attempt to migrate the kiosk settings automatically from the opsi-client-agent to the opsi-client-kiosk package and install it on the depot or the corresponding clients if needed. Usually this is done automatically without the need of further interaction.
For a better understanding of the process described here in more detail, it’s important to distinguish what happens during the installation of the opsi-client-agent on a depot and what happens during the installation on a client.
Installation of the opsi-client-agent Version (>=4.1.1.6-5) on a Depot
When installing opsi-client-agent on the depot, the opsi-client-kiosk package is installed on the depot if certain conditions are met. It tries to migrate the kiosk settings from the opsi-client-agent package to the opsi-client-kiosk package. This happens only if the following conditions are fulfilled:
-
the opsi-client-kiosk package is NOT installed on the depot.
-
the opsi-client-agent (>=4.1.1.6-5) is installed over an old opsi-client-agent that still contains the old kiosk (i.e. contains the directory opsiclientkiosk, <=4.1.0.0)
Installation of the opsi-client-agent Version (>=4.1.1.18-1) on a Client
When installing the opsi-client-agent (>=4.1.1.18-1) on a client, the opsi-client-kiosk is set to setup under certain conditions. This happens when the following conditions are met:
-
the opsi-client-kiosk is NOT installed on the client
-
the config/host-parameter software-on-demand.active is set to true for this client
So in most cases the opsi-client-kiosk will be installed on the client automatically after the opsi-client-agent installation, due to the fact that the client PC will be rebooted and the opsi-clientd event gui_startup will be triggered which should be configured in most cases.
If the kiosk is not available on some clients, despite attempted automatic migration/installation, please check:
-
if an opsi-client-kiosk package is installed on the depot the client is connected to, if not install the opsi-client-kiosk package or the current opsi-client-agent package, respectively
-
if the opsi-client-kiosk is installed on the client, should that not be the case please set it to setup
opsi-client-kiosk: Installation on a client
The installation on a client is controlled by the following 'opsi-client-kiosk' product properties:
-
startmenu_entry
The Start Menu entry for the opsi-client-kiosk (software on demand).
Default=software on demand; editable -
startmenu_folder
The Start Menu folder for the opsi-client-kiosk (opsi.org)
Default=opsi.org; editable -
desktop_icon
Create a desktop icon for opsi-client-kiosk ?
Default=false -
install_icon_collection
For adminsitrative purposes an icon collection can also be installed. It is only recommended though if product icons are to be set on the client via the kiosk admin mode and you want to select some of them from the icon collection.
Default=false
The used icon for the start menu / Desktop may be modified by storing a kiosk.ico file (Windows) or kiosk.png file (Linux) at
/var/lib/opsi/depot/opsi-client-kiosk/files/app/ock_custom/skin/ (since opsi-client-kiosk version 4.1.1.7-2).
opsi-client-kiosk: Usage
Standard mode
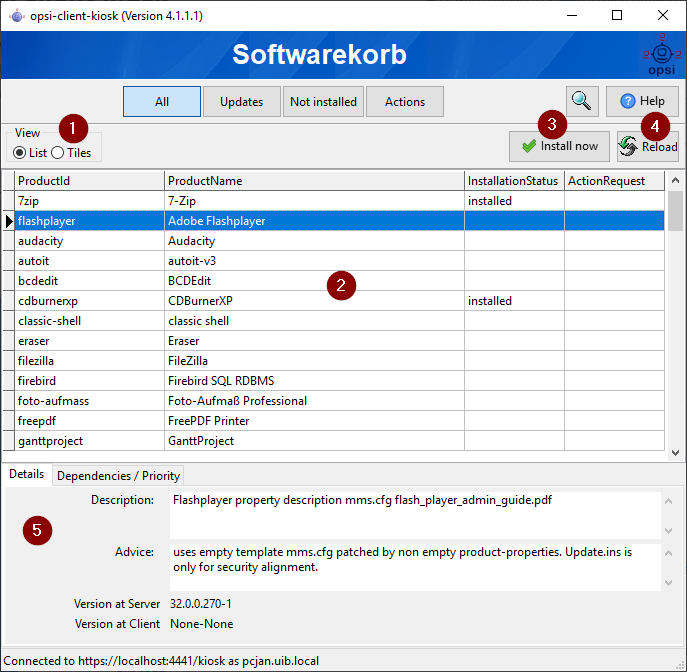
After start of the kiosk all products which are assigned to the kiosk are shown on product tiles within the main window. The switch "All" is marked in the filter switch panel (Figure 5).
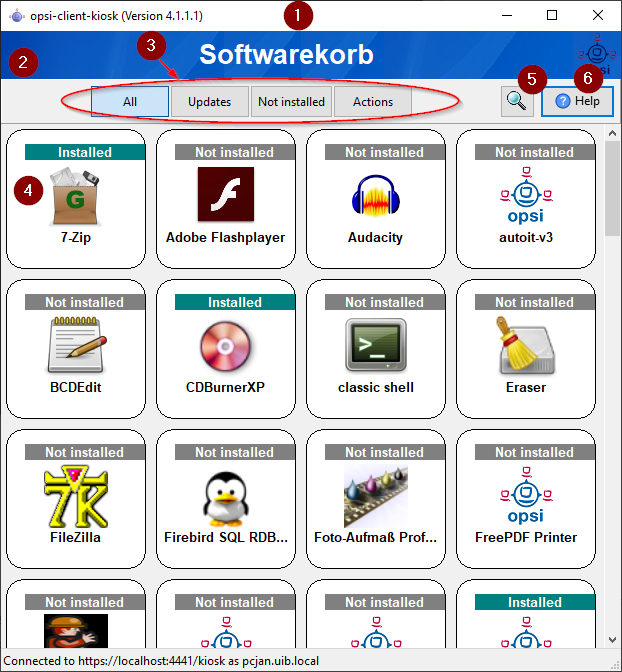
Window panel (1) and Header panel (2)
In the standard mode the version of the kiosk and, if applicable, the info that installations as from now are disabled are shown in the window panel (1) (see also dialogs for installation/uninstallation and update of the product). The header panel (2) is customisable. See section Corporate Identity of the opsi-client-agent for more details.
Filter switch (3)
By clicking on the filter switch (3) "Updates", "Not Installed" or "Actions" only products are shown with the choosen status.
Product tiles (4)
Products are displayed by product tiles.
Product tiles show first information about the product. That are the name of the product, if set, a specific product icon otherwise a standard icon, as well as the status of the product and, if a action is set, the respective action.
| Only if an action is set an action is displayed otherwise nothing is displayed. |
After clicking on a product tile the tiles are hidden and detailed information of the selected product are shown (Figure 7).
Search (5)
Click on the magnifying glass to open a search field (Figure 6).

Use the search field to search for specific products. All fields of the product will be searched. Only products which fit to the search term will be displayed e.g. because the term is in the name or in the description of the product. Clicking on th "X" within the search field will clear the search field and all products are displayed again. The same effect has a click on the magnifying glass above the serach filed (Figure 5) but additionally the search field is hidden.
Help (6)
Via the button "help" the help window is reached.
After clicking on a product tile the detailed product view is shown.
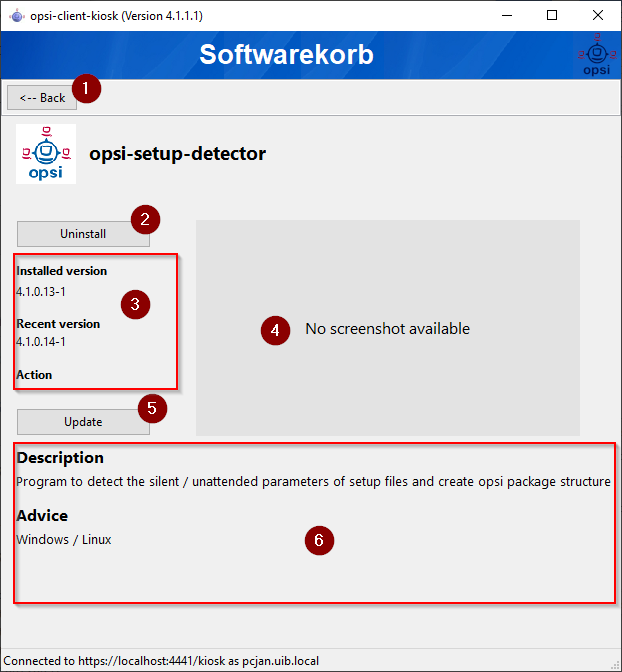
Back (1)
Back to main window (Figure 5).
Install/Uninstall product or removes action (2)
Clicking on this button opens a dialog to install/uninstall the product or removes the action set before.
| The functionallity of this button depends on the product state (installed/not installed, action set) |
Info block (3)
The info block shows the installed version and the current available version as well as the respective action if it is set.
Screenshot (4)
Shows, if available, a screenshot of the product.
| Ask your system administrator if no screenshot is displayed but you like to have one. |
Update (5)
Opens a dialog to update the prodcut.
| This button is only displayed if an update is available i.e. the installed version differs from the newest available version. |
Description and Notes (6)
Here the prodcut description and notes are presented.
| The prodcut description and notes are only as good as they are incorporated into the opsi-products. Ask your system administartor or package manager if they are not understandable. |
A dialog is displayed after clicking on the respective button within the detailed prodcut view. Either you are directly prompt for confirmation of the action (Figure 8) or an additional dialog is shown where you can select the starting point of the requested action (now or later after standard event e.g. reboot, Figure 9)

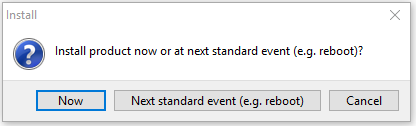
| The dialog for selecting the starting point of the requested action is only shown if the installation as from now is not disabled by your system administrator |
The help window (Figure 8) displays information about the opsi client kiosk. Via the help window it is also possible to launch this manual. In addition the kiosk can be put into the expert mode from here.
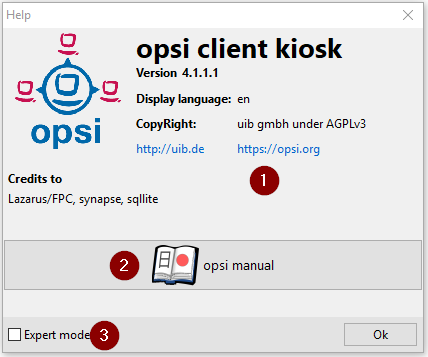
Info block (1)
Here information about the opsi client kiosk are shown. Via the links it is possible to launch the uib or opsi webpage in your preferred browser.
Opsi manual (2)
Link to the opsi manual.
Expert mode (3)
Activation of the check box activates the expert mode.
Expert mode
Is the expert mode activated (activation via the help Help) you can switch between the tile view of the standard mode and a list view. In the list view the prodcuts are displayed in a table among each other. The additional buttons 'Installation now' and 'Reload' are displayed (Figure 11).
| Only if the installation as from now is not disabled the button 'Installation now' is shown. |
Toggle view (1)
Using the check box you can toggle between list view and the tiles view.
List view (2)
In the list view the products are displayed in a table among each other. In the column ActionRequest an action request can be set.
Depending on product state the actions which can be set in the column ActionRequest may differ. Setting the action to setup yields to the installation or update of the product. The action none is for resetting an action which was set but was not executed until now.
|
Installation now (3) - only available if the installation as from now was not disabled
Clicking on the button 'Installation now' opens a seperate window showing the actions set. You can choose if the actions shall be execute now or later at next standard event (Figure 12).
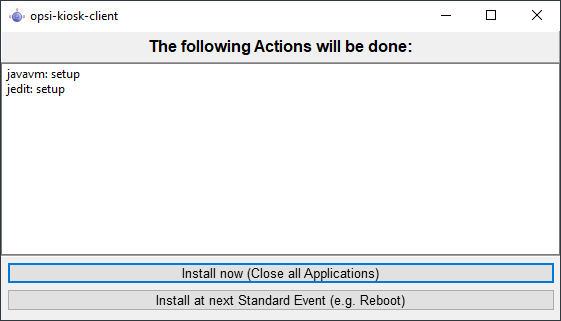
At this window (Figure 12) you can execute an installation as from now (button Installation now). In this case it would be advisable to close all other applications (i.e. to save your data) because the started installations may come in conflict with currently running applications.
Using the button Install at next standard event (e.g. reboot) closes the window and the actions will be proceed later at next standard event.
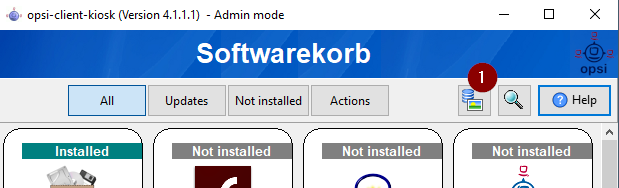
Admin mode
To execute the kiosk in the admin mode the config software-on-demand.admin-mode = true had to be set. In addition
the kiosk must be executed as administrator.
|
Using the kiosk in admin mode allow to set product icons and screenshots for the products. Therefore you need to click with the rigth mouse button on the icon or screenshot or its respective placeholder. This opens a file dialog from which the desired image can be chosen. This works within the main window as well as in the detailed prodcut view.
A click on the button  (Figure 13) opens a dialog to save the icons/screenshots on an opsi depot which means that these icons/screenshots are than also available for other kiosk installations.
| After setting icons and screenshot within the kiosk the icons and screenshots are saved on the client only locally. To make these images available for kiosk installations on other clients they had to be copied to the ock-custom folder (e.g with the kiosk as described above). |
The config software-on-demand.show-details from opsi 4.0.7 has no effect on the kiosk anymore and can be deleted.
|
Logs of the opsi-client-kiosk:
The program logs to C:\opsi.org\applog.
Characteristics
The following apply to the software-on-demand module:
-
Dependencies are resolved automatically
-
Software that depends on software from the Demand group, will automatically be set to setup (install), without interaction from the user..
-
opsi-client-kiosk: Customizable to Corporate Identity
The header bar of the main window (1) is customizable. Three files in the ock_custom directory (/var/lib/opsi/depot/opsi-client-kiosk/files/app/ock_custom/skin) are key:
-
header.png -
logo.png -
opsiclientkiosk.ini
The header.png contains the image which is loaded to the left of the logo in this area, logo.png the logo.
The opsiclientkiosk.ini defines the text and its display, which will be shown in this area (Since opsi-client-kiosk version 4.1.1.7-2).
Example:
[TitleLabel]
Text= Softwarebasket
FontName = Arial
FontSize = 20
FontColor = $00ffffff
FontBold = true
FontItalic = false
FontUnderline = false
The applied desktop/startmenu icon can be changed by placing a kiosk.ico file (Windows) or kiosk.png file (Linux) in the ock_custom/skin directory (starting with opsi-client-kiosk version 4.1.1.7-2).