Windows Imaging Format (opsi-wim-capture)
Re-installing a computer can be very time-consuming, especially if that involves many hotfixes or other applications. However, with opsi-wim-capture you can record the installation settings, including all software, hotfixes, and configurations from an existing computer and save them in a WIM (Windows Imaging Format). You can then use this WIM as a basis for future installations on other machines which makes the whole process a lot easier and faster.
Prerequisites
| This module is currently a paid extension. This means that you need an activation file to unlock it. You will receive this file after you have purchased the extension. For evaluation purposes, we’re happy to provide you with a temporary license free of charge. Please contact us via email. |
General Requirements
To install the extension, you need opsi 4.0.6 or newer. Additionally, the following packages should be installed:
| opsi-package | version |
|---|---|
|
>= 20160111 |
|
>= 4.0.6.3-8 |
Windows Netboot >=7 |
>= 4.0.6.1-3 |
|
|
|
To use opsi-wim-capture, the share opsi_depot_rw must have read/write permission for pcpatch. Please check your Samba configuration.
|
-
As of
opsi-wim-capture4.1.x, the extension supports UEFI. -
As of
opsi-wim-capture4.1.x, the extension supportsinstall.esd(instead ofinstall.wim) as target format.
Quick Info
For those in a hurry, here is a quick guide. You will find more detailed information below.
Preparations
-
Set PXE boot/LAN boot as the first boot option in the BIOS.
-
Make sure that the machine is set up with the following property specifications in the Netboot product:
'boot_partition_size=0' 'preserve_winpe_partion = true' 'windows_partition_label = WINDOWS' 'windows_partition_size=100%' 'setup_after_install=win10-sysprep-app-update-blocker' -
Complete the Target Product:
As a target product you usually use one of the provided capture products, e.g.win10-x64-capture.You can create the WinPE (Windows Preinstallation Environment) directory and the driver directory, which are normally part of the capture product, as symbolic links from the standard product.
Copy the directory with the installation files and adjust the file
install.wimin it.If necessary, copy or link files like
unattend.xmlfrom thecustomdirectory. -
The default for the
opsi-clonezillaproperty isimageshare = auto(deprecated://<servername>/opsi_images).opsi-wim-captureautomatically sets the values forimagefileandruncommand. -
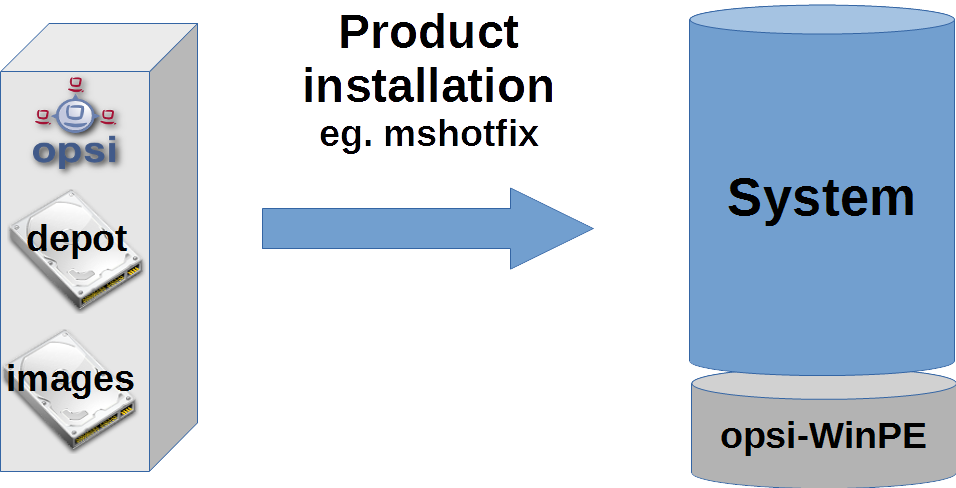
Install all available Windows updates or use
config-win10in combination withmshotfixto upgrade. -
All software which is to be integrated into the image must be installed on the computer.
Introduction
With NT6 (i.e. from Vista), Microsoft has introduced a new Image Format/ Container for OS Installation. Its called Windows Imaging Format (WIM). A WIM Image is not exactly an image of a disk or partition, but rather an archive of files and Metadata. A WIM file can contain several images. The default installation of an NT6 operating system works like this: setup.exe unzips an image from an install.wim file, configures it, and adds some additional drivers.
This way, an installation is quicker than with NT5. But then installation of Hotfixes with NT6 takes significantly longer, so that the basic install of Windows 7 will take 30 minutes, but adding all required Hotfixes may take several hours.
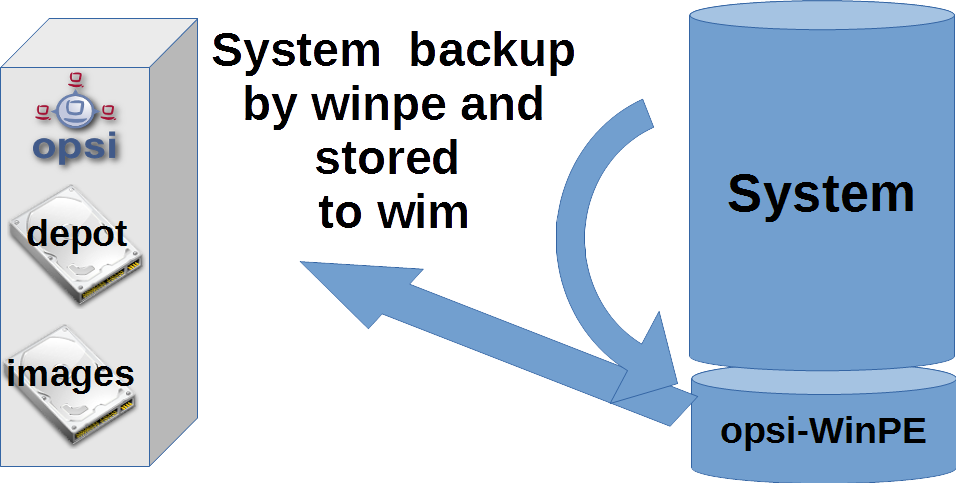
With this opsi extension, it is possible to read an installed Windows OS, including installed software, Hotfixes and configurations, and save it as a WIM image. This WIM file can then be used as a source for a fresh Windows Installation.
Our product opsi-wim-capture is made exactly for this purpose. Roughly, we boot off a PE partition, so that the PE can read the system partition and save it into a WIM file.
Overview of the Sequence
Capturing an installed Windows image works like this:
Preparation:
-
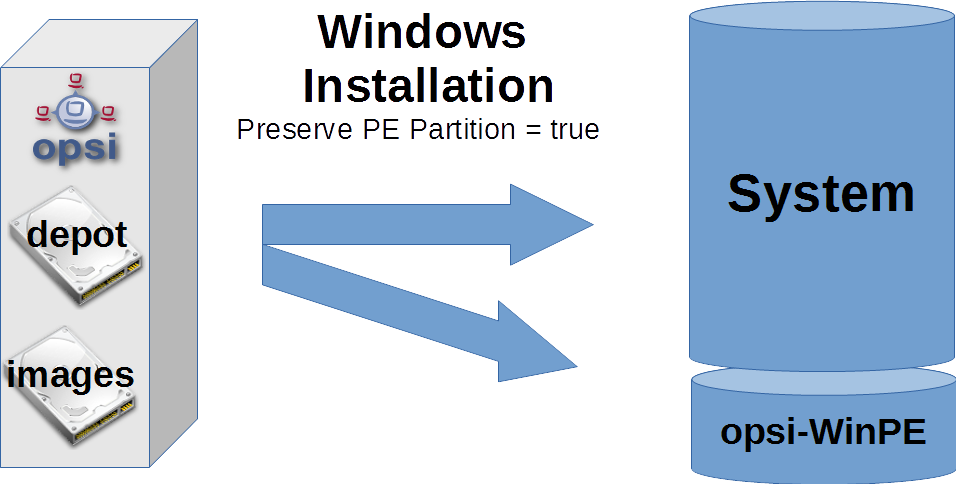
opsi - installation of a Windows OS with set property:
'preserve_winpe_partition=true'
'boot_partition_size=0'
'windows_partition_size=100%'
'setup_after_install=win10-sysprep-app-update-blocker
run the product opsi-wim-capture.
All the following steps will be controlled by the product opsi-wim-capture:
-
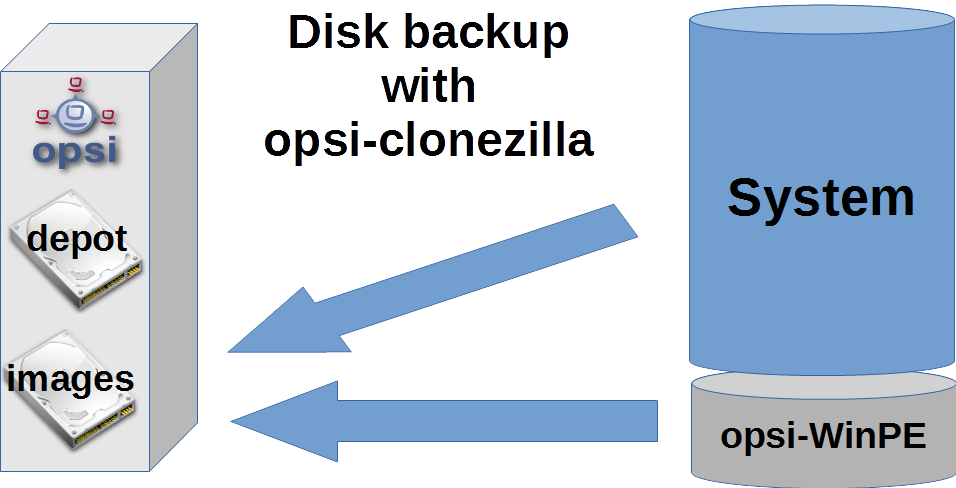
via opsi-clonezilla, makes a backup of the disk (OS and winpe partition)
-
backup of the opsi metadata
-
make winpe partition bootable, create winpe script (work.cmd)
-
sysprep of the installed systems (depersonalization)
-
boot winpe, capture of OS disk, write to destination product
-
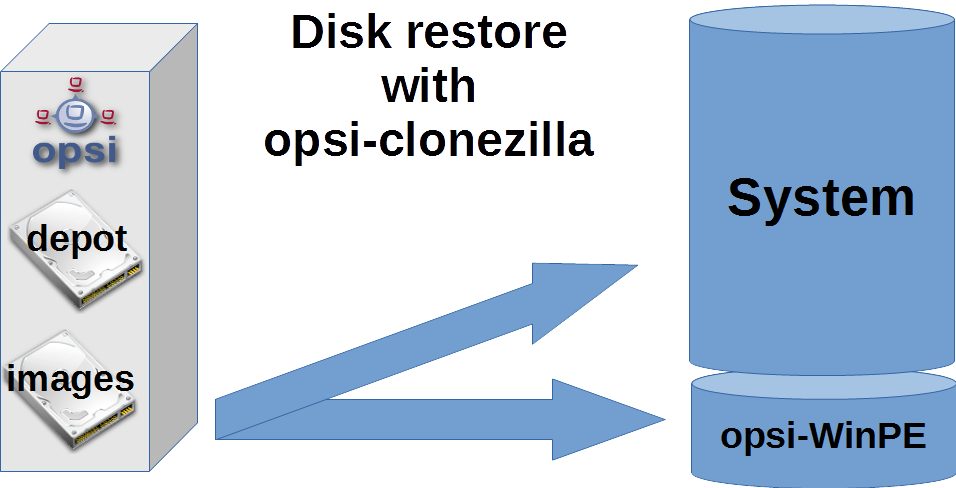
restore of the original disk (OS and winpe partition) via opsi-clonezilla
Sequence Details
Preparation
Installation of a Windows OS must have the property set to 'true' like this 'preserve_winpe_partition=true', because the winpe partition will be needed later.
After the Windows OS installation you can install additional Software and Hotfixes, configure the system manually or via opsi.
opsi-wim-capture
The whole sequence will need time, at least an hour. It will work unattended, though.
In case the property disabled is set to 'true' (default=false), the process will be canceled immediately. This switch is for development only.
The setting of the property 'always_backup_before_sysprep' will be checked. If yes, it’ll make a backup of the system via opsi-clonezilla.
|
In opsi-clonezilla, the runcommand is In order to avoid a never ending loop, we write a reboot flag, so that after writing the backup, we can see that this step has already been done. Technical note: We do not want to reboot again after restoring the backup, though (but the reboot flag is contained in the backup). Thats why the reboot flag is being set as a time stamp. In case the time stamp is older than 0.1 days (i.e. 2.4 hrs), it will be ignored. |
The system will reboot now, leaving the product 'opsi-wim-capture' set to 'setup'. opsi-clonezilla will start up and do the backup.
|
Why backup via opsi-clonezilla ? The sysprep action to follow will leave the OS partition unusable. An OS, that is set up from a captured WIM Image, will contain information about the sysprep run. Thus, it cannot be used for further capturing via opsi-wim-capture. Only perform repeat capturing using a previously restored opsi-clonezilla image. |
The product opsi-clonezilla is now being configured in a way that it will perform a restore on next run.
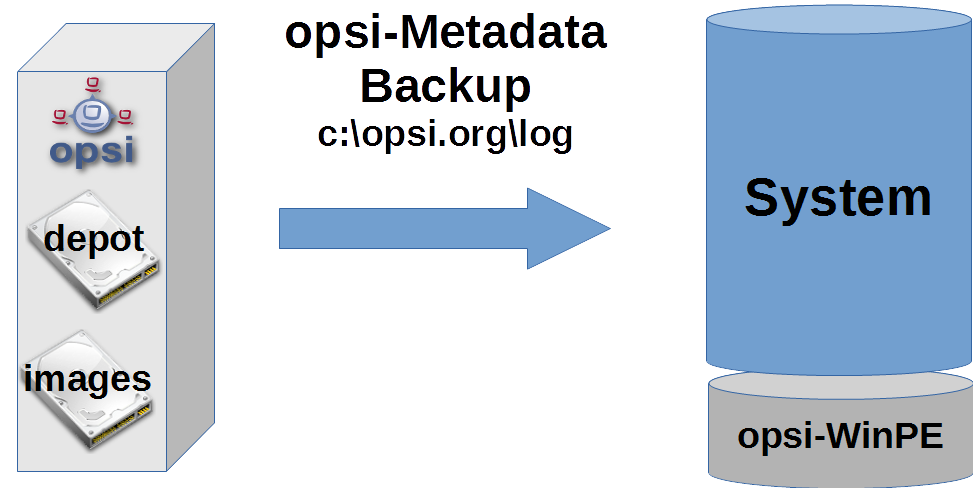
Now information about the installed opsi-products (and versions) will be stored on the client.
|
The productOnClient objects of all Localboot Products are being written to |
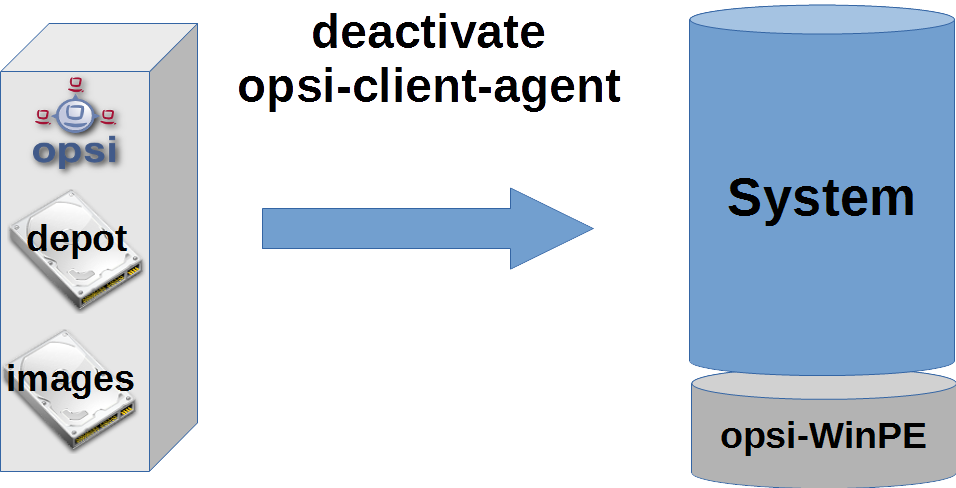
The machine’s opsi-client-agent is now being deactivated, so that it cannot run after deployment based on this image.
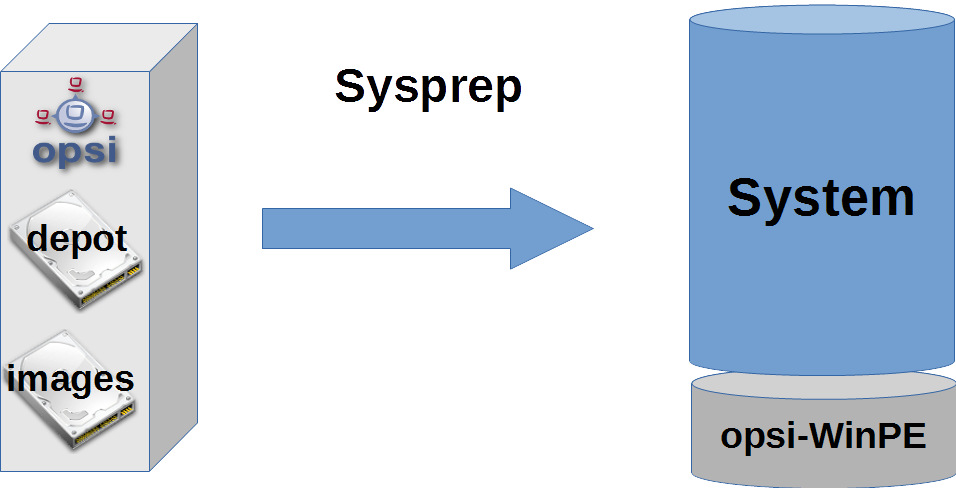
In order to be able to deploy the captured image like a default Windows Setup to any machine, it needs to be depersonalized. This will be done via sysprep.
| This does not mean 'all' of the software will be depersonalized. It’s , that installed software 'holds data' regarding on which computer it was originally installed. A config of that kind will be likely to cause problems, specially if you deploy the image to different machines. It might be a good idea not to capture all the software on the computer. |
If the property startcapture is set to 'false' (default=true), will stop working after the sysprep, and shut down the machine. This makes sense only if you plan to take an image of the machine using a different tool.
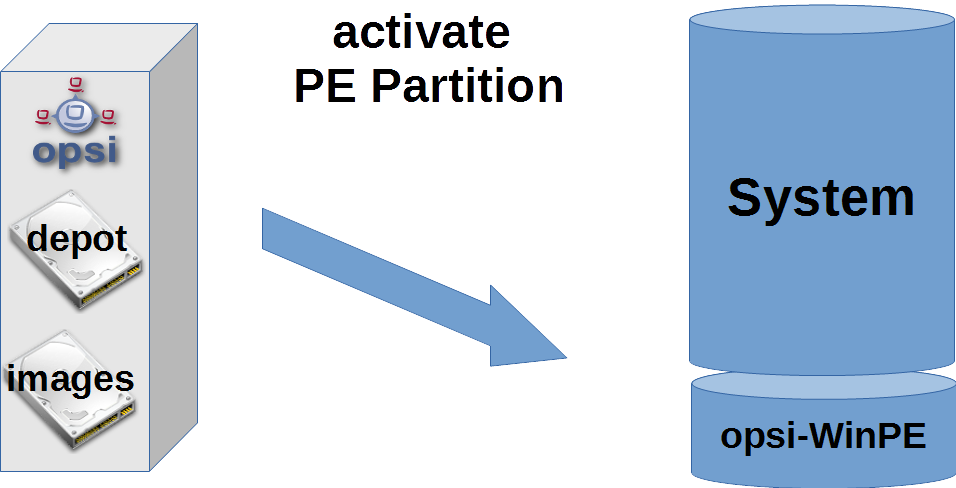
In order to read the OS partition and writing it into the WIM file, we have to use a Windows OS, which cannot be the Windows OS we want to read (for obvious reasons). Therefore, we use the Windows PE we created and preserved at the initial installation. And afterwards:
-
Activation of the WinPE as bootable partition, creation of the required boot record, (if necessary) deactivation of drive letters of other partitions
-
Reading opsi metadata concerning installed products on the client, saving the data to a temporary folder on the client
-
some cleaning on the system we want to capture
-
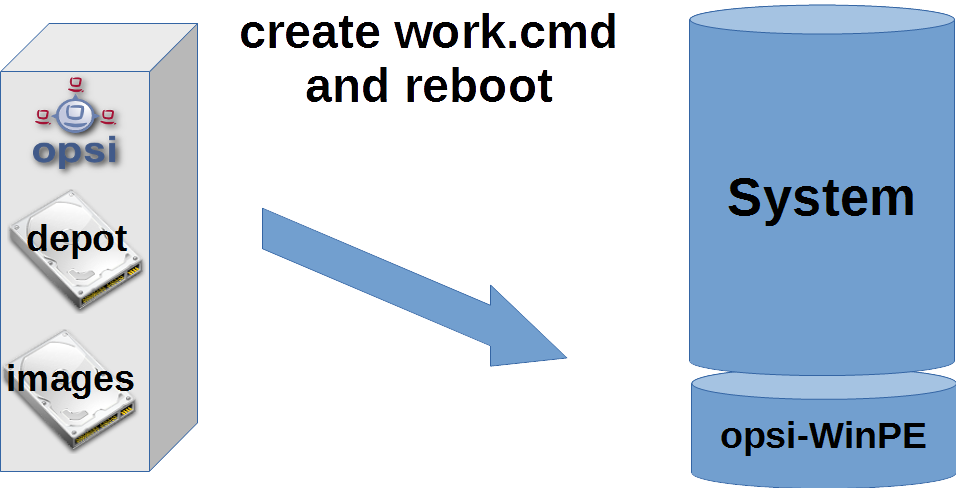
Writing a command file, which will initiate the capturing at next WinPE boot.
-
Provisioning of further data for the WinPE run, like list of products from the property
start_after_capture -
Reboot the client
Now the WinPE starts and will do the actual capturing. Here are the details:
-
Mounting the 'opsi_depot_rw' share, so that we can write to it.
-
Checking the architecture of the WinPE (32/64 Bit); start of the corresponding opsi-script interpreter.
-
Establishing a connection to the opsi-webservice
-
Re-activation of the drive letters
-
If the property
check_disk_before_capturecontains the value 'true' (default=false), we performchkdskon the Windows OS partition. That will take time. -
Checking for existence of the target product stated in the property
target_producton our 'opsi_depot_rw' share, and whether it contains aninstall.wimfile in the right place. -
Checking and creating a lock file within the
target_productfolder. If this file exists already, we cancel the process in order to prevent several capturing processes writing to the same WIM file. -
If the property
force_imagexis set to 'true' (default=true), then we use theimagexcommand of our product 'opsi-wim-capture' for capturing, even if the Windows PE has adismcommand. Otherwisedismwill be used, if available.Dismis faster, but might produce images that cannot be used for successful deployment. -
If the property
capture_modeis set toappend: Check, if there is an image of that name contained in theinstall.wim, and delete it.
The valuealways_createwill only be accepted, ifdismis being used. In this case, a newinstall.wimfile will be created. -
Start of the capture process. The previously mentioned tool (
imagexvsdism) and thecapture_modechosen will be used. The name of the image is set by the propertyimagename. The propertyimage_descriptionwill determine the description of the image.
This can take a long time to be completed.Keep in mind the name of the Image! The name of the image created can’t be automatically added to the list of installable images at the current time. You have to keep the name in mind and state the image name when deploying! -
Deleting of the lock file in the
target_productfolder. -
Merging the resulting log files.
-
Request action 'setup' for products contained in the property
setup_after_capture.
At this time, also product dependencies will be resolved.
The property is a list and can contain several product IDs.
|
leave settings so that opsi-clonezilla will be set to setup! The machine will be depersonalized after the capture run, and thus remain unusable. Our product opsi-clonezilla is prepared, so that the backup taken earlier will be restored automatically. |
-
Deactivation of the WinPE partition, and re-activation of the OS partition (Windows).
-
Transfer of the logfile to the server. It will be appended to the existing logfile of the opsi-wim-capture run.
-
Reboot
If the product opsi-clonezilla has been set to 'setup', a restore of the disk is being performed automatically.
Products
Main Product opsi-wim-capture
The product opsi-wim-capture contains the following product properties:
-
always_backup_before_sysprep:
(true/false), Default=true,
Always make an opsi-clonezilla backup before sysprep. -
startcapture:
(true/false), Default=true,
Sets the productopsi-local-image-captureto 'setup', and reboots the machine -
disabled:
(true/false), Default=false,
If set to true, nothing will happen. Its only there for debugging. -
target_product:
Name of the target product: (Default = '')
This property is not 'intelligent', i.e. we do not check, if the image being copied matches the target product. You could easily write a win7-32Bit Image into a Win81-64Bit product without errors. But you shoud not do that! Furthermore, we recommend separated products for capturing, that are only target products in the capture process. (for instance win10-x64-captured).
|
The target product has to be prepared for deployment like any other Windows OS product. The target file within the target product will be the install.wim file (installfiles/sources/install.wim), which also contains the images provided by Microsoft. Our new OS image will either be created as a new install.wim , or be appended to the existing file. This is being controlled by the property :
-
capture_mode:
(append/always_create) Default='append':
append will append the newly created image to the existing install.wim .
If the install.wim contains an image that’s named like the new one, it will be deleted without warning. always_create will always create a new install.wim .always_create will not work with a WinPE based on Windows < 8 .
|
An Install.wim file is a container, that can contain several images. All of them have a name and a description, which can be controlled by the following properties:
-
imagename:
Default = '' -
image_description:
Default = '' -
The property
start_after_capture
this is a list of products that will be set to 'setup' after completion of the capture process. Could be good to use for instance opsi-clonezilla, which will restore the backup taken before sysprep. -
force_imagex:
true/false (default=true) This will use theimagextool, even ifdismis available. -
opsi_depot_rw_host:
Normallyauto(default) or leave empty.
If notautoor empty: the host from which we mount the opsi_depot_rw share.
If the host is given, it must be a hostname, a FQDN or a IP Number
This property is only for situations where theopsi_depot_rwshare is not reachable at the opsi depot where the client is assigned to. -
checkdisk_before_capture:
Should we make a file system check on the system partition before we capture.
Default = false. -
verify_clonezilla_images:
Should Clonezilla check the imagesafter_save,before_restore,never,always
A verify check takes nearly the same time as the save or restore process.
Default =never
Target Products
The target products shall host the captured images.
Why target products ?
The target products do not differ from default opsi Windows netboot products. Technically, a standard win10-x64 they can be used as a target product.
We recommend the usage of dedicated target products, so that it is easy to differentiate a modified installation (opsi-wim-capture) from an unmodified installation (original Microsoft DVD).
Furthermore, it might be wise to keep a fall back product you can switch to in case the captured install.wim becomes unusable for some reason.
This decision is for you to make.
We provide the following target products:
-
win7-x64-captured -
win81-x64-captured -
win10-x64-captured
These products have to be equipped with required files from the OS DVDs like any other Windows netboot product (see our opsi-getting-started document).
Still, folders like winpe or drivers/drivers/additional/byAudit can be symbolic links to a directory in a suitable non-target product. Watch out: the Subfolder installfiles needs to be physically there (copy from Windows DVD).
Windows Installation via Target Product
(Deployment from a captured Image)
Restore of the opsi metadata from installed Products
The Problem:
If you reinstall a Windows with opsi, e.g. win10-x64, then during the installation of the opsi-client-agent all the local Boot products, which in this computer were previously marked as` installed`, will automatically be set to setup and thus reinstalled later.
This can not be completely carried out exactly in the rolling of a 'captured' Image.
In the image is the backup from the opsi data that was stored during the capture process. This will be discovered when you install the opsi-client-agent and re-imported into the depot server. With it the products that were installed in the 'captured' Image, now are on the newly installed computer mark as installed.
Should now all the products that are mark as installed set to` setup`, this would imply that all products installed already in the image will be re-installed. This is not desirable.
By the restoring from the opsi metadata of installed products there are two alternatives available now with opsi 4.0.7:
-
Alternative 1:
Restoring the metadata and retention of 'setup' -Action Requests.
Products that are mark as 'installed' will not be set to 'setup'.
This is the default, and the behavior before opsi 4.0.7 -
Alternative 2:
Restoring the metadata. Products that are mark as 'installed' will be set to 'setup' except those which were contained in the restore metadata.
Alternative 1
By the deploy from a 'captured' image, after the install, only the products which were already from the beginning of the OS-install set to 'setup' will be automatically installed. These can be done through your intervention, or through the property 'setup_after_install'.
Therefore only the products which stood at setup before installing the operating system will be installed in this case.
This is the default, and the behavior before opsi 4.0.7
Alternative 2
Variant 2 behaves similar to what would be the case of an installation without a captured Image:
* Restore of the metadata.
* Products that are mark as 'installed' are then set to 'setup' except those which were contained in the restore metadata.
This behavior is only available since opsi 4.0.7 and is not the default. Option 2 is made possible by enhancements to the opsi script and is part of the opsi-client-agent of 4.0.7.
In order to be able to apply this behavior a 'config' must be set on ('Host parameters') :
The Boolean configuration entry: clientconfig.capture.switch_installed_products_to_setup. If the entry for this client has the value 'true' then variant 2 is applied, otherwise variant 1
'Hostparameter' can have specific client events activated or deactivated. The 'Hostparameter' can be applied using the 'opsi-configed' or the 'opsi-admin'.
To create the 'Hostparameter' over the 'opsi-admin' the following commands are to be executed on the’opsi-configserver':
opsi-admin -d method config_createBool clientconfig.capture.switch_installed_products_to_setup "capture.switch_installed_products_to_setup" trueWith that you set for all computers 'Alternative 2'.
To create the 'Hostparameter' over the 'opsi-server' select there 'Server Configuration' / 'ClientConfig' / And on the right side with the right mouse button: Add Boolean configuration entry.