License Management
License management or software license management ensures the legal handling of proprietary software in companies and organizations. Ideally, license management supports different license models and helps those responsible to maintain an overview of the software used in the company and the existing licenses. Using a good license management system, you can avoid penalties and unnecessary licensing costs.
Prerequisites
| This module is currently a paid extension. This means that you need an activation file to unlock it. You will receive this file after you have purchased the extension. For evaluation purposes, we’re happy to provide you with a temporary license free of charge. Please contact us via email. |
More details can be found in opsi Extensions.
Overview
The license management module simplifies the time-consuming and complex administration of licenses of non-free software installed on clients managed with opsi.
Main Features
The main features of this opsi extension are:
-
The configuration of the license management takes place in the same interface as the software distribution and operating system installation (see chapter opsi Management GUI:
opsi-configed). -
You can easily generate reports about the installed licenseable software, even for software not distributed via opsi. The latter uses the information from the software inventory as a basis.
-
You can reconcile installations and existing license agreements.
-
Optionally you can automatically provision, allocate and reserve licenses and license keys.
Software Licensing Models
A licensing model defines who may use a software in which form (see section Configuring the Licensing Model). There are various approaches as to how the software manufacturers handle this:
-
Standard Single License: one installation on one computer (with individual license key).
-
Volume License: maximum number of installations is fixed; as campus license the key is valid for an unlimited number of installations
-
OEM License: license bound to one computer, key is valid only for specific hardware
-
Concurrent User License: any installation of the software, a license server regulates the number of usages
If the opsi server controls the allocation of licenses, it is ensured that the license and if necessary the key are released again when the software is uninstalled. Furthermore, the allocation of licenses can also be done manually or even script-controlled, e.g. if a license has not been distributed with opsi.
Database Model for License Management
License management is a complex topic. To represent it, opsi has to implement a relatively complex database model to manage the licenses and their keys. For a better overview the following diagram represents the involved tables. The blue line marks the border between tables which are automatically generated by the software audit functions and tables with data that is collected or assigned specifically for license management. Only the license pool table has connections to both spheres. This fact hints at the importance of this construct.
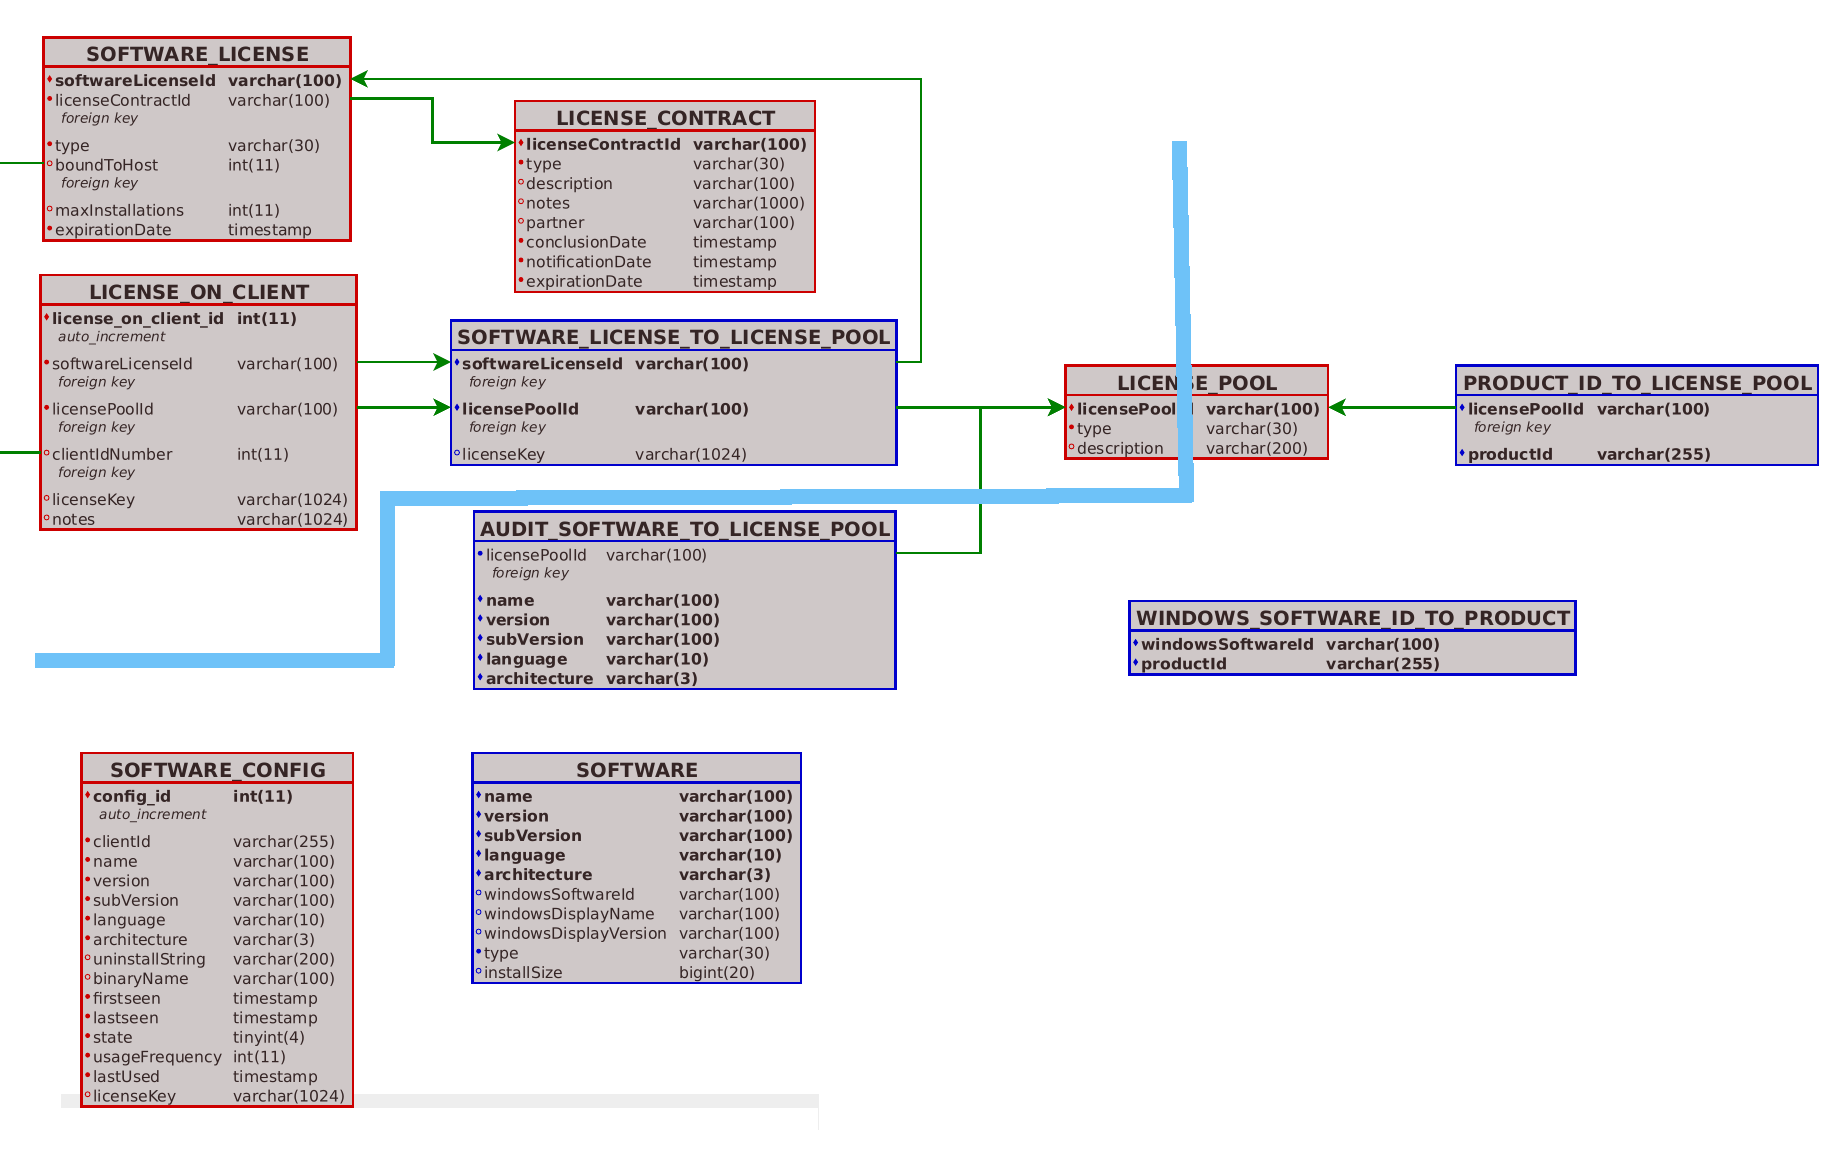
The diagram also shows the meaning of license pools, which the License Pools section explains in detail.
Lizenzmanagement im opsi-configed
The management interface opsi-configed offers a separate window for license management. You can access the dialog via the Licenses button in the main window. The prerequisite is that the extension is installed and activated. To check this, go to the Help / Modules menu in the main window.

opsi-configed: You can reach the license management via the rightmost icon (Licenses).The license management dialog box displays six tabs at the top:
-
License pools
-
New license
-
Edit licenses
-
Licenses usage
-
Reconsiliation
-
Statistics
The following sections explain the individual dialogs and their various features.
License Pools
The tab License pools shows the associations of the license pools with the information of the opsi database about installed software and installation packages.
What’s a License Pool?
For each type of license you want to manage with this extension, you need to set up a separate license pool. This pool describes the summary of rights, which are needed to install a certain kind of software legally. The license pool is the center of all opsi license management activities:
-
On the one hand, it refers to the installed software items and opsi installation packages.
-
On the other hand, it combines legal and technical constructions of the installation permissions.
Managing License Pools
At the very top of the License pools dialog you can see a two-column table listing all available license pools. You can edit the description field and enter your own descriptions there.
Further editing functions can be accessed via the context menu of the right mouse button. Use the entries displayed there to create a new pool, delete an existing one, save or discard the changes, and reload the data.
When creating a new pool, i.e. when creating a new table row, enter a (unique) licensePoolId in the corresponding field, for example pool_for_x.
| Please do not use special characters for the IDs. Upper case letters are automatically converted to lower case! |
Unlike the description, you can edit the pool ID only until you save it for the first time. After that, it cannot be changed because it’s used as the primary key. Deleting an entry is only possible if there is no reference to this key in other tables. Recursive search for such references is currently not supported.
Each editing operation changes the status display of the two buttons OK and Cancel. The green check mark of the OK button turns red and the Cancel button is enabled. Press one of the two buttons or select the corresponding entry from the context menu of the right mouse button to save or cancel your changes.
License Pools and opsi Products
In general, only one license pool belongs to an opsi product which installs a software requiring a license and which is to use the license management. The required licenses are drawn from this pool. It’s possible, though, that several products refer to the same license pool if those are variants of the same software. For example, the products win10-x64 and opsi-local-image-win10-x64 both use the pool p_win10-x64.
The situation is less clear, if an opsi product installs several software products requiring licenses from several license pools. Assuming that a package called Design-Programs includes Adobe Photoshop and Adobe Writer, the opsi product must request licenses from two different pools. Basically, these assignments are based on an n:m scheme.
| To keep things easy, please assign only one software which needs a license to an opsi product. Assign this product to the corresponding license pool. This restriction is mandatory if you use the license management module together with the WAN/VPN Support extension. |
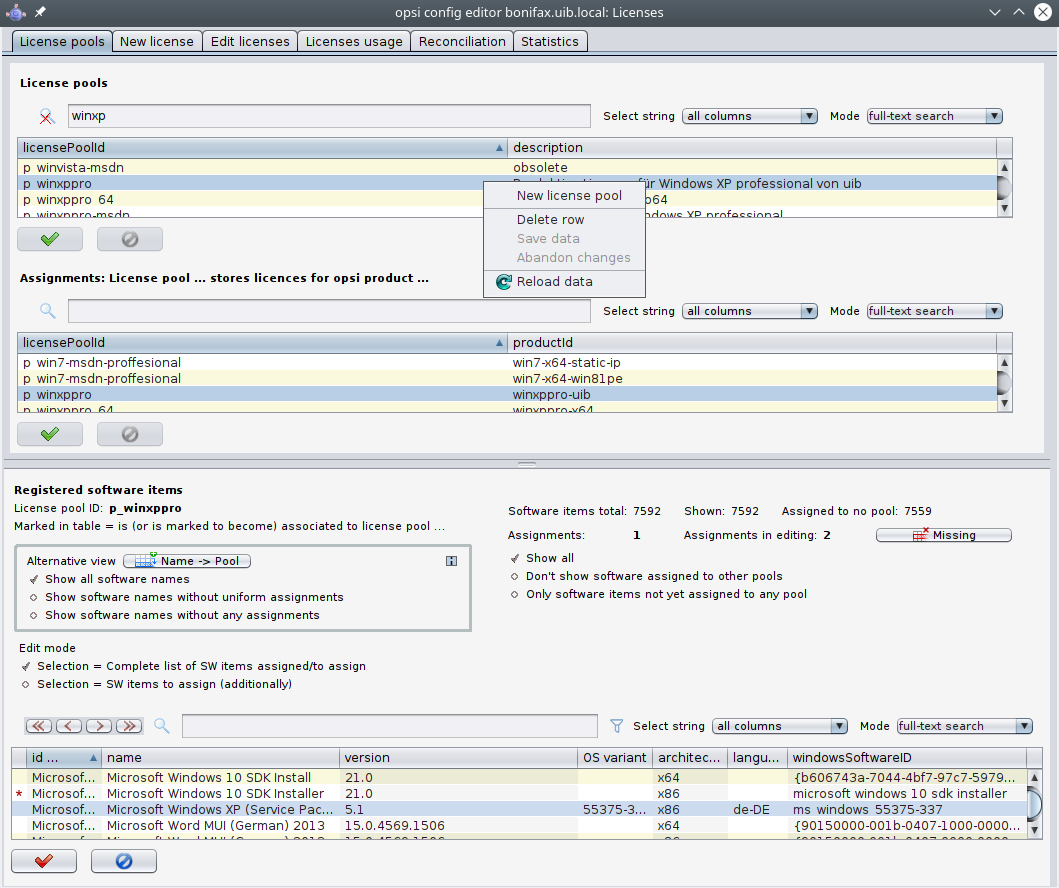
The second table in the License pools tab (see [licensemanagement-licensepools.png]) manages the relationship between the license pools and the product IDs of the opsi products. Click on the licensePoolId or productId column title to sort the table. This way you can show the connections between opsi products and a license pool or all license pools assigned to an opsi product.
![[licensemanagement-licensepools.png]](#licensemanagement-licensepools.png)
You can create a new entry, i.e. a new assignment of a license pool to a product ID, via the context menu of the right mouse button. After clicking into the table field you will see a list of available options.
License Pools and installed Software
The lower half of the License pools tab (see [licensemanagement-licensepools.png]) represents the correlation between license pools and the installed software on the opsi clients, either installed with opsi tools or in another way. In the individual columns you can see a unique ID, which is constructed from combining all attributes and acts as a unique key. This is followed by information about the software, including the name, the version number, the operating system, the architecture etc.
The opsi software audit determines the values (see section Products for Hardware and Software Audit: hwaudit and swaudit); it retrieves information from the registry and reports it back to the opsi server. The table SOFTWARE_CONFIG of the opsi database stores the values for each client. If not already present, they are added to the table SOFTWARE. This forms the basis for the table displayed in the license management.
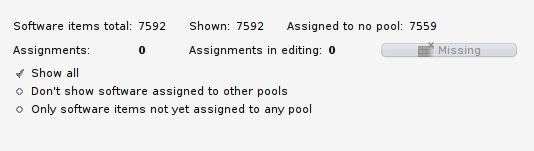
Two different views determine which data you can see in the table at the bottom of the License pools dialog:
-
Only show specific data (Show all, Don’t show software assigned to other pools, Only software items not yet assigned to any pool); this is the default.
-
Description of what the highlighting of rows means (Selection = Complete list of SW items assigned/to assign, Selection = SW items to assign (additionally)).

So here you can see all assignments of software items (from the database table SOFTWARE) to a license pool (table LICENSE_POOL). All entries belonging to the license pool selected in the upper table appear as highlighted rows with a colored background. This allocation is precisely the data from the AUDIT_SOFTWARE_TO_LICENSE_POOL table.
| Change the selection to edit the assignment of software items to the individual license pools. Use [Ctrl]+click or [Shift]+click to select multiple rows in the software table. A single click in a row restarts the selection. |
| If there is still an assignment of a software item to a license pool in the database, but the software no longer exists according to the database, the Missing button is activated. Press the button to open a new dialog window. It lists the referenced but apparently no longer existing software and offers to remove the allocation from the AUDIT_SOFTWARE_TO_LICENSE_POOL table. |
Navigating the Software Table
A change in the rows highlighted in blue means a change in data. Therefore, the functions for navigating in the table behave differently than usual. A red asterisk at the beginning of the line marks the location of the cursor.
In order to reposition the cursor, you have the following options:
-
Search for a value (e.g. by showing the assigned software items when changing the license pool).
-
Use the search field above the table.
-
Use the buttons with the red arrows above the table for navigation.
-
Click the column of the row marked with the asterisk. (Attention: Clicking into the data itself resets the row selection!)
Performing a Compliance Check
By allocating software items to license pools, you have already established the base for a compliance check required by Microsoft. This is how it works: Use the mouse to mark the software items in a pool. To determine the total number of installations assigned to a pool, open the Statistics tab (see section Statistics).
| To get correct results, it is important to carefully maintain the assignments of software items to a license pool. It is imperative that these are complete. Thus, when a new licensable application is added, the software must be assigned to the pool. |
Filtering the Software Table
Use the context menu of the right mouse button to access functions for filtering the assigned software items. You can either display all items or only the selected ones.
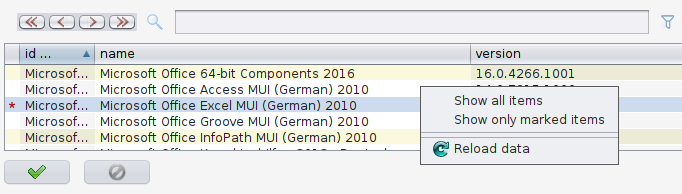
This can be helpful since the rows of assigned software items are not necessarily consecutive in the software table. Select Show only marked items, and the view changes:
Alternatively, use the filter icon next to the search field. When a filter is active, the icon appears crossed out.
| Even when the filter is active, you can edit the assignments, or more precisely: remove assignments. |
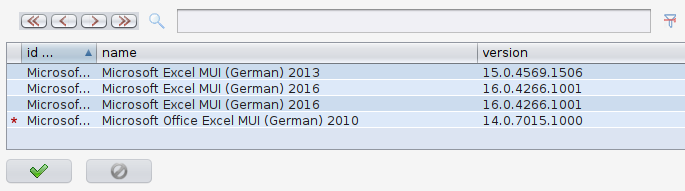
Completing Assignments to Software Names
When the software manufacturer distributes a new version, an update or a patch, the new variant also receives a new Windows software ID and therefore shows up as a new entry in the software table (with a new ID). In most cases, the new software can be treated the same way as far as the license is concerned. If a license agreement was required for the old version, one probably exists for the new one. This means that the need for licensing for both editions must be registered in the same license pool. Coverage is then organized via the common license pool.
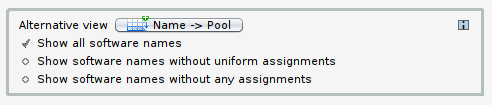
When rolling out new versions, you should therefore remember to add an assignment to the correct license pool. Of course, there is also software which installs updates without your intervention. As a result, the correct allocation may be missing after the update. That is why the management interface opsi-configed (since version 4.1.9.8) offers a separate dialog to simplify the completion of allocations. You can open the window by clicking on the Name → Pool button in the lower half of the License pools tab.
| Usually the data field name is sufficient for identifying the required license pool, so you can ignore differences in other components of the software ID. |
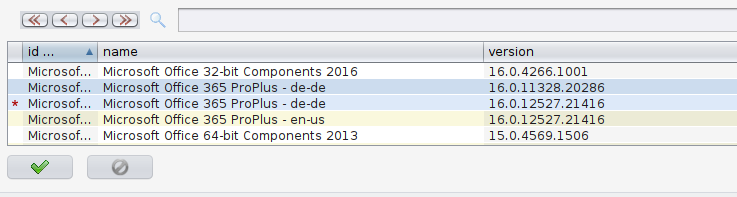
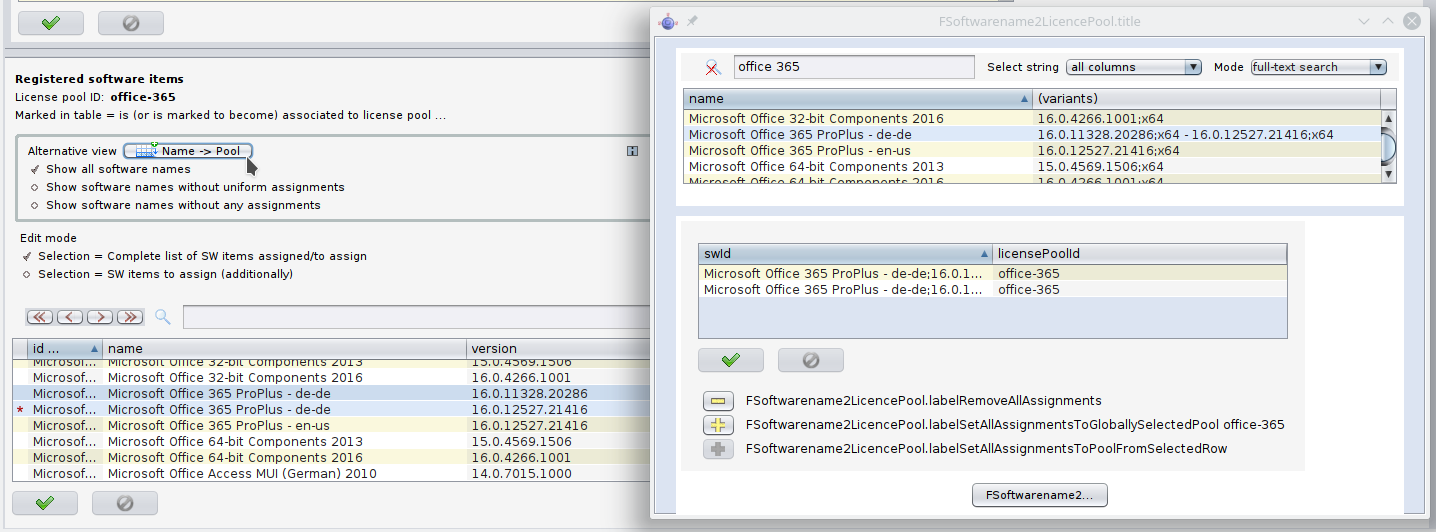
The dialog displays two auxiliary tables. If you have activated the default setting Show all software names before opening that window, the first column of the first table shows the names in alphabetical order. The second column lists all IDs associated with the respective name (although the first part of the ID, i.e. the exact software name, is not repeated for simplicity reasons).
The second table lists the IDs for the name selected in the first table. For each ID, it shows whether there is an allocation to a license pool and what it is called. This allows you to standardize the license pool assignments:
-
remove all assignments
-
assign the pool selected in the main window to all ID variants (probably the standard case)
-
assign everything to the selected pool if the variants are allocated to different pools
| If such unresolved assignments exist, a small i appears in this gray box as an indicator. We have deliberately chosen a subtle design because it may well be correct and necessary that variants of a software are licensed differently. |
The third option (Show software without any assignments) allows you to search for any forgotten license assignments.
Detecting Software Not Yet Assigned
Of course, it is possible to assign all installed applications to a license pool — including free software. If you then install a new software or a new version of an existing one, previously unassigned software items are easily identifiable.
| For such an approach to work in reality, you need pseudo license pools such as Free Software or Operating System Components. You then allocate software items to these pools for which no licensing exists or is required. |
opsi-configed provides additional display options for such scenarios (see also Software Table: configuring the view):
Assuming you have assigned all software to a license pool until now, the individual steps look like this:
-
You install a (new) software on an opsi client.
-
On the client, you start the opsi product
swaudit. -
If the software is new indeed, a new entry appears in the software table. It’s possible that you see several entries there, for example for additionally installed libraries.
-
Select a suitable license pool and activate the option Show software names without uniform assignments. The new table entries are now the only ones highlighted.
-
If the selected license pool is suitable, then add a new entry with [Ctrl]+click.
The steps are different if you want to distribute arbitrary, not yet assigned software items to license pools:
-
Activate the option Show software names without any assignments
-
In the section Edit mode, select Selection = SW items to assign (additionally).
-
Use [Ctrl]+click to select the relevant rows; optionally, you can use the search function or a filter.
-
Now select the license pool to which you want to assign the highlighted software items.
-
Press the now green OK button to save.
-
Finally, set the Edit mode back to Selection = Complete list of SW items assigned/to assign.
| Please note that the functions described here (seem to) behave differently when a filter is active for the table. |
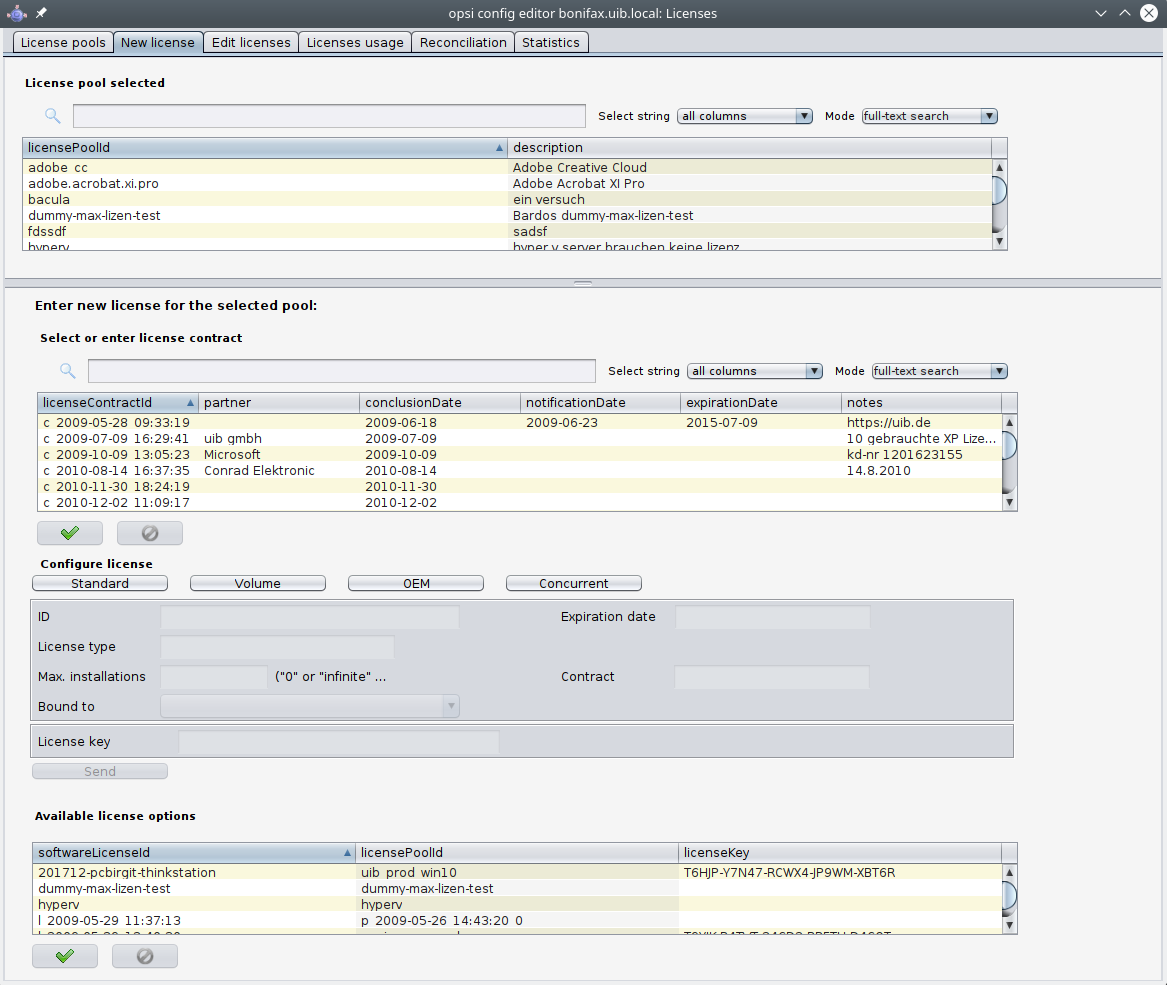
Setting up Licenses (New license)
Change to the New license tab to set up licenses and then make them available via a license pool. The dialog window shows a (non-editable) table with all available license pools in the upper area. Select a pool that the new license is to be assigned to.
The Licensing Concept
First, let’s clarify some important terms:
-
Licensing
-
License Key
-
Software License
-
Licensing Model
-
License Contract
-
Licensing Option
-
License Usage
Licensing means the actual deployment of a permission to use software by installing the software on a client. Sometimes, but not always, this includes using a special license key.
The software license is the permission to install and use a software as defined by the license contract. In the opsi database the software license corresponds to the licensing right and is identified by a softwareLicenseId. The licensing model describes the licensing right in more detail and determines, for example, for how many computers and how long a license is valid. The license contract states and documents the licensing right in the legal sense.
A licensing option describes the possibility to apply a licensing right for a specific license pool. opsi defines the licensing option by a combination of softwareLicenseId and licensePoolId. If required, this includes the actual licenseKey.
Finally, the license usage documents the use of a license by assigning the licensing option to a client, it’s the completed and authorized licensing of a software installation. The description is composed of softwareLicenseId, licensePoolId, and hostId (unique name of the opsi client). If required, it also notes the licenseKey.
Registering the License Contract
After you have decided on a license pool for which you want to create a licensing option, you select the license contract. In the table Select or enter license contract you can choose an existing contract or create a new contract record.
The first column shows the licenseContractId, which is used to identify the license contract in the database. This is followed by information about the contract partner (partner), the conclusion date (conclusionDate), the notification date (notificationDate) and the expiration date (expirationDate). The last field (notes) can hold some additional information. For example, here you can write down the location of the documents belonging to the contract or a file number.
Use the context menu of the right mouse button to create a new record. A new unique ID (based on the current date and time stamp) is automatically created. You can use the default setting if purchasing the software implies the license contract or if the contract is documented and traceable in some other way. Otherwise, the data can and should be edited to ensure orderly tracking of the underlying contract, for example, by entering a file number in the notes field.
| You can only change the contract ID as long as the data record has not yet been saved. When saving the data, the opsi service checks whether the ID is unique. If it isn’t, a new ID is generated and cannot be changed anymore. |
Configuring the Licensing Model
In the Configure license section of the New license tab, you can register the licensing model. Use one of the four buttons to select the licensing model:
-
Standard: Installation on any computer (with individual license key, which is also used only once).
-
Volume: Maximum number of installations is fixed; one volume license legitimizes n installations (possibly with a single license key); n=0 means that the key is valid for an unlimited number of installation (campus license).
-
OEM: License is bound to a computer, key is only valid for certain hardware (often for PCs with pre-installed operating system).
-
Concurrent: From opsi’s point of view, this is an unlimited volume license which may be used as often as desired; de facto, however, the number of licenses used is controlled differently, e.g. by a license server.
In all four cases, the automatically generated data includes a unique ID (based on the current date and time stamp). You can accept or modify the default value. Depending on the license model you have chosen, you can adjust the other fields or not.
| Please note that the file Expiration date defines the validity of the licensing right. The expirationDate field in table above (Select or enter license contract) shows the same value, but is currently used for documentation purposes only. This may change in the future. |
Hit the Send button to submit the data to the opsi service and to add it to the database. This will create records for a software license based on the selected contract and licensing option. You can see these at the very bottom of the tab in the Available license options section. After saving your changes, the table will be reloaded and the newly generated option will be automatically highlighted.
| If necessary, you can correct the entered license key via this table. |
Edit Licenses
In 90% of the cases, the features on the two tabs License pools and New license should be sufficient to enter and edit licensing options, but you might encounter situations where you need to tweak some data. The third tab Edit license contains three tables which allow you to view internals of the licensing options and adjust them if necessary.
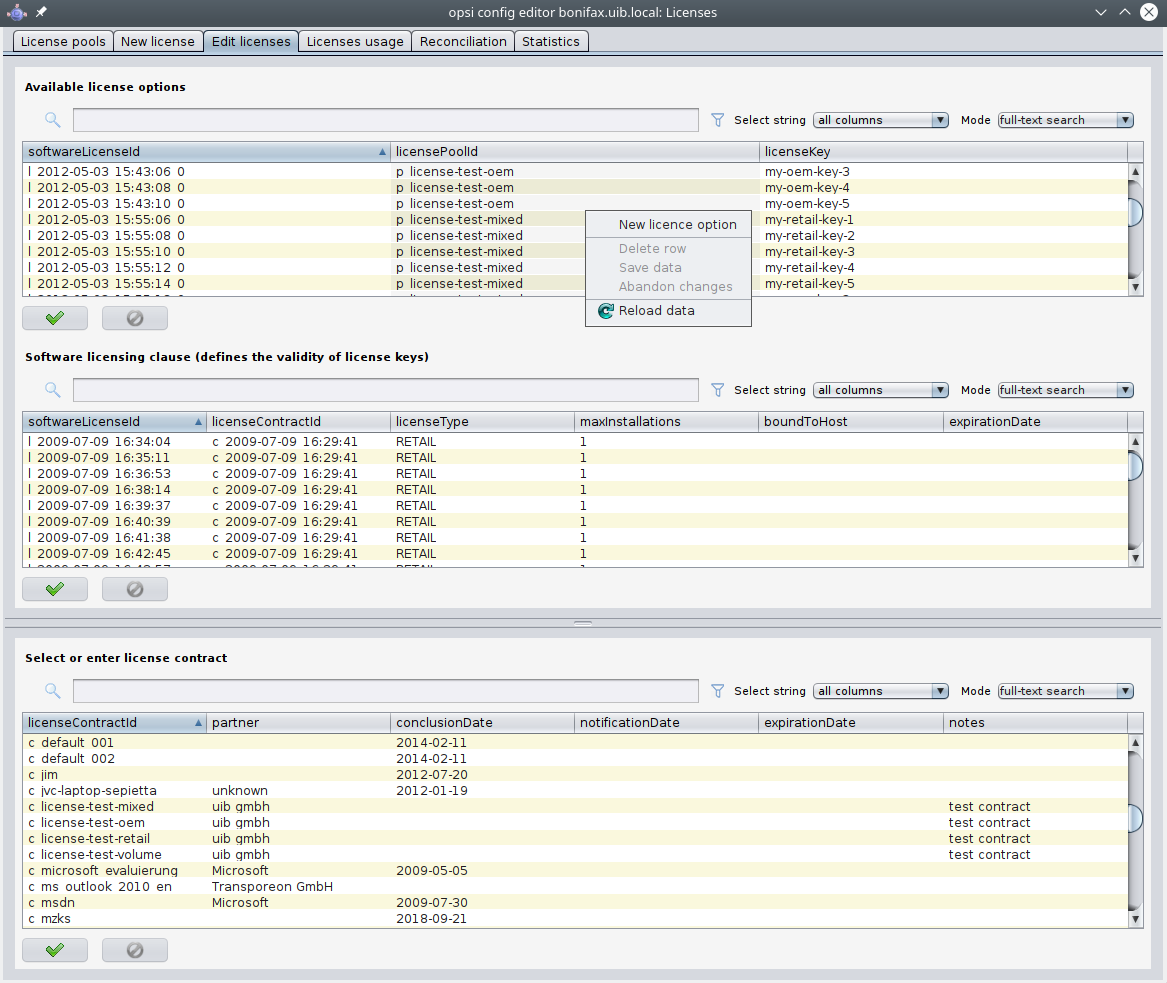
Example: Configuring a Downgrade Option
The following example shows how to configure a license with downgrade option. In other words, instead of the purchased software, the preceding version may also be installed. Thus, an existing license key may be used for an additional installation for which it was not originally legitimized.
The opsi model maps this construction as follows: on the tab New license you register the license. As a result, you receive a new licensing option (displayed in the lower table), which is based on a likewise newly created licensing right (softwareLicenseId). You need this value for the following steps. Either you copy the value to the clipboard or you look for it in the second table on the tab Edit licenses.
| Via the context menu of the right mouse button and the entry Transfer Licensing ID to license option row you can copy the ID. |
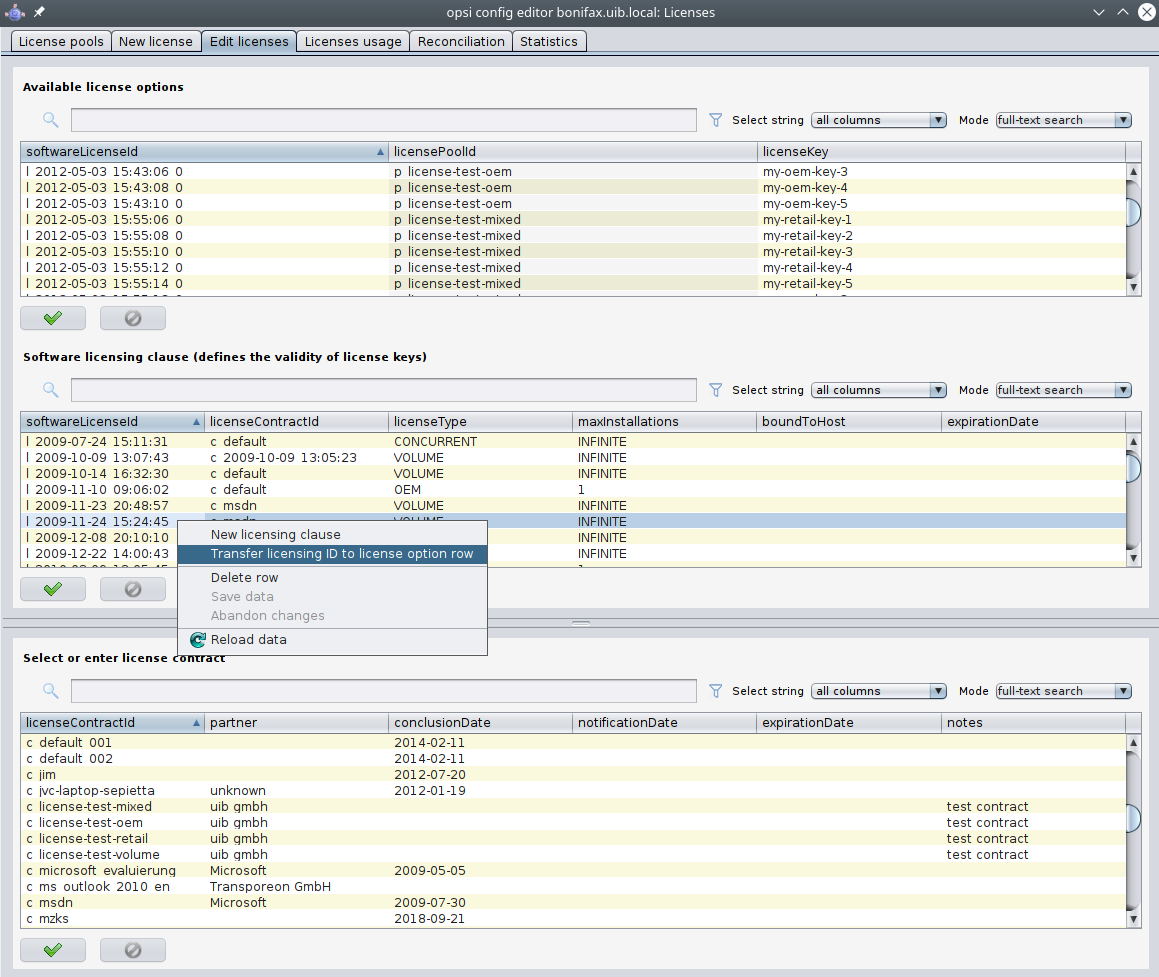
Next, connect the existing licensing right to another license pool:
-
Create a new record in the first table (Available license options) of the Edit licenses tab.
-
Enter the ID of the licensing right (softwareLicenseId) and the ID of the additional license pool.
-
Save the changes; now you have registered two licensing options based on the same software license.
The opsi service counts each application of one of the two options against the maximum number of installations granted by the licensing right. Therefore, in case of such a downgrade option for single PC licenses with maxInstallations = 1, the opsi service always returns the key for only one license.
|
Licenses usage
On the tab Licenses usage you can view the licenses registered via the opsi service.
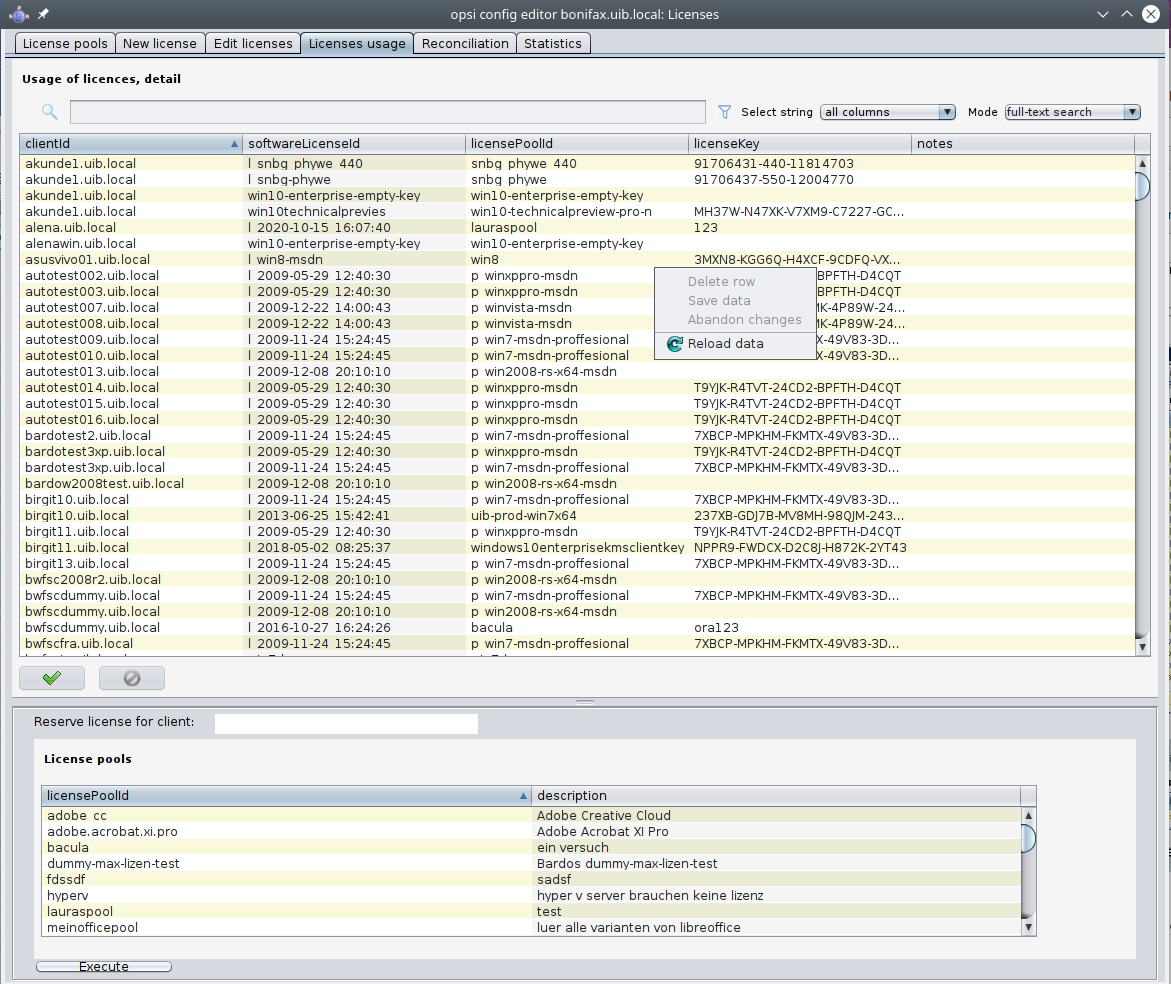
Additionally, you can manage the use of the licenses manually on this tab. For example, this makes sense if a software is to be installed only manually on just a few clients and is not part of the opsi deployment:
-
Mark a table row and select Delete row from the context menu of the right mouse button to release a licensing option.
-
If you edit the licenseKey field in the upper table, you can (re)determine the key used for licensing.
-
The Reserve license for client section at the bottom of the dialog is used to request and allocate a licensing option.
When reinstalling a PC, previously assigned licensing options will remain unless you have explicitly deleted them. Release such an option either in this tab or with opsi-script (see section Requesting and Releasing Licenses).
|
Reconciliation
The table Reconsiliation to software audit shows for each client (hostID) and license pool (licensePoolId) whether the opsi license management is responsible or not (column used_by_opsi). The last column (SWinventory_used) reveals if a (Windows) software is installed on a client according to the software inventory (swaudit) and if it requires a license from the pool.
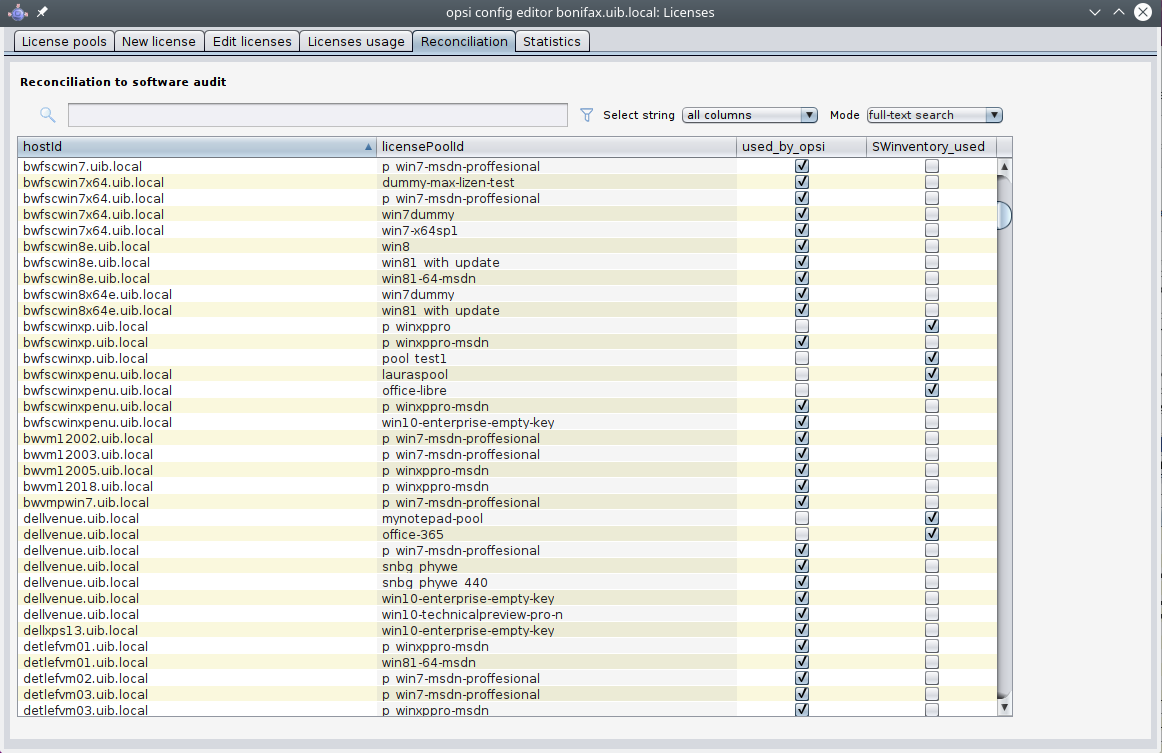
To evaluate the results of swaudit, the corresponding software IDs (client registry) must be assigned to the correct license pools (tab License pools).
| The license management extension counts a maximum of 1 occurrence per client and license pool when matching with the software inventory. For example, if a license pool office2010 is associated with 10 different patterns from the software inventory, all of which indicate that an MS Office 2010 is installed, this will only be counted as one installation—even if all 10 patterns are found on one client. |
To display additional information about the clients in the table, edit the server’s host parameters page in opsi-configed and extend configed.license_inventory_extradisplayfields accordingly.
You can copy & paste the data into a spreadsheet or print it via the context menu of the right mouse button. This requires the opsi-configed to have the appropriate permissions. It cannot run as an applet sandbox in the browser, but must run as a standalone application.
|
Statistics
The last tab gives you an overview of the general status of the licensing. Among other things, you can see the used and still free licensing options of the different license pools.
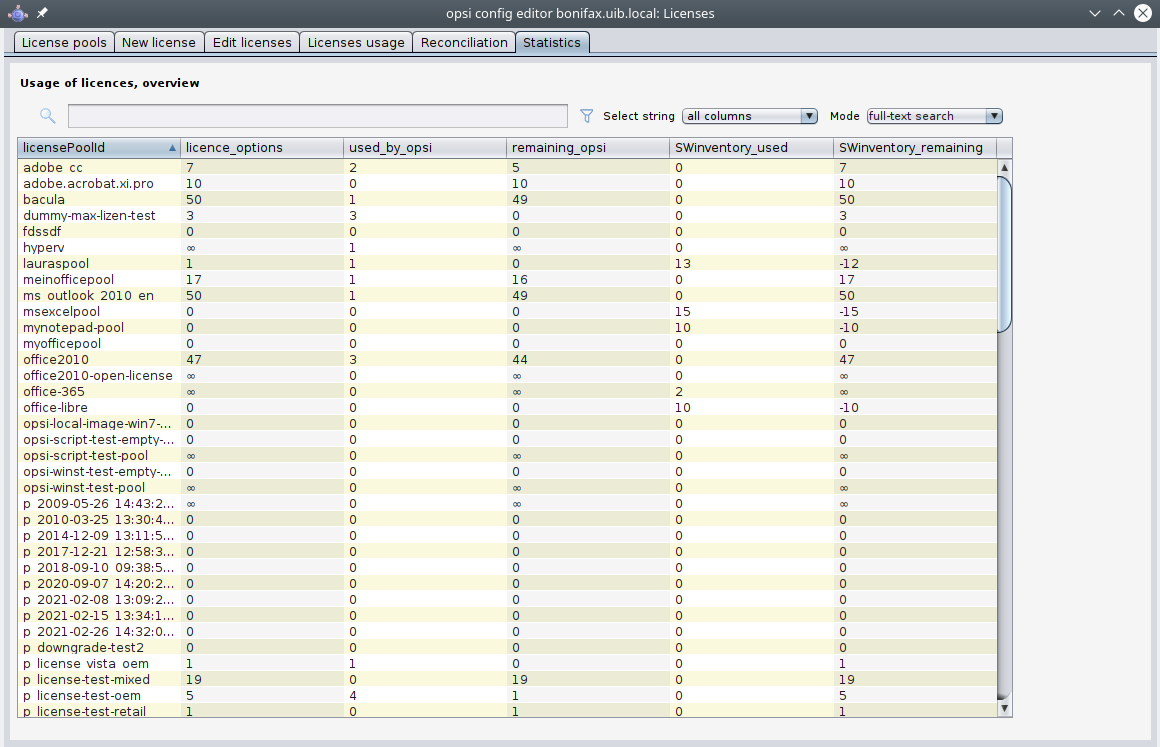
In addition to the registered licenses (used_by_opsi) and the remaining free licenses (remaining_opsi), you can see the total number of actual installations which need a license (SWinventory_used). The data of the column SWinventory_used is based on the clients' registry scans by the opsi product swaudit. The allocations of the determined software IDs to the respective license pools can be managed on the tab License pools (see section License Pools).
You can copy & paste the data into a spreadsheet or print it via the context menu of the right mouse button. This requires the opsi-configed to have the appropriate permissions. It cannot run as an applet sandbox in the browser, but must run as a standalone application.
|
Example: Configuring a Downgrade Option
If you have configured a downgrade option (see section Example: Configuring a Downgrade Option), the Usage of licenses, overview table represents that as well. A downgrade license grants one licensing option each for (at least) two license pools. Only one of the two can actually be used. Therefore, as soon as a licensing option is used, the value in the remaining_opsi column in both rows decreases by 1. So apparently the number of available licenses decreases by 2—this is completely correct, however, and reflects the actual authorization situation.
Allocation and Release by Script
Whenever you install a software on a computer and assign a licensing option to a client, this leads to a license usage. In an opsi environment these installations are script-based and automatic. The script sends calls to the centrally running opsi service.
This is done with the program opsi-script (formerly opsi-winst under Windows). The script takes care of the automatic software installation and configuration, but you can also use it as a standalone program. More information about the script language and the individual commands can be found in the opsi-script Manual.
|
The next sections introduce the opsi-script commands relevant for license management.
Requesting and Releasing Licenses
There are two functions for license management (see the section (String) Functions for Licence Management [W/L/M]):
-
DemandLicenseKey(poolId [, productId [,windowsSoftwareId]])
Use the functiongetAndAssignSoftwareLicenseKeyto query the opsi service whether there is a reserved license for the computer. For example you can "pull" a licensing option with the setup script of an operating system installation and retrieve the key you need. -
FreeLicense(poolId [, productId [,windowsSoftwareId]]])
Use the functionfreeSoftwareLicenseto release a license and return it to the pool of unused licensing options.
Instead of the license pool ID, you can specify the product ID or a Windows software ID as a parameter.
If you reinstall a software and the script requests a license via DemandLicenseKey, then the previously assigned licensing option will continue to be used, so the function returns the same key as before. If this is not what you want, remove the usage by FreeLicense with the call deleteSoftwareLicenseUsage. Accordingly, the license usage will be preserved during a new installation. You release it with deleteAllSoftwareLicenseUsages (together with the host ID of the respective PC as parameter).
|
The boolean function opsiLicenseManagementEnabled checks whether license management is enabled (see Boolean Expressions]).
|
Service Methods for License Management
You can call service methods for license management with the tool opsi-admin (see On the Command Line: opsi-admin), e.g. to read license keys from a file with a script.
Editing License Contracts with opsi-admin
You call the service methods for example with opsi-admin; parameters marked with \* are optional:
method createLicenseContract(*licenseContractId, *partner, *conclusionDate, *notificationDate, *expirationDate, *notes)The method creates a new license contract record with the ID licenseContractId or edits an existing one. If you don’t specify the ID, it will be generated automatically. The two parameters partner (contract partner) and notes (notes on the contract) are user-defined strings. Specify conclusionDate (date of conclusion of the contract), notificationDate (reminder) and expirationDate in the format YYY-MM-DD, e.g. 2023-02-28.
You can use the string functions getLastServiceErrorClass and getLastServiceErrorMessage to react to an error, e.g. if no free license is available anymore:
if getLastServiceErrorClass = "None"
        comment "kein Fehler aufgetreten"
endif
The error class LicenseMissingError is returned if a license is requested but not available. The error class LicenseConfigurationError is returned if the configuration does not allow a unique assignment of a license pool to a software.