Netboot products
Parameteters for the opsi linux boot image
The opsi-linux-bootimage has some parameters which may be used to change the behaviour of the bootimage. You will try this if the opsi-linux-bootimages doesn’t run properly with the standard parameters on your hardware (e.g. black screen).
You may change these standard parameters by the 'opsi-configed' choosing the Tab 'Hostparameter' and use there the entry 'opsi-linux-bootimage.append'.
Typical values are (may be combined):
-
acpi=off
-
noapic
-
irqpoll
-
reboot=bios
For AMD Ryzen 2XXX Prozessoren we recommend to use the parameters:
-
mem=2G
-
ramdisk_size=2097152
AMD Ryzen 3XXX additionally need the parameter
-
nomodeset
to correctly display the bootimage.
-
dhclienttimeout=SECONDS
sets the value 'timeout' in /etc/opsi/dhclient.conf within the opsi-linu-bootimage (default 30 seconds).
With opsi-linux-bootimage >= 20220331-1 another possible parameter was added
-
macaddress=MACADDRESS
This parameter works around a broken MAC Passthrough by spoofing the specified MAC address onto the found network device of a docking station or USB-to-Ethernet dongle.
Devices that properly get an IP address are not affected by this parameter. In such cases MAC Passthrough works properly or is disabled and therefore MAC address spoofing is not required.
An other important default is the password of the root user within the opsi-linux-bootimage. This password is 'linux123' by default and you should change this for security reasons.
To do this change the 'opsi-linux-bootimage.append' entry at the 'server-configuration'.
The option you have to change is 'pwh' (password hash). As the value to this option you have to give a new password as a hash, which will be loaded to the /etc/shadow during the boot process.
The best way to get the correct password hash is to login via ssh to your bootimage:
ssh root@<client.domain.tld>The old password is 'linux123'.
Now set a new password for root:
passwdGet the new hash
grep root /etc/shadowThe output should look like this:
root:$6$344YXKIT$D4RPZfHMmv8e1/i5nNkOFaRN2oYNobCEjCHnkehiEFA7NdkDW9KF496OHBmyHHq0kD2FBLHZoTdr5YoDlIoWz/:14803:0:99999:7:::Now copy from after the first colon until to the second colon and use this as value for 'pwh'.
So the option for 'opsi-linux-bootimage.append' may be:
pwh=$6$344YXKIT$D4RPZfHMmv8e1/i5nNkOFaRN2oYNobCEjCHnkehiEFA7NdkDW9KF496OHBmyHHq0kD2FBLHZoTdr5YoDlIoWz/One can execute a pythin script before the execution of the desired netboot product. Therefore the bootimage append supports two parameter:
-
pre-execute
-
pre-script
In addition these parameter require an address with the script. This can be a 'http://' or 'tftp://' address. Please refer to the following example:
-
tftp://172.16.166/linux/test.py
When using tftp please keep in mind that the default port 69 is used.
Unattended automated OS installation
Overview
-
Using PXE-Boot:
-
Choose the client which has to be installed with the utility opsi-configed or opsi-admin.
-
-
At the next reboot, the client detects (via PXE-Bootprom) the re-installation request and loads the boot image from the opsi-server.
Using CD-Boot: * The client boots the boot image from the 'opsi-client-boot-cd'. *The boot image starts and asks for confirmation to proceed with the re-installation. This is the only interactive question. After confirming this, the installation proceeds without any further request for interaction. * The bootimage formats and partitions the hard disk. * The bootimage copies the required installation files and configuration information from the 'opsi-server' to the client and initiates a reboot. * Windows Installation: After the reboot the client installs the OS according to the provided configuration information without any interaction. * Linux Installation: By default the Linux Netboot products initiate a 'kexec' command from within the bootimage and directly jumpt to the distribution installaer. * Next the 'opsi-client-agent' is installed as the opsi installer for automated software distribution. * The automated software distribution then installs all the software packages as defined in the client’s configuration.
Preconditions
The client PC has to be equipped with a bootable network controller. Most recent network controllers provide this functionality (PXE boot). Also recent network controllers which are integrated on the PC’s main board. The PXE software, which is stored in the 'bootprom' of the network controller, controls the boot process via network according to the BIOS boot device sequence. Usually the boot sequence has to be set in the BIOS, 'network-boot' has to be the first boot device. If there is no possibility to use PXE you may boot from the opsi-client-bootcd.
The opsi installation package for the OS to be installed needs to be provided on the depot server. In the following we assume Windows 10 to be the OS to install.
PC-client boots via the network
The PXE firmware gets activated at startup of the PC. Part of the PXE implementation is a DHCP client.
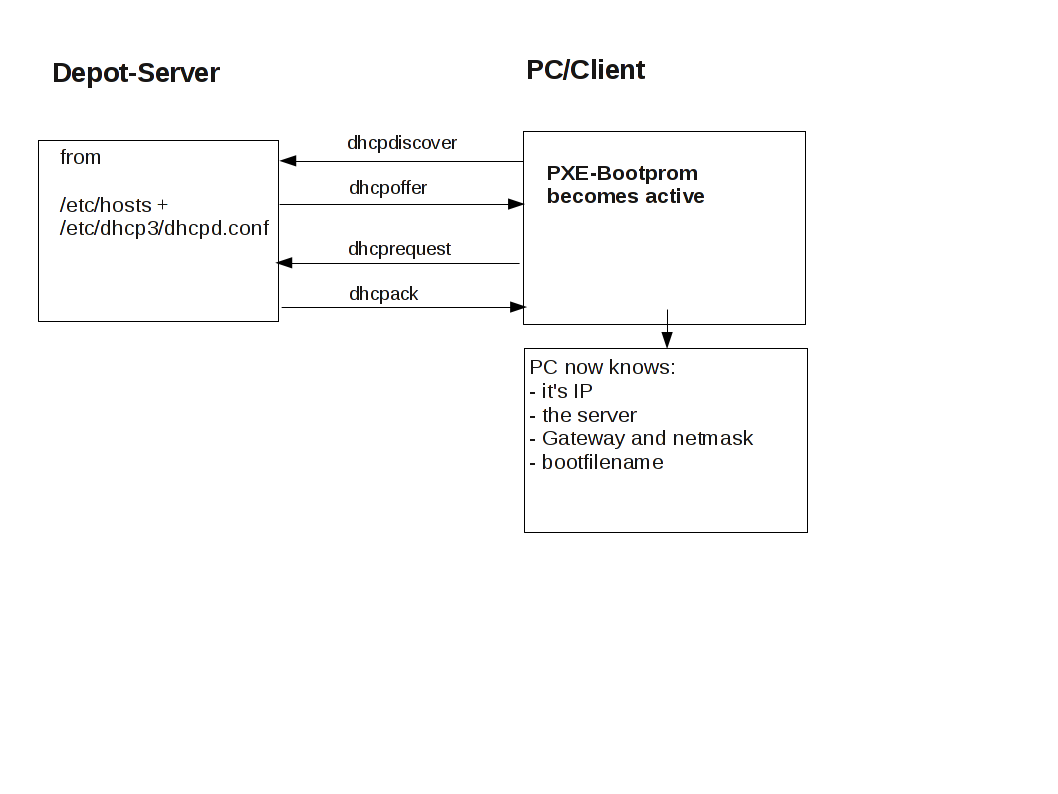
At first the PC only knows its hardware Ethernet address (MAC), consisting of six two-digit HEX characters.
The firmware initiates a 'DHCPDISCOVER' broadcast: “I need an IP address, who is my DHCP-Server?“
The DHCP-Server offers an address ('DHCPOFFER').
'DHCPREQUEST' is the response of the client to the server if the IP address is accepted. (This is not an obsolete step as there could be more than one server in the network.)
The server sends a 'DHCPACK' to acknowledge the request. The information is sent to the client again.
You can watch this process on the display, for the PXE-BOOTPROM displays some firmware information and its 'CLIENT MAC ADDR'. The rotating pipe-symbol is displayed during the request. When an offer was made it is replaced by an '\' and you get the transmitted information (CLIENT IP, MASK, DHCP IP, GATEWAY IP). A short while later you should get a response like this: 'My IP ADDRESS SEEMS TO BE ……'.
This process makes the PC a regular, fully configured member of the network. The next step is to load the boot file (bootimage) given in the configuration information.
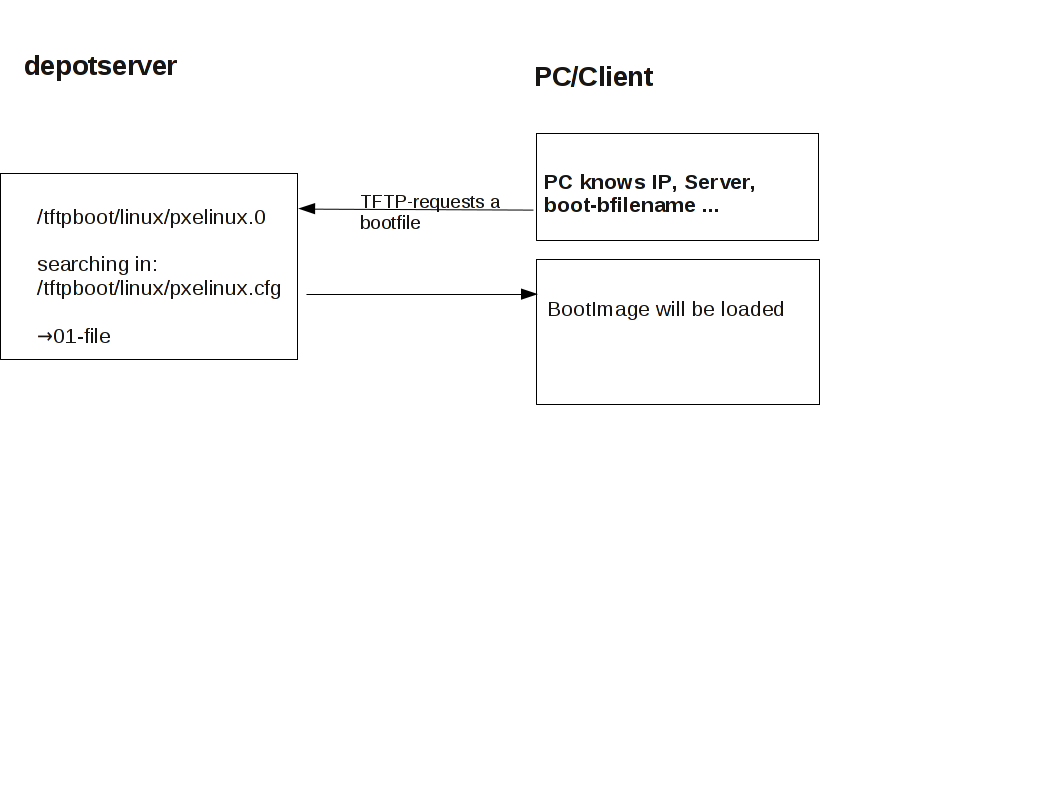
Loading pxelinux
The bootimage is loaded via trivial file transfer protocol (tftp). The displayed message is „LOADING“. tftp is a rather old and simple protocol to transfer files without authentication. In fact, all data available via tftp is available to everyone in the network. Therefore the tftp access is limited to one directory, which is usually '/tftpboot'. This directory is specified in x/inetd (internet daemon, /etc/inetd.conf), which will start the tftp daemon 'tftpd' if requested. The start command as noted in inetd.conf is something like
tftpd -p -u tftp -s /tftpboot
The PXE boot-process is a multi-stage process:
Stage 1 is to load and start the file submitted as part of the address discovery process (usually /tftpboot/linux/pxelinux.0).
The program 'pxelinux.0' then looks for configuration and boot information in '/tftpboot/linux/pxelinux.cfg'. It first looks for a PC specific file with a name based on the hardware ethernet address (MAC) of the network controller with a leading 01. The filename for the controller with the hardware ethernet address 00:0C:29:11:6B:D2 would be 01-00-0c-29-11-6b-d2. If the file is not found, 'pxelinux.0' will start to shorten the filename (starting at the end) to obtain a match. If this process ends without result, the file 'default' will be loaded. This file only contains the instruction to boot from the local hard disk. In this case the PC won’t install anything and will just start the current OS from hard disk.
To initiate the re-installation of a certain PC, a loadable file is prepared for the program 'pxelinux.0'. In order to do so, the opsipxeconfd creates a PC custom file in '/tftpboot/linux/pxelinux.cfg'. Part of this file is the command to load the installation boot image. Also this file contains the client key to decrypt the pcpatch password. This file is created as a 'named pipe' and therefore disappears after being read once. More details about this in the chapter on security of file shares.
Based on the information the 'pxelinux.0' got from the 'named pipe', the actual bootimage is loaded from the opsi depot server via tftp. The bootimage is based on a linux kernel (/tftpboot/linux/install) within an appropriate initrd file system (/tftpboot/linux/miniroot.bz2).
Boot from CD
Similar to the tftp boot via PXE-bootprom, the installation boot image can be booted from the opsi bootcd.
This might be recommended under the following conditions:
-
the client has no PXE bootprom;
-
there is no dhcp;
-
there is a dhcp but it isn’t allowed to configure any client data and the hardware addresses of the clients are unknown;
-
there is a dhcp but it isn’t configured for this demand.
According to different situations, several information has to be provided for the CD boot image by interactive input. The most simple case is to provide no further information. Eventually the clients hostname can be passed by 'hn=<hostname>'. Using the option 'ASK_CONF=1' several parameters can be queried. Pressing 'F1' at the CD prompt shows the syntax.
Please read the chapter 'Create a new client using the opsi-client-bootcd' at the opsi-getting-started manual.
The linux bootimage prepares for reinstallation
The bootimage again performs a dhcp request and configures the network interface according to the perceived information. Afterwards the configuration data for the client will be loaded via 'opsi-webservice'.
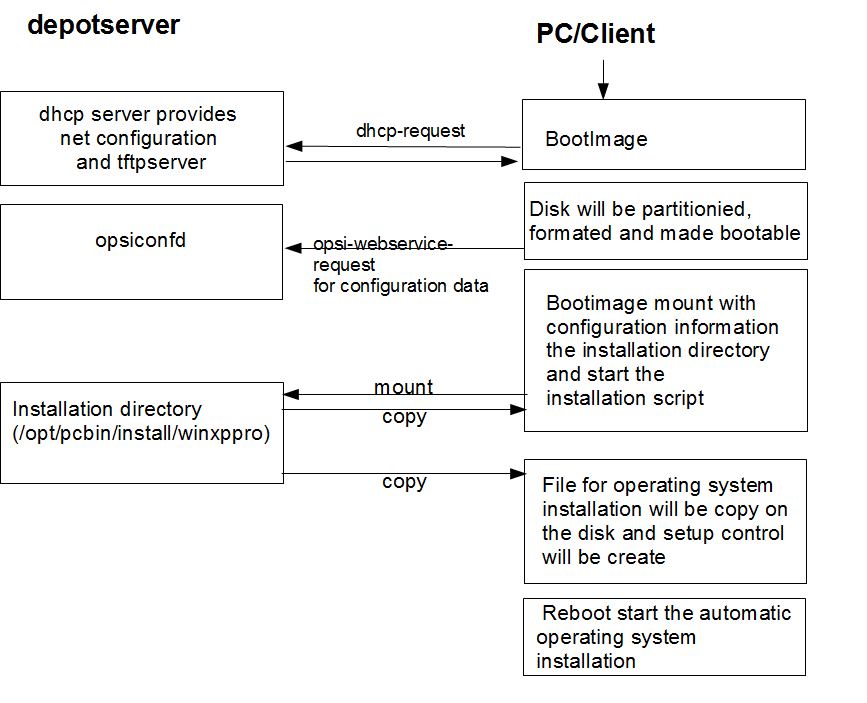
It also holds the information on how to partition the hard disk, what file system to use and which operating system to install. Also it provides the encrypted password to connect the file share.
These information will be combined with some information taken from the dhcp response and then be passed to the installation script for further processing.
Then the password for the user 'pcpatch' will be decrypted with the transferred key to mount the installation share and then call the installation script from the mounted share to start the installation of the operating system. What specific operations the script performs depends on the operating system which is to be installed. Below the steps of a Windows 10 installation will be described.
Prepare the disc: On the hard disk the bootimage creates a new partition (size of 4 GB), formats it and installs a bootable ntloader kernel.
Copy the installation file: The files required for OS installation and the setup files for the opsi-client-agent (which is the opsi software distribution pack) will be copied from the server file share (e.g. /var/lib/opsi/depot/win10/installfiles) to the local hard disk.
Maintain the configuration informations: Some of the configuration and control files contain replacement characters, which will be patched before starting the actual installation. With a specified script (patcha-script) the placeholders will be replaced with parameters taken from the information packet. This is built from configuration files and the dhcp-response. For example the file 'unattend.xml', which is the control file for unattended OS Installation, will be patched with specific information like host IP, client IP, client name, workgroup, default gateway etc..
Prepare Reboot: Bootrecords will be installed which will start the Windows setup program at the next reboot. The patched 'unattend.xml' is passed to the setup as the control file for unattended installation.
Reboot: During the previous boot, the named pipe (which is indicating a request for installation) has been removed by reading it once. So the next PXE boot will load the default netboot response, which executes the command 'localboot 0'. The local boot loader will be started and the setup for operating system installation starts.
These steps are controlled by an OS specific python script.
Installation of OS and opsi-client-agent
The OS installation bases on the Microsoft unattended setup. Part of this is the standard hardware detection. In addition to the possibilities given during an installation from non-OEM or slipstreamed installation media, drivers and patches (i.e. service packs) can be installed during the initial installation, making the separate installation of drivers obsolete.
One feature of the unattended installation is the possibility to initiate additional installations after the main installation is finished. This mechanism is used to install the opsi-client-agent, which implements the automatized software distribution system. An entry in the registry marks the machine as being still in the 'reinstallation-mode'.
The final reboot leads to starting the opsi-client-agent service for software distribution prior to the first user login. Based on the value of the aforementioned registry key the opsi-client-agent switches into 'reinstallation-mode'. Therefore, regarding the configuration status of each software packet, each packet which is marked as action status ”setup” or installation status ”installed” within the configuration of that client will be installed. After all the designated client software has been installed, the reinstallation process is finished and the internal status is switched back from 'reinstallation-mode' to 'standard-mode'. In 'standard-mode' only software packages that are marked as action status ”setup” will be installed.
How the patcha program works
As mentioned above the information collected from dhcp and opsi-webservice will be used to patch some configuration files as e.g. 'unattend.xml'. The program used for patching is the script '/user/local/bin/patcha'.
This script replaces patterns like '@flagname()' in a file with values taken as 'flagname=value' from the specified properties in the Windows 10 product. In the files that have to be patched, the search and replace pattern must start with '@', might have an optional '' after the flagname and must have one or more trailing ''.
So by calling 'patcha -f <patchValues> <filename>' the file '<filename>' will be patched with information from the set product properties, stored in the file '<patchValues>'. The file '<patchValues>' is generated before the installation from the product properties.
Usage: patcha [-h|-v] [-f <params file>] <patch file>

Fill placeholders in file <patch file>
Options:
-v Show version information and exit
-h Show this help
-f <params file> File containig key value pairs
If option not given key value pairs from kernel cmdline are used
patcha patches one tag per line
Caveat: patch a patches only the first pattern of each line.
Each pattern will be expanded (or reduced) to the length of the value to be replaced with and then replaced. Trailing chars will not be affected.
Examples:
With the input file 'try.in'
cat try.in
tag1=hallohallohallo1 tag2=t2
and the file 'patch.me' to be patched:
cat patch.me
<#@tag1##########################>
<#@tag2##########################>
<#@tag1#>
<#@tag2#>
<#@tag1*##########################>
<#@tag2*##########################>
<#@tag1*#>
<#@tag2*#>
<#@tag1#><#@tag1#####>
<#@tag2*#######><#@tag1#>
the result will be:
./patcha -f try.in patch.me
cat patch.me
<hallohallohallo1>
<t2>
<hallohallohallo1>
<t2>
<hallohallohallo1>
<t2>
<hallohallohallo1>
<t2>
<hallohallohallo1><#@tag1#####>
<t2><#@tag1#>Some hints to the NT6 netboot products (Win7 to Win 10)
All netboot products with the version >= '4.1.0.0' require an opsi-winst >= '4.12.0.13' installed on the opsi server.
The netboot products with the version '4.1.0.0' also run on opsi 4.0.7.
Windows OS installations on systems with more than one hard disk are now supported with the new multidiskmode property.
The multidiskmode property allows to select the target disk for the Windows installation by selecting the disk number. It is also possible to select the first SSD by using prefer_ssd or to select the first rotational ('classic') disk by prefer_rotational
In order to work with the multidisk mode, the property winpenetworkmode has to be true.
|
By using the multidiskmode on a computer with MBR BIOS you have to make sure, that the by multidiskmode selected disk is also the first disk in the BIOS boot sequence. On UEFI BIOS systems no further actions are necessary, due to the fact that the boot sequence it’s controlled by the installation software. |
The preparation of a Windows installation starts with the opsi-linux bootimage, which select and prepares the hard disk. It also copies a Windows PE to a partition of the hard disk. This Windows PE is booted in order to start the Windows setup.
Starting with the 4.1.0.0 netboot products we use an opsi-script inside the Windows PE. This has the following advantages:
-
Easier and clearer scripts
-
The creation of a log file of the actions inside the PE
-
Sending of this log file to the opsi server
The netboot products for the installation of the operating systems of the NT6 familiy, contain several properties which will be described below.
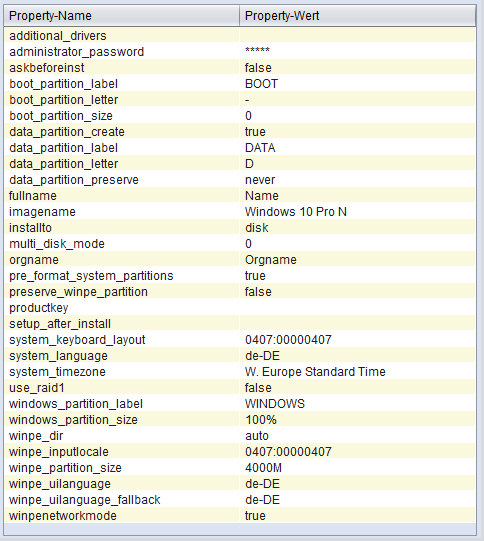
- additional_drivers
-
One or more directories below
<productid>\drivers\drivers\additional. All driver directories below the given directories will be integrated. If there is here a driver for a found device, no other driver will be integrated by the automatic driver integration. - administrator_password
-
At this property you set the password for the local Administrator.
Default = 'nt123' - architecture
-
Select the bootimage architecture (e.g. 32/64 Bit). This will not (!) affect the architecture of the installed Operating System.
Default = '65bit' Since version 4.1.0.0-15 - askbeforeinst
-
Should there be a confirmation dialog before start installing
- boot_partition_label
-
Label of the 'boot_partition' (Bitlocker partion)
- boot_partition_letter
-
Drive letter of the 'boot_partition' (Bitlocker Partion)
- boot_partition_size
-
Size of the 'boot_partition' (Bitlocker Partion). 0 = create no partition
- data_partition_label
-
Label of the data partion (if created)
- data_partition_letter
-
Drive letter of the data partion (if created)
- data_partition_preserve
-
Preserve data partition on reinstallation
- fullname
-
Full name of the license holder, which is given to the setup program
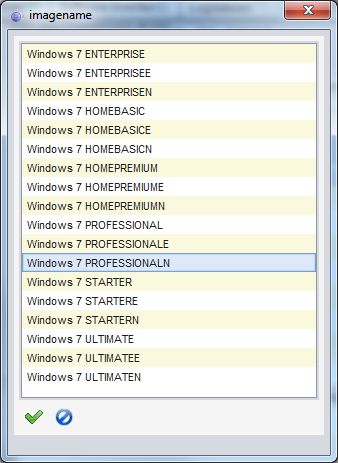
- imagename
-
Name of the operating system variant
- installto
-
This property should never be changed. It ist not editable. It is used internally to difference between standard (disk) installations, opsi-local-image (oli) and opsi-vhd (vhd).
Please do not try to change it. - multi_disk_mode
-
This property is used to select the target disk of the Windows installation.
Possible values are: "0","1","2","3","prefer_ssd","prefer_rotational"
The values "0","1","2","3" are the index of the hard disks ("0"= 1. harddisk)
The value "prefer_ssd" selects the first SSD.
The value "prefer_rotational" selects the first rotational ('classic') disk.
This property is ignored on systems with only one disk.
Default = "0" - orgname
-
Name of the company or organisation of license holder, which is given to the setup program
- pre_format_system_partitions
-
Should we format the windows and boot partition before installation starts to remove any traces of former installations ? (takes time !)
- preserve_winpe_partition
-
By default (False) the winpe partition will be deleted after the installation and the space is used by the system partition. True meens only to hide the winpe partition.
- productkey
-
License key for the installation. Is only used if the 'host parameter'
license-management.useis set to 'false'. If it set to 'True' the license key will be get from the license management module. - setup_after_install
-
Which opsi product(s) should we switch to setup after OS installation is done ?
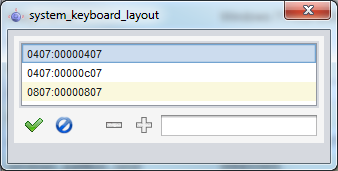
- system_keyboard_layout
-
Select keyboard language. (see: http://msdn.microsoft.com/en-us/goglobal/bb895996 )
- system_language
-
Select system language
- system_timezone
-
Select time zone
- winpe_dir
-
This property only is used for debuging
The value "auto" detects the matching standard winpe directory. These are 'winpe' or 'winpe_uefi'
Any other value must point to an existing directory inside the product directory on the opsi depot share.
Default = 'auto' - winpe_inputlocale
-
Microsoft-Windows-International-Core-WinPE InputLocale
- winpe_partition_size
-
Size of the winpe_partition
- winpe_uilanguage
-
Microsoft-Windows-International-Core-WinPE
- winpe_uilanguage_fallback
-
Microsoft-Windows-International-Core-WinPE
- windows_partition_label
-
Label of the system partion (c:)
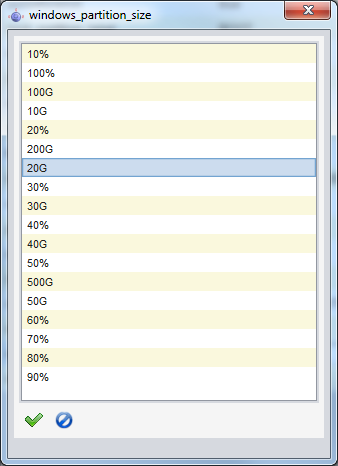
- windows_partition_size
-
Size of the system partion (c:). The size may be given as percent of the harddisk size or as absolut size (G=Gigabyte). If you choose a other value the '100%', the rest will be used as 'data_partition'.
- winpenetworkmode
-
If 'true' the PE tries to mount the depot share and start the operating system setup from the share (faster). If 'false' all installation files will be copied to the hard disk and the installation starts from the local disk (slower).