opsi command line tools and processes
opsi-cli
opsi has received some command line tools and opsi-python scripts over time. Among them are opsi-setup or opsi-admin and others. Since not all command line tools were created at the same time, each has its own parameter handling and different outputs. Many of these components use the standard RPC interface for backend operations, while many bypass the opsi web service and operate directly on the backend. The new opsi-cli aims to provide all this and much more. At the same time with opsi-cli a new plugin system was implemented, which allows opsi users to extend the functionality of opsi-cli by own plugins. In the following it is described how the new 'opsi-cli' can be used.
opsi-cli Installation
opsi-cli is officially installed with the opsi-utils package on the opsi servers. Thus a manual installation is not necessary. opsi-cli can be used as a client component also outside the opsi server, the communication takes place exclusively via the opsi web service. Therefore opsi-cli is also available for Linux, Windows and MacOS.
INFO: To use the opsi-cli outside of the opsi-server you have to pass access data to the opsi-webservice. One possibility is to use the options --service, --username, --password or to store the credentials locally on the client (see opsi-cli config service add --help).
opsi-cli is a directly executable binary and can be used portably. If you want to install the binary on a client in the path, opsi-cli can be used itself for that:
opsi-cli self --help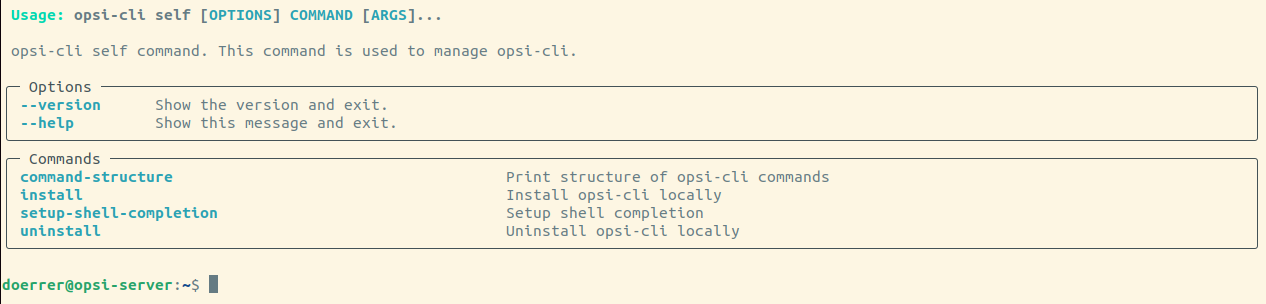
opsi-cli usage
opsi-cli is a Python binary which is controlled by commands. Similar to docker or kubectl, each command can contain one or more subcommands. In the following, first the basic functionalities and then the already available commands are presented. At each point of the call there is the possibility to display a help message, for example: opsi-cli --help or opsi-cli config --help.
The general call to opsi-cli looks like this:
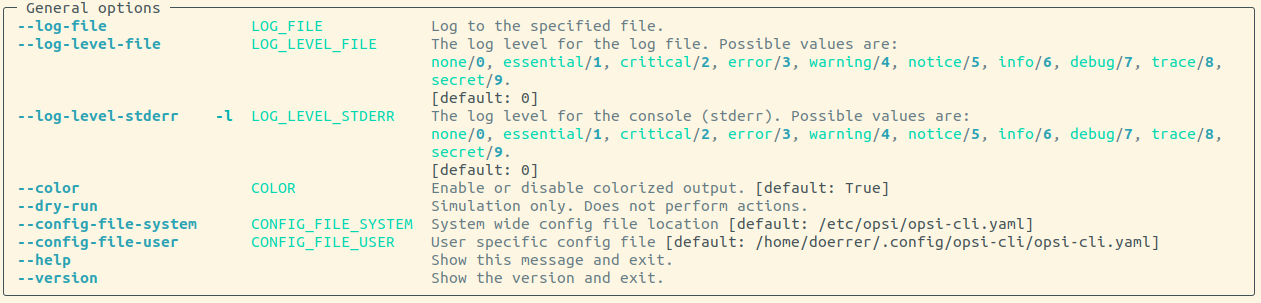
opsi-cli [OPTIONS] COMMAND [ARGS]...The options immediately following the opsi-cli call itself are considered global configuration and apply to all subcommands as well. There are three main categories in global options.
Global options
In diesem Segment lässt sich der allgemeine Ablauf und das Logverhalten beeinflussen.
Output options
With opsi-cli the output of all subcommands can be unified and offers various formats and filter options.

Here is another example how the output can be influenced:
opsi-cli jsonrpc execute host_getObjects [] '{"id":"client*.domain.local"}'[
{
"description": "",
"notes": "Created by opsi-deploy-client-agent at Mon, 26 Sep 2022 17:19:29",
"id": "client-linux.domain.local",
"hardwareAddress": "08:00:27:f5:1d:8e",
"ipAddress": "192.168.56.11",
"inventoryNumber": "",
"systemUUID": null,
"opsiHostKey": null,
"created": "2022-09-26 17:19:29",
"lastSeen": "2023-03-08 12:13:10",
"oneTimePassword": null,
"type": "OpsiClient",
"ident": "client-linux.domain.local"
},
...
]The same call with different formats and filtered to three attributes:
opsi-cli --output-format table --attributes id,type,lastSeen jsonrpc execute host_getObjects [] '{"id":"client*.domain.local"}'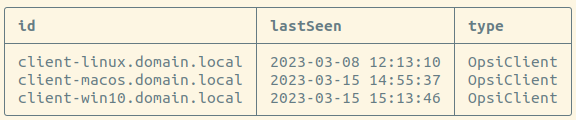
opsi-cli --output-format csv --attributes id,type,lastSeen jsonrpc execute host_getObjects [] '{"id":"testclient0*.uib.local"}'
...
id;lastSeen;type
client-linux.domain.local;2023-03-08 12:13:10;OpsiClient
client-macos.domain.local;2023-03-15 14:55:37;OpsiClient
client-win10.domain.local;2023-03-15 15:13:46;OpsiClient
The --output-file option can also be used to write the output directly to a file.
Service options
If used outside the opsi server, credentials for the opsi web service must be used. With the following options you can pass the credentials directly when calling the service (alternatively you can store the credentials locally on the client. For more information about this alternative: opsi-cli config service add --help). You can also store different service configurations as profiles if you want to manage more than one opsi system.

Kommandos
The currently available commands are explained below.
config
This command can be used to change the opsi-cli configuration:
opsi-cli config --help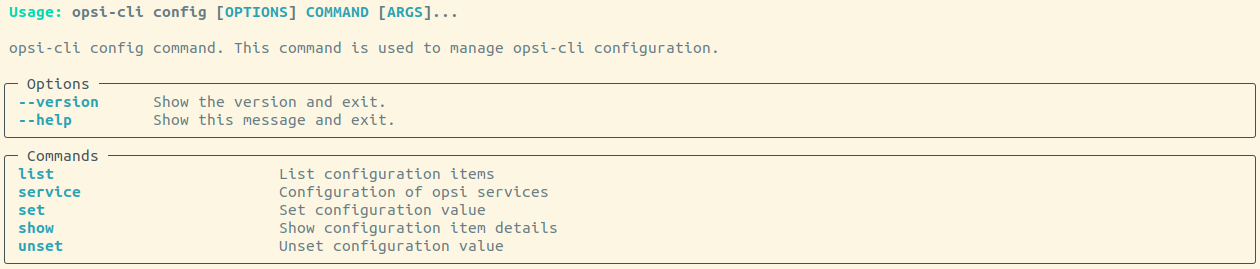
The following command can be used to display the current configuration and its default settings:
opsi-cli config list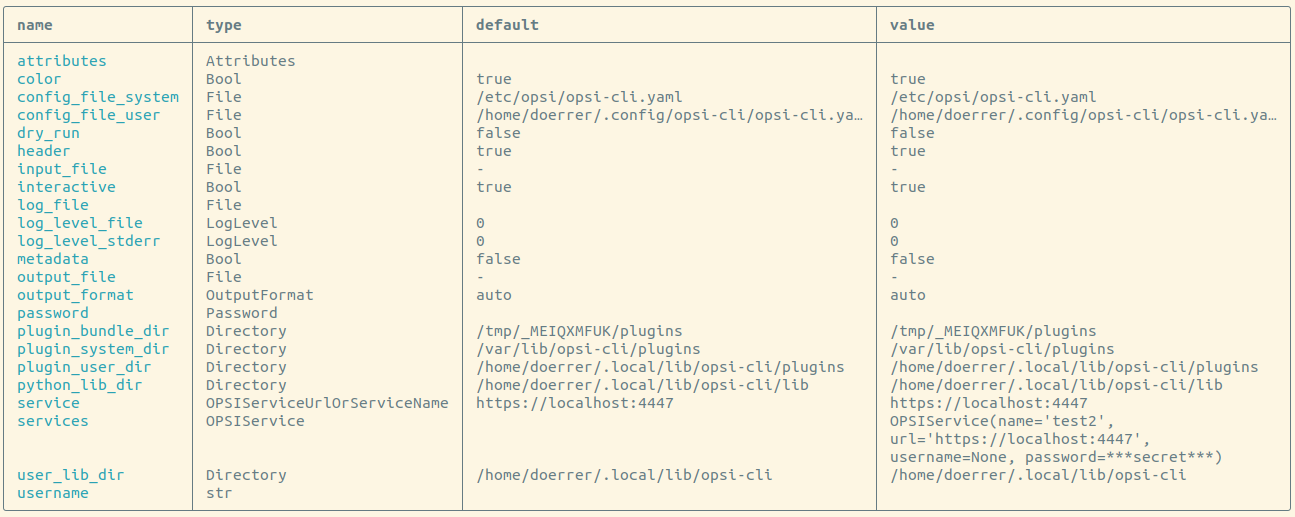
To persistently set a value, you can use the command opsi-cli config set <name> <value>. This value will then be active for all subsequent calls of opsi-cli. To remove the value, use opsi-cli config unset <name>. To manage access data to opsi service, there is opsi-cli config service with the subcommands add, list and remove.
jsonrpc
With this cammand you get direct access to the opsi webservice API. So opsi-cli is a complete drop-in replacement for opsi-admin. jsonrpc has two subcommands. With opsi-cli jsonrpc methods you get a list of all available API methods and parameters. This list also shows if the method is marked as "deprecated" and in this case also gives an alternative method as recommended fallback. These methods also appear in the log. However, experience has shown that these messages are not noticed in practice. That gives direct access to the current status. The second subcommand execute executes the API method. The syntax for the call itself is very similar to the usage with opsi-admin.
The following is a direct comparison:
opsi-cli jsonrpc execute authenticatedLegacy Call:
opsi-admin method authenticatedThe method parameters are passed absolutely identically. Here is a more complicated example for clarification:
opsi-cli jsonrpc execute host_getObjects '["created","lastSeen"]' '{"id":"testclient01.uib.local"}'Legacy Call:
opsi-admin method host_getObjects '["created","lastSeen"]' '{"id":"testclient01.uib.local"}'In the examples the option -d of opsi-admin was deliberately omitted. Bypassing the opsi webservice has caused problems within the opsi system in the past. Therefore the way to the API is now only possible via the opsi webservice and opsi-cli does not support this mode at all. On an opsi server directly you don’t need any credentials, these are read out automatically from the server configuration. Because everything is done via the opsi webservice, you can manage opsi from everywhere. To use opsi-cli in scripts or cronjobs outside of the opsi server you have to store the credentials before.
Also here the output formats can be influenced like everywhere with opsi-cli:
opsi-cli --output-format table --attributes id,created,lastSeen jsonrpc execute host_getObjects '["created","lastSeen"]' '{"id":"testclient01.uib.local"}'If you use this on windows, be aware that it might be necessary to use escape sequences, as cmd and powershell interpret single and double quotes in a different way. The following example shows the distinguishing behaviour (The command shows information about all opsi depots in the environment).
unix shell:
opsi-cli jsonrpc execute host_getObjects [] '{"type":"OpsiDepotserver"}'cmd:
opsi-cli jsonrpc execute host_getObjects [] {\"type\":\"OpsiDepotserver\"}powershell (until version 7):
opsi-cli jsonrpc execute host_getObjects [] '{\"type\":\"OpsiDepotserver\"}'client-action
The command client-action gives the possibility to manage the opsi clients. client-action itself offers primarily options to influence the list of clients on which the actions affect:
opsi-cli client-action --help
Currently this command supports another subcommand set-action-request, which sets product actions for clients. It is comparable with the tasks of opsi-admin, but works according to an exclusion principle. That means without explicit specification and filtering of clients and products the action affects everything. Below this subcommand there are further options to filter the products on which the action has an effect:
opsi-cli client-action set-action-request --help
Here are some examples:
When called without explicitly specifying clients and products, the command affects all clients and all products. To prevent errors, opsi-cli does not allow set-action-request to be executed without at least one of --where-outdated, --where-failed, --products, --product-groups.
|
To set all obsolete products to setup for all clients:
opsi-cli client-action set-action-request --where-outdatedTo set a specific product to setup for a client:
opsi-cli -l5 client-action --clients test-98.domain.tld set-action-request --products opsi-client-agent

[5] [2022-10-28 12:54:59.998] [               ] Selected clients: ['test-98.domain.tld']   (client_action_worker.py:48)
[5] [2022-10-28 12:55:00.055] [               ] Handling products ['opsi-client-agent']   (set_action_request_worker.py:105)
[5] [2022-10-28 12:55:00.065] [               ] Setting 'setup' ProductActionRequest: opsi-client-agent -> test-98.domain.tld   (set_action_request_worker.py:134)
The product state setup is the default if you want to set the same package to uninstall:
opsi-cli -l5 client-action --clients test-98.domain.tld set-action-request --products opsi-client-agent --request-type uninstall

[5] [2022-10-28 12:57:06.848] [               ] Selected clients: ['test-98.domain.tld']   (client_action_worker.py:48)
[5] [2022-10-28 12:57:06.904] [               ] Handling products ['opsi-client-agent']   (set_action_request_worker.py:105)
[5] [2022-10-28 12:57:06.914] [               ] Setting 'uninstall' ProductActionRequest: opsi-client-agent -> test-98.domain.tld   (set_action_request_worker.py:134)
To reset an action request for a client for a specific product the switch None is used (none is also accepted):
opsi-cli -l5 client-action --clients test-98.domain.tld set-action-request --products opsi-client-agent --request-type None

[5] [2022-10-28 14:12:50.538] [               ] Selected clients: ['test-98.domain.tld']   (client_action_worker.py:48)
[5] [2022-10-28 14:12:50.574] [               ] Handling products ['opsi-client-agent']   (set_action_request_worker.py:105)
[5] [2022-10-28 14:12:50.580] [               ] Setting 'None' ProductActionRequest: opsi-client-agent -> test-98.domain.tld   (set_action_request_worker.py:134)
In the event that an error is found in a product, all product actions on clients should be temporarily rolled back to prevent the faulty product from being distributed further:
opsi-cli client-action set-action-request --products opsi-client-agent --request-type NoneIf the product is available again without errors, all outdated or faulty product statuses can be set back to setup:
opsi-cli client-action set-action-request --where-outdated --where-failedTo set a specific product to setup for a client group:
opsi-cli -l5 client-action --client-groups testclients set-action-request --products opsi-client-agent

[5] [2022-10-28 13:03:24.100] [               ] Selected clients: ['test-1.domain.tld', 'test-2.domain.tld', 'test-3.domain.tld', 'test-4.domain.tld', 'test-5.domain.tld']   (client_action_worker.py:48)
[5] [2022-10-28 13:03:24.159] [               ] Handling products ['opsi-client-agent']   (set_action_request_worker.py:105)
[5] [2022-10-28 13:03:24.169] [               ] Setting 'setup' ProductActionRequest: opsi-client-agent -> test-1.domain.tld   (set_action_request_worker.py:134)
[5] [2022-10-28 13:03:24.170] [               ] Setting 'setup' ProductActionRequest: opsi-client-agent -> test-2.domain.tld   (set_action_request_worker.py:134)
[5] [2022-10-28 13:03:24.170] [               ] Setting 'setup' ProductActionRequest: opsi-client-agent -> test-3.domain.tld   (set_action_request_worker.py:134)
[5] [2022-10-28 13:03:24.170] [               ] Setting 'setup' ProductActionRequest: opsi-client-agent -> test-4.domain.tld   (set_action_request_worker.py:134)
[5] [2022-10-28 13:03:24.170] [               ] Setting 'setup' ProductActionRequest: opsi-client-agent -> test-5.domain.tld   (set_action_request_worker.py:134)
To set a product group to setup for the client group:
opsi-cli -l5 client-action --client-groups testclients set-action-request --product-groups testproducts

[5] [2022-10-28 13:05:53.147] [               ] Selected clients: ['test-1.domain.tld', 'test-2.domain.tld', 'test-3.domain.tld', 'test-4.domain.tld', 'test-5.domain.tld']   (client_action_worker.py:48)
[5] [2022-10-28 13:05:53.225] [               ] Handling products ['hwaudit', 'opsi-client-agent', 'swaudit']   (set_action_request_worker.py:105)
[5] [2022-10-28 13:05:53.236] [               ] Setting 'setup' ProductActionRequest: hwaudit -> test-1.domain.tld   (set_action_request_worker.py:134)
[5] [2022-10-28 13:05:53.237] [               ] Setting 'setup' ProductActionRequest: opsi-client-agent -> test-1.domain.tld   (set_action_request_worker.py:134)
[5] [2022-10-28 13:05:53.237] [               ] Setting 'setup' ProductActionRequest: swaudit -> test-1.domain.tld   (set_action_request_worker.py:134)
[5] [2022-10-28 13:05:53.237] [               ] Setting 'setup' ProductActionRequest: hwaudit -> test-2.domain.tld   (set_action_request_worker.py:134)
[5] [2022-10-28 13:05:53.237] [               ] Setting 'setup' ProductActionRequest: opsi-client-agent -> test-2.domain.tld   (set_action_request_worker.py:134)
[5] [2022-10-28 13:05:53.238] [               ] Setting 'setup' ProductActionRequest: swaudit -> test-2.domain.tld   (set_action_request_worker.py:134)
[5] [2022-10-28 13:05:53.238] [               ] Setting 'setup' ProductActionRequest: hwaudit -> test-3.domain.tld   (set_action_request_worker.py:134)
[5] [2022-10-28 13:05:53.238] [               ] Setting 'setup' ProductActionRequest: opsi-client-agent -> test-3.domain.tld   (set_action_request_worker.py:134)
[5] [2022-10-28 13:05:53.238] [               ] Setting 'setup' ProductActionRequest: swaudit -> test-3.domain.tld   (set_action_request_worker.py:134)
[5] [2022-10-28 13:05:53.239] [               ] Setting 'setup' ProductActionRequest: hwaudit -> test-4.domain.tld   (set_action_request_worker.py:134)
[5] [2022-10-28 13:05:53.239] [               ] Setting 'setup' ProductActionRequest: opsi-client-agent -> test-4.domain.tld   (set_action_request_worker.py:134)
[5] [2022-10-28 13:05:53.239] [               ] Setting 'setup' ProductActionRequest: swaudit -> test-4.domain.tld   (set_action_request_worker.py:134)
[5] [2022-10-28 13:05:53.239] [               ] Setting 'setup' ProductActionRequest: hwaudit -> test-5.domain.tld   (set_action_request_worker.py:134)
[5] [2022-10-28 13:05:53.239] [               ] Setting 'setup' ProductActionRequest: opsi-client-agent -> test-5.domain.tld   (set_action_request_worker.py:134)
[5] [2022-10-28 13:05:53.240] [               ] Setting 'setup' ProductActionRequest: swaudit -> test-5.domain.tld   (set_action_request_worker.py:134)
When processing --where-outdated and --where-failed, there is a list of packages that are automatically excluded. These packages are "opsi-winst", "opsi-auto-update","opsi-script", "shutdownwanted", "windows10-upgrade", "activate-win", "opsi-script-test", "opsi-bootimage-local", "opsi-uefi-netboot", "opsi-wan-config-on", "opsi-wan-config-off", "opsi-winpe", "win10-sysprep-app-update-blocker", "windomain". It is possible to exclude additional products or product groups. An even safer way is to maintain a product group and explicitely limit the handled products to that group.
plugin
The plugin command is used to manage the plugins. All commands in opsi-cli are included as plugins, this also applies to the command plugin itself. It is possible to install new plugins from outside the system, but also to extract running plugins from the system.
opsi-cli plugin --help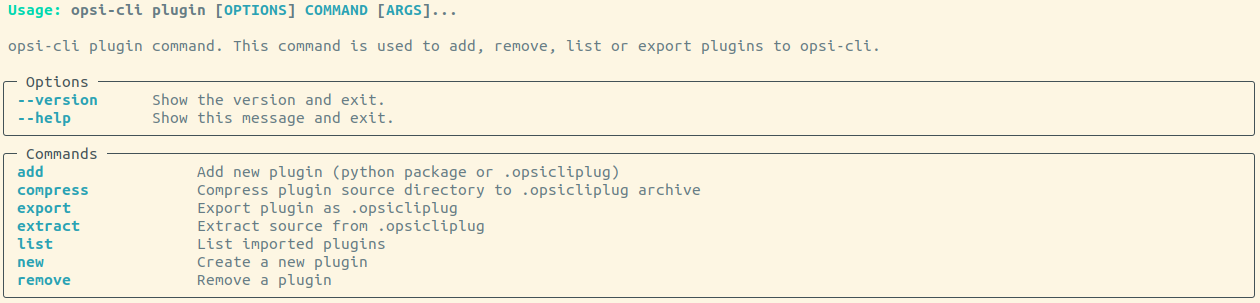
To generate a template for a new plugin, you can use
opsi-cli plugin newAfter supplying a name, version and description, a new directory with that name is created in the current working directory. Contained are directories python and data.
python represents a python-package and can be filled with the code for the new plugin. Entrypoint is in init.py, which is already filled with a command, a subcommand and some options as an example. data contains static ressources for the plugin and can be ignored in most cases.
After the template has been filled with content, the code can be registered as a plugin to the local opsi-cli instance.
opsi-cli plugin add <directory>If <directory> contains valid python code, the contained command is then available as plugin in opsi-cli (opsi-cli plugin list shows all registered plugins).
A plugin can be exported to an archive, which can be imported at another opsi-cli instance (opsi-cli plugin add <archive>).
opsi-cli plugin export <name>Archive and directory representation of a plugin can be converted into the other using opsi-cli plugin compress <directory> and opsi-cli plugin extract <archive>.
To change an imported plugin, you can adapt the directory representation (as created with opsi-cli plugin new) and call opsi-cli plugin add <directory> again. This overwrites the previously added plugin with the same name.
You can remove a plugin from an opsi-cli instance using:
opsi-cli plugin remove <name>self
The command self is used to manage the opsi-cli instance itself. With it you can install and uninstall opsi-cli, setup the shell autocompletion and display the command structure.
opsi-cli self --helpStarting from a opsi-cli binary, you can install opsi-cli using the call opsi-cli self install. That means the binary is copied to a path, where it is globally accessable (for windows the path is added to PATH environment to achive that). Additionally a config file is created to store persistent configurations. Installation can be done user specific or system wide (option --system). For uninstallation use opsi-cli self uninstall.
During installation of the opsi-cli opsi package on a client or the opsi-utils server package the installation is performed automatically.
|
The whole command structure with all commands (and their versions) and subcommands can be printed with this command:
# opsi-cli self command-structure
opsi-cli (4.2.0.5)
┣━━ client-action (0.1.0)
┃   ┗━━ set-action-request
┣━━ config (0.1.0)
┃   ┣━━ list
┃   ┣━━ show
┃   ┣━━ set
┃   ┣━━ unset
┃   ┗━━ service
┃       ┣━━ list
┃       ┣━━ add
┃       ┗━━ remove
┣━━ jsonrpc (0.1.0)
┃   ┣━━ methods
┃   ┗━━ execute
┣━━ plugin (0.1.1)
┃   ┣━━ add
┃   ┣━━ export
┃   ┣━━ extract
┃   ┣━━ compress
┃   ┣━━ list
┃   ┣━━ remove
┃   ┗━━ new
┣━━ self (0.1.1)
┃   ┣━━ setup-shell-completion
┃   ┣━━ install
┃   ┣━━ uninstall
┃   ┗━━ command-structure
┣━━ support (0.1.0)
┃   ┗━━ health-check
┗━━ terminal (0.1.1)
opsi-cli offers the possibility to set up autocompletion for shells. The call is:
opsi-cli self setup-shell-completionAfter restarting the currently active shell, you can use the TAB-key to trigger different support mechanisms:
-
show list of available (sub-)commands (use TAB TAB)
-
show list of available options (following
-) -
complete the started (sub-)command, option oder parameter (if unique)
These support mechanisms can speed up working with opsi-cli.
support
The command opsi-cli support offers ways for analysing and solving problems in an opsi environment. At the moment there is only one subcommand. opsi-cli support health-check checks different aspects that may threaten smooth operation of an opsi environment and assembles a report.
The following example shows a compact representation of the report. Without the filter (--attributes=id,status,message) additional information is displayed regarding the warnings and errors.
opsi-cli --attributes=id,status,message support health-check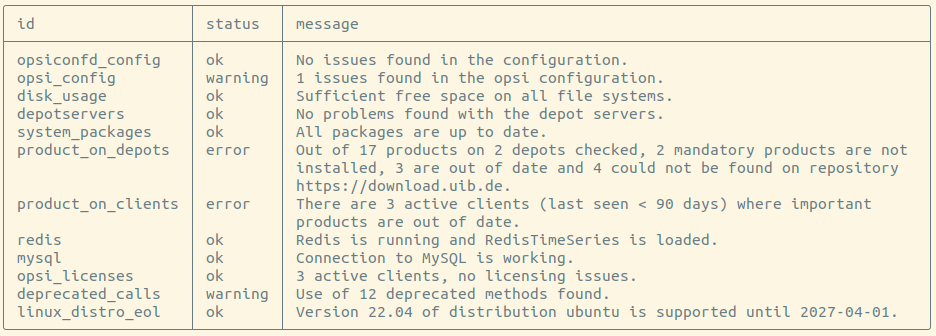
terminal
The command opsi-cli terminal is a minimal terminal client which can be used to open a connection to opsi servers. The behaviour is similar to a ssh/Putty console.
You can use the fqdn (opsi host id) of an opsi server to contact or use the placeholder configserver to reach the config server.
opsi-cli terminal configserverThe connection is closed when the terminal on the destination is closed. This can be done by exit<Enter> or the keyboard shortcut STRG+D.
Tool: opsi-setup
This program is something of a 'Swiss army knife' for configuration. Opsi installation scripts use opsi-setup as well as various other common maintenance and repair tasks.
Some common opsi-setup tasks include:
-
Depot server registration
-
File access rights correction
-
Backend data storage initialization
-
Backend upgrades (from 3.4 to 4.0)
-
MySQL backend configuration
-
Default configuration editing
-
Backend cleanup
-
Essential Samba share configuration
-
Essential DHCP configuration
The opsi-setup --help command switch displays the following options:
Usage: opsi-setup [options]

Options:
   -h, --help     show this help
   -l             log-level 0..9
   -V, --version  Show version info and exit.

   --log-file <path>             path to log file
   --backend-config <json hash>  overwrite backend config hash values
   --ip-address <ip>             force to this ip address (do not lookup by name)
   --register-depot              register depot at config server
   --set-rights [path]           set default rights on opsi files (in [path] only)
   --init-current-config         init current backend configuration
   --update-from=<version>       update from opsi version <version>
   --update-mysql                update mysql backend
   --update-file                 update file backend
   --configure-mysql             configure mysql backend
   --file-to-mysql               migrate file to mysql backend and adjust dispatch.conf
     --no-backup                 do not run a backup before migration
     --no-restart                do not restart services on migration
   --edit-config-defaults        edit global config defaults
   --cleanup-backend             cleanup backend
   --auto-configure-samba        patch smb.conf
   --auto-configure-dhcpd        patch dhcpd.conf
   --patch-sudoers-file	        patching sudoers file for tasks in opsiadmin context.
Additional functions and switch options:
-
--ip-address <ip>
Set the ip-address for 'opsi-server' and don’t resolve by name. -
--register-depot
This option is used to register an 'opsi-server' as depot on a 'opsi-configserver'. For details see:
-
--set-rights [path]
Sets file access rights on all opsi directories:-
/tftpboot/linux -
/var/log/opsi -
/var/lib/opsi -
/var/lib/opsi/depot -
/var/lib/opsi/workbench(or a different depot path) -
/etc/opsi
You may state a path as argument to limit access rights of this specific directory.
For example:
opsi-setup --set-rights /var/lib/opsi/depot/winxppro/drivers -
-
--init-current-config
initialize the configured backend. This command should always be used after changing the configuration file.
/etc/opsi/backendManager/dispatch.conf -
Commands:
--update-mysql
--update-file
are used to upgrade the backends from one opsi version to the next one.
For details see the 'releasenotes-upgrade-manual'. -
--configure-mysql
Configures the MySQL database for the first time.
-
--file-to-mysql
Automatically migrates an environment with file backend enabled to a MySQL backend. Before the migration a backup is created automatically and the opsi services are stopped. After the migration, the services are started again and then automatically use the MySQL backend.
The following parameters can be used here:
--no-backup: Do not create a backup.
--no-restart: Do not stop or start services.
The call returns the following exit codes: +.
0: Migration done successfully.
1: An error occurred during migration.
2: Migration has already been performed.
-
--edit-config-defaults
Edits 'opsi-configed' default values.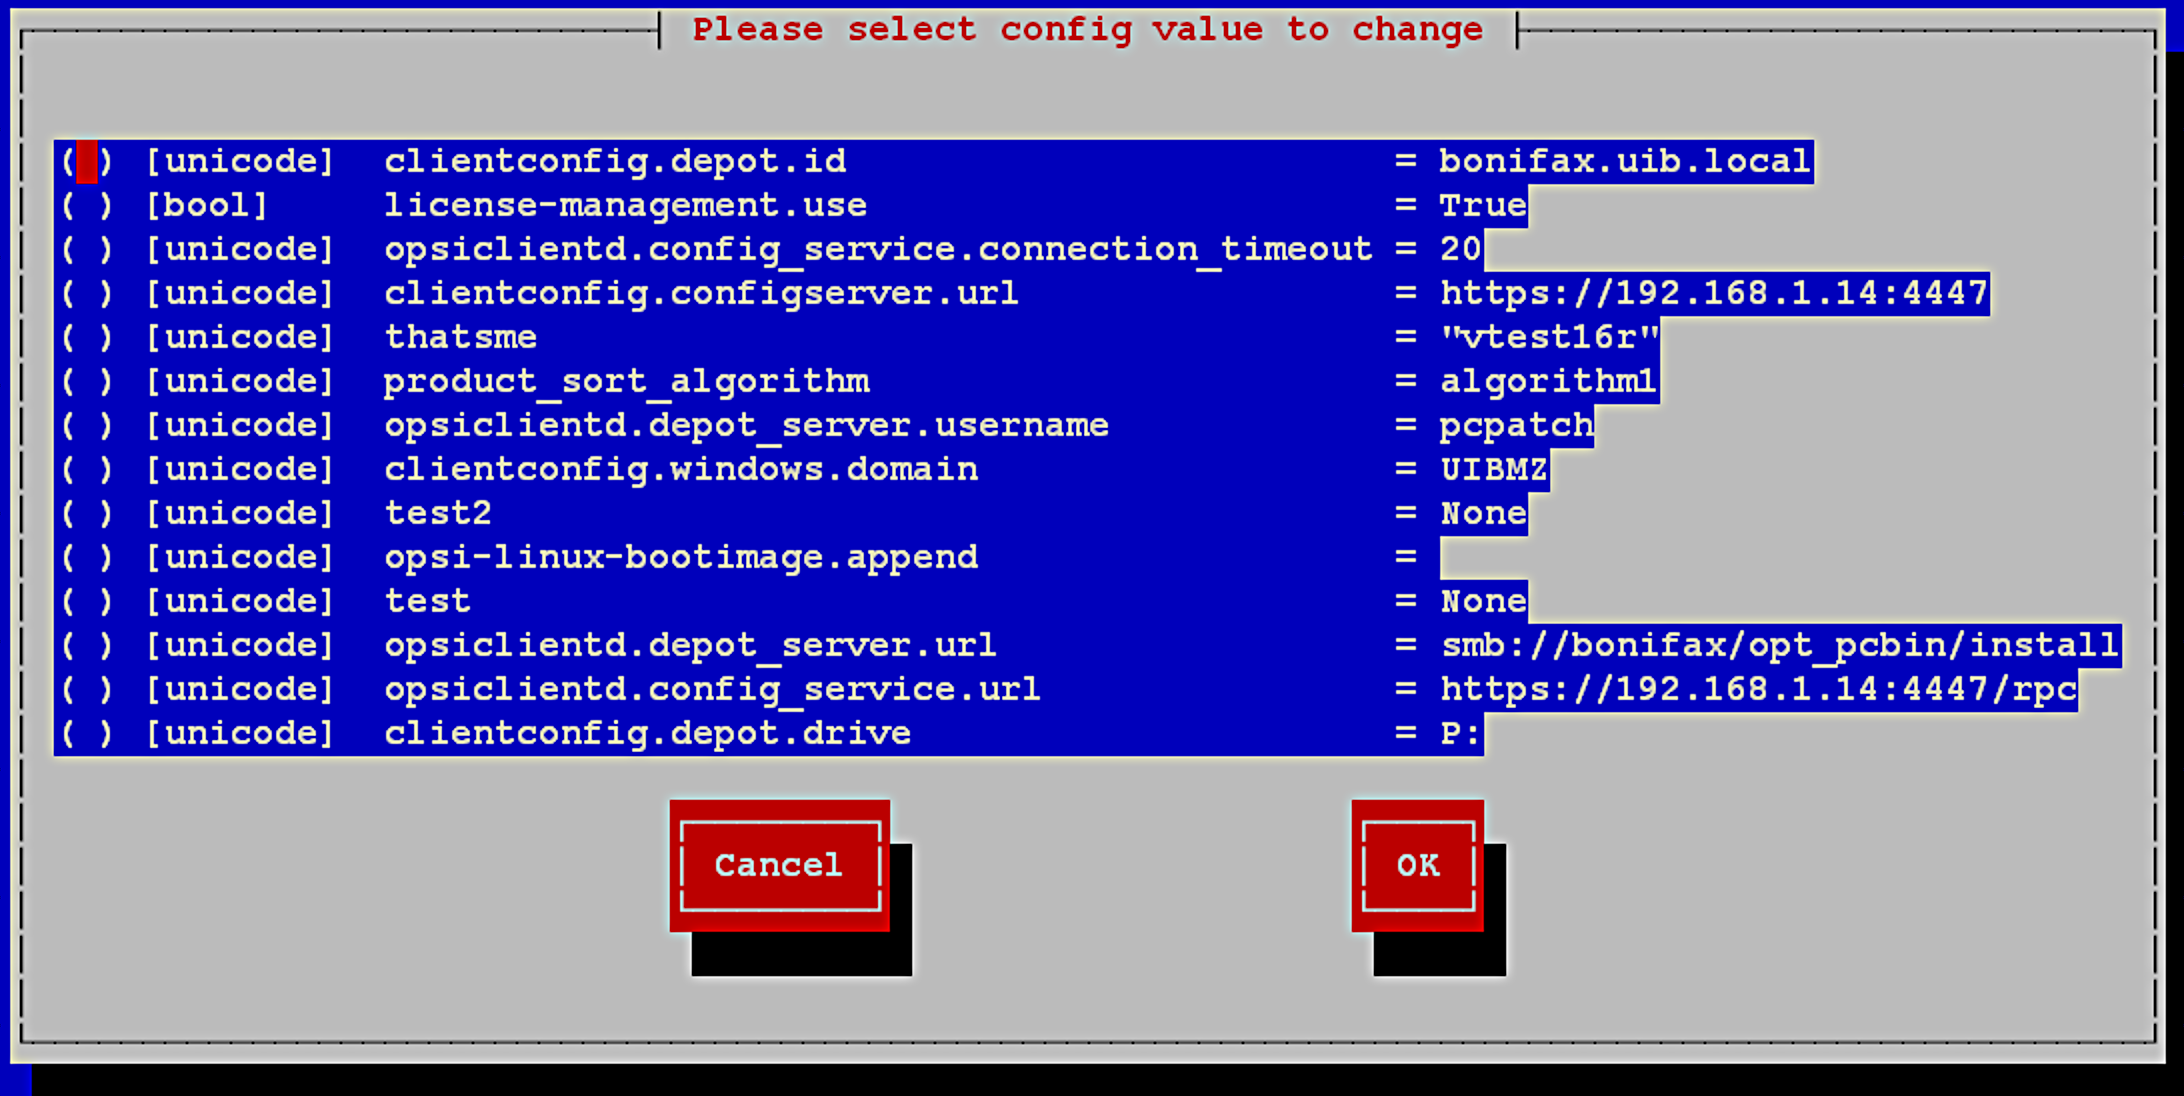 Figure 1. Dialog: 'opsi-setup --edit-config-defaults'
For example:
- clientconfig.depot.id
-
Configures the name of the default depot server.
- clientconfig.depot.drive
-
Configures a drive letter to mount the installation data share. You can either select a specific drive letter or choose the dynamic option. With the dynamic option enabled, the client will try to automatically select a drive letter from those not in use.
- license-management.use
-
Defines if netboot products should get license keys from license management or from the product properties.
- product_sort_algorithm
-
Defines the algorithm used to calculate the product installation sequence.
-
--cleanup-backend
Checks the current backends for integrity and removes obsolete or unreferenced entries.
Examples for entries that may be removed are products without reference (not installed on depot / client), host-groups without a parent and configstates without configuration.
| Backup your backend configuration with 'opsi-backup' as standard best practice. |
-
--auto-configure-samba
Creates opsi share entries in the/etc/samba/smb.confconfiguration file. -
--auto-configure-dhcpd
Creates needed DHCP daemon configuration file entries.
Don’t use this option if you don’t plan to use dhcpd on the opsi server.
More details in the 'opsi-getting-started' manual.
Tool: 'opsi-makepackage': build opsi-packages
Use opsi-makepackage to build a opsi package from the opsi product files. The simpelst way is:
Change to the root directory of the product (maybe /var/lib/opsi/workbench/myproduct/, and enter opsi-makepackage. The product package will be built. The package (<package name>) will be a file that has a format similar to /var/lib/opsi/workbench/<myproduct>/<myproduct_ProductVersion-PackageVersion>.opsi.
opsi-makepackage can be started with different options:
$ opsi-makepackage --help
usage: opsi-makepackage [--help] [--version] [--quiet] [--verbose]
                        [--log-level {0,1,2,3,4,5,6,7,8,9}] [--no-compression]
                        [--archive-format {cpio,tar}] [--follow-symlinks]
                        [--custom-name custom name | --custom-only custom name]
                        [--temp-directory directory] [--md5 | --no-md5]
                        [--zsync | --no-zsync] [--no-pigz] [--keep-versions]
                        [--package-version packageversion]
                        [--product-version productversion]
                        [source directory]

Provides an opsi package from a package source directory. If no source
directory is supplied, the current directory will be used.

positional arguments:
  source directory

optional arguments:
  --help                Show help.
  --version, -V         show program's version number and exit
  --quiet, -q           do not show progress
  --verbose, -v         verbose
  --log-level {0,1,2,3,4,5,6,7,8,9}, -l {0,1,2,3,4,5,6,7,8,9}
                        Set log-level (0..9)
  --no-compression, -n  Do not compress
  --archive-format {cpio,tar}, -F {cpio,tar}
                        Archive format to use. Default: cpio
  --follow-symlinks, -h
                        follow symlinks
  --custom-name custom name, -i custom name
                        custom name (add custom files)
  --custom-only custom name, -c custom name
                        custom name (custom only)
  --temp-directory directory, -t directory
                        temp dir
  --md5, -m             Create file with md5 checksum.
  --no-md5              Do not create file with md5 checksum.
  --zsync, -z           Create zsync file.
  --no-zsync            Do not create zsync file.
  --no-pigz             Disable the usage of pigz

Versions:
  Set versions for package. Combinations are possible.

  --keep-versions, -k   Keep versions and overwrite package
  --package-version packageversion
                        Set new package version
  --product-version productversion
                        Set new product version for package
It is recommended to create the packages with a corresponding md5 checksum file.
This file is used amongst others by opsi-package-updater to check after a file transfer to ensure package integrity.
This file is created by default but its creation can be suppressed for special purposes.
When transferring packages to opsi-depotserver zsync can be used to only transfer differences between different packages.
To be able to use this method a special .zsync file is required.
This file is created by default but its creation can be suppressed for special purposes.
If you are running into the problem that the creation of a package fails because of insufficient free space in /tmp you can use the option --temp-directory to specify a different temporary folder.
If there is already a package file with the same version information, opsi-makepackage will ask for overwrite confirmation:
Package file '/var/lib/opsi/workbench/mytest/mytest_3.14-1.opsi' already exists.
Press <O> to overwrite, <C> to abort or <N> to specify a new version:
Choosing o will overwrite, c abort, and 'n' will ask for new version information.
The created opsi-package can be installed at the opsi-server with the command:
opsi-package-manager --install <packagefile>
Tool: 'opsi-package-manager': (un-)install opsi-packages
The opsi-package-manager is used for (un-)installing Produkt-Pakete on an opsi-server.
To install an Produkt-Paket, the opsi system user opsiconfd must be able to read the package. Therefore, it is strongly recommended to install those packages at /var/lib/opsi/workbench (or other subdirectory).
The 'opsi-package-managers' log file path is /var/log/opsi/package.log.
Silent package install (install without prompts):
opsi-package-manager -i softprod_1.0-5.opsi'Install a package (with prompts after each property):
opsi-package-manager -p ask -i softprod_1.0-5.opsiReinstall a package (package reinstall for everyone who has it installed):
opsi-package-manager -S -i softprod_1.0-5.opsiReinstall a package (package reinstallation with dependencies):
opsi-package-manager -s -i softprod_1.0-5.opsiOr:
opsi-package-manager --setup-with-dependencies --install softprod_1.0-5.opsiSilent package uninstall (uninstall without prompts):
opsi-package-manager -r softprodExtract and rename a package:
opsi-package-manager -x opsi-template_<version>.opsi --new-product-id myprodYou may install a package with a different 'product id'. Helpful when a custom Windows netboot product derives from an existing package, and such package updated in the meantime.
opsi-package-manager --install win7-x64_1.2.3.opsi --new-product-id win7-x64-custom
Please note that products installed in such a way will not be automatically updated by opsi-package-updater.
|
Running opsi-package-manager with the --help switch lists all possible options.
Please note:
-
Multi-depot-server environments use the
-dor--depotsoption exclusively. -
The
-doption copies the opsi-package to the target servers/var/lib/opsi/repositorydirectory before installing. Please make sure that there’s enough free space on the target server file system. See also: multidepot -
If package installation fails due to lack of free space on your target’s temporary folder, you can specify a different temporary folder with the
--temp-diroption.
# opsi-package-manager --help

Usage: opsi-package-manager [options] <command>

Manage opsi packages

Commands:
  -i, --install      <opsi-package> ...      install opsi packages
  -u, --upload       <opsi-package> ...      upload opsi packages to repositories
  -l, --list         <regex>                 list opsi packages matching regex
  -D, --differences  <regex>                 show depot differences of opsi packages matching regex
  -r, --remove       <opsi-product-id> ...   uninstall opsi packages
  -x, --extract      <opsi-package> ...      extract opsi packages to local directory
  -V, --version                              show program's version info and exit
  -h, --help                                 show this help message and exit

Options:
  -v, --verbose                           increase verbosity (can be used multiple times)
  -q, --quiet                             do not display any messages
  --log-file         <log-file>           path to debug log file
  --log-file-level   <log-file-level>     log file level (default 4)
  -d, --depots       <depots>             comma separated list of depot ids to process
                                             all = all known depots
  -p, --properties   <mode>               mode for default product property values
                                             ask     = display dialog
                                             package = use defaults from package
                                             keep    = keep depot defaults (default)
  --purge-client-properties               remove product property states of the installed product(s)
  -f, --force                             force install/uninstall (use with extreme caution)
  -U, --update                            set action "update" on hosts where installation status is "installed"
  -S, --setup                             set action "setup" on hosts where installation status is "installed"
  -s, --setup-with-dependencies           set action "setup" on hosts where installation status is "installed" with dependencies
  -o, --overwrite                         overwrite existing package on upload even if size matches
  -n, --no-delta                          full package transfers on uploads (do not use librsync)
  -k, --keep-files                        do not delete client data dir on uninstall
  -t, --temp-dir     <path>               tempory directory for package install
  --max-transfers    <num>                maximum number of simultaneous uploads
                                             0 = unlimited (default)
  --max-bandwidth    <kbps>               maximum transfer rate for each transfer (in kilobytes per second)
                                             0 = unlimited (default)
  --new-product-id   <product-id>         Set a new product id when extracting opsi package or
                                          set a specific product ID during installation.
  --suppress-pcf-generation               Suppress the generation of a package content file during package
                                          installation. Do not use with WAN extension!
Tool: 'opsi-package-updater'
Use opsi-package-updater to download opsi products from one or more repositories and install them on the server. In addition, you can trigger opsi-package-updater with a cronjob to synchronize depot servers and for automatic package updates.
opsi-product-update will use repositories as their source to fetch new opsi packages.
You can configure each repository’s access and behavior individually.
Configure the General settings at the /etc/opsi/opsi-package-updater.conf file.
Usage
The opsi-package-updater works with different modes, each with its own help module options. You can display help with the --help switch.
# opsi-package-updater --help
usage: opsi-package-updater [-h] [--version] [--config CONFIGFILE]
                            [--verbose | --log-level {0,1,2,3,4,5,6,7,8,9}]
                            [--force-checksum-calculation]
                            [--repo repository_name]
                            [--use-inactive-repository] [--ignore-errors]
                            [--no-zsync]
                            {install,update,download,list} ...

Updater for local opsi products. Operates in different MODEs: install, update,
download and list. Each mode has their own options that can be viewed with
MODE -h

optional arguments:
  -h, --help            show this help message and exit
  --version, -V         show program's version number and exit
  --config CONFIGFILE, -c CONFIGFILE
                        Location of config file
  --verbose, -v         Increase verbosity on console (can be used multiple
                        times)
  --log-level {0,1,2,3,4,5,6,7,8,9}, -l {0,1,2,3,4,5,6,7,8,9}
                        Set the desired loglevel for the console.
  --force-checksum-calculation
                        Force calculation of a checksum (MD5) for every
                        package. Default is to use existing checksums from the
                        .md5-file of a package if possible.
  --repo repository_name
                        Limit the actions the given repository.
  --use-inactive-repository
                        Force the activation of an otherwise disabled
                        repository. The repository must be given through
                        --repo.
  --ignore-errors       Continue working even after download or installation
                        of a package failed.
  --no-zsync            Forces to not use zsync. Instead the fallback command
                        is used.

Mode:
  {install,update,download,list}
    install             Install all (or a given list of) downloadable packages
                        from configured repositories (ignores excludes)
    update              Update already installed packages from repositories.
    download            Download packages from repositories. This will not
                        install packages.
    list                Listing information
# opsi-package-updater download --help
usage: opsi-package-updater download [-h] [--force]
[productID [productID ...]]
positional arguments:
productID Limit downloads to products with the given IDs.
optional arguments:
-h, --help show this help message and exit
--force Force the download of a product even though it would otherwise
not be required.# opsi-package-updater list --help
usage: opsi-package-updater list [-h]
[--repos | --active-repos | --packages | --packages-and-installationstatus | --package-differences | --updatable-packages | --search-package text]
optional arguments:
-h, --help show this help message and exit
--repos Lists all repositories
--active-repos Lists all active repositories
--packages, --products
Lists the repositories and the packages they provide.
--packages-and-installationstatus, --products-and-installationstatus
Lists the repositories with their provided packages
and information about the local installation status.
--package-differences, --product-differences
Lists packages where local and remote version are
different.
--updatable-packages, --updatable-products
Lists packages that have updates in the remote
repositories.
--search-package text, --search-product text
Search for a package with the given name.There are some common options.
-
--verboseincreases the visible output volume and is re-adjustable, as needed. You can specify log level with the--log-levelswitch. Both options only affect the output in terminal. -
--repo <name of a repository>limits the actions of the given repository. Thelist --active-reposoption lists available repositories.
Different modes result in different behavior.
The install, update and download modes load packages from a repository, whereas list displays information.
install mode installs new packages.
update mode overhauls installed packages to a newer version.
Both modes don’t require other parameters.
Example: Installing all available packages on all repositories:
opsi-package-updater installThe modes install and update limit the actions to specific products by using their ID.
Example: Updating the packages for the products 'firefox' and 'javavm':
opsi-package-updater -vv update firefox javavmYou can specify the package source with --repo id.
Example: Installing 'ubuntu' package from the 'uib_linux' repository:
opsi-package-updater -vv --repo uib_linux install ubuntu
opsi-package-updater install
The download mode allows to download packages without installing them afterwards.
The --force switch forces the download of a package, even if this version is already installed on the server.
The modes install and update allow to limit the actions to specific products by handing over their ID.
Example: Updating the packages for the products 'firefox' and 'javavm':
opsi-package-updater -vv update firefox javavmIn combination with the --repo switch the package source can be limited.
Example: Installing the package for 'ubuntu' from the repository 'uib_linux':
opsi-package-updater -vv --repo uib_linux install ubuntuThe mode download allows to download packages without installing them afterwards.
The switch --force forces the download of a package even though this version is already installed on the server.
Through list --active-repos the active repositories are shown.
The information consists of name, address and if applicable the description of the repository.
You can display active repositories using list --active-repos.
The information displayed is name, address, and, if available, the repository description.
Through list --products the available products per repository are shown.
To display possible updates use list --updatable-products.
This option only considers product already installed.
Finally, the update can begin using update.
list --products displays available products
list --updatable-products displays available updates.
Installed products are only considered using the aforementioned command. Product update is kicked off via update.
opsi-package-updater list --updatable-packages
opsi-package-updater -v update
Repository Configuration: Access
Repository configurations are specified in /etc/opsi/package-updater.repos.d/.
You will find a commented template with all possible configuration options in file example.repo.template.
There are two kinds of repositories - 'internet' and 'opsi-server' repositories.
Internet Repositories
Example: download.uib.de
You configure this repositories by:
-
'baseURL' (for example http://download.uib.de)
-
'dirs' (a list of directories for example: opsi4.0/products/essential)
-
and for password protected repositories 'username' and 'password'
-
an alternative to password protected repositories, is certificate authentication if the repository supports it. For this, you need to configure 'authcertfile' and 'authkeyfile' with the full path to the clientcertificate and keyfile.
-
If a HTTPS baseURL is used and the server signature should be verified, you need to set 'verifyCert' to 'true'. At the moment the default is 'false'.
You can configure access through proxy, if required. To use a common proxy for all repositories, specify it at the opsi-package-updater.conf file. This file requires at least opsi-utils 4.1.1.33. All repositories without their own proxy use this configuration.
baseUrl = http://download.uib.de
dirs = opsi4.0/products/localboot
username =
password =
proxy =
opsi-server
A repository has the 'opsi-server' type, if the configured ID points to another opsi-server. You can specify such ID in the repository configuration file, under the item opsiDepotId.
opsiDepotId = mainserver.my.lanYou can set the central 'configserver’on an 'opsi-depotserver'. As a result, opsi-package-updater will fetch packages from the /var/lib/opsi/repository directory of such central server.
Repository Configuration: Behavior
For each repository you have to configure which actions to run:
-
'autoupdate': Newer versions of installed packages will be downloaded and updated
-
'autoinstall': Packages not yet installed will be downloaded and installed
-
'autosetup': Clients using this product are set to 'setup', on the action request column, once all new packages are downloaded and installed on the server.
-
'onlyDownload': Opsi downloads new packages, but no further actions take place.
-
'ignoreErrors': Tries to continue downloading/updating even after errors occured when processing any package.
Administrators use this option together with notifications, to trigger a notification email. This way, the administrator can install the packages at a convenient time in the future.
In addition, you can send all these clients a Wake-On-LAN signal to install the new software. Furthermore, Produkt 'shutdownwanted' ensures that clients power off after the installation.
-
time window for autosetup: You can specify a time window which may be used to change the client action requests to setup.
-
Automatic WakeOnLan with shutdown: If there’s new software, Clients could be woken up and shutdown after installation automatically.
Tools for opsi API access: opsi-admin & opsi interface page
opsi has a python library which provides an API for opsi configuration. Documentation for this API regarding python-opsi https://docs.opsi.org/python-docs/python-opsi and opsicommon https://docs.opsi.org/python-docs/python-opsi-common is at docs.opsi.org.
The 'opsiconfd' provides this API as a web service that can be accessed in multiple ways.
In the browser: opsi admin page
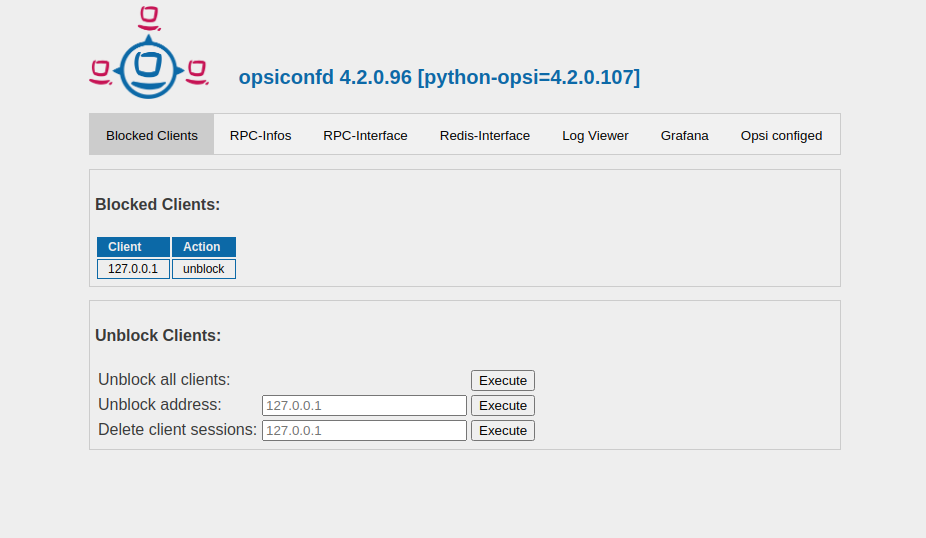
Versions 4.2 interface and info page merged into the new admin page. Point your browser to 'https://<opsi-server>:4447/admin' to access. You must access with 'opsiadmin' group credentials.
The first Blocked Clients tab displays a list of all blocked clients. Clicking the unblock button releases this client. You can unblock clients individually by IP or unblock all clients en masse.
With Delete client sessions you can delete all client sessions.
The user receives feedback in a text box under the input fields. The server’s JSON response is also output.
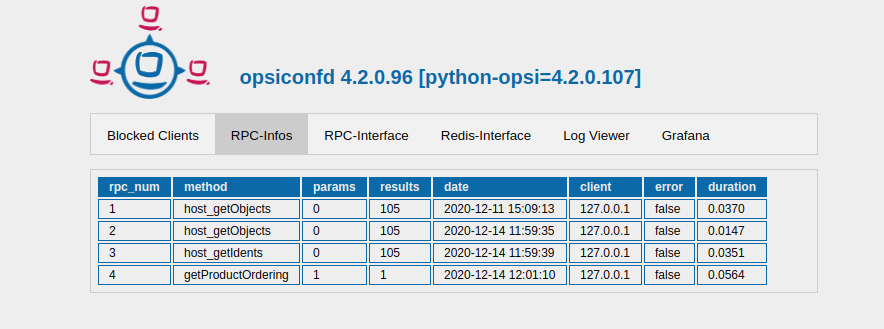
The RPC-Info tab contains a table of the last RPC calls. Click the header bar to sort the table.
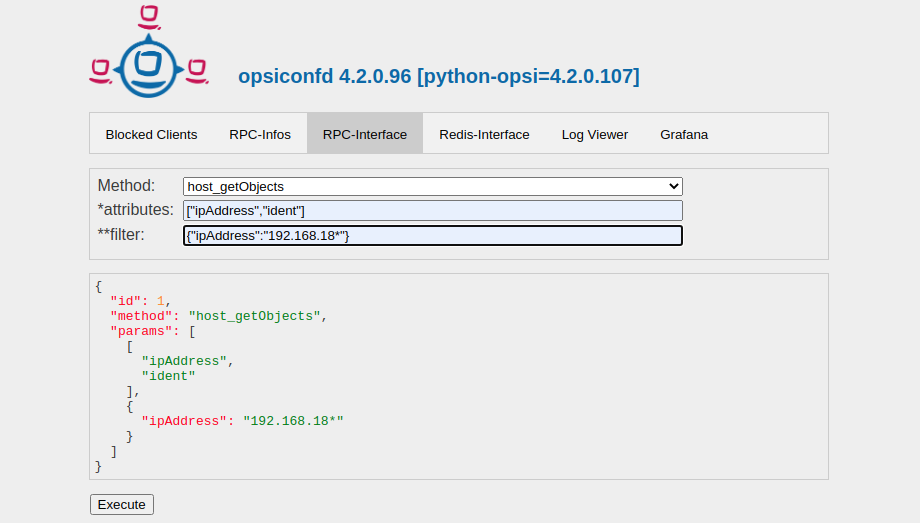
The RPC-Interface tab contains the former interface page. With the interface you can make API calls. The request and the response is displayed as JSON.
You can use the Redis interface to make redis calls. The response from the server is displayed in JSON.

The tab Grafana redirects the user to the Grafana dashboard of the opsiconfd. There you can find information about the load history of the 'opsiconfd'.
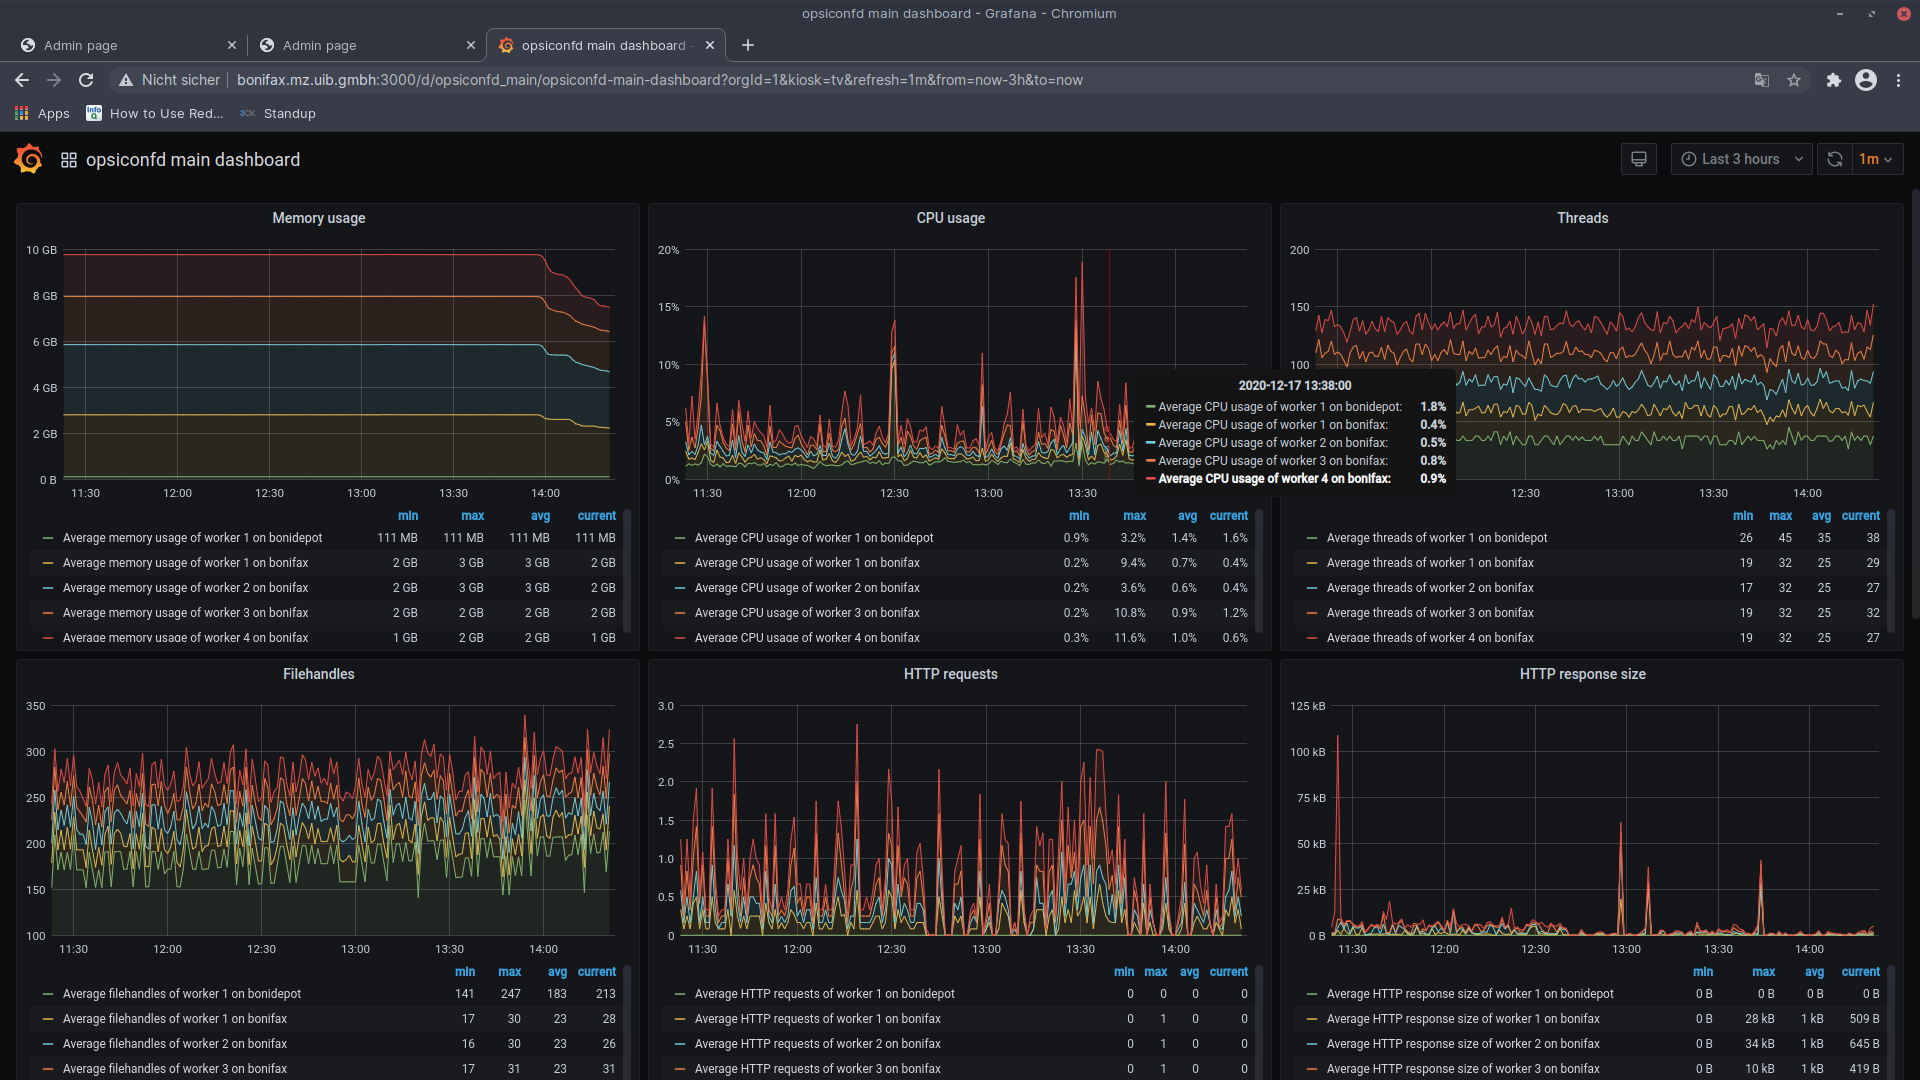

If the Grafana server is running on the same host as the 'opsiconfd' and no user and password have been set with the configuration variable grafana_internal_url, a new Grafana user is created in the database and the variable grafana_internal_url is adjusted (example: http://opsiconfd:passwort@<host>:3000). The creation of the user takes place when starting 'opsiconfd' or calling opsiconfd setup. Grafana can be called via the admin page (https://<opsi-server>:4447/admin). Clicking on the appropriate tab will redirect to https://<opsi-server>:4447/metrics/grafana/dashboard. The endpoint 'metrics/grafana/dashboard' creates and opens the dashboard in Grafana. On redirection the 'opsidashboard' user is created if he does not exist. The opsidashbord user is used for the automatic login in Grafana and gets a random password on each call.
On the Command Line: opsi-admin
At the command line 'opsi-admin' provides an interface to the opsi API. There’s an interactive mode and a non-interactive mode for batch processing from within scripts.
The opsi-admin --help switch displays a list of available command line options:
$ opsi-admin --help

Usage: opsi-admin [options] [command] [args...]
Options:
  -h, --help           Display this text
  -V, --version        Show version and exit
  -u, --username       Username (default: current user)
  -p, --password       Password (default: prompt for password)
  -a, --address        URL of opsiconfd (default: https://localhost:4447/rpc)
      --opsirc         Path to the opsirc file to use (default: ~/.opsi.org/opsirc)
                       An opsirc file contains login credentials to the web API.
  -d, --direct         Do not use opsiconfd
      --no-depot       Do not use depotserver backend
  -l, --log-level      Set log level (default: 3)
                       0=nothing, 1=essential, 2=critical, 3=error, 4=warning
                       5=notice, 6=info, 7=debug, 8=debug2, 9=confidential
  -f, --log-file       Path to log file
  -i, --interactive    Start in interactive mode
  -c, --colorize       Colorize output
  -S, --simple-output  Simple output (only for scalars, lists)
  -s, --shell-output   Shell output
  -r, --raw-output     Raw output
  --exit-zero          Always exit with exit code 0.
The opsi-admin command interacts by way of the opsi web service or first hand with the data backend. To work via the web service, you must specify 'username' and 'password' together with a URL. The opsi-admin command defaults to the currently logged-in user but allows you to specify a different username with --username.
For security, you want to avoid plain text passwords when using this command in scripts. This prevents unauthorized users from capturing the credential values. Use an opsirc file to secure your credentials or, as an alternative, use the -d option for direct data access.
opsi-admin includes an interactive mode, the -i switch, often used with -c, for colored display, and -d for direct data access. The full combined command becomes opsi-admin -i -c -d, or opsi-admin -idc for short.
Interactive mode uses the Tab key for navigation. The tab key allows you to navigate through the multiple choice options or input text fields. Page up and down scroll through the entire screen.
Options -s and -S generate an output format which scripts can easily parse through.
Besides API-request based method calls, there’s a collection of function ‘tasks’ which combine method calls to perform complex or specific jobs.
Usage of a connectionsettings file - opsirc
Starting on version 4.1.1.30, opsi-admin allows you to save web service connection configuration in a file. This allows you to use the web service without retyping your credentials every time you connect from command line.
By default, opsi-admin searches for credentials at ~/.opsi.org/opsirc but you can specify a different path using the --opsirc switch, allowing you to maintain various configuration files.
An 'opsirc' file has the following contents:
address = https://seeing.the.ramp:4447/rpc
username = tony
password file = ~/.opsi.org/tonys_secret
Everything in an opsirc file is optional. If the file is empty or doesn’t exist, opsi will use the default values.
In the previous example, the ~/.opsi.org/tonys_secret file keeps the password and opsi in turn, reads this information from the specified path location. This file in turn, contains the password.
Although not recommended, you can state the password in plain text in the opsirc file:
address = https://seeing.the.ramp:4447/rpc
username = tony
password = first900
Typical use cases
opsi-admin -d task setupWhereInstalled "softprod"opsi-admin -d method host_getIdentsopsi-admin -d method host_delete <clientname>For example:
opsi-admin -d method host_delete "pxevm.uib.local"opsi-admin -d method host_createOpsiClient <full qualified clientname>For example:
opsi-admin -d method host_createOpsiClient "pxevm.uib.local"opsi-admin -d method setProductActionRequest <productId> <clientId> <actionRequest>For example:
opsi-admin -d method setProductActionRequest win7 pxevm.uib.local setupopsi-admin -d method setHostDescription "dpvm02.uib.local" "virtual client"This uses the option -S so that every client is on its own line.
Filtering OpsiClient avoids displaying the server IDs.
You can use this output in other programs or calls.
opsi-admin -dS method host_getIdents '' '{"type": "OpsiClient"}'opsi-admin -d method productOnClient_getObjects '["productVersion", "packageVersion", "installationStatus"]' '{"installationStatus": "installed"}'opsi-admin -d task setPcpatchPasswordSets the password of the pcpatch user for Unix, samba and opsi.
{health-check}
The opsiconfd provides a {health-check} that checks various settings and version and can detect possible problems.
The health check can be called in different ways.
All variants get their data from the API call service_healthCheck.
The opsi API returns the data of the {health-check} as JSON.
Such a JSON file is especially useful for support requests.
| You can use the RPC interface on the admin page to call the {health-check} method. |
opsiconfd health-check
On the opsi server console, you can run the command opsiconfd health-check.
opsiconfd health-check --help prints the help text and
opsiconfd health-check --manual describes all checks.
| Via the admininterface or {opsi-cli} you can open a terminal on the server and execute the command (see opsi-cli terminal). |
opsi-cli
The {health-check} can also be invoked via the {opsi-cli}. See here for the section support in the {opsi-cli} chapter.
Health Checks
This section describes what the {health check} checks and how it assesses the health of the system.
opsiconfd configuration
The {health check} examines the configuration of the opsiconfd service by checking the following values:
-
log-level-stderr,log-level-file,log-level+. If the log level is too high for a productive environment, then performance problems may occur.
For this reason, a warning is issued at a log level of 7 and an error is issued at log level 8 or higher. -
debug-options
If a debug option is active, this is considered an error, as it can lead to performance problems in productive environments. -
profiler
The profiler should also be deactivated for performance reasons. An active profiler will also result in an error output. -
run-as-user
Running the service opsiconfd as user root will be evaluated as an error, because root has too many rights on the system.
opsi config
Here we check whether certain configurations deviate from the standard. If this is the case, a warning is issued. An error is output if the value does not exist.
Currently only opsi 4.3 checks if opsiclientd.global.verify_server_cert is activated.
Disk usage
Checks the free space for the following mount points:
-
/
-
/temp
-
/var, /var/lib or var/lib/opsi
If there is less than 15 GiB free, a warning is given. If there are less than 7.5 GiB, it is considered an error.
Depotserver check
Since opsi 4.3 the opsi repository must be located under /var/lib/opsi/repository. If this is not the case, an error will be reported.
Check System Packages
Currently the following system packages are checked for actuality:
-
opsiconfd
-
opsi-utils
-
opsipxeconfd
The check is carried out against the stable repository of uib (https://download.opensuse.org/repositories/home:/uibmz:/opsi:/4.2:/stable/Debian_11/). Older versions are considered a warning and if one of the packages is not installed, an error is issued.
Check Products on Depot
It is checked whether the following products are installed and up-to-date on the depots:
-
opsi-script
-
opsi-client-agent
If opsi-linux-client-agent and opsi-macos-client-agent are installed, these packages are also checked. Here, an outdated package is considered a warning and an uninstalled package is considered an error.
Check Products on Client
On the clients, it is checked whether the respective client agent is up to date. If an older version is installed, the Health Check issues a warning.
Check Redis
Checks whether the Redis server is available and whether the RedisTimeSeries module is loaded. If the server is not available or the module is not loaded, this is considered an error.
Check MySQL
Checks whether the database is accessible. The data from the file /etc/opsi/backends/mysql.conf is used for the connection. If no connection can be established, this is an error.
Server processes: opsiconfd and opsipxeconfd
'opsipxeconfd' provides the 'named pipes' to control the PXE boot process in the tftpboot directories.
The configuration file is /etc/opsi/opsipxeconfd.conf
The log file is /var/log/opsi/opsipxeconfd.log.
The 'opsiconfd' provides the opsi API as JSON web service and other important tasks. 'opsiconfd' is opsis central service, and allows for communication with all clients.
Since its central for communication, monitoring this process and its load is important. You use the 'opsiconfd' info page as a tool to monitor this service.
Server process: opsi-tftpd-hpa
The opsi-tftpd-hpa is a standard tftpd-hpa, with the expanded ability to handle 'named pipes'.
By default, the opsi-tftpd-hpa runs with its own systemd service.
The service starts with a default or simple verbose parameter. You can modify this parameter to get additional information for troubleshooting or analysis purposes. Enter the following command to change verbosity:
# systemctl edit --full opsi-tftpd-hpa.serviceReplace the '-v' parameter by '--verbosity 7' and restart the service.
# service opsi-tftpd-hpa restart| on Debian 8 the edit operation is not available. However there is a workaround: |
# cp /lib/systemd/system/opsi-tftpd-hpa.service /etc/systemd/system/opsi-tftpd-hpa.service
# vi /etc/systemd/system/opsi-tftpd-hpa.service
# systemctl daemon-reload
# service opsi-tftpd-hpa restart