opsi-setup-detector (free)
opsi-setup-detector Quickstart
After the first start of the opsi-setup-detector a configuration mask appears. The following information is required:
-
fullname: (Used for entries in the changelog.txt)
-
email_address: (Used for entries in the changelog.txt)
-
workbench_path: : Path to the directory in which the opsi packages are going to be created. This is ideally the path to the place where the
opsi_workbenchof your opsi-server is mounted.
At the start page select the desire task and follow the dialogs (click 'Next step')
Introduction: opsi-setup-detector - What is this ?
The creation of opsi-packages from available setup programs is a recurring task when operating opsi. The opsi-setup-detector should help you to simplify this in two ways:
-
Detection of the type of the setup program and the determination of the necessary command line parameters
-
Creation of an opsi package with the necessary scripts for installation and deinstallation.
-
If necessary, include the opsi-package-builder for further processing of the provided package or to build and install the package.
Most setup programs are not written by the developers themselves, but are based on different frameworks. The opsi-setup-detector now tries to find patterns in the setup program which are specific for certain frameworks and to recognize the framework on the basis of these and thus to determine the necessary information.
This can lead to you getting a finished opsi package with just a few clicks. Often you get an opsi-package to which you have to add further information after the first installation of the program (e.g. with the created opsi-package).
Of course there can also be problems. The most common are described in the chapter opsi-setup-detector: Problems and solutions There is also described how you can help us to improve the opsi-setup-detector after solving a problem.
Installation of the opsi-package-builder
The opsi-package-builder is currently available for Windows and Linux and MacOS.
The installation files / packages of the opsi PackageBuilder can be found here:
https://forum.opsi.org/viewtopic.php?p=32473#p32473
There you will find in the first lines of the post links to the installation files for Windows and Linux and MacOS.
The opsi PackageBuilder is not made by 'uib' but by Holger Pandel from the opsi-community (thank you!)..
The opsi PackageBuilder open source license:
https://github.com/pandel/opsiPackageBuilder/blob/master/LICENSE_DE
The opsi PackageBuilder has its own documentation, that is part of the installation.
You can install the opsi PackageBuilder also via opsi:
The package opsipackagebuilder_wlm belongs to the opsi standard products and should be installed on your opsi-server. If not, use:
opsi-package-updater install opsipackagebuilder_wlmto install it on the opsi-server.
Installation of the opsi-setup-detector
The opsi-setup-detector is currently available for Windows and Linux and MacOS.
You can install the opsi-setup-detector via opsi:
The package opsi-setup-detector belongs to the opsi standard products and should be installed on your opsi-server. If not, use:
opsi-package-updater install opsi-setup-detectorto install it on the opsi-server.
A setup program to install the opsi-setup-detector without opsi can be found at :
https://download.uib.de/opsi4.2/misc/helper/
The base functionality of the opsi-setup-detector is the same on all suppoted platforms. While analyzing a installer file some helper programs will be called, that may not availiable or runable.
-
Inno-Setups will be analyzed with innounpack.exe at Windows.
-
wix-setups will be analyzed with dark.exe at Windows.
-
.debor..rpmfiles will be analyzed with the Linux command line tools.
The opsi product opsi-setup-detector has a dependency on the opsi product opsipackagebuilder_wlm. The opsi-setup-detector uses the opsi PackageBuilder if available, but can for the most part also work without it. The installation of the opsi PackageBuilder is recommended.
Requirements in order to use the opsi-setup-detector
Recommendation:
-
You should have mounted the share
opsi_workbenchof your opsi-server on your computer. -
Ideally you should have the opsi-Package-Builder installed on your computer.
Integration of the opsi-package-builder through the opsi-setup-detector

On the tab Create Mode you will find a selection for the creation mode.
The default is create opsi product files.
If you choose one of the other modes, an installed opsi-package-builder will be called.
In case of … and build package the opsi-package-builder is called in the background to build the directory created by the opsi-setup-detector with the opsi files to a package. The checkboxes 'Build Mode' can be used to select whether the build should be 'silent', if the package should be built and if the built package should be installed.
Without any of these options, this call corresponds to the last build mode: '… and start interactive PackageBuilder'.
Opsi-setup-detector Start and necessary configurations
The opsi-setup-detector can be started from the programs menu and can be found there under opsi.org. Under Windows the opsi-setup-detector is also integrated into the context menu of the explorer in order to call the setup program directly for analysis with the right mouse button.
Opsi-setup-detector configurations
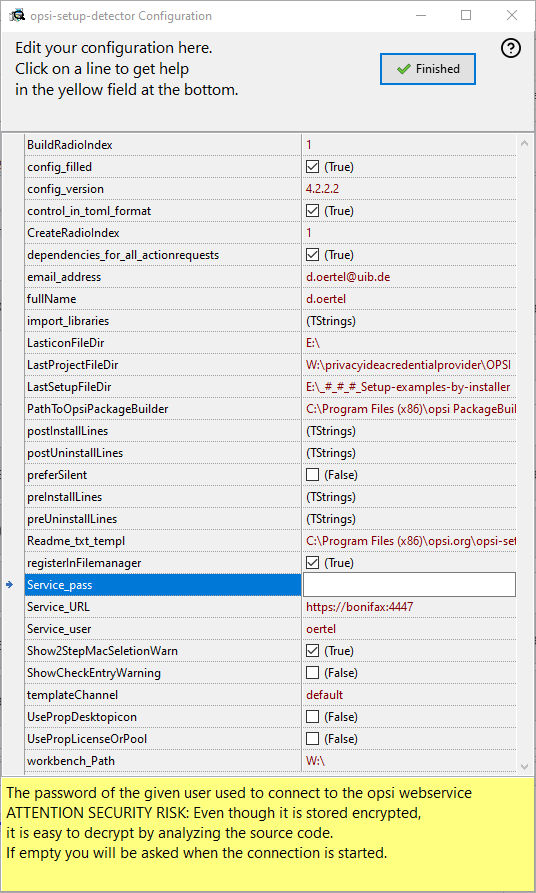
After the first start of the opsi-setup-detector a configuration mask appears. The following information is required here:
-
fullname: (Used for entries in the changelog.txt)
-
email_address: (Used for entries in the changelog.txt)
-
workbench_path: : Path to the directory in which the opsi packages are going to be created. This is ideally the path to the place where the
opsi_workbenchof your opsi-server is mounted.
Optional: Connection data for the opsi-webservice:
-
Service_URL : The URL of the opsi webservice (like: https://<opsi-server>:4447)
-
Service_user : The user name used to connect to the opsi webservice
-
Service_pass : The password of the given user used to connect to the opsi webservice
ATTENTION SECURITY RISK: Even it is stored encrypted, it is easy to decrypt be analyzing the source code. If empty you will be asked if the connection is started.
Optional:
-
control_in_toml_format : Create control file in (opsi 4.3) toml format ?.
If true, you need opsi 4.3 (or up)
and the toml file is the main control file that should be maintained. -
dependencies_for_all_actionrequests : Allow dependencies for all action request ?.
If true, you need opsi 4.3 (or up)
Be careful when creating dependencies for other action requests than "setup".
More details to the configuration you will find over here:
https://docs.opsi.org/opsi-docs-en/4.2/manual/modules/setup-detector.html#opsi-setup-detector-configuration
Opsi-setup-detector Online Help

A click to this question mark icon will open the general or context sensitive online help pages.
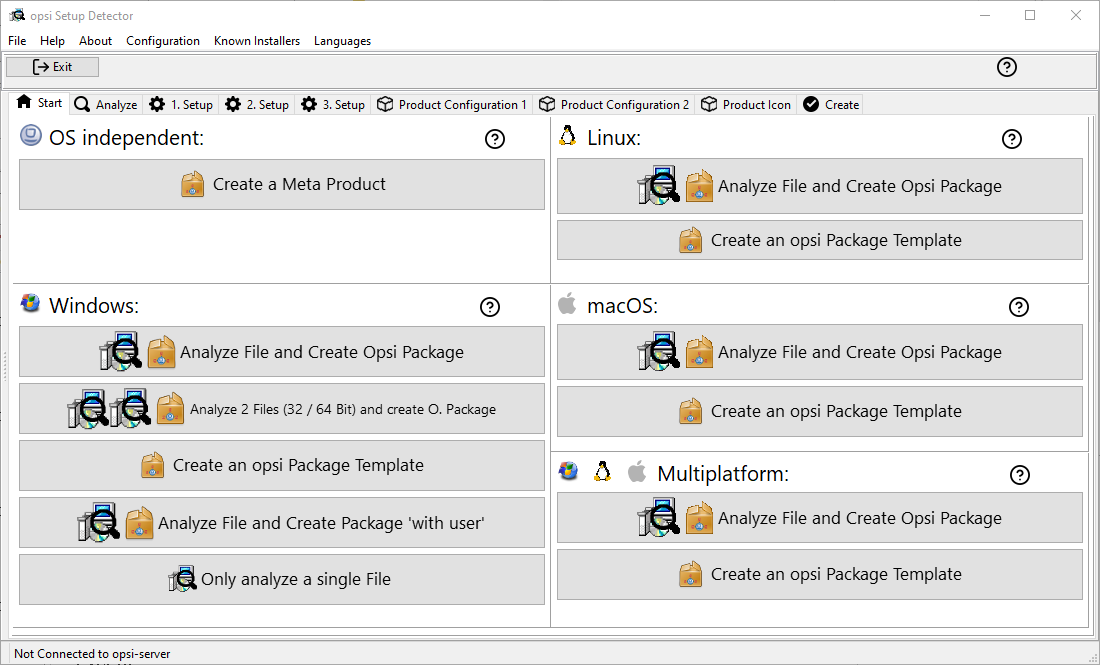
Opsi-setup-detector start page
On the main window, select the desired task and follow the dialogs or select the 'Next step' button.
The offered tasks are grouped by:
-
OS independent
-
Windows
-
Linux
-
MacOS
-
multi platform
The offered tasks for OS independent:
-
Create a Meta Product
A Meta Product is an opsi product, that installs nothing but contains a bundle of dependencies to other products.
By switching the action request for Meta Product to setup all the dependecies will be handled. So a Meta Product can be used to describe a target state for a complete installation. Meta Products can be nested: A Meta Product may have a dependency to an other Meta Product.
The workflow is similar to the process described in the next chapter but you will not be asked for any installation file to analyze.
All information is also stored in a fileopsi-project.osdin the base directory of the product. This file may be opened and used to modify the product.
The offered tasks for Windows:
-
Analyze file and create opsi package
Here, a setup file is analyzed and the entire process is run until an opsi package is created. This process is described in the next chapter. -
Analyze 2 files (32 / 64 bit) and create opsi package
The procedure is the same as in point 1 above with the following differences:
Two setup programs for the 32 and 64 bit architectures are queried and analyzed. The product gets an additional property: install_architecture with the possible values: 32bitonly, 64bitonly, both, systemspecific. -
Analyze file and create package 'with user'
Runs, similarly to point 1 above. The package is build based on the template for installation with logged on user.
The product gets the following additional properties: The property execution_method with the possible values: (loginOpsiSetupUser, runAsOpsiSetupUser, runOpsiScriptAsOpsiSetupUser), and the boolean properties: uninstall_before_install, copy_files_locally, debug. +.
For more Details see : opsi_template_with_userlogin -
Create an opsi package template
This point does not ask for a installer file, but creates a opsi template product for Windows with the information from the product configuration is already taken over. -
Only analyze single file
runs, similarly to point 1 above, only that is aborted after the analysis of the setup program.
The offered tasks for Linux:
-
Analyze a Linux installer file and create an opsi package
Here an installer file is used and the entire process is gone through including the creation of an opsi package. This process is described in the next chapter. -
Create an opsi package template for Linux
This item does not ask for an installer file, but creates a template similar to the opsi productopsi-template, with the information from the product configuration already filled in.
The offered tasks for macOS:
-
Analyze file and create an opsi package
A macOS installer file is used and the entire process is gone through including the creation of an opsi package. This process is similar to that described for Windows in the next chapter. -
Create an opsi package template
This item does not ask for an installer file, but creates an opsi template product for macOS, with the information from the product configuration already filled in.
The offered tasks for multiplatform:
-
Analyze a installer file and create an opsi package
A Windows, Linux and macOS installer file is used and the entire process is gone through including the creation of a multiplatform opsi package. This process is similar to that described for Windows in the next chapter. -
Create an opsi package template
This item does not ask for an installer file, but creates a multiplatform opsi template product for Windows, Linux and macOS, with the information from the product configuration already filled in.
opsi-setup-detector: Analyze file and create opsi package
The workflow is here described using Analyze file and create opsi package as an example.
After you selected the task, you will get a file selection dialog. Select now the setup file that has to be analyzed. The analyze will start directly after the selection is done.
opsi-setup-detector: Analyze
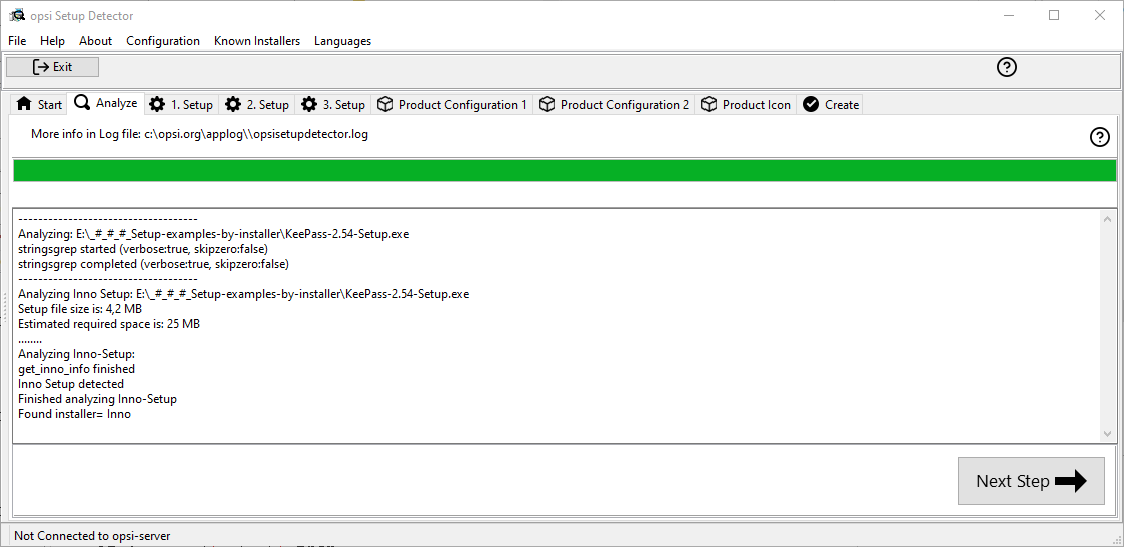
If the analyze found no result, you will get here a Sorry unknown Installer.
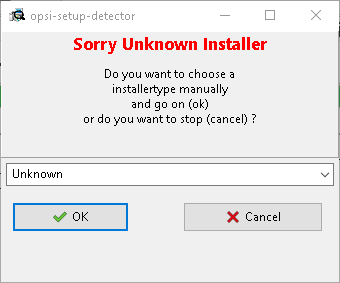
In this dialog you may choose to abort the create process. You may also choose to continue based on the pattern of a choosable installer type.
If we have a successful analyze, you will see the result page.
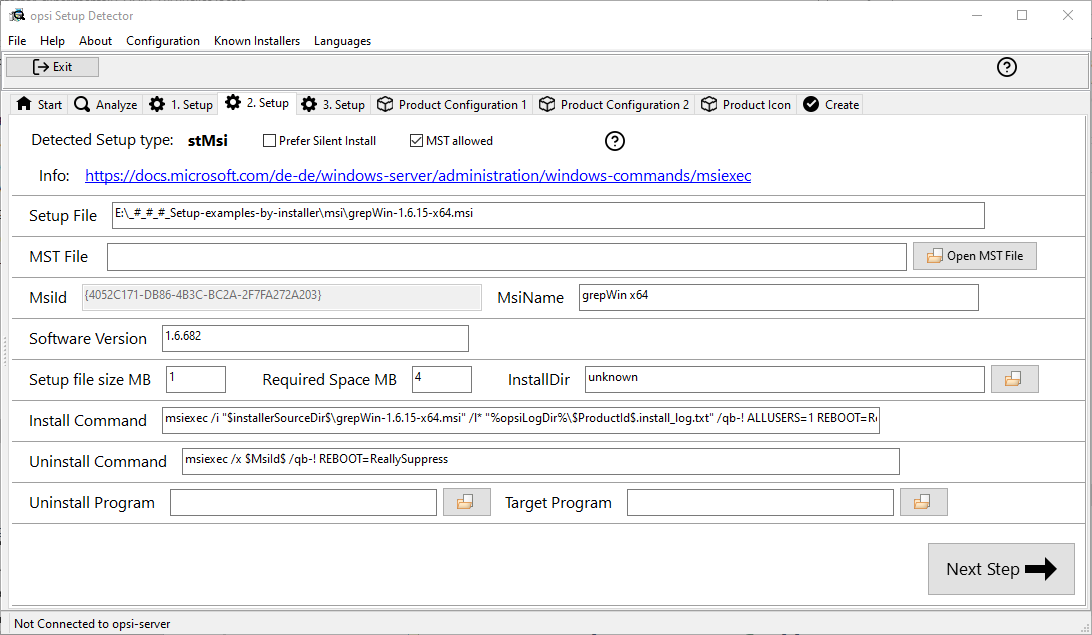
opsi-setup-detector: Result of the analysis
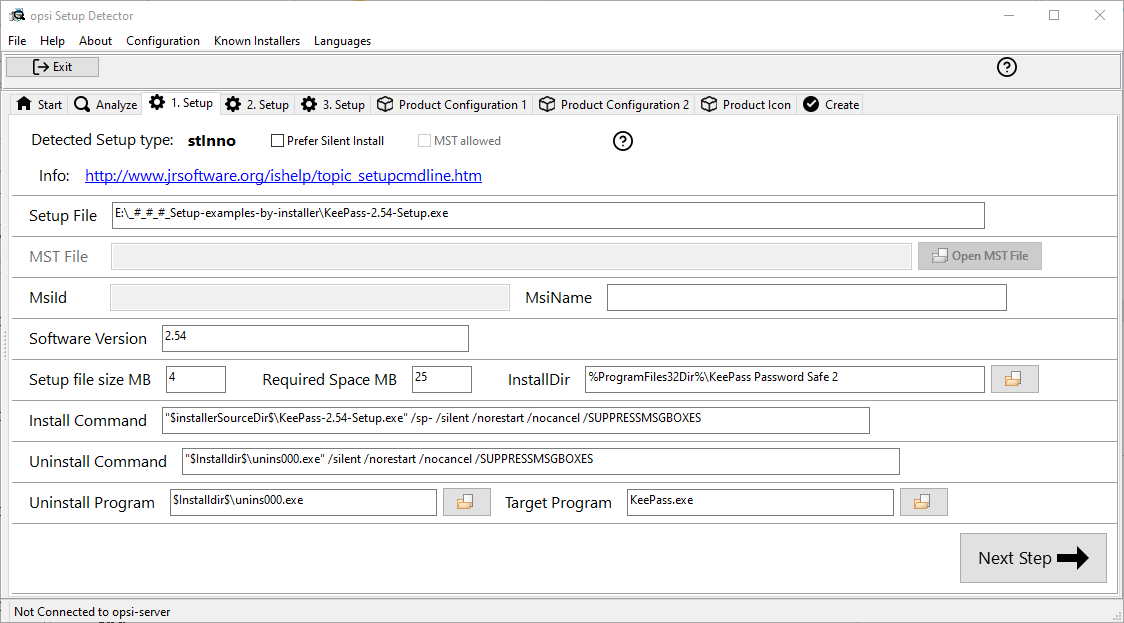
-
Detected Setup Type: Type of detected Installer
-
Prefer Silent Install:
Is a 'silent' installation preferred? (instead of a 'unattended') ? -
MST allowed: Is the additional use of 'mst' files allowed? (msi only)
-
Show Help: image::osd_help-circle20.png["Show Help", pdfwidth=10%]
-
Info Link with information about the installer
-
Setup file: Path and name of the analyzed setup file
-
MST file: For MSI installers or installers which contain MSI, an MST file can be specified here which will be integrated into the MSI call.
-
MsiId: For MSI installers or installers that contain MSI in the form of product code
-
MsiName: For MSI installers or installers that contain MSI in the form of product name as it will be used in the registry as 'DisplayName'.
-
Software version: The version of the software to be installed if determinable.
-
Setup file size MB: Size of the setup file in MB
-
Required space MB: This value is an estimate of six times the size of the setup file and can be adjusted if necessary
-
InstallDir: As far as detected the directory where the software will be installed.
You may also choose the directory via the selection button on the right (if the product is installed on this machine). If you there get a path like 'C:\program Files' or 'C:\program Files (x86)', it will be replaced by the matching opsi-script constant (e.g. '%ProgramFiles32Dir%'). -
Install Command: The determined command for a non-interactive installation. The details are dependent from the value of the checkbox
Prefer Silent Install:. -
Uninstall Command: The determined command for a non-interactive deinstallation. The details are dependent from the value of the checkbox
Prefer Silent Install:. -
Uninstall Program: The determined deinstallation program.
You may also choose the file via the selection button on the right (if the product is installed on this machine). -
Target Program: The main program of the software that has to be installed.
Will be used for creating desktop icons or start menu entries.
Will be not detected. You have to choose it via the selection button on the right (if the product is installed on this machine).
The values determined here can now be corrected or supplemented if necessary. The button Next Step leads to the first page of the product configuration. The metadata of the opsi product to be created is entered here.
|
The values determined here can be incorrect and are probably incomplete! After an initial installation, you should definitely check the values of InstallDir, Uninstall Program, Target Program: and Software version and adjust them in your script if necessary. |
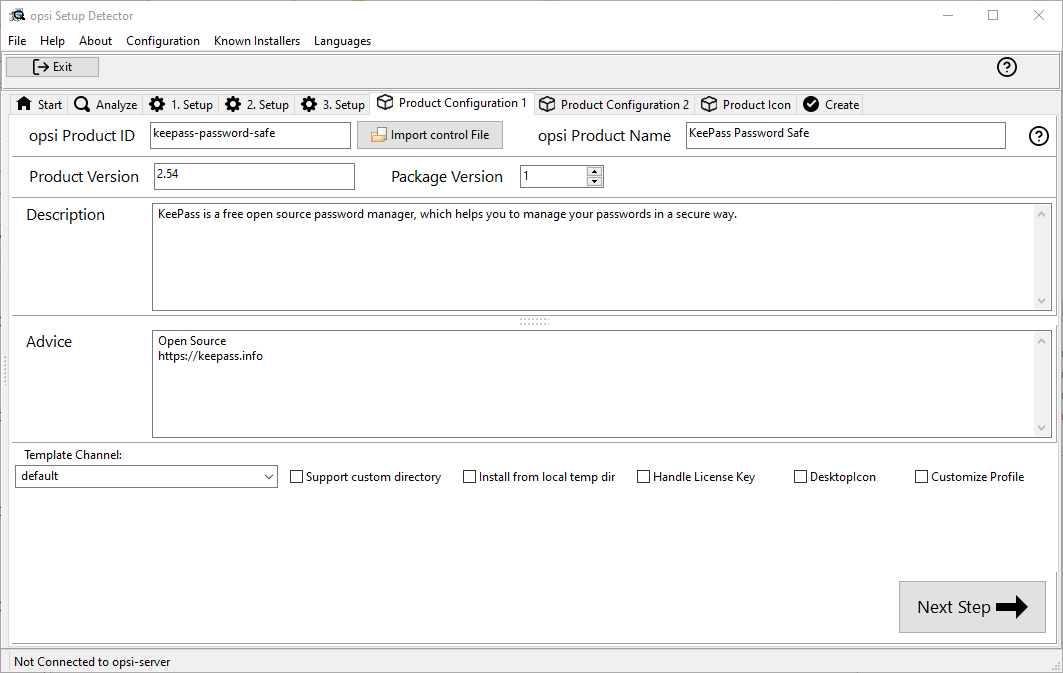
opsi-setup-detector: Product configuration 1
-
opsi Product ID: this is the name of the opsi package to be generated and is generated from the product name below, where spaces and other invalid characters are replaced by a '-'. The proposed opsi Product ID can of course be changed.
-
Import control File: With this Button, it possible to import some data from a existing opsi control file (
control, control.toml) into the running project. The following data will not be imported: version numbers, script names, required space. -
Product Name: the name of the software to install. This may have to be corrected manually.
-
Product Version: The version number determined from the name of the setup file must probably be corrected manually. It may only contain numbers and periods, since it’s used for the versioning of the opsi package.
-
Package Version: The version number of the opsi Package. This helps to make a difference between packages that contain the same software version but foe example different scripts. It may only contain numbers, since it’s used for the versioning of the opsi package.
-
Description: Usually a short description of the purpose of the software or the package.
-
Advice: Additional descriptions for example about origin (download link) and license
-
Template Channel: Here you may select from different sources of template files, that are used to create the product scripts. The following 'template Channels' are available:
-
Default: This is the default and fallback. If you choose any other channel and work with a task that does not provide the templates for this task, so the files from default will be used.
The basic script files for a product are: setup.opsiscript, uninstall.opsiscript, declarations.opsiinc, sections.opsiinc, delinc.opsiinc -
Training: The goal is to be more simple and more commented.
The basic script files for a product are: setup.opsiscript, uninstall.opsiscript, delinc.opsiinc -
Structured: Empty in version 4.2.2 (fallback to default)
-
Custom: This is empty be default. You may add your own templates. Therefor you have to copy your own templates to the directory 'opsi-setup-detector/custom/template-files/' on your opsi-depot.
-
Checkboxes for additional code
The following check boxes will add additional code and settings in order to handle special tasks:
-
Support custom directory : The product will contain a additional directory 'custom' to hold custom specific files. While installation of a new version of the product your custom directory and its content will remain. There will be code added to the scripts to copy files from the custom directory to the client.
More details: [opsi-setup-detector-support_custom_directory] -
Install from local temp dir : The installation files will be copied to a temporary, local directory in a first step. In a second step the installation will be started from the local directory. This is be useful especially for installation that may interfere wit the network connection (e.g. driver).
More details: [opsi-setup-detector-install_from_local_temp_dir] -
Handle License Key : Adds a property and code for the handling of a license key.
More details: [opsi-setup-detector-handle_license_key] -
DesktopIcon : Adds a property and code for the handling of desktop icons.
More details: [opsi-setup-detector-desktopicon] -
Customize Profile : Add to the installation code a 'Profileactions' section which is used for manipulating the local or roaming user profiles. For 'Roaming Profiles' the script will be also provided as loginscript.
More details: [opsi-setup-detector-customize_profile]
opsi-setup-detector: Priority and dependencies
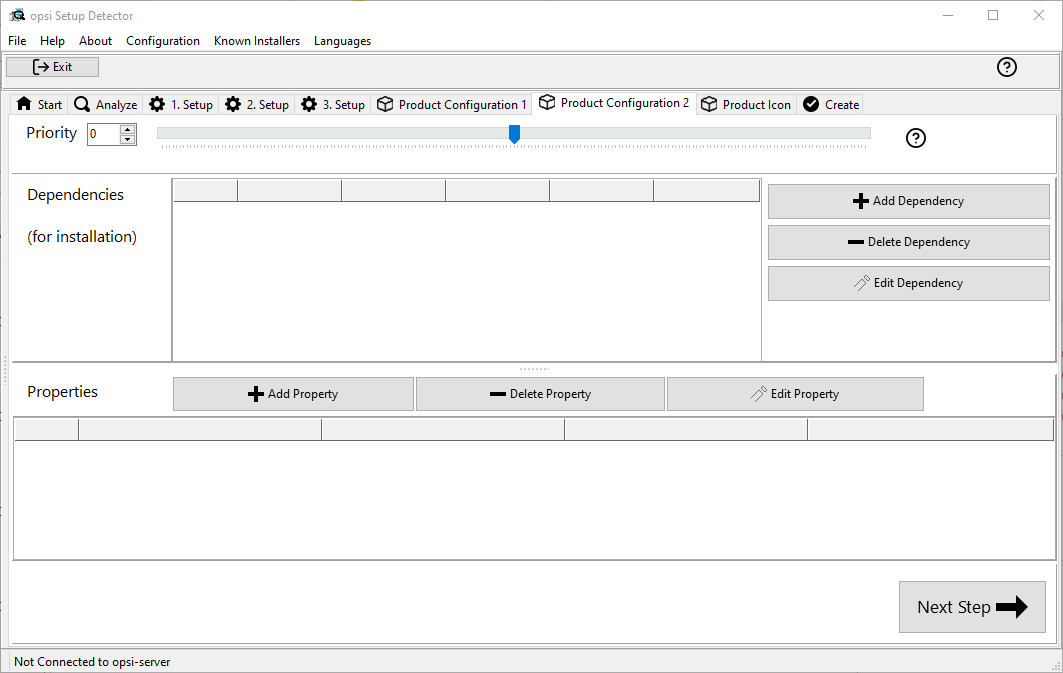
For normal application software you don’t have to do anything here, due to the fact that the default settings 'fit'. You can press the Next Step button.
Otherwise, here is an explanation of the settings that are possible:
- Priority
-
affects the installation order. Recommended for application software: 0
Possible values are between 100 (at the very beginning) and -100 (at the very end). If product dependencies also exist, these will also additionally influence the installation sequence.
Here you can define the dependencies between products.
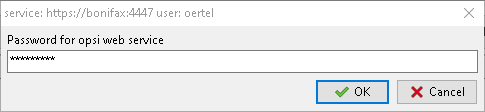
If the configuration contains the connection data for your opsi-server, the connection will here be started. If the configuration does not contain the password (for security reasons) you will be asked for the password:
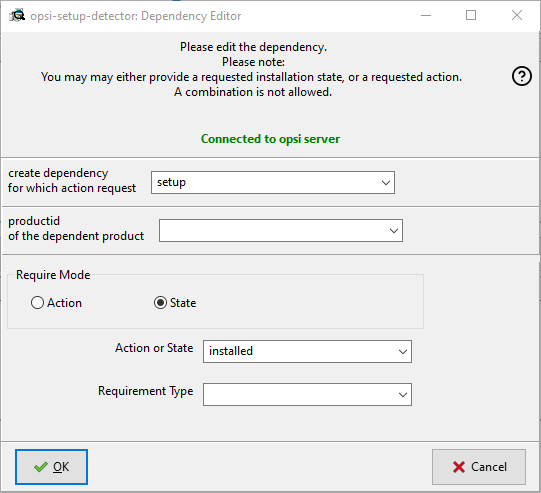
- Actionrequest
-
For which action request do you want to create a dependency ? This is normally
setup. Since opsi 4.3 it is also possible to use all other action request here. Use this possibility with care to avoid circular or contradictory dependencies.
This part is only enabled if you setdependencies_for_all_actionrequests = truein your configuration. - Productid
-
Productid (identifier) of the product to which a dependency exists.
If there is a connection to the opsi-server, this will be noticed in green letters and you may select the productId in the DropDownBox. If there is no connection, this will be noticed in red letters and you have to write the productId in the input field. - Require Mode
-
You can either request the Action setup or (see below) the State (installed).
- Action or State
-
For State: State that the product to which a dependency corresponds, should have (installed). If there is another status, the product is set to setup.
For Action: Action request, which should be set on the product, whereupon there is a dependency (setup).
This control is disabled while creating a Meta Product to avoid sense less changes. - Requirement Type
-
Installation order. If the product for which there is a dependency must be installed before the installation of the current product, then this is before. If it must be installed after the current product, this is after. If the order doesn’t matter then nothing has to be entered here.
This control is disabled while creating a Meta Product to avoid sense less changes.
Hint:
The actual installation order is determined by a combination of product dependencies and product prioritization. Details about this can be found in the opsi manual in the chapter 'Manipulating the installation sequence by priorities and dependencies'.
opsi-setup-detector: Properties
Here, editable properties (product variables) can be defined for the product.
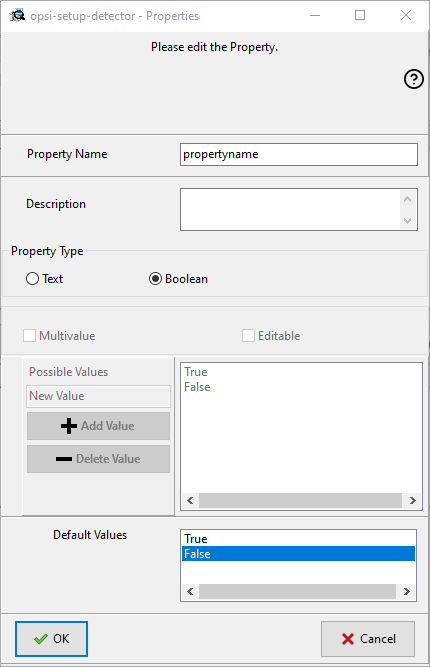
Field / Function |
Description |
Notes |
Property Name |
Name of the product variable |
This identifier is displayed in the product configuration in opsi-configed and can be read within the scripts with the function |
Description |
Variable function description |
Displayed as tooltip in opsi-configed |
Property Type |
Variable type |
Possible values: Text / bool |
Multivalue |
Determines whether the product variable can take only exactly one or multiple values |
Only available for type Text |
Editable |
Determines whether the default values can be overwritten with new or additional values or not |
Only available for type Text |
Possible values |
Comma separated list of possible input values |
If editable is set to “True”, the list can be added later within opsi-configed. |
Default value |
Default value |
Selection list; Only available for type text: Free text field. Only available for type Multivalue: Multiple selection |
opsi-setup-detector: Product Icon
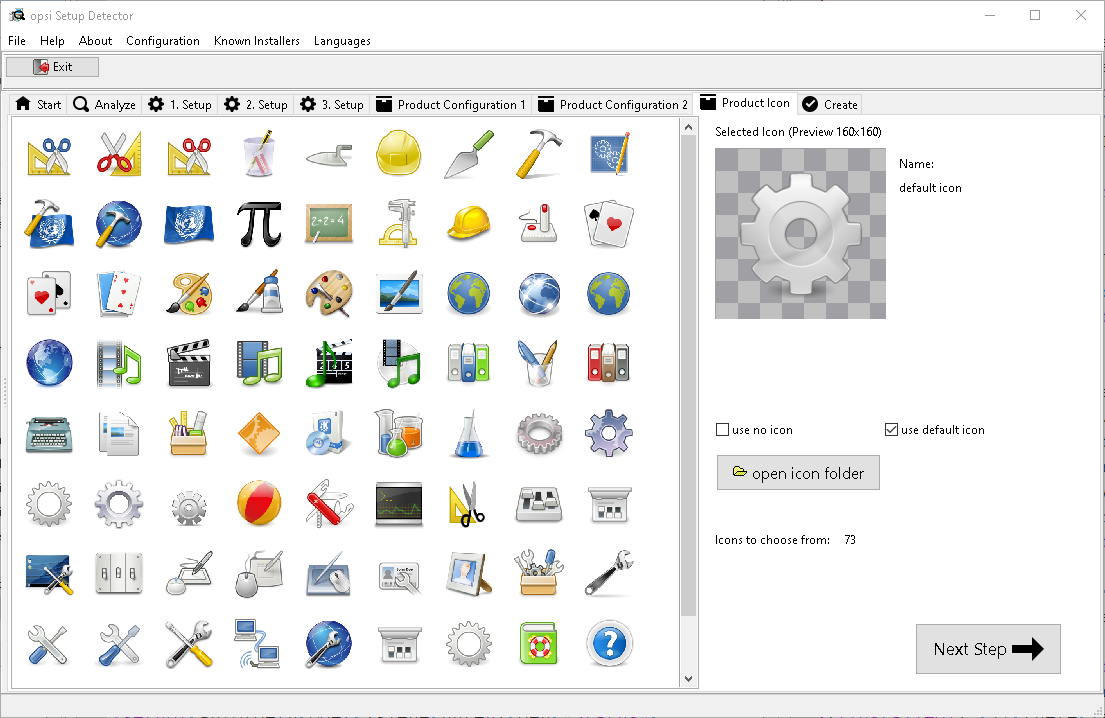
Here you can select an icon to be displayed during the installation or you can accept the default icon (cogwheel) with Next step and switch to the next tab…
To select another icon, use the button Open icon directory to select the directory in which you expect to find icons. As a preselection you get a directory of 'open source' icons: 128x128, supplied with the opsi-setup-detector. Select a subdirectory and the icons will be displayed.
Now you can select an icon from the display.
After the product configuration is performed, the product can be created.
opsi-setup-detector: Create product
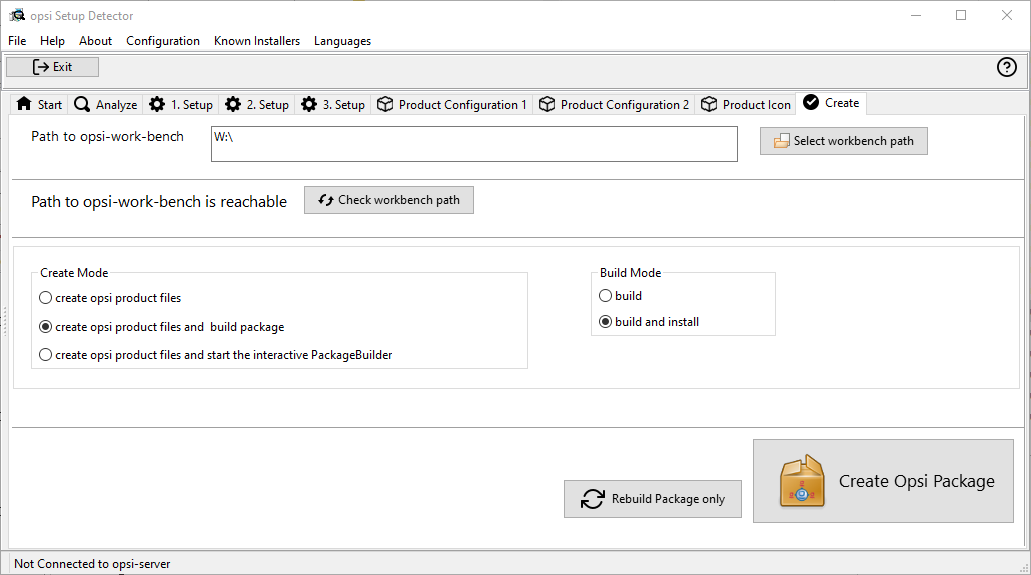
-
Path to opsi-workbench is a drive letter or UNC path where the share opsi_workbench of your opsi-server is mounted.
-
To the left of the button Create opsi package there are three possible options, which refer to the function of the button:
-
Create Mode is a selection area where you can specify what happens when creating the package:
-
Create opsi product files creates the directory tree for the new opsi package on the selected opsi workbench if it does not already exist. The files required for the package will be created or copied.
-
Create opsi product files and build package performs the operations described in the first point.
Additionally, we try to build and perhaps install the package on the opsi server.
If we have the connection data to the opsi web service (see also: Opsi-setup-detector Start and necessary configurations), we connect the opsi web service. If there is no password stored in the configuration, you will be asked for the service password. If the version of the opsi web service is 4.2.0.287 or higher, we use the opsi web service to do this task.
If we can not connect to the opsi web service or if the web service is to old, then the opsi Package Builder is called (without GUI) to create the opsi package from the created directory tree and will be terminated if the job is done.
The exact processes are determined by the selection field Build Mode:-
Only build just create the opsi package like calling the server command
opsi-makepackage. -
build and install create the opsi package like calling the server command
opsi-makepackage. Afterwards the new package is installed like calling the server commandopsi-package-manager --install <package name>.
-
-
Create opsi product files and start interactive package builder performs the operations listed in the first item.
Additionally the opsi Package Builder is called interactively.
You have to quit it yourself to return to the opsi-setup-detector. For installation, configuration and operation of the community project opsi Package Builder check https://forum.opsi.org/viewforum.php?f=22 -
Create opsi package is the button that initiates the package creation.
If a package with this name already exists, you will be asked if the files in the existing directory should be backuped or deleted:
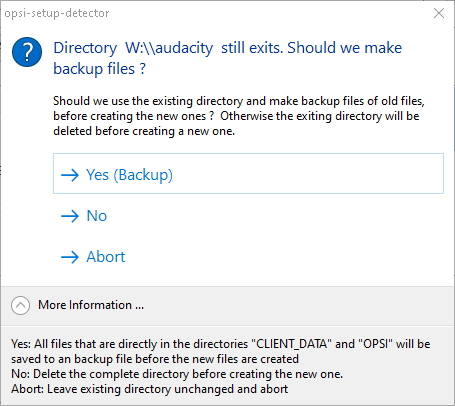
If while creating the new product files a existing directory is detected, you will be asked how to handle the old existing files.
-
Rebuild Package only is the button that initiates the rebuild of the opsi package (via webservice) without recreating the opsi files. So it can be used to rebuild and install the opsi package after you modified the script via editor without loosing your changes.
While creating the new product files, all given data of the project will be stored in the file opsi-project.osd in the base directory of the project. This file may be used later, to reopen the project.
opsi-setup-detector: Reopen a Project
A existing Project can be reopend by the opsi-setup-detector in two ways:
-
If it was created by the opsi-setup-detector, you may use the menue entry:
File / Open Project File. -
If it was not created by the opsi-setup-detector, you may use the menue entry:
File / Open Control Fileto open the filecontrolbzw.control.tomlin theOPSIdirectory of the product.
In this case you will have less information e.g. about the used installer files.
Opsi-setup-detector: Analyze two setup files (32 and 64 bit) and create one opsi package
This item corresponds to the Analyze file and create an opsi package described above with the following addition:
Two setup programs for the 32 and 64 bit architectures are queried and analyzed. The product gets an additional property: install_architecture with the possible values: 32bitonly, 64bitonly, both, systemspecific.
Opsi-setup-detector: Only analyze single file
This item corresponds to the Analyze file and create an opsi package described above with the following restriction:
After the analysis the process will be aborted.
Opsi-setup-detector: Create an opsi package template
This item corresponds to the Analyze file and create an opsi package described above with the following restriction:
it does not ask for a setup file and therefore the analysis is not necessary. Rather a general script template is created.
Opsi-setup-detector: Configuration
-
Name :
(Used for entries in the changelog.txt) -
Email :
(Used for entries in the changelog.txt) -
Path to the opsi-workbench :
Path to the directory in which the opsi packages should be created. This is ideally the path to the place where the opsi_workbench of your opsi-server is mounted. -
Path to the OpsiPackageBuilder :
Path to the OpsiPackageBuilder. OpsiPackageBuilder is used to build the opsi packages via ssh.
see also: https://forum.opsi.org/viewtopic.php?f=22&t=7573
-
Service_URL :
The URL of the opsi webservice (like: https://<opsi-server>:4447) -
Service_user :
The user name used to connect to the opsi webservice -
Service_pass :
The password of the given user used to connect to the opsi webservice
ATTENTION SECURITY RISK: Even it is stored encrypted, it is easy to decrypt be analyzing the source code. If empty you will be asked if the connection is started.
-
BuildRadioIndex :
Selects theBuild ModeRadiobutton. -
CreateRadioIndex :
Selects theCreate ModeRadiobutton. -
control_in_toml_format :
Create control file in (opsi 4.3) toml format ?.
If true, you need opsi 4.3 (or up)
and the toml file is the main control file that should be maintained. -
dependencies_for_all_actionrequests :
Allow dependencies for all action request ?.
If true, you need opsi 4.3 (or up)
Be careful when creating dependencies for other action requests than "setup". -
preferSilent :
Default value forPrefer Silent Install:
Should really silent installs (with no output) be preferred ? Default is false = unattended is preferred. -
Readme_txt_templ :
Path to the text file that is used as Read-me template. -
registerinfilemanager :
Should this program be registered to the Filemanager (Explorer) context menu ? -
templateChannel :
Default value for the 'Template Channel' to use. -
UsePropDesktopicon :
Default value for:
Should we create a "DesktopIcon" property and add code to handle desktop icons ? -
UsePropLicenseOrPool :
Default value for:
Should we create a "LicenseOrPool" property and add code to handle license keys ? -
workbench_mounted :
Automatically detected. Is the opsi workbench reachable at workbench_Path.
-
import_libraries :
List of opsi-script libraries that have to be imported.
One per line. May be empty. Example:
myinstallhelperlib.opsiscript
Configurations where you can enter opsi-script code for certain jobs :
opsi-script code lines which will be inserted.
List of opsi-script code lines that should be included.
One per line. May be empty. Example:
comment "Installation finished…"
-
preinstall lines :
opsi-script code lines that should be included before the installation starts. -
postinstall lines :
Lines that should be included after the installation finished. -
preuninstall lines :
opsi-script code lines that should be included before the uninstallation starts. -
postuninstall lines :
opsi-script code lines that should be included after the uninstallation finished.
-
config_filled :
Automatically detected. Do we have all needed configurations ? -
config_version :
Do not change. Version of the config structure. -
LasticonFileDir :
Last directory used to open a icon file. -
LastProjectFileDir :
Last directory used to open a project file. -
LastSetupFileDir :
Last directory used to open a installer or setup file. -
Show2StepMacSeletionWarn :
Do not change here - Internally set by a dialog. -
ShowCheckEntryWarning :
Do not change here - Internally set by a dialog.
opsi-setup-detector: Problems and solutions
The opsi-setup-detector is designed in such a way that it is as easy as possible to be continuously maintained and expanded.
Certain customization options and help with problems are presented in the following.
If you have ideas and / or wishes beyond that, please contact us at (info@uib.de) - we are looking forward to your suggestions.
Logging
The opsi-setup-detector creates log files under
c:\opsi.org\applog\opsisetupdetector.log.
Older log files are located in the same directory as opsisetupdetector_0.log to opsisetupdetector_8.log.
The log file becomes very large because it contains the complete data of the analysis of the setup file(s). For the analysis of the log file we recommend the opsi-log-viewer or another editor which can hide the unneeded log levels, because the text patterns found in the setup (on log level 8) in many cases are not so relevant.
Language support
When the program is started, the language of the Windows system is automatically determined. If a suitable language file is found for the language, it is used. If no supported language is found, English is used.
You can select the language via the menu item Languages or via the command line parameter --lang=xx where xx stands for the selected language.
Currently the 'opsi setup detector' supports :
-
German
-
English
-
French
-
Spanish (incomplete)
Additional languages can be easily added to be translated via a language file.
Translations are done via the portal:
https://explore.transifex.com/opsi-org/opsiorg/
We look forward to your support
Unknown Installer
Surely you will come across the message Unknown Installer while working with the opsi-setup-detector. Then the opsi-setup-detector did not recognize the installer framework with which this installer was made.
Suggestions:
-
Check if the file is really an installer. (Sounds stupid, but it happened to me already)
-
Search the Internet for the keywords 'silent' and product name
-
Maybe the links on this page will help you:
https://wiki.opsi.org/
Once you have solved the problem, let us, (and the opsi community) know about experience.
The new (internal) design of the opsi-setup-detector makes it possible to easily add new installers. What we need is :
-
Example setup program
-
Manufacturer or typical command line Switch for installation and uninstallation
-
Informative links to the problem
False detection
Especially in the context of the increasing number of supported (i.e. detected) installers, false detection can occur.
This happens especially when an installer contains several software components which are packed with different installers.
Should you discover such a problem, please inform us and have the appropriate example and the correct solution ready.
Program error
If the opsi-setup-detector behaves strangely or does something unexpected, please backup the corresponding log file from c:\opsi.org\applog\ (see also: Logging) and inform us about the problem at info@uib.de. Also have the sample file ready, as we may need it to reproduce the problem.