opsi Management GUI: opsi-configed
Requirements and operation
The opsi-configed works with the data from a running opsiconfd at least of version 4.1.
On top of that, you can download the opsi-configed also as a portable for the operating systems Windows, Linux and MacOS from :http://download.uib.de/4.2/stable/misc/[]. This way you can also start the program without installation.
On every system - if the necessary jar-archive is available - you can start the opsi-configed with the command java -jar configed.jar.
With java -jar configed.jar --help you’ll get a list of the command line options:
-l [LOC]		            --locale [LOC]			                        Set locale [LOC] (format: <language>_<country>)
-h [HOST]		            --host [HOST]			                          Configuration server [HOST] to connect to
-u [NAME]		            --user [NAME]		                            User for authentication
-p [PASSWORD]	          --password [PASSWORD]		                    password for authentication
-c [CLIENT]	            --client [CLIENT]		                        [CLIENT] to preselect
-g [CLIENTGROUP]        --group [CLIENTGROUP]	                      [CLIENTGROUP] to preselect
-t [INDEX]		          --tab [INDEX]                               Start with tab number INDEX, index counting starts with 0, works only if a CLIENT is preselected
-d [PATH]			          --logdirectory [PATH]                       Directory for the log files
-r [REFRESHMINUTES]		  --refreshminutes [REFRESHMINUTES]			      Refresh data every [REFRESHMINUTES]  (where this feature is implemented, 0 = never)
-qs [SAVEDSEARCH_NAME]	--querysavedsearch [SAVEDSEARCH_NAME]	      On command line: tell saved host searches list resp. the search result for [SAVEDSEARCH_NAME]
--ssh-key SSHKEY					                            	            full path with filename from sshkey used for authentication on ssh server
--ssh-passphrase PASSPHRASE			                                    passphrase for given sshkey used for authentication on ssh server
--version								                                            Tell configed version
--collect_queries_until_no [N]		                           	      Collect the first N queries; N = -1 (default, no collect), 0 = infinite
--help								                                              Give this help
--loglevel [L] 						                            	            Set logging level [L], [L] is a number >= 0, <= 9, Default 4
--halt								                                              Use first occurring debug halt point that may be in the code
--sqlgetrows							                                          Force use sql statements by getRawData
--nosqlrawdata			                                                Avoid getRawData
--localizationfile [EXTRA_LOCALIZATION_FILENAME]					          Use [EXTRA_LOCALIZATION_FILENAME] as localization file, the file name format has to be: configed_LOCALENAME.properties
--localizationstrings												                        Show internal labels together the strings of selected localization
--swaudit-pdf FILE_WITH_CLIENT_IDS_EACH_IN_A_LINE [OUTPUT_PATH]		  export pdf swaudit reports for given clients (if no [OUTPUT_PATH] given, use home directory)
--swaudit-csv FILE_WITH_CLIENT_IDS_EACH_IN_A_LINE [OUTPUT_PATH]     export csv swaudit reports for given clients (if no [OUTPUT_PATH] given, use home directory)
If the opsiconfd does not work on the default port 4447, it should be specified on the start of the opsi-configed (host:port).
Logging of the 'opsi-configed'
By default, the 'opsi-configed' uses its log level 4 "Warning". The level can be changed to levels between 1 and 9.
To change the log level the command line option --loglevel [LEVEL] can be used. The log level should only be set to 7 or higher at the start if the configed start already causes problems. Otherwise the log file will be extremely large and it will be difficult to get loaded and shown. When the 'opsi-configed' is running and a potential error situation is expected the log level can be raised via the menu entry Help/ConfigEditor log level.
Level 6 can be helpful since then service calls are logged. Level 7 offers a more detailled view of actions.
Since version 4.1 the logfiles are deposed by default in the user home directory. In Windows the folder
c:\Users\[User name]\AppData\Roaming\opsi.org\log
In Linux the default logfiles folder is the (hidden) subfolder ".configed" in the user home directory.
The current logfile is named configed.log, the up to 3 preceding versions are configed_0.log, configed_1.log, configed_2.log.
The logging directory can be changed via the command line option "-d".
The current logfile path is displayed at the Help menu, entry "Current logfile". The filename can there be retrieved in order to use it in an open file dialog of a viewer program or can be directly opened by the default application for .log files.
Choosing the language
The 'opsi-configed' tries to use the language following the OS defined locale. If the matching translation file is missing English is used as default language. If terms in translations file are missing the expressions of the Englisch translation are used as default.
When calling the 'opsi-configed' you can set a locale via the command line option
-l resp. --locale
On principle, the locale has the format language_region, each component with two characters, eg. en_US of de_DE. It suffices to give the two character language code since there no region specific variants prepared.
In a running 'opsi-configed' the language can be switched via the menu item File/International. A change triggers a re-initialization of the program with a (nearly complete) rebuilding of the visual components in the new language.
Finally the call parameter
--localizationfile
can be used for directly prescribing a localiziation file. The additional parameter
--localizationstrings
has the effect that the display of the localized expressions is combined with displaying the terms for which expressions should be given. This can be used for producing and testing a localization file.
Logging of the 'opsi-configed'
By default, the 'opsi-configed' uses its log level 3 "Info". The level can be raised to 4 "check" or 5 "debug".
To change the log level the command line option --loglevel [LEVEL] can be used. It is not recommended to set level 5 if not already the start process has problems since, with level 5, the produced log file is very large; it is difficult to view. When the 'opsi-configed' is running and a potential error situation is expected the log level can be raised via the menu entry Help/ConfigEditor log level.
Level 4 can be helpful since with it, the service calls are logged. Level 5 often offers a detailled view of actions.
By default the logfiles are deposed in the user home directory in the subfolder ".configed". The current logfile is named configed.log, the up to 3 preceding versions are configed_0.log, configed_1.log, configed_2.log.
In newer versions of windows the user home directory is interpreted as
c:\users\[USERNAME]\appdata\local
Observe that the Windows Explorer shows a localized version of "users" and does not give "AppData" in the listing of "c:\users\[USERNAME]". But the AppData folder contents appear, when "appdata" is supplemented to its superfolder name.
The logging directory can be changed via the command line option "-d". The opsi product opsi-configed uses this option to set the logging directory to
c:\opsi.org\log
But only local administrators can write to this location. If other users start the 'opsi-configed' the location
c:\users\[USERNAME]\appdata\local
will therefore again be used.
Login
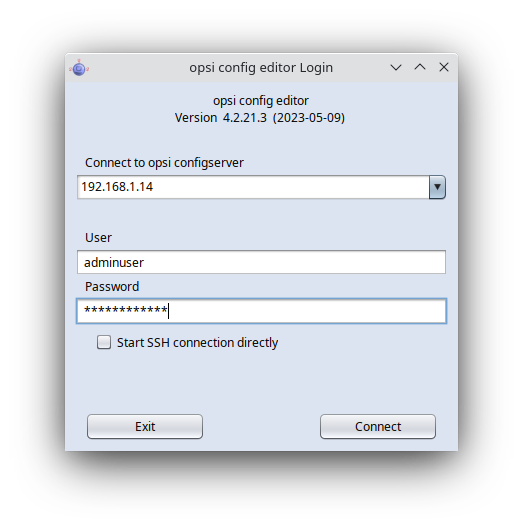
The 'opsi-configed' tries to connect to the opsi server via https. The login is done with the given parameters 'opsi server[:Port]' (default port 4447 – opsiconfd) and the user/password pair of the 'opsi-configserver' account. For a successful login the provided user has to be a member of the unix group 'opsiadmin'.
In the local user profile, the 'opsi-configed' saves certain session info in order to rebuild the essential working context after a restart, in particular a selected client group. Since version 4.0.7 the session data is used to produce a selection list of opsi servers to which you were connected (e.g. a productive one and a second one for experimental purposes). The last server used gets the highest place, and can be directly used again.
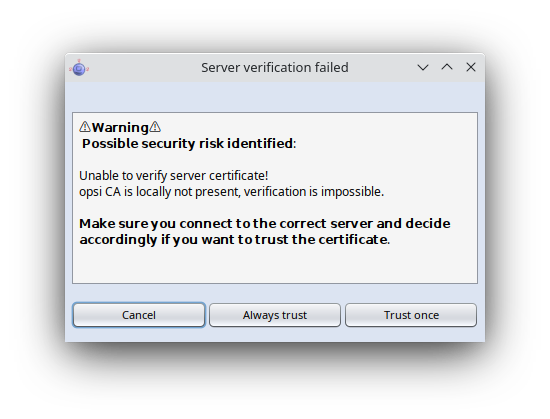
Before connecting to a server, a verification of the opsi-CA certificate takes place. The first time you connect to a server, you must first confirm that you trust the server’s certificate. By clicking on 'Trust once' you connect and the warning occurs again the next time. If you click on 'Always trust', the certificate will be saved in a local folder and will also be used for future connections. The purpose of this is that from then on this warning should only occur if an attacker with a forged certificate tries to connect to you and thus obtain your login data.
Copy & Paste, Drag & Drop
You may copy the selected entries from nearly every section of the 'opsi-configed' to the clipboard using the standard key combinations ('Ctrl-Insert', 'Ctrl-C'). This may be used to transfer interesting data to other programs.
For most of the tables you may also use 'Drag & Drop' to copy the data e.g. to 'Excel' or a
opsi-configed modes Client configuration / server configuration / license management
To switch between the different usage modes of the 'opsi-configed', use the buttons in the upper right corner of the 'opsi-configed' frame. Since version 4.0.4, there are six buttons.

The first three buttons allow you to change the editing target of the main window: client configuration, server configuration. On the other hand, each of the buttons 'group actions', 'product actions' and 'license management' starts a special window to manage the specific objects or actions.
These windows can as well be opened via the main menu item 'windows' (since 'opsi-configed' version 4.0.7).
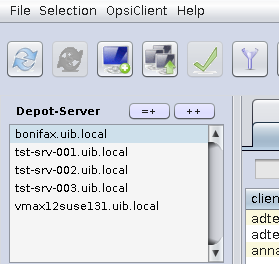
Depot selection
All opsi-depotservers that are integrated with your server, are listed in the upper left corner of the 'opsi-configed'. By default the depot on your 'opsi-configserver' is selected and the clients belonging to this 'opsi-depot' are shown.
You can select multiple Depots at the same time and edit their clients together. However, only the selected depots are synchronized with each other. Trying to edit clients from asynchronous depots together will be rejected with an appropriate warning and the corresponding error message.
As of version 4.0.5, there is no need to carry out a complete data-reload when switching to a different depot-server, that means, when you select a depot its data is loaded immediately. In addition, there are the following buttons:
-
(=+) : Marks all depots with identical product stocks.
-
(++) : Marks all depots (you can also use Ctrl-a)
Cient selection
After a successful login, the main window pops up and shows the tab 'Client selection'. This tab shows a list of known clients from the selected 'opsi-depot' resp. the clients which are selected using the 'tree view control' on the left side of the 'opsi-configed'.
Since version 4.0.4, the 'opsi-configed' saves on the local machine, for the current user, the current depot server and group selection. If the 'opsi-configed' is restarted, you can continue working at the point where you were.
Please note, that group selection is preserved when changing depot selection. In order to see all clients in the other depot the group selection has to be changed appropriately. the same pattern of work.
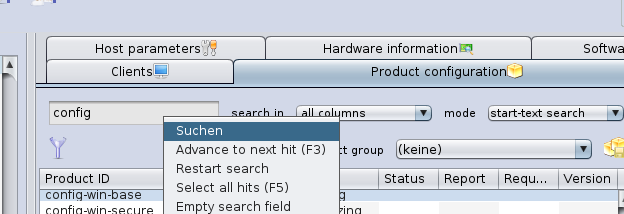
You may select a line of the list not only by manual scrolling and selecting but also by a String search. This requires that you enter a String into the search field at the top of the list
How the search works is determined by the selected elements in two drop down lists:
Via field selection you can choose if
-
all fields (more precisely, all fields that are for this temporary configuration represented as columns) are searched (default), or
-
only one field (and which one) is searched.
Concerning the method of search you may select between the options (since 4.0.7):
-
Full-text: the search string is used in a similar way to a web search on a certain search engine for example in the standard manner; i.e., if the input contains several keywords (delimited by blanks) then the word elements will be a match if any of the input parts are fully contained in some of the columns.
-
Full-text (complete string): the search string is used like using a web search on a search engine the search string embraced by citation marks; i.e. a table line will match if the complete input string is part of one of the columns content.
-
Start-text search: a table line will be a match if the column text starts with the search string.
-
Regular expression: the search string is interpreted as a so called regular expression; i.e., a line will be a match if the input string produces a match according to the rules of regular expressions (as described in the java doc for java.util.regex.Pattern).
The enter key produces the next search hit. If there is no match it advances the mark to next line.
More selection functions based on String search are shown in the context menu of the search field.

|
Examples of Search Patterns
All PCs which have a name or a description containing the character sequence Miller with capital M or with m are found by using the pattern .*iller.* The dot in " .* " means "arbitrary character", the asterisk " * " means "arbitrary number of occurrences (of the beforehand designated element)". That is .*iller.* it matches, if anything (any number of any characters) come before iller and anything after iller. Since "any number" may be zero Home of Miller matches where no character follows after iller. But to ensure that we do not mark Tiller as correct a more precise pattern would be .*[Mm]iller.* Several characters enclosed in brackets are interpreted as the searched value must contain one of the enumerated characters. With this more precise pattern, every string is recognized which contains either Miller oder miller but no other string. Here is yet another example, a pattern search for products: 0.-opsi.*standard matches for all products which have a name beginning with "0", followed by an arbitrary character, followed by -opsi, followed by arbitrary characters (in arbitrary number); finished by standard. To ensure that the second character is a number symbol, i. e. one of the characters "0", "1", "2", "3", "4", "5" , "6", "7", "8", "9", one can write 0[0123456789]-opsi.*standard As short hand for [0123456789] one can use, since it is a complete partial sequence of the sequence of all characters, [0-9]. Therefore the search pattern reduces to 0[0-9]-opsi.*standard Matching products e.g. 03-opsi-abo-standard or 05_opsi-linux_standard More informations on the topic can be found in the java api doc, key word "java.util.regex.Pattern". |
The clients list
The clients list has per default the columns 'client name', 'description', 'on', 'IP address' and 'last seen'.
-
'client name' is the 'full qualified hostname' which is the client name including the domain name
-
'description' is a free selectable description which you can edit in the top right hand side of the window
-
'On' shows after clicking the button 'Check which clients are connected' the result of this query. This feature runs in the background and shows the results in the client table. It can be enabled from the login screen mask or via command line parameter. The default refresh interval is 0 min (= deactivated).
-
'IP address' shows the IP number to which the opsi server resolves the client name.
-
'last seen' shows the date and a time of the last client connect to the opsiconfd web service
Some columns are deactivated by default:
-
'session infos' (data is retrieved from the operating system running on the specific client)
-
'Inventory No' (displaying some optionally entered data)
-
'created' (date and time of client creation)
-
'opsi mac address' (hardware address of the client as used by opsi)
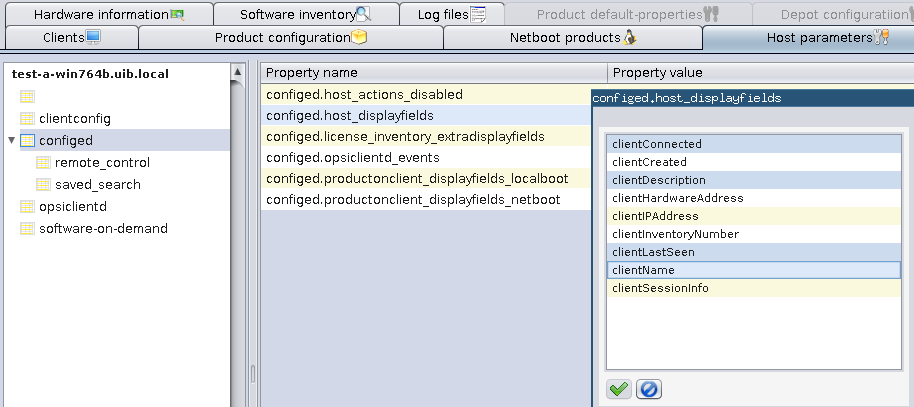
You may activate these columns using the context menu. The configuration of the columns being displayed may be changed using the entry 'configed.host_displayfields' in the server configuration.
Adding the column 'session infos' enables the button "request session infos from all clients" in the button panel.
When this button is clicked the 'opsiconfd' tries to connect to all clients and to retrieve data of the active user sessions. From the result, the account names are shown in the column 'session infos'. Instead of using the button you may start the request only for the selected clients via the context menu or the main menu entry 'OpsiClient'. By doing this, network timeouts are avoided.
Since the search function for the client list works (if not configured otherwise) on all displayed columns you may now find out which is the client belonging to a logged in user (with known account name).
To sort the clients by a certain column click on the top header of that column.
Selecting clients
You can select one or multiple clients to work with. The client view can be restricted to the selected clients by clicking the funnel icon or from the menu by 'Grouping / Show only selected clients'.
A selected client group can be saved with the icon 'Save grouping' or from the menu by 'Grouping / save group' with a free selectable name.
You can use the mouse to add the selected clients to an existing group (by dragging them to an existing group which is displayed in the tree view).
In the client selection dialog (as called via menu 'Selection / Define search') clients can be selected using a variety of criteria based on their configurations.
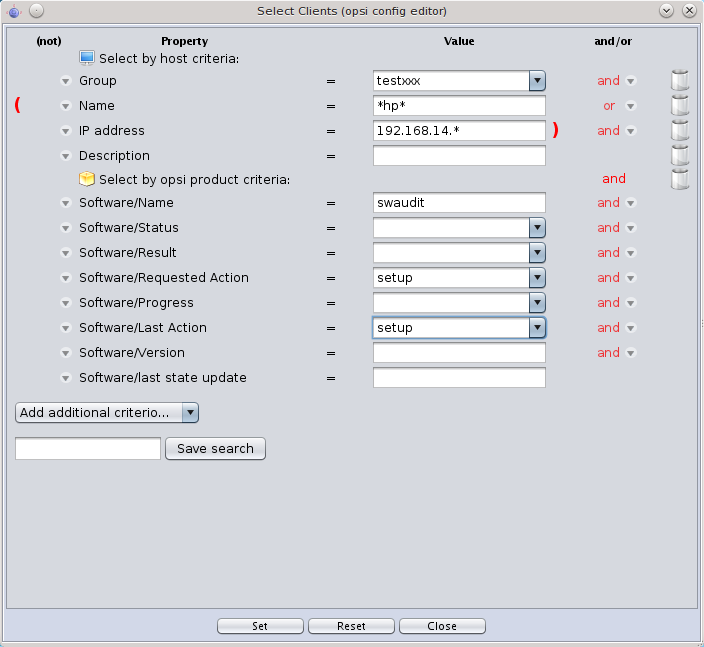
E.g., it is possible to search for opsi installed products as well as software found by the opsi software audit. You may as well search for PCs satisfying certain hardware conditions. Criteria may be combined by logical 'AND' or 'OR' operations and may be negated by a 'NOT' (which is produced by a click on the Not-Field before the property field). Search strings can be given as fixed strings combined with asterisks '*' as wildcard symbols.
Search definitions can be saved and then again used via the menu item 'Selection/Use saved search definition'.
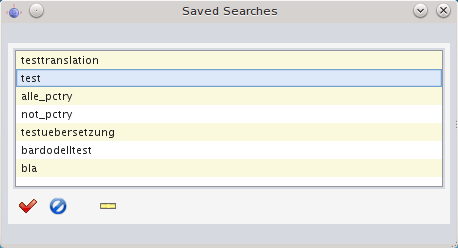
It is also possible to run a saved search from the command line when the opsi-configed editor is started. By including the flag "-qs" and the name of the saved search, the configuration editor will start with the saved search results. If the name is omitted, then a list of available searches will be displayed.
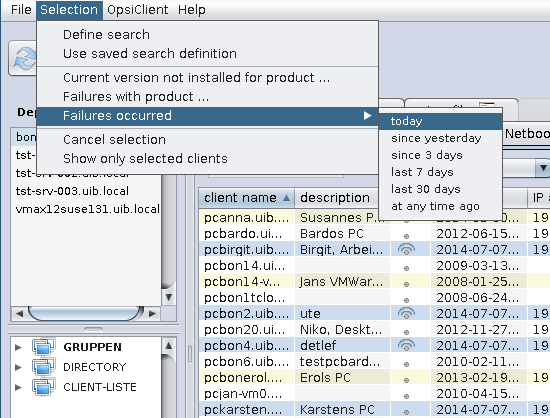
To detect failed installations, the menu item Selection offers Failures with product and Failures occurred (today, since yesterday, …), since version 4.0.5 .
Choose the first setting to get a list of all products. If you select a single product, all clients will be shown, where the installation of this product failed.
When choosing for instance Failures occured - today, all the clients will be marked, where an product installation failed today.
Client selection and hierarchical groups using the tree view
Clients can be grouped in a convenient way by using the tree view control placed on the left side of 'opsi-configed' frame.
Basic concepts
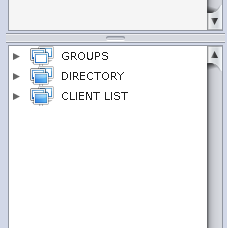
The tree view control has three base nodes 'groups', 'directory' and 'client list'. Alls clients of the selected depots are displayed in the group 'client list'.
The nodes 'groups' and 'directory' are different in so far as each client can have any number of locations in the 'groups' subtree but has a unique location in the 'directory' subtree; as long as there was no other assignment to subgroup of 'directory' a client is automatically placed into the group 'NOT_ASSIGNED'.
If you select a client, all groups to which the client belongs will get color marked icons.
How to …
By a click one a node (or a group) all clients beyond this node will be shown in the 'Clients' tab, but none of these clients is selected for processing.
By a click one a client, this client will be shown in the 'Clients' tab and selected for processing. You may also use this way to change the selected client while you are in a other tab like product configuration without coming back to the clients tab.
You may use Ctrl-click and Shift-click to select multiple clients. This tree view control show the groups which are created according the chapter
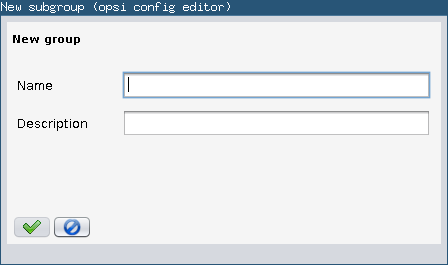
You may also create groups by using the context menu above 'ALL' or any existing group.
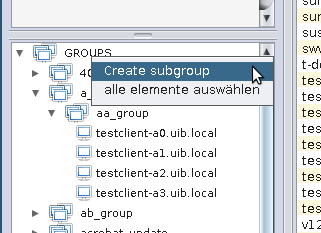
You will be asked for the new groups name.
A group can be populated with clients using Drag&Drop by
-
copying clients from the 'Clients' tab to the group in the tree view (left mouse button)
-
copying clients from the tree view control below the node 'ALL' to group in the tree view (left mouse button)
-
moving clients from a group in the tree view control to a other group in the tree view (left mouse button)
-
copying clients from a group in the tree view control to a other group in the tree view (Ctrl-left mouse button)
A group can
-
be moved to a different location via drag & drop.
The context menu of a group item can be used
-
to create a subgroup;
-
to edit the group properties;
-
to delete the group together with its subgroups and all client assignments of them;
-
to remove all client assignments while keeping the group and its subgroups;
-
to display the the contained clients and select them in one step.
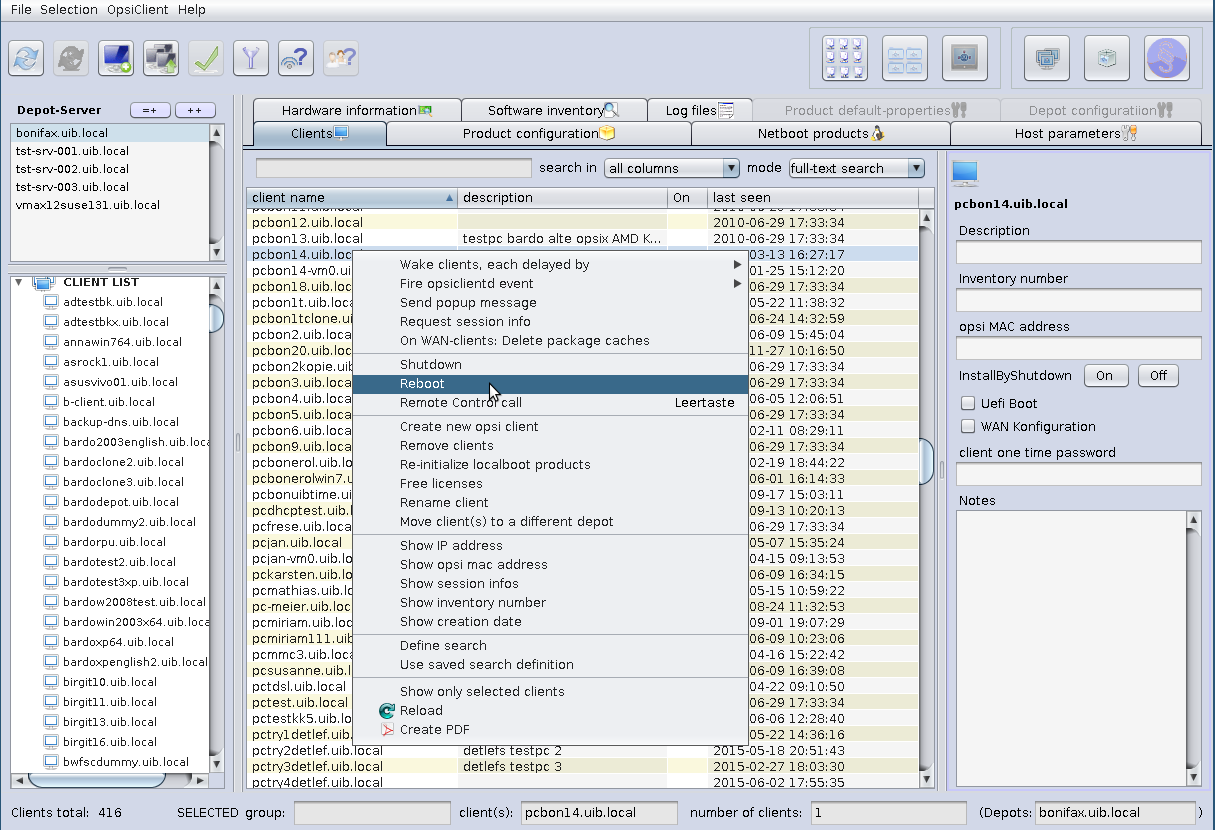
Client processing / Client actions
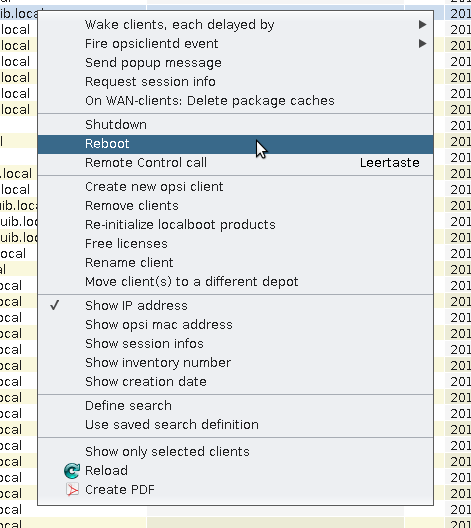
Using the menu 'OpsiClient' or the context menu in the 'Clients' tab you may choose from a lot of client specific operations
Install By Shutdown, Uefi Boot and WAN Configuration
Several client standard configurations can be applied directly in the client information panel which is located on the right side of the clients page. Please observe that UEFI support and WAN configuration both are currently based on non free extension modules. If these modules are not active the corresponding buttons are disabled.
-
Install By Shutdown:
In opsi Installation on Shutdown (free) , the method do switch to Install by Shutdown installation is described en detail. You can automatically trigger this configuration by pushing the On-Button for InstallByShutdown. Observe that this requires a opsi-client-agent reinstall or reconfigure. Alas, the state of the configuration can currently only be seen in the product property `on_shutdown_install`of the opsi-client-agent product. -
Uefi Boot:
The state of checkbox Uefi Boot indicates, if a client is configured for UEFI boot. It is activated the value of the client host parameterclientconfig.dhcpd.filenameis changed tolinux/pxelinux.cfg/elilo.efigeändert. (For more infos cf opsi with UEFI / GPT) -
WAN configuration:
The opsi configed checks, if the standard Wan configuration is available or not. The check mark for the WAN configuration will be set or not accordingly. If you check the box manually, the default configuration will be set.
This configuration is no longer hard coded since version 4.0.7.6.5, but is read from the server host parameters configed.meta_config.wan_mode_off* and is also interpreted as a negation. If you have kept the automatically set Meta_Config.wan_mode* parameters, the one described in Recommended configuration when using the WAN/VPN extension module, can be taken as an example or recommendation for a standard WAN configuration given by uib gmbh.
| Whether the client is configured as a WAN client or perform an UEFI boot, can also be displayed in the appropriate columns on the client table. For the current session you can find on the menu item 'OpsiClient' or activated in the context menu, permanently via the entry configed.host_displayfields for the server host parameters. This can be seen directly in the overview, for which clients the property is set, and it can also be searched for and sorted out. |

WakeOnLan ('Wake selected clients')
Choosing this menu entry, you will send the selected clients a WakeOnLan signal.
Since version 4.0.7 you can choose
-
if the network signal is meant to be sent to the selected clients at once
-
which delay should be between the waking of two clients
-
when the process shall start (via a scheduler).
If a client is assigned to a depot server which is not the configserver then the Wake On Lan signal is not directly sent to the client, but the 'opsi-configed' tries to establish a HTTPS connection to the 'opsiconfd' of the depot server which in turn sends the Wake On Lan package to the client inside its network segment.
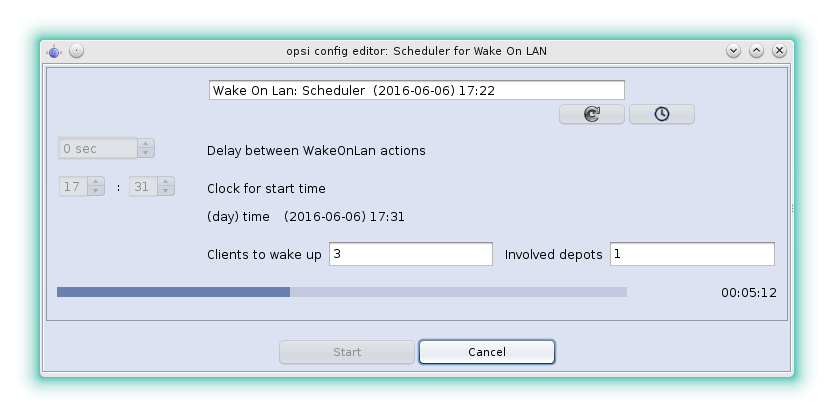
It should be observed that it is the 'opsi-configed' which triggers the actions, therefore the program must not be shut down in the meantime.
Fire opsiclientd event (Push Installation)
This menu entry is used to send to the 'opsi-client-agent' on the selected clients a command to fire the event which is selected in the submenu. If a Client is not reachable or currently processing another non-cancelable event, the 'opsi-configed' shows an error text.
The standard event is "on demand" which means the demanded action is started at once. Be aware that this may have the effect that the client is rebooting without any warning.
To incorporate additional events (which should be configured in the opsiclientd.conf) into the submenu you have to edit the config configed.opsiclientd_events via the tab (server) host parameters.
All messages will be shown on the active desktop. If the client isn’t reachable, you will get a message.
What happens exactly if you fire the event 'on_demand' can be configured in the event 'on_demand' configuration.
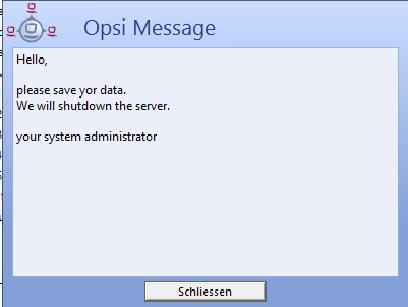
Sending messages ('Show popup message')
Choosing the menu entry 'Show popup message' you will get a small edit window where you can type in your message.
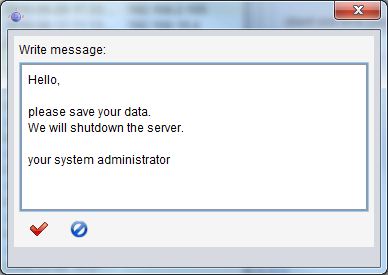
By clicking on the red tick you will send the message to the selected clients.
At the selected clients a message window will appear.
Session info for selected clients
The selected clients get the signal to communicte their session information. The data is shown in the session info column (if visible).
For WAN-Clients: Delete package cache
On WAN clients there are occasional problems with the package cache synchronization. This function resets the cache.
Call external remote control tools for selected clients
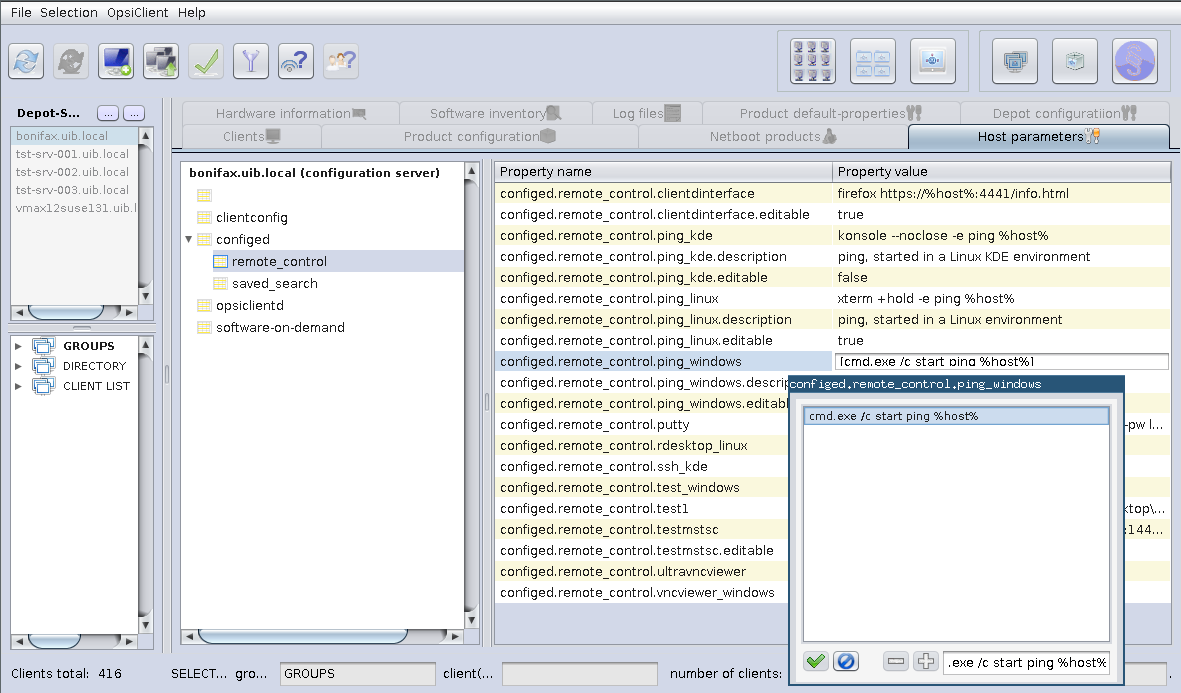
The option 'Remote Control Software call' in the client context menu as well as the client main menu (since 'opsi-configed' version 4.0.1.11) is very powerful. It can be used to use any command that the operating system offers, parametrized e.g. by the client name.
As an example there are configurations automatically generated which can be used to send a ping to the selected client: one
ping command that works in Windows environment and one command that requires a Linux X environment. Please observe:
'opsi-configed' calls obviously the command in its environment, i.e., we need the Linux command when the 'opsi-configed'
is running in Linux.
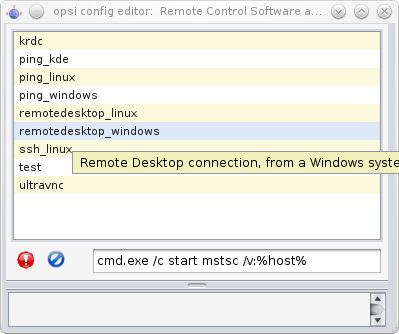
The selection window has three parts. The upper part lists the names of the existing commands. It follows a line, which shows the selected command and offers the chance to edit it (if this is allowed). Additionally, the line contains the buttons to execute or abandon the action. The third text area of the window captures any messages that are returned by the operating system when calling the command.
These calls offer a quasi infinite range of opportunities. For example, a command can be configured to open a Remote Desktop connection to the selected client (if it allows such connections). On a Windows system, such a command is
cmd.exe /c start mstsc /v:%host%
In a Linux environment the following command can be used:
rdesktop -a 16 %host%
In these examples serves %host% as a variable, which 'opsi-configed' automatically replaces
by the value for the selected host. Other variables that can be analogously used in the commands are:
-
%ipaddress% -
%hardwareaddress% -
%opsihostkey% -
%inventorynumber% -
%depotid% -
%configserverid%
If the command is marked by the additional server configuration entry 'editable' as true,
then the command line allows ad hoc editing. For example, you may supply a requested password or vary
the command as needed.
| If there is some command declared as 'editable' then in fact 'any' program addressed at the client computer can be called by changing the editable command. |
If more than one client is selected the command will be executed in a own thread for each client.
The list of remote control commands is editable via server configuration entries (cf. Host parameters in client and server configuration).
To define a command example, at minimum an entry configed.remote_control.example
(or configed.remote_control.example.command) must be generated. The value of property has to be the command
(in which the variables %host%, %ipaddress% etc. can be used). Additionally, an entry configed.remote_control.example.description
can be defined. The value of this entry will be shown as tooltip (if not existing, the command itself will serve as tooltip content).
Furthermore, a Boolean entry configed.remote_control.example.editable can be added. If its value is set to false the command
cannot be edited in the selection window.
Shutdown / reboot of selected clients
You may send the selected clients a shutdown or reboot signal. You have to confirm this command at the opsi-configed.
| If the client received the signal, it will going down with out any more questions. |
Delete, create, rename and move clients
You may delete the selected clients from the 'opsi-server'.
If you choose to create a client, an input mask opens. There you enter or confirm the required data – client name without domain specification, domain name, depot server name. You may add a textual description for this client and notes on this client.
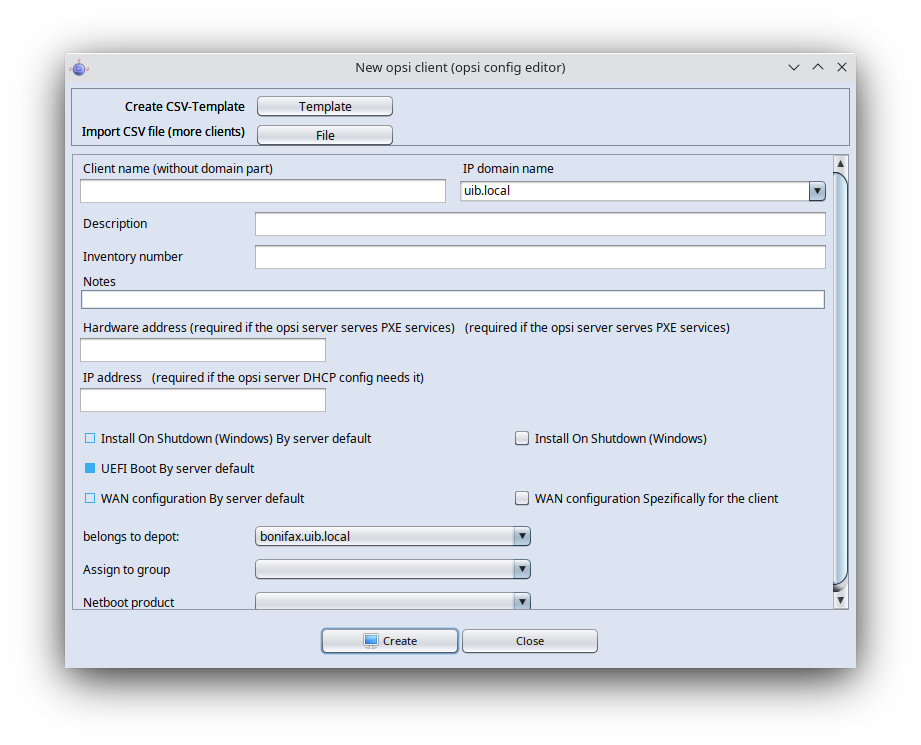
The mask also contains fields for an optional declaration of the IP-number and the ethernet (MAC) address of a client. If the backend is activated for the configuration of a local dhcp-server (which is not the default setting), this information will be used to make the new client known to the dhcp-server. Otherwise the MAC address will be saved in the backend and the IP-number will be discarded.
When creating clients you can directly for the new client specify to which group it should belong, as well as which netboot product should be directly set on setup. In addition, you can activate directly the Install by shutdown, UEFI Boot and the (standard) WAN configuration from the beginning. These settings can easily be made in the Hosts-List. These configurations are only available since the version 4.0.5.8.1 .
Since opsi 4.0.4 it is possible to disable the options for creation and deletion of an opsi client. This is used if the client creation should be managed by a different service, eg. the UCS service.
For the configuration of these options, a host parameter (config) is provided. It is named configed.host_actions_disabled and
offers the list values
-
add client -
remove client
(multiple selection allowed). The default is the empty selection meaning that no option is disabled.
The default setting can be changed so that adding and removing clients from the 'opsi-configed' is disabled:
opsi-admin -d method config_createUnicode "configed.host_actions_disabled" "Disable host actions" ["add client","remove client"] ["add client","remove client"] false trueThere is now the possibility to create several clients at once. For that you may click in template in the dialog frame to create a CSV-template. That can be edited with a text editor or programs like Microsoft Excel and LibreOffice Calc to list as many clients including their properties as you want. If you click on File and select the CSV-document, all clients from that list will be created automatically.
You may rename a selected client, you will be asked for the new name.
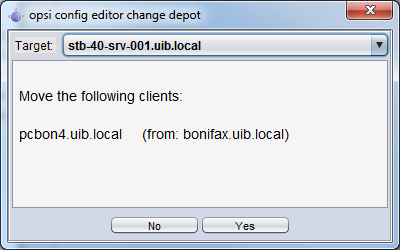
Moving a client to a different depot-server. If clicked the following windows appears with a list of existing depot-servers
Localboot products
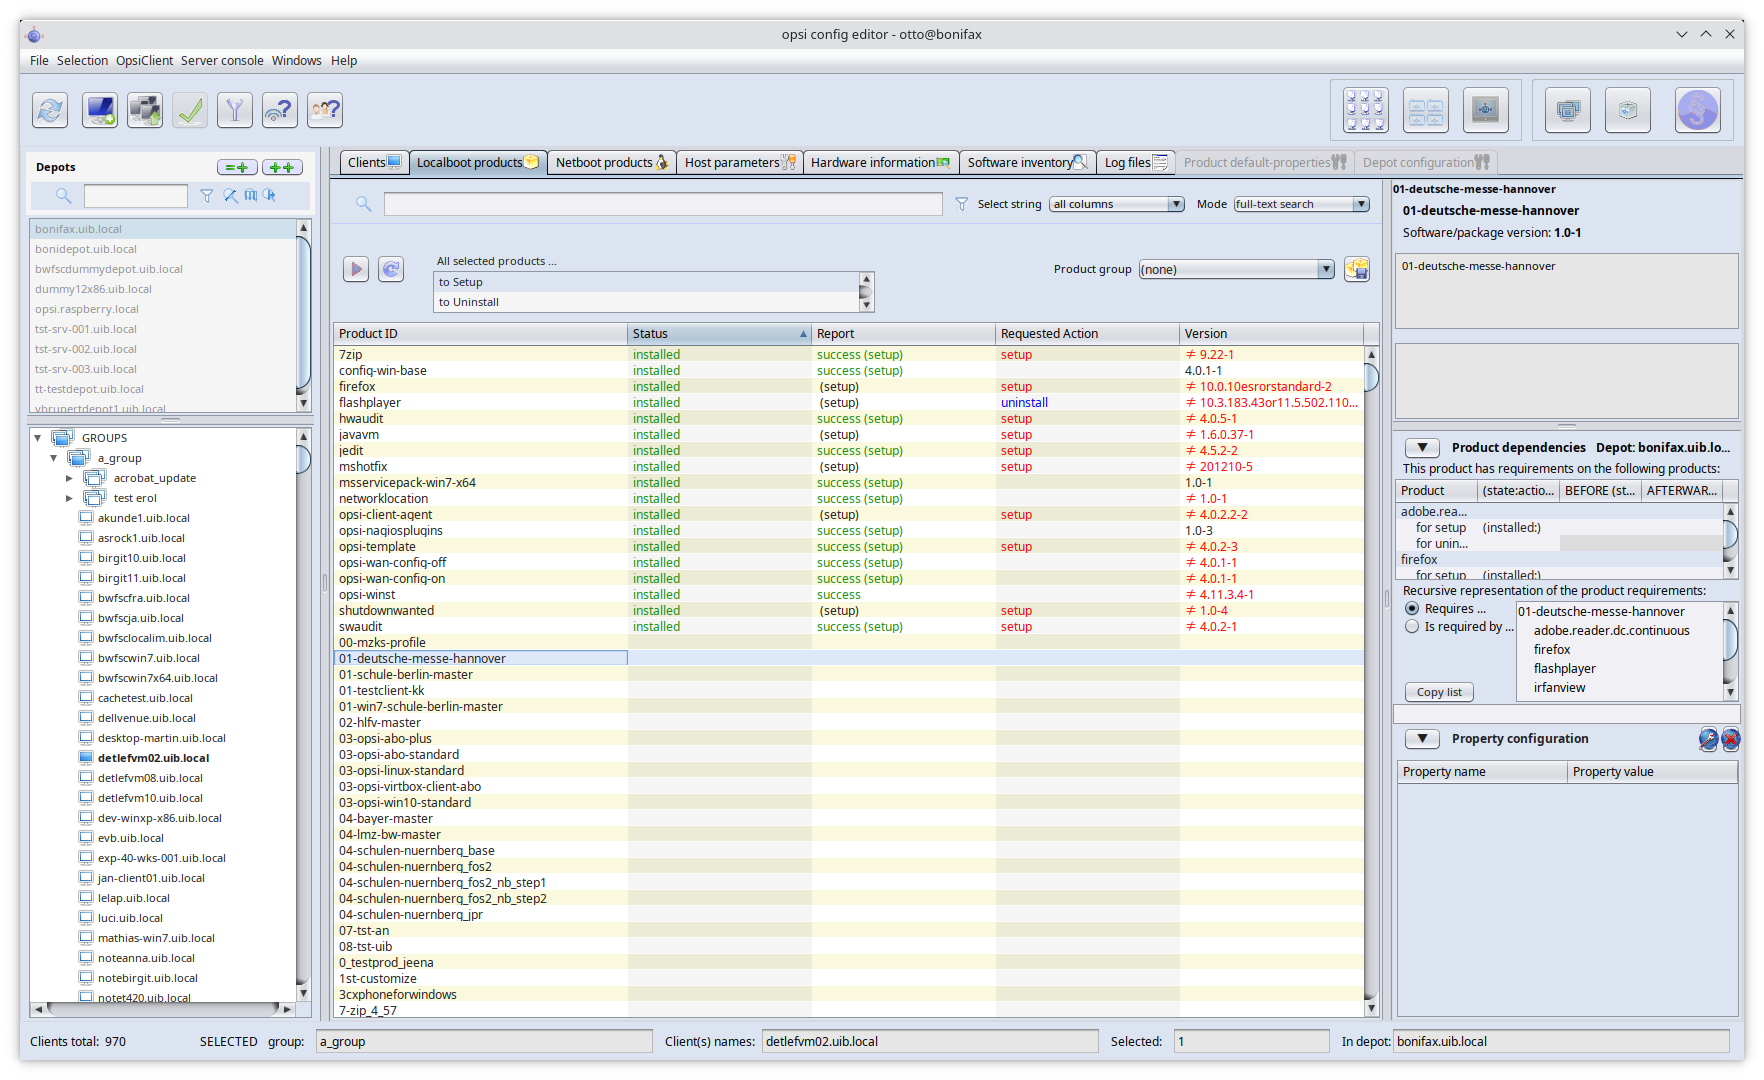
Switching to the tab 'Localboot products' you get a list of available software packages with its installation status and action status for the selected clients.
On top of that, on the right side, there is information about the selected product like product name and version. The fields for the product information and description also support MarkDown if you used it in the control.toml file for creating the product package.
Also product dependencies are shown in a table including the properties of that dependencies. Below you'll even find a recursive representation of that dependencies in a dependency tree. That does not only show on which products the selected product depends, but also what products depend on the selected product. That can be useful if you want to check if other products depend on a product before you remove it.
Since opsi 4.0.4 a search function is added.
With the search function, products can be searched by product names and (if desired) in combination with special values in the fields of the product table (like searching the client table). Therefore a search string can be entered. The search starts immediately and the first matching line is marked . If there is no match to be found (or characters are removed from the search string), the first line of the table is marked.
The context menu offers some more options.
To get a better overview, activating the filter function reduces the product view to the selected products only. The selections stays active until the filter is disabled by clicking the filter button again.
If there is a different status for the selected clients this will be marked grey ('undefined'). The list of the selected clients is shown at right on top.
You can also sort the product list by clicking at the column header.
This are the columns:
-
'Status' is the last announced state of the product and can hold the values 'installed', 'not_installed', 'unknown'. The table shows an empty cell if the value is 'not_installed' to improve the usability of the view. The cell becomes grey if a multitude of selected clients is selected and does not share a common value (grey coloring represents the pseudo value 'mixed').
-
'Report' informs about the progress or the result of the last action using the pattern <action result> (<last action>). During an installation process there may be indicated 'installing', afterward e. g. 'failed(setup)' or 'success (uninstall)'.
-
The column 'Requested action' holds the information which action is to be executed. Possible values are 'none' (shown by an empty cell) and the action types for which scripts are defined in the product package (possible values are 'setup', 'uninstall', 'update', 'once', 'always', 'custom').
-
The field 'Version' displays the software version number combined with the opsi package number of the software package installed on the client.
There are two more columns which can be activated via the context menu:
-
'Priority class' displays a priority value that is assigned to the product (highest priority +100, lowest priority -100). It influences the product order when products are installed (by virtue of the product_sort_algorithm)
-
The 'position' column displays the product ordering forecast for installation sequences.
Choose a software product to get more product information in the right part of the window like:
-
'Complete product name': full product name of that software package.
-
'Software/package version': 'software version'-'version of the opsi package' of the software package (specified in the opsi installation package).
-
'Product description': free text to describe the software.
-
'Hints': free text with advices and caveats for handling the package.
-
'Requirements': A list of other products which the selected product (say 'A') depends on combined with the type of dependency: 'required' means that A requires the other product ('B'), but it doesn’t matter whether B is installed before or after A. 'pre-required' means B has to be installed before A. 'post-required' means B needs to be installed A.
-
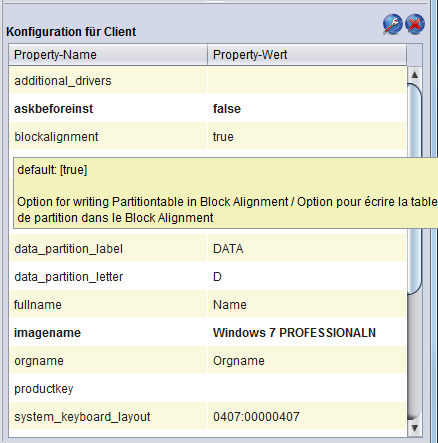
'Configuration for client': It is possible to define additional properties for a product. Their values can be evaluated in a setup script to configure the product per client. Because of the intrinsic complexity of a property definition there is a specific GUI element for displaying and editing the table of properties:
Property tables with list editor windows
A property table is a two-column table. In each row, the first column contains a property name, the second column displays the assigned property value(s).
It may be configured that a tool tip is displayed showing some information on the meaning of the property and the default value.
If you click at a value a window pops up: the 'list editor' for this property. It shows a value resp. a list of preconfigured values with the current value (resp. a combination of values) as selected.
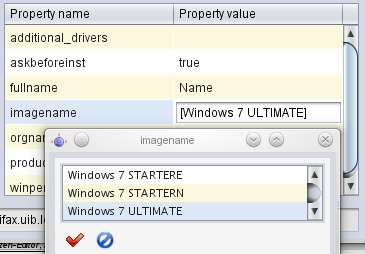
Clicking a new value changes the selection.
If the property value list is editable (new values may be added to the existing list resp. existing values changed) the window comes up with an edit field for the new or modified values.
The most comfortable way to get a new value that is a variant of an existing one is double clicking the existing value in the list. This copies it into the edit field where it can be modified.
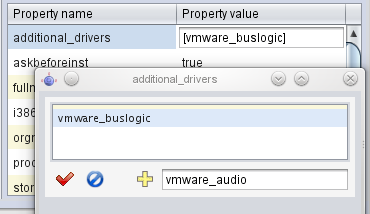
As soon as the edit field contains a new value – not yet occurring in the value list – the plus button will be activated with it the new value can be added to the list of values.
If multiple values are allowed – as it should be e.g. for the property 'additional drivers' – a value may be added to the set of selected values by Ctrl-Click . The very same action removes a selected value from the set. The minus button empties the selection set completely.
When the list has been edited the green check mark turns to red as usual in the opsi-configed. Clicking it takes the new selection as new property value (and finishes editing). Clicking the blue cancel button stops editing and resets the original value.
Hidden Password Property Values
A property value that is a password should not be directly displayed.
Until this feature will be constructed as a special value type in some coming release the hack is used that a property value will only be displayed if the user explicitly requests it in cases (since version 4.0.7 ):
-
the property key text contains the string 'password'
-
the property key text starts with the string 'secret'
E.g., the value of the property 'root_password' in the Linux netboot products is displayed as a sequence of stars (until the user does the edit click and explicitly confirms to showing the password).
Netboot products
The products on tab 'Netboot products' are mainly used to install the client OS (operating system) and are listed and configured like the products on tab 'Localboot products'.
If for the selected client(s) a netboot product is set to 'setup', the correspondent bootimage will be loaded and executed at the next client reboot.
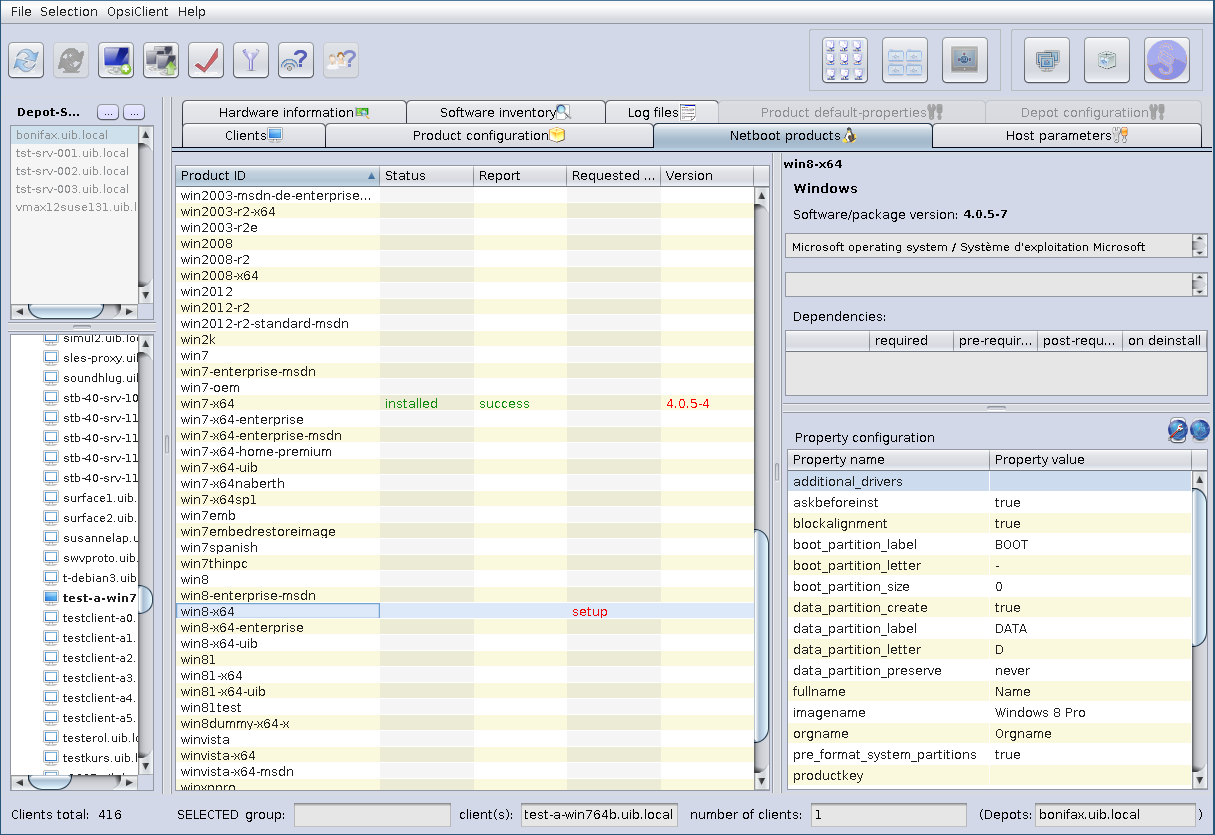
This is usually done to initiate an OS installation or any other bootimage task (like a memory test etc.)
Hardware information
With this tab you get the last detected hardware information for this client (only available if a single client is selected).
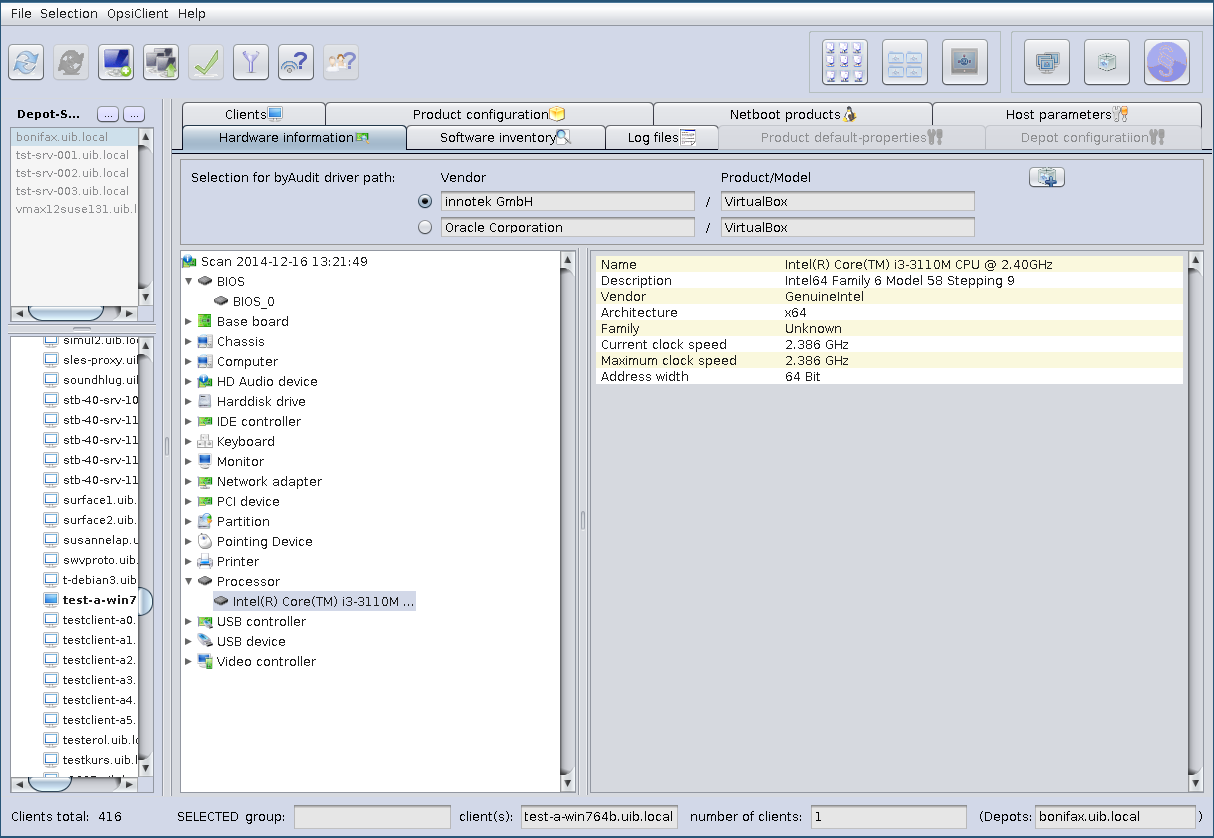
Automatic driver upload
To simplify and automate the drivers of special clients and to upload them on the opsi-depot-server, since version 4.0.5, the option to select the paths from the hardware information is possible, thus the opsi-configed via the Share delivers the above mentioned. The two offered byAudit driver paths are composed of the manufacturer and the product or the model, which are respectively read from the computer and the mainboard. By clicking the right button to upload a driver, a new window will be displayed to add more settings.
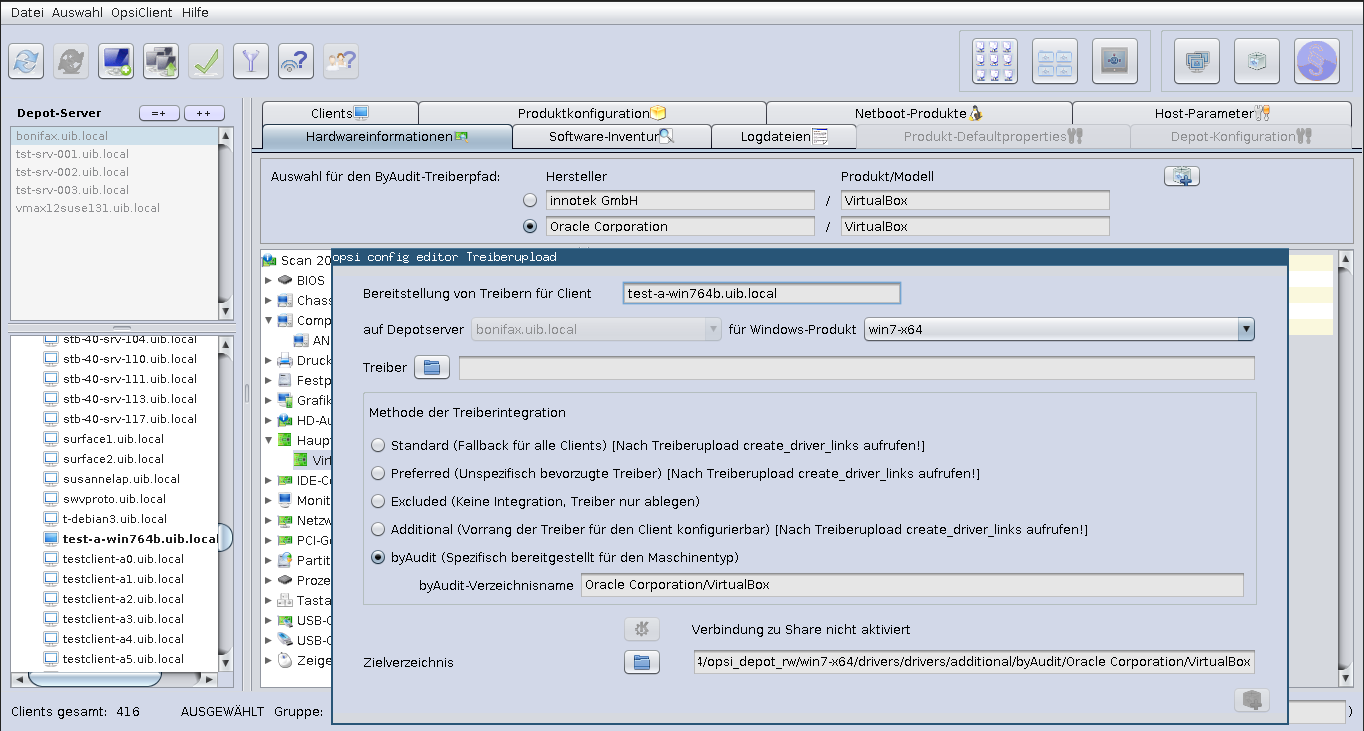
If you open the 'opsi-configed' on a Linux system, it is not directly possible to carry out a driver upload because the connection is carried out via a Share. This needs to be made manually. However, the methods or directory structures are an essential aspect of the drivers integration for linux users as well as for windows users.
Without further settings, the driver upload of a Windows computer, works only if the connection to the Share is enabled.
Among other things, information must be given in a new window, like to which Windows product should the driver be prepared, which drivers are to be uploaded and with which method or the directory in which the driver integration takes place. The target directory is accordingly changed with the selection of another method. The previously selected byAudit driver path can be found again by default in the selected method 'byAudit', that specifically integrates the selected driver for the type of machine.
Following methods and directories are possible:
-
'standard': For the drivers which are found in
./drivers/drivers/, the driver will be matched to the corresponding hardware using the PCI IDs (i.e. USB- or HD_Audio-ID) in the description file, and then integrated into the Windows setup as needed. It may be the case that the drivers found by opsi in this location do not necessarily work with your hardware. For the drivers which are found in./drivers/drivers/, the driver will be matched to the corresponding hardware using the PCI IDs (i.e. USB- or HD_Audio-ID) in the description file, and then integrated into the Windows setup as needed. This is the fall back directory for all clients. -
'preferred': In the case that you have to support special hardware, and you can find the additional drivers from the manufacturers, then use the following procedure to include them in the installation. Place the additional drivers in their own directory under:
./drivers/drivers/preferred(the naming and depth of the directory structure is not important). Drivers that are found in the directory./drivers/drivers/preferredwill be integrated into the Windows setup, assuming that opsi finds a suitable match to the drive hardware based off of the PCI IDs (i.e. USB or HD_Audo-ID) in the description file. Problems can occur when the same PCI ID of the drivers is found inpreferred. In this case, a direct mapping of the drivers to the devices is needed. -
'excluded': It could happen that the manufacturers include different drivers for different operating systems (i.e. Vista vs. Win7) or different configurations (ie. SATA vs. SATA RAID). The
create_driver_links.pycannot make this distinction. If you think the wrong driver has been installed, then move the driver to the 'drivers/exclude' directory and then callcreate_driver_links.pyagain. Drivers in the directory 'drivers/exclude' are not used during the integration. -
'additional': When installing additional drivers based on the PCI-IDs or USB-IDs, they should be installed under the directory
./drivers/drivers/additional(where name and depth of the directory structure is not important). You can map one or more drivers to a client using the Product-Property 'additional_drivers' and a list of driver directories under./drivers/drivers/additional. The directories specified by 'additional_drivers' are searched recursively until all drivers are found. This method can be used to make a specific directory based on the client type (i.e. dell-optiplex-815). -
'byAudit': The previously described mechanisms that directly map drivers to devices is automated since the 4.0.2 Release 2 of opsi. Opsi will search the directory
./drivers/drivers/additional/byAuditfor a director name that matches the field 'Vendor' that was given in the Hardware Inventory. This 'Vendor' directory will be search for a 'Model' directory that corresponds to what is seen in Hardware Inventory. If this directory is found, then it will be manually assigned to the product property 'additional_drivers'. The directory name 'byAudit' is case sensitive. The directory names for 'Vendor' and 'Model' are not case sensitive ('Dell' and 'dELL' are treated the same way).
Some manufacturers use model names that are very delicate to this method, since some special characters such as / are not allowed to be used in files or directory names. An example for a model name could be: "5000/6000/7000". A directory with this name is not allowed because of the special characters. Since the third Service Release from opsi 4.0.3 the following special characters: < > ? " : | \ / * were replaced internally with an underscore "_" character. With this change can the above example be replaced with: "5000_6000_7000" the directory will automatically be shown, even though the directory structure information in the hardware inventory is not visually the same.
After uploading a driver to ./drivers/drivers or ./drivers/drivers/preferred the script create_driver_links.py should be executed on the 'opsi-depotserver'!
|
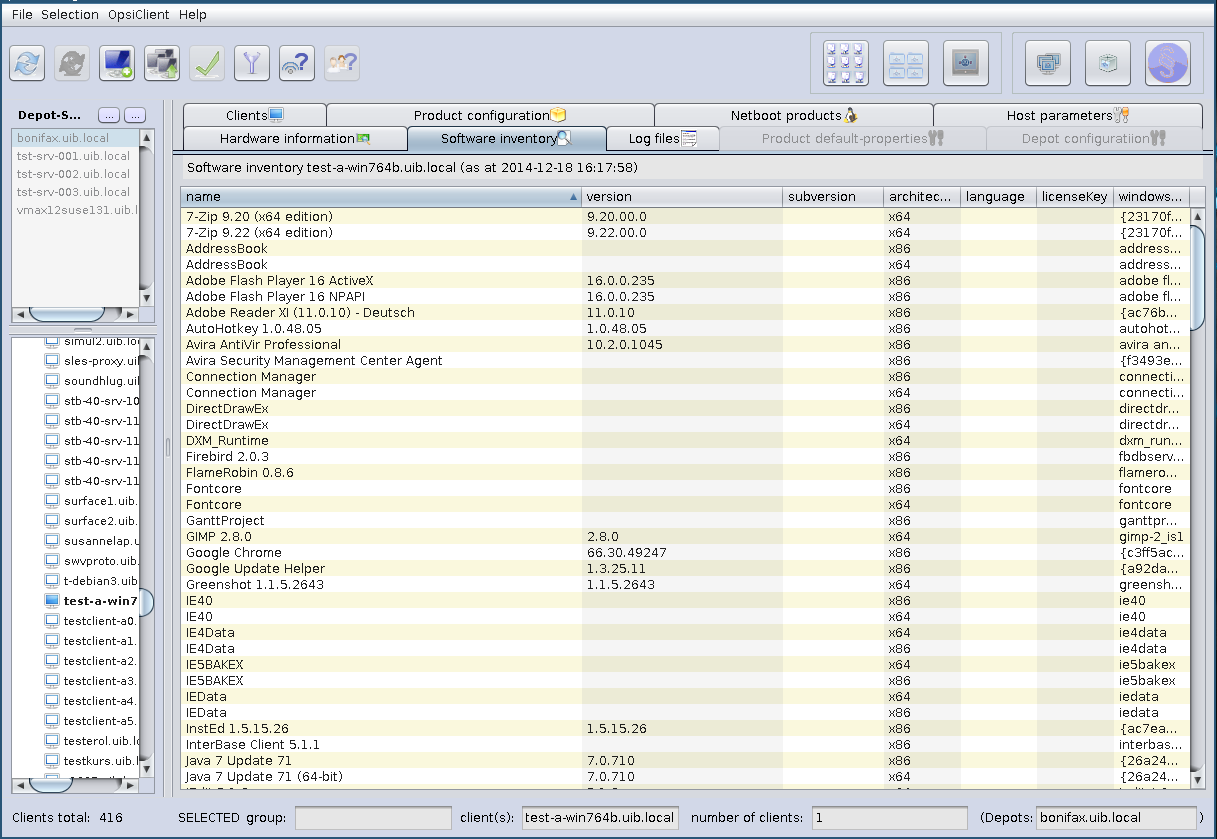
Software inventory
With this tab you get the last known software information for this client (only available if a single client is selected).
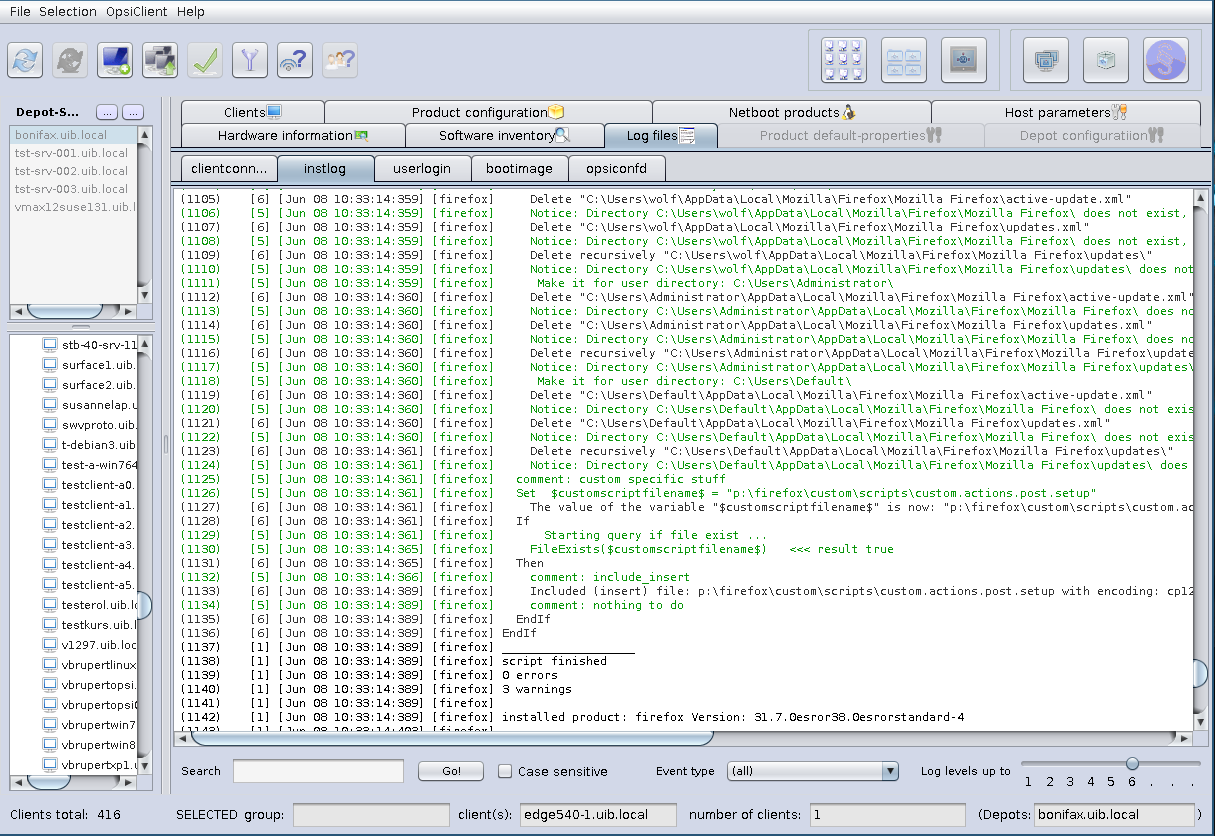
Logfiles: Logs from client and server
The client specific log files are stored on the server and visible with the opsi-configed via the Tab 'log files'.
The level up to which the log lines are seen can be chosen by a slider (wheel mouse enabled), so that errors can be easily found.
It’s also possible to search in the log file (to continue the search press 'F3' or 'Ctrl-L' = last search repeated).
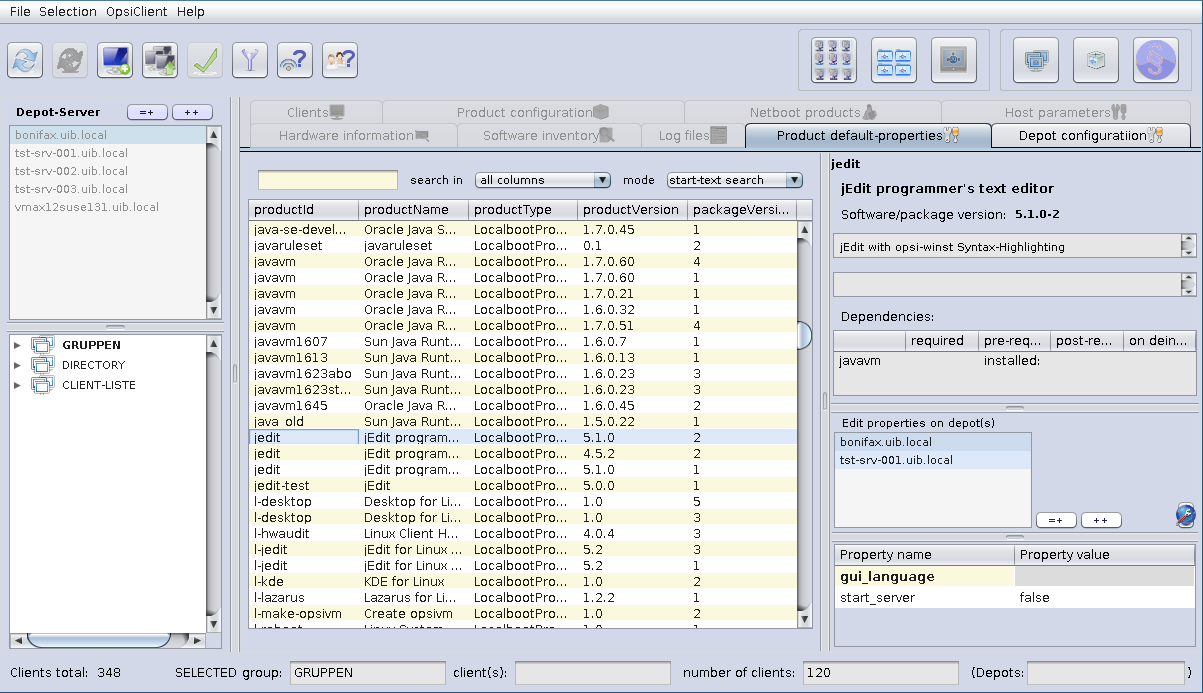
Product default properties
To change the default values of the products for one or more opsi-depots, there is a tab, called Product default-properties.
This is only available if you select Properties of depots (which is the second button at the top right hand side).
In the main table, all products are listed with the product version as well as the package version.
If a product is selected, at the top of the right side (as is customary for the client product configuration) general information about the product packages is shown. Below is the list of all depots, that have installed the selected product. The table below with the property keys and values is also known from the client product configuration.
You can select a single depot or multiple depots to change the default values
(which are also called the depot values) of the product.
As the default, all available depots are preselected. With the usual shortcuts
(Ctrl-a, Ctrl-Click or Shift-Click) multiple or all clients can be selected.
If the property value is shown grayed (see 'opsi-configed': product default properties - ``gui_language''),
the values for that property differ on the selected depots.
On the right side of the depots are three buttons:
-
(=+): Mark all depots that have identical values
All depots, that have the same default values, are marked. -
(++): All depots are marked.
-
(globe): set the package default values
The original package default values of the products will be set for the selected depot(s).
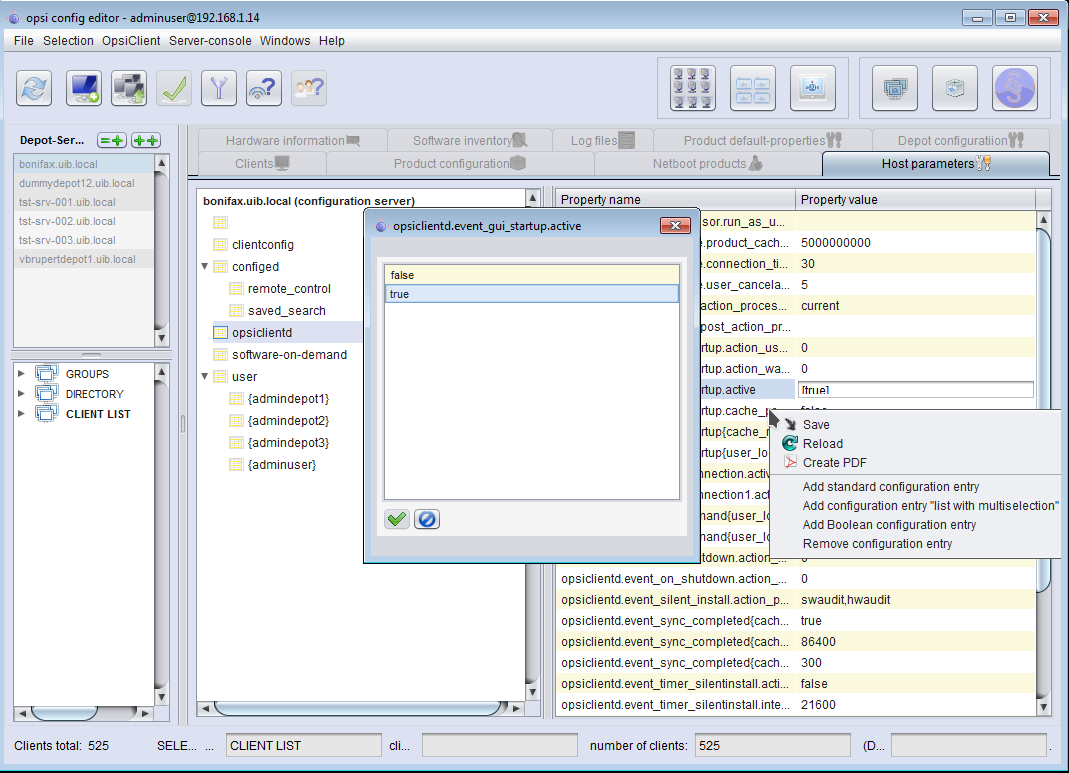
Host parameters in client and server configuration
There are many configuration options for the opsi server and the opsi clients that may be set or changed via the tab 'Host parameters'. Server defaults are set in the mode 'server configuration', client specific values in the mode 'client configuration' plus manual selection of the 'Host parameters' tab (see also opsi-configed modes Client configuration / server configuration / license management).
On principle, these configuration entries ('config objects' of the 'opsi-server') are conceived as lists of values. Therefore they are edited via the list editor component (cf. Property tables with list editor windows).
Depending on the specific type of a configuration object,
-
the elements of the list can be of type text (
Unicode) or of typeBoolean(i.e.true/false); -
the set of all values from which elements can be selected may be fixed or extensible.
-
the object has a defaultValues-entry, which comprises in the singleValue case exactly one list element, in the multiValue case some partial list selected from the list of all possible values.
New configuration objects can be created via the context menu of the server host parameters. At this place it is also possible to remove existing entries.
The relationship of server and client entries is a little bit complicated.
-
Server entries hold the defaults for client entries (this is the defaultValues entry in the server configuration object)
-
Consequentliy, if a client entry is needed a server configuration object must be created beforehand.
-
And, when a server entry (a config object) is deleted, the depending client entries (called config states) are (automatically) deleted as well.
-
If the client related value is shown as identical with its (server based) default value this may be be because there does not exist a client specific data base entry or because the client value is identical with the server default value. In the first case the client value changes when the server default value gets new contents, in the second case the client remains unchanged.
-
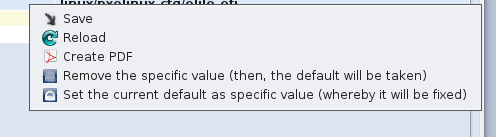
In order to work comfortable with this situation since opsi-configed version 4.0.7.6.5 the context menus of the client host properties offer the options (1) to remove the specific client values, so that from now on only the current server values are decisive, (2) to fix the specific client values to the current server values.
-
if the currently presented client value iis not identical with the server default value it is given in a bold font.
-
There are configurations objects for which client values can be created and edited but in fact only the server objects are used. In most cases, the current configed does not show them any more in the client parameters view.
To get more structure the configurations objects are categorized in some (predefined) groups. The groups are listed in a tree-like manner on the left part of the panel. The entry name/value pairs belonging to the selected group are shown in the right part of the panel. Wheel mouse scrolling is enabled as well on the left as on the right side.
Managing User Rights and Roles
Starting with version 4.0.7.5 the 'opsi-configed' includes the user roles function.
| In order to use this feature the module user roles must be activated in the modules_-file. |
In the interface, in the overview of the server host parameters, the category user shows the availability of the function (not necessarily active). The user branch of the properties tree starts with a boolean entry
user.{}.registerwith default value false.
The other entries at this location represent the default values for the user-specific configurations of the server console (cf. Server-Console).
To activate the user role extension you need to:
-
Set the value of user. {}.register to true.
-
Load a modules file that has the userroles extension temporarily or permanently activated.
When the user-role extension is activated, an entry is created in the properties tree for the logged-in user. The default settings used for the administration of rights are like the "classic" requirements for an administrator, that means, that this user has no restriction whatsoever. E.g., for a user named admindepot1 the following entries are generated:
user.{admindepot1}.privilege.host.all.registered_readonly	[false]
user.{admindepot1}.privilege.host.depotaccess.configured	[false]
user.{admindepot1}.privilege.host.depotaccess.depots		[]
user.{admindepot1}.privilege.host.opsiserver.write 		[true]
These four items mean:
-
admindepot1 is not restricted to read-only access to the server (a pure read-only access might be appropriate for a help desk staff member);
-
depot restrictions do not exist or are not taken into account;
-
consequently, the list of depots available to the user can stay empty (and if some depots are entered, this has no effect);
-
the user is allowed to edit config server settings of all kinds.
In the case that the access of admindepot1 is to be restricted to the computers in the depot server depot1, the following should be set:
-
host.depotaccess.configured is to be set to true;
-
the value "depot1" is to be put into the list host.depotaccess.depots.
After a complete data reload, clients from other depots are not more visible to admindepot1 (and also only the depot settings for depot1 are accessible).
| admindepot1 him/herself can change this settings as long as she/he owns the privilege host.opsiserver.write |
In order to complete the restriction, it therefore is required to set
-
host.opsiserver.write to false.
| The privileges which are set in this way restrict only the functionality of the 'opsi-configed'. Until further notice, they have no effect if the JSON-RPC interface of the opsi-server is accessed by other means. |
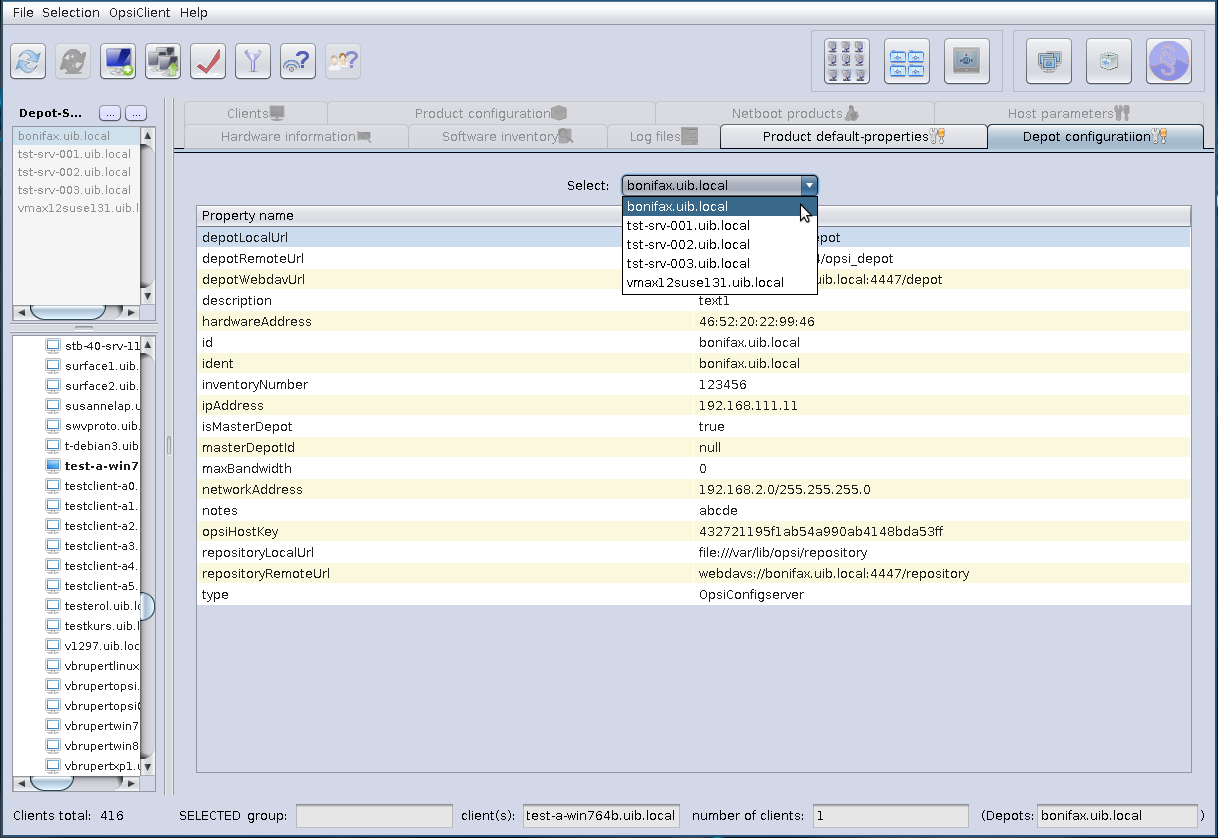
Depot configuration
In the mode 'Properties of depots' you will see the tab 'Depots'. There is a drop down menu to select the depot. After selecting the depot you may change the properties of the 'opsi-depot'.
see also:
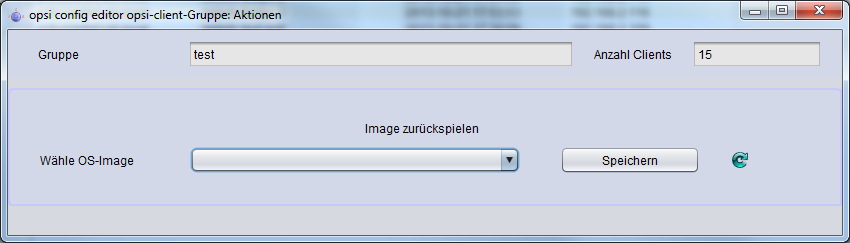
Group actions
The button "group actions" in the main button bar (cf. opsi-configed modes Client configuration / server configuration / license management) opens a window for group related functions.
At the moment, it provides only one function which is relevant for the opsi-localimage module.
-
to search for an operating system, that had been installed on all of the clients of the selected group and therefore can be offered for all of the clients of that group.
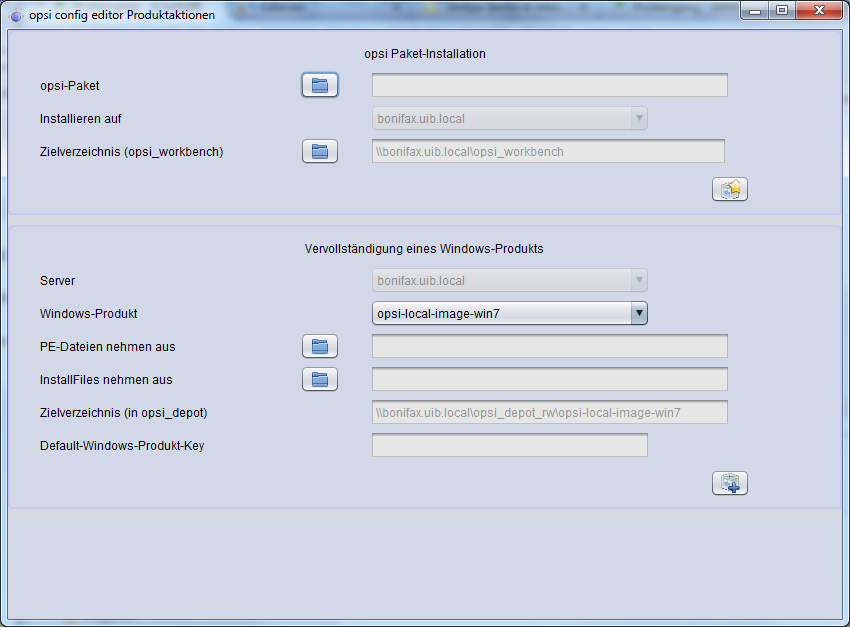
Product actions
The button "product actions" in the main button bar (cf. opsi-configed modes Client configuration / server configuration / license management) opens a window for functions related to products resp. packages.
Currently it offers two options:
-
An .opsi file (opsi package) can be selected or entered and can be uploaded to the opsi server; the default upload directory on the server is the network (samba) share named opsi_workbench. The button click starts installing the package on the server, like invoking the opsi-package-manager.
-
The WinPE files and install files for an Windows product (Windows Vista and above) can be uploaded to the server product directory (share opsi_depot), so that windows products do not have to be managed from the server side.
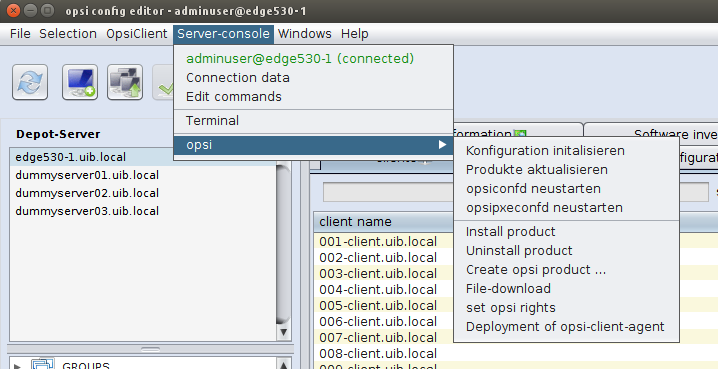
Server-Console
| Some of the following features require at least python-opsi version 4.0.7.38, in particular defining you own commands as described in Define commands and using them via configed. |
With version 4.0.7.5, the configed is extended with a new main menu entry, the "Server Console". At this place some options are bundled to access the opsi-server via a SSH-Connection. It is as well possible to start a terminal as well as menu items are offered of some predefined commands on the opsi-server.
Connection data and permissions
If not otherwise configured, it is tried to build a SSH connection with the same user/server pair for which to configed login was done.
Should this not be the case the connection can be also started via a SSH key (possibly with a password) when the configed starts. In this case, the following start parameters can be used:
-
--ssh-key PATH: e.g. --ssh-key /home/user/.ssh/id_rsa
-
--ssh-passphrase PASSPHRASE: e.g. --ssh-passphrase Password
The settings can be changed or adjust under the menu entry "Connection Information".
The visibility of menu items in the server console menu is controlled by a series of server host parameters in the user section. If the user roles feature is used (cf. Managing User Rights and Roles) the configs are specifically set for each user (the default values for a newly created user entry are taken from the top user level).
In order to be able to use different functions, the appropriate server settings must be activated.
-
user.{}.ssh.serverconfiguration.active:
Activates the ssh connection settings menu. (Default: false) -
user.{}.ssh.commandmanagement.active:
Activates the editing of commands and their menu entries. (Default: false) -
user.{}.ssh.menu_serverconsole.active:
Deactivate the "Server Console" menu in principal. (Default: true) -
user.{}.ssh.terminal.active:
Allows the usage of the ssh shell. (Default: true) -
user.{}.ssh.commands.active:
Allows to execute all menu items displaying stored commands. (Default: true)
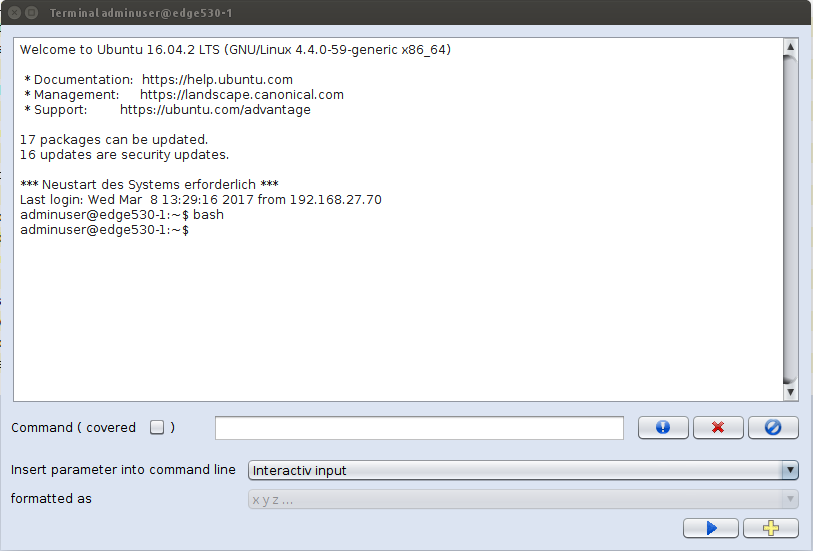
SSH-Terminal
With the Terminal, Linux commands can be run from the connected SSH-Server.
In addition to the possibility to replace the input with asterisks (*), which is strongly recommended for the input of passwords, a process can also be canceled by clicking the "End process / connection" button or by pressing "Ctrl + C".
Just like in the Terminal, the "TAB" can be used to complete commands. Warning: Paths will not be completed - only Linux system commands.
Besides it is also possible to specify data sources, that before the execution can be replaced by concrete data. More about this functionality:
Define commands - Item: Datasources)
Predefined commands with input masks
Under the menu group "opsi" a few commands are available independently of the self-defined commands with their own input interface. These simplify the handling of various scripts.
-
Download from data …
Any data file which can be downloaded from the Internet can also be downloaded by the "wget"-command and stored in a certain path on the Server. This could be used for example to download opsi-packages from download.uib.de -
Create opsi product file …
Prerequisite for this command is an opsi-utils package with version >= 4.0.7.7. Using this menu item, an opsi package can be created, specifying the directory upon which must be stored. In addition, can the found versions (package and product version) be displayed and overwritten with a button. And also, a md5sum and/or a zsync file can be created. -
Set opsi-rights …
This menu item maps the opsi command opsi-set-rights. After entering a specific (optional) path in which the script is to be executed, the root password is prompted and the script is executed in a separate window. -
Package-Installation …
With this command, opsi packages can be installed on all depots or in one depot using "opsi-package-manager". You can also specify the server path to the package where the opsi package is located.
By selecting a package from the Internet, the functionality of "File download …" command is taken up and then the downloaded package is installed on the depot. Additionally, the parameters "--update" and "--setup" of the opsi-package-manager are implemented. If the zsync and md5 files of an opsi package are to be downloaded, the switch "zsync and md5 include" can be activated. Then the url of the packages is added accordingly and the additional files are also obtained.
You can find more about opsi-package-manager under Tool: opsi-package-manager: (un-)install opsi-packages
-
Package-Deinstallation …
From a list of installed packages one can be selected and uninstalled.
Please check Tool: opsi-package-manager: (un-)install opsi-packages -
Deployment opsi-client-agent …
If you want to add existing computers to opsi, the opsi-client-agent must be installed on the target computer. If you select the clients in the configed and execute this command, the client names are copied into the corresponding field. If the command is to be executed on several clients in a single call, the login data must be the same on all the participating computers.
Attention: The location of the script have to be: "/var/lib/opsi/depot/opsi-client-agent/opsi-deploy-client-agent" Detailed information can be found in the 'opsi-getting-started' manual on the 'First steps' chapter.
TIP: Some user interfaces include a selection component for paths in the directory structure. If the button "Find Subdirectories" is activated, all directories or files that are contained in the specified path will be listed. To visualize further sections, you can press the button several times. This functionality is, among others, in the "Set Opsi rights" or the "Package installation" interface.
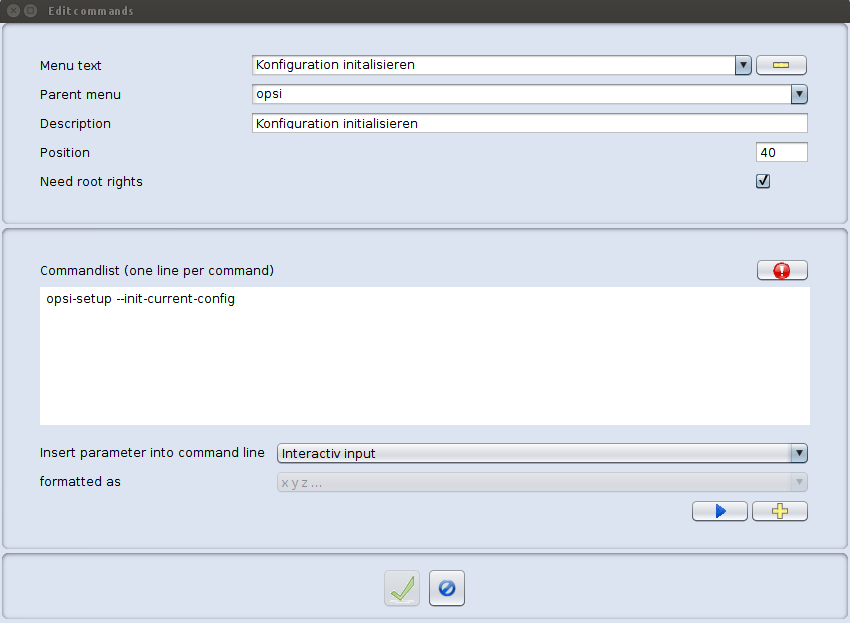
Define commands
In addition to the predefined server console commands, you can create or remove your own commands, which can be accessed via menu items. It should be noted that different Linux systems may not be able to execute the same commands. Thus, the administrator must be sure that the commands can be executed on the addressed Linux system.
Following data must be or rather could be (marked with a "*") for a command:
-
Menu-Text:
When creating a new command you must make sure that the menu text has not been used already for another command. If a menu text is to be changed, the command must be first deleted with the minus button, and then the new command can be entered. -
Description*:
If a more detailed description is stored, then it appears as a tool tip text on the command. -
Superior menu*:
Determines in which menu the new command should appear as a menu item. In the case that field is empty, then the menu entry will be directly assigned to the "Server console" menu. -
Position *:
The position determines the order (small numbers comes first) of the menu points in total, and thus within each respective menu. If alphabetical order should be displayed, all items must be set identically (e.g., all 0). Should the the field remain empty, then the position 0 is assigned by default. -
"Sudo" rights *:
If one of the commands in the command list requires administrative rights, a check mark must be set on "Required root privileges" afterwards the commands in the list are automatically executed with the keyword "sudo". -
Command list:
For the command list, the Linux commands must be entered line by line, so that they can be executed sequentially. Caution: Command can be tested or executed on the SSH server by means of a button without creating an extra menu point. -
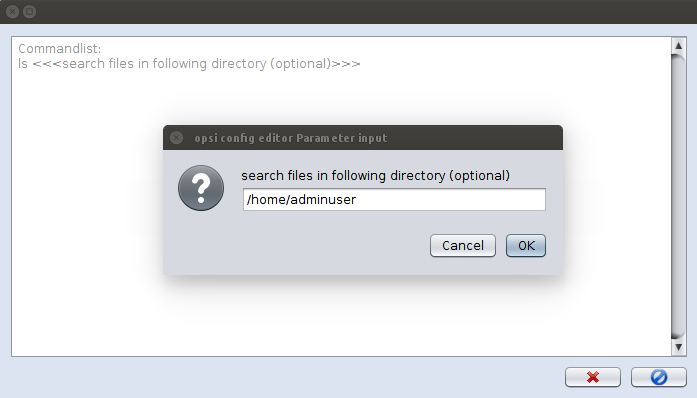
Data sources* (on the command list):
Additionally methods can be stored as a data source. Before the command can be executed, the parameters are overwritten with the result of the applied method. The following parameters are possible:-
Interactive input:
It is possible to specify parameters for the commands or to identify them for an interactive output. This is done with the following format "<<< This text will be displayed to the user and replaced by the user input >>>" , it is recommended though to write a sample input for the parameter for the user text. -
Selected client names / Selected client IP addresses
-
Selected depot names / Selected depot IP addresses
-
configserver name
-
Connected SSH servername
Note: Except for "Interactive Input", the return of the methods can also be formatted, for example, into a comma separated list. In the interface, the data source can be tested, and also insert it into the location marked in the field of the command list.
-
|
- On Linux, commands can be combined using two commercial ANDs ( "&&"). However, it must be ensured that the second command, if needed, is executed with administrative rights, since this is not done automatically. Example: Requires root privileges: "activated", command list: "apt-get update --yes && sudo apt-get upgrade --yes". + - During the execution, no user input can be made. It is necessary to control all the inputs via the command \ parameters (example: "--yes" option for "apt-get upgrade") |
Validation status of opsi modules
In the main menu entry Help under Validation status of the opsi modules the current licensing status of the opsi modules can be viewed.

The table shows for each module whether it is available.
The green column highlights the current period and shows for how many clients the module is currently licensed.
Each column shows the status starting at the respective date.
The columns with dates in the future represent future changes, e.g. when a license expires or a new license becomes valid.
Selecting the checkbox 'show complete history' shows the past states.
In the next part a key to the warnings and warning level can be found.
Three different warning levels can be configured, from which the user receives a warning.
These warnings intend to draw attention to licenses that have (soon) reached the license limit or will (soon) expire.
The 'client count' warning level defines the absolute difference between the number of clients and the licensed number, from which the warning should be issued. The 'client percentage' warning level defines the percentage of the number of clients to the licensed number, from which the warning should be issued.
The 'days until end of license' warning level specifies the number of days remaining until the end of the license, from which warnings should be issued.
Warning limits can be edited in the server configuration using the licensing.client_limit_warning_absolute, licensing.client_limit_warning_percent and licensing.client_limit_warning_days configs.
If a warning level is exceeded, the corresponding field in the table is highlighted in yellow.
If there are not enough licenses left for a module or the license has expired, the corresponding field is marked in red.
Then a new license must be purchased.
When the opsi-configed is started, existing warning states are pointed out.
In the lower part of the window there is information about the clients and the customer data for which the licenses were issued.
The checksum value is for matching whether the data in the environment matches the data at uib.