opsi data storage (backends)
file backend
When using the 'file-Backend' the configuration information is stored in ini-files on the server.
Main features of the backend 'file':
-
Current default backend
-
The files of this backend are located in
/var/lib/opsi/config. -
Is implemented on the assumption that the FQDN of the server on which the backend is used corresponds to the FQDN of the configserver.
The content and structure of these files is explained in more detail in the Files of the file backend chapter.
mysql backend
mysql backend for inventory data (overview and data structure)
The hardware and software inventory data are by default stored in text files via the opsi 'file-Backend'. This form of data storage is less suitable for queries and reports. For this, the data can be stored in a SQL database.
Main features of the backend 'mysql':
-
Optional (not the default backend)
-
For inventory data free of charge, for use with other data you need a paid activation.
-
Finely granulated data structure for data storage and additionally a simplified data model for queries.
-
A history function, which logs changes to the inventory data.
Due to the very different nature of the hardware components to be inventoried, the data structure is roughly structured as follows:
-
A table 'HOST' describes all known clients and provides a unique 'host_id'.
-
There are two tables for each device type:
-
'HARDWARE_DEVICE_ ….' describes the device e.g. Network card type with PCI-identifier
-
'HARDWARE_CONFIG …' describes configuration of the specific network card e.g. MAC address. The two tables are linked to each other via the 'hardware_id' field.
-
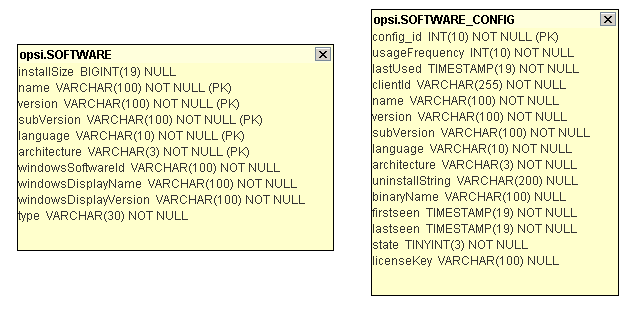
The situation is similar for the software inventory. Again, the 'Software' table describes the total software found, while the 'Software_Config' table stores the client-specific configuration.
This results in the following list of tables:
HARDWARE_CONFIG_1394_CONTROLLER
HARDWARE_CONFIG_AUDIO_CONTROLLER
HARDWARE_CONFIG_BASE_BOARD
HARDWARE_CONFIG_BIOS
HARDWARE_CONFIG_CACHE_MEMORY
HARDWARE_CONFIG_COMPUTER_SYSTEM
HARDWARE_CONFIG_DISK_PARTITION
HARDWARE_CONFIG_FLOPPY_CONTROLLER
HARDWARE_CONFIG_FLOPPY_DRIVE
HARDWARE_CONFIG_HARDDISK_DRIVE
HARDWARE_CONFIG_IDE_CONTROLLER
HARDWARE_CONFIG_KEYBOARD
HARDWARE_CONFIG_MEMORY_BANK
HARDWARE_CONFIG_MEMORY_MODULE
HARDWARE_CONFIG_MONITOR
HARDWARE_CONFIG_NETWORK_CONTROLLER
HARDWARE_CONFIG_OPTICAL_DRIVE
HARDWARE_CONFIG_PCI_DEVICE
HARDWARE_CONFIG_PCMCIA_CONTROLLER
HARDWARE_CONFIG_POINTING_DEVICE
HARDWARE_CONFIG_PORT_CONNECTOR
HARDWARE_CONFIG_PRINTER
HARDWARE_CONFIG_PROCESSOR
HARDWARE_CONFIG_SCSI_CONTROLLER
HARDWARE_CONFIG_SYSTEM_SLOT
HARDWARE_CONFIG_TAPE_DRIVE
HARDWARE_CONFIG_USB_CONTROLLER
HARDWARE_CONFIG_VIDEO_CONTROLLER
HARDWARE_DEVICE_1394_CONTROLLER
HARDWARE_DEVICE_AUDIO_CONTROLLER
HARDWARE_DEVICE_BASE_BOARD
HARDWARE_DEVICE_BIOS
HARDWARE_DEVICE_CACHE_MEMORY
HARDWARE_DEVICE_COMPUTER_SYSTEM
HARDWARE_DEVICE_DISK_PARTITION
HARDWARE_DEVICE_FLOPPY_CONTROLLER
HARDWARE_DEVICE_FLOPPY_DRIVE
HARDWARE_DEVICE_HARDDISK_DRIVE
HARDWARE_DEVICE_IDE_CONTROLLER
HARDWARE_DEVICE_KEYBOARD
HARDWARE_DEVICE_MEMORY_BANK
HARDWARE_DEVICE_MEMORY_MODULE
HARDWARE_DEVICE_MONITOR
HARDWARE_DEVICE_NETWORK_CONTROLLER
HARDWARE_DEVICE_OPTICAL_DRIVE
HARDWARE_DEVICE_PCI_DEVICE
HARDWARE_DEVICE_PCMCIA_CONTROLLER
HARDWARE_DEVICE_POINTING_DEVICE
HARDWARE_DEVICE_PORT_CONNECTOR
HARDWARE_DEVICE_PRINTER
HARDWARE_DEVICE_PROCESSOR
HARDWARE_DEVICE_SCSI_CONTROLLER
HARDWARE_DEVICE_SYSTEM_SLOT
HARDWARE_DEVICE_TAPE_DRIVE
HARDWARE_DEVICE_USB_CONTROLLER
HARDWARE_DEVICE_VIDEO_CONTROLLER
HOST
SOFTWARE
SOFTWARE_CONFIG
The assignment of the column names to individual device classes results from the following list (/etc/opsi/hwaudit/locales/en_US):
DEVICE_ID.deviceType = Device type
DEVICE_ID.vendorId = Vendor ID
DEVICE_ID.deviceId = Device ID
DEVICE_ID.subsystemVendorId = Subsystem vendor ID
DEVICE_ID.subsystemDeviceId = Subsystem device ID
DEVICE_ID.revision= Revision
BASIC_INFO.name = Name
BASIC_INFO.description = Description
HARDWARE_DEVICE.vendor = Vendor
HARDWARE_DEVICE.model = Model
HARDWARE_DEVICE.serialNumber = Serial number
COMPUTER_SYSTEM = Computer
COMPUTER_SYSTEM.sku = Stock Keeping Unit
COMPUTER_SYSTEM.systemType = Type
COMPUTER_SYSTEM.totalPhysicalMemory = Physical Memory
COMPUTER_SYSTEM.dellexpresscode = Dell Expresscode
CHASSIS = Chassis
CHASSIS.name = Name
CHASSIS.chassisType = Chassis type
CHASSIS.installDate = Installation date
CHASSIS.serialNumber = Serial number
BASE_BOARD = Base board
BASE_BOARD.product = Product
BIOS = BIOS
BIOS.version = Version
SYSTEM_SLOT = System slot
SYSTEM_SLOT.currentUsage = Current usage
SYSTEM_SLOT.status = Status
SYSTEM_SLOT.maxDataWidth = Maximum data width
PORT_CONNECTOR = Port
PORT_CONNECTOR.connectorType = Attributes
PORT_CONNECTOR.internalDesignator = Internal designator
PORT_CONNECTOR.internalConnectorType = Internal type
PORT_CONNECTOR.externalDesignator = External designator
PORT_CONNECTOR.externalConnectorType = External type
PROCESSOR = Processor
PROCESSOR.architecture = Architecture
PROCESSOR.family = Family
PROCESSOR.currentClockSpeed = Current clock speed
PROCESSOR.maxClockSpeed = Maximum clock speed
PROCESSOR.extClock = External clock
PROCESSOR.processorId = Processor-ID
PROCESSOR.addressWidth = Address width
PROCESSOR.socketDesignation = Socket designation
PROCESSOR.voltage = Voltage
PROCESSOR.NumberOfCores = Number Of Cores
PROCESSOR.NumberOfLogicalCores = Number Of Logical Cores
MEMORY_BANK = Memory bank
MEMORY_BANK.location = Location
MEMORY_BANK.maxCapacity = Maximum capacity
MEMORY_BANK.slots = Number of slots
MEMORY_MODULE = Memory module
MEMORY_MODULE.deviceLocator = Device locator
MEMORY_MODULE.capacity = Capacity
MEMORY_MODULE.formFactor = Form factor
MEMORY_MODULE.speed = Speed
MEMORY_MODULE.memoryType = Memory type
MEMORY_MODULE.dataWidth = Data width
MEMORY_MODULE.tag = Tag
CACHE_MEMORY = Cache memory
CACHE_MEMORY.installedSize = Installed size
CACHE_MEMORY.maxSize = Maximum size
CACHE_MEMORY.location = Location
CACHE_MEMORY.level = Level
PCI_DEVICE = PCI device
PCI_DEVICE.busId = Bus id
NETWORK_CONTROLLER = Network adapter
NETWORK_CONTROLLER.adapterType = Adapter type
NETWORK_CONTROLLER.maxSpeed = Maximum speed
NETWORK_CONTROLLER.macAddress = MAC address
NETWORK_CONTROLLER.netConnectionStatus = Net connection status
NETWORK_CONTROLLER.autoSense = auto-sense
NETWORK_CONTROLLER.ipEnabled = IP protocoll enabled
NETWORK_CONTROLLER.ipAddress = IP address
AUDIO_CONTROLLER = Audio controller
HDAUDIO_DEVICE = HD Audio device
HDAUDIO_DEVICE.address = Addresse
IDE_CONTROLLER = IDE controller
SCSI_CONTROLLER = SCSI controller
FLOPPY_CONTROLLER = Floppy controller
USB_CONTROLLER = USB controller
1394_CONTROLLER = 1394 controller
PCMCIA_CONTROLLER = PCMCIA controller
VIDEO_CONTROLLER = Video controller
VIDEO_CONTROLLER.videoProcessor = Video processor
VIDEO_CONTROLLER.adapterRAM = Adapter RAM
DRIVE.size = Size
FLOPPY_DRIVE = Floppy drive
TAPE_DRIVE = Tape drive
HARDDISK_DRIVE = Harddisk drive
HARDDISK_DRIVE.cylinders = Cylinders
HARDDISK_DRIVE.heads = Heads
HARDDISK_DRIVE.sectors = Sectors
HARDDISK_DRIVE.partitions = Partitions
DISK_PARTITION = Partition
DISK_PARTITION.size = Size
DISK_PARTITION.startingOffset = Starting offset
DISK_PARTITION.index = Index
DISK_PARTITION.filesystem = Filesystem
DISK_PARTITION.freeSpace = Free space
DISK_PARTITION.driveLetter = Drive letter
OPTICAL_DRIVE = Optical drive
OPTICAL_DRIVE.driveLetter = Drive letter
USB_DEVICE = USB device
USB_DEVICE.vendorId = Vendor ID
USB_DEVICE.deviceId = Device ID
USB_DEVICE.usbRelease = USB release
USB_DEVICE.maxPower = Maximum power
USB_DEVICE.interfaceClass = Interface class
USB_DEVICE.interfaceSubClass = Interface sub class
USB_DEVICE.interfaceProtocol = Interface protocol
USB_DEVICE.status = Status
MONITOR = Monitor
MONITOR.screenHeight = Screen height
MONITOR.screenWidth = Screen width
KEYBOARD = Keyboard
KEYBOARD.numberOfFunctionKeys = Number of function keys
POINTING_DEVICE = Pointing Device
POINTING_DEVICE.numberOfButtons = Number of buttons
PRINTER = Printer
PRINTER.horizontalResolution = Horizontal resolution
PRINTER.verticalResolution = Vertical resolution
PRINTER.capabilities = Capabilities
PRINTER.paperSizesSupported = Supported paper sizes
PRINTER.driverName = Driver name
PRINTER.port = Port
Examples queries: List of all hard drives:
SELECT
  *
FROM HARDWARE_DEVICE_HARDDISK_DRIVE AS d
LEFT OUTER JOIN HARDWARE_CONFIG_HARDDISK_DRIVE AS h
ON
  d.hardware_id = h.hardware_id ;
The software inventory uses as primary key the following entries:
-
Name
This is the 'windowsDisplayName' or, if this is not available, the 'windowsSoftwareId'. Both values are obtained from the registry:
'HKLM\SOFTWARE\Microsoft\Windows\CurrentVersion\Uninstall' respectively
'HKLM\SOFTWARE\Microsoft\Windows\CurrentVersion\Uninstall\<id> DisplayName' -
Version
'HKLM\SOFTWARE\Microsoft\Windows\CurrentVersion\Uninstall\<id> DisplayVersion' -
SubVersion
-
Language
-
Architecture (32 Bit / 64 Bit)
In the table 'Software_config' these fields are combined to the field 'config_id'.
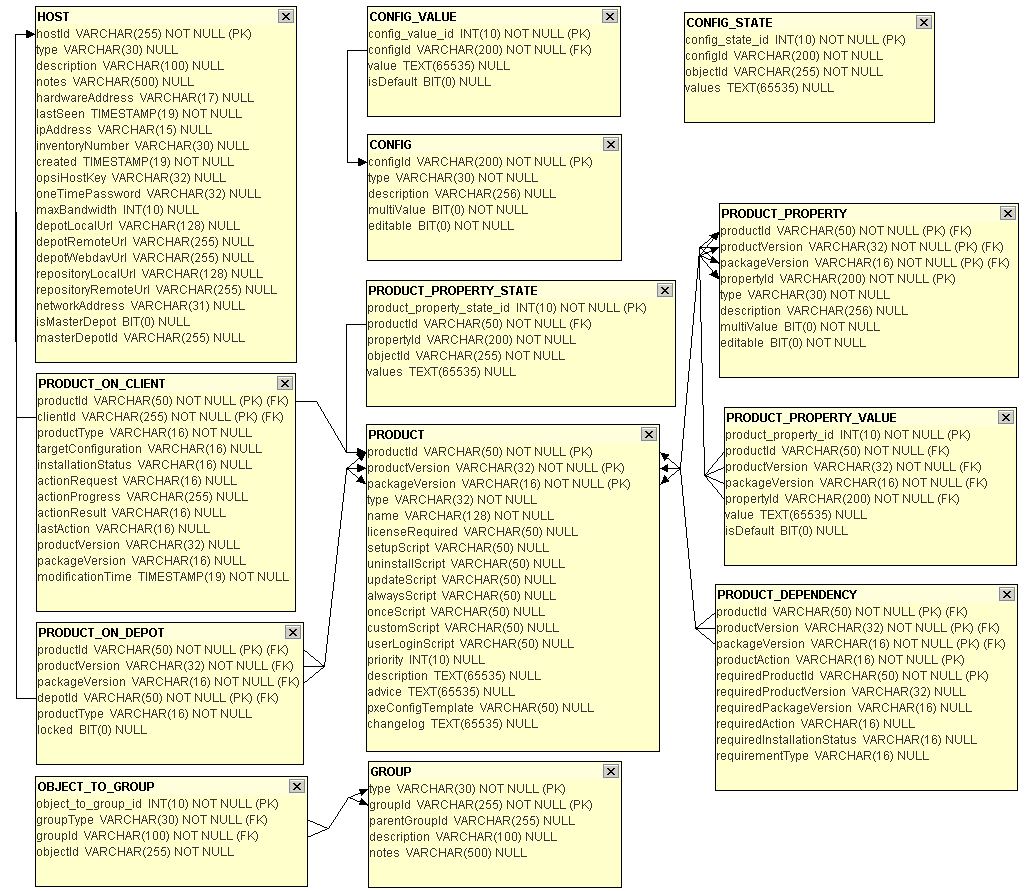
mysql backend for configuration data (overview)
The 'mysql-Backend' for configuration data has been available since opsi 4.0.
This module is currently a co-financed opsi extension. This means it is not free to use.
Further details can be found in opsi modules.
The '{mysql backend}' has the advantage of a higher performance, especially with large installations.
Here is an overview of the data structure:
Initializing the MySQL-Backend
If the MySQL server is not yet installed, this must first be done by:
apt-get install mysql-serverThen a password must be set for the MySQL-user 'root' user':
mysqladmin --user=root password linux123
Since MySQL-Server version 5.7 the previously optional 'strict mode' is enabled by default. This causes the opsi-setup --configure-mysql command to fail. Accordingly, the file /etc/mysql/mysql.conf.d/mysqld.cnf should be edited before the command is executed.The following line must be inserted in the [mysqld] section:sql_mode = NO_ENGINE_SUBSTITUTIONThen the service mysql has to be restarted:` systemctl restart mysql.service`It is now possible to continue. |
The database can now be set up with the command opsi-setup --configure-mysql.
An example session:
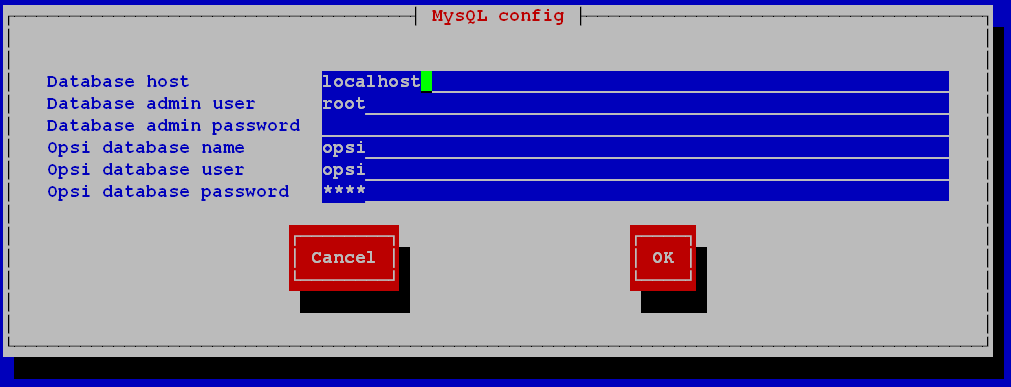
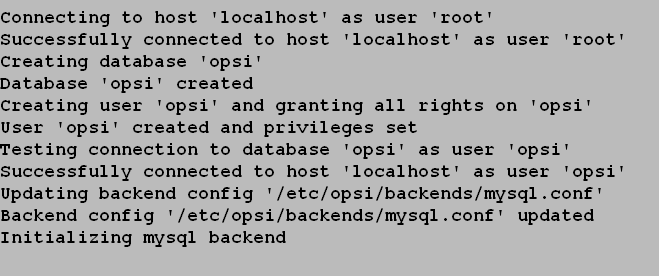
In the input dialog, all entries can be confirmed with Enter except for the password.
Next you have to specify in /etc/opsi/backendManager/dispatch.conf that the 'mysql-Backend' should also be used. A detailed description of this configuration can be found in the 'Backend configuration' chapter of the 'getting-started manual'. The file itself contains a number of examples of typical configurations.
A configuration for the 'mysql-Backend' (without internal dhcpd) looks like this:
backend_.*         : mysql, opsipxeconfd
host_.*            : mysql, opsipxeconfd
productOnClient_.* : mysql, opsipxeconfd
configState_.*     : mysql, opsipxeconfd
.*                 : mysql
After completing the configuration, you must execute the following commands to use the now configured and converted backend:
opsi-setup --init-current-config
opsi-setup --set-rights
systemctl restart opsiconfd.service
systemctl restart opsipxeconfd.service| The 'opsiconfd' service has no hard dependency on MySQL by default, since opsi can be used without a MySQL-backend, and the service can also run on another server. Please refer to the documentation of your operating system on how to configure this. |
Manual configuration
A manual configuration can be done via the backend configuration file.
By default this is /etc/opsi/backends/mysql.conf.
Since python-opsi 4.1.1.76 it has been possible to force the creation of new connections after a certain time in order to avoid problems with timeouts. One indication of such timeouts can be the message 'mysql server has gone away'.
You can set a timeout by specifying 'connectionPoolRecycling' after how many seconds a new connection should be created.
The default value is -1, which means no forced reconnection.
If this value is set, it should generally be lower than the value for connection timeouts configured on the server (wait_timeout).
HostControl backend
The HostControl backend does not store any configuration data, but is used to control the opsi clients. This includes, for example, starting clients via Wake-On-LAN or sending control commands to the opsi-client-agent.
The configuration of the HostControl backend is done in the configuration file /etc/opsi/backends/hostcontrol.conf. Configuration options are:
-
opsiclientdPort:
Network port for connecting to an opsi-client-agent. -
hostRpcTimeout:
Timeout (in seconds) when connecting to an opsi-client-agent. -
resolveHostAddress:
If this option is set to True, when connecting from opsi-server to an opsi-client, the IP address of the client is firstly determined via name resolution. To give preference to the IP address stored in the opsi backend, the option must be set to False. -
maxConnections:
Maximum number of simultaneous connections to an opsi-client-agent. -
broadcastAddresses:
Assignment of network addresses to broadcast addresses in the form: +.{ "<network-address>": { "<broadcast-address>": <port-list> } }
Multiple broadcast addresses can be assigned to a network address. Different ports can be configured for each broadcast address. The suitable broadcast addresses are determined on basis of the IP address of a client as stored in the opsi backend. If the IP address is part of several networks, the most specific entry is used.
Example:
"broadcastAddresses": {
		"0.0.0.0/0": {
			"255.255.255.255": [7, 9, 12287]
		},
		"10.10.0.0/16": {
			"10.10.1.255": [12287],
			"10.10.2.255": [12287]
		},
		"10.10.3.0/24": {
			"10.10.3.255": [12287]
		},
		"192.168.1.0/24": {
			"192.168.1.255": [12287, 9, 12287]
		}
	}
HostControlSafe-Backend
A peculiarity of opsi 4.0 methods called without parameters is that it matches all existing objects. For example, the command "host_getObjects" without any parameters returns all host objects. This behavior is somewhat problematic in the HostControl backend. Especially with the two commands: hostControl_shutdown and hostControl_reboot. In these cases, calling these methods without parameters would shutdown or restart all clients.
Therefore with opsi release 4.0.3 two changes were introduced:
-
The methods
hostControl_shutdownandhostControl_rebootare different from the standard opsi 4.0 behavior since this release. These two methods now return an error message when they are called without any parameters. -
A new backend has been introduced (HostControlSafe-Backend), which results in error message for all methods, if they are called without any correct client parameter. To explicity address all clients with a HostControlSafe-Backend method, you can use the
*character:opsi-admin -d method hostControlSafe_shutdown *
For the reasons mentioned above, we recommend using hostControlSafe methods on the console or if you are new to using the service methods.
Conversion between different backends
The opsi-convert command is used to convert the opsi configuration data between different backends. Destination and source can be assigned in different ways:
-
backend name:
By specifying the name, a corresponding backend is specified on the current server. The commandopsi-convert file mysqlconverts the data on the current server from the 'file-Backend' to the 'mysql-Backend'. -
Service address
By specifying service addresses, a server can can also be addressed remotely. The service address has the formhttps://<username>@<ipadresse>:4447/rpc. You will be asked for the passwords.
Example:
opsi-convert -s -l /tmp/log https://uib@192.168.2.162:4447/rpc https://opsi@192.168.2.42:4447/rpc
opsi-convert commandline arguments:
usage: opsi-convert [-h] [--version] [--quiet] [--verbose]
                    [--log-level {0,1,2,3,4,5,6,7,8,9}] [--clean-destination]
                    [--with-audit-data] [-s OLD SERVER ID]
                    [--log-file LOGFILE]
                    source destination

Convert an opsi database into an other.

positional arguments:
  source                Backend to read data from.
  destination           Backend to write data to.

optional arguments:
  -h, --help            show this help message and exit
  --version, -V         show program's version number and exit
  --quiet, -q           do not show progress
  --verbose, -v         increase verbosity (can be used multiple times)
  --log-level {0,1,2,3,4,5,6,7,8,9}
                        Set log-level (0..9)
  --clean-destination, -c
                        clean destination database before writing
  --with-audit-data, -a
                        including software/hardware inventory
  -s OLD SERVER ID      use destination host as new server
  --log-file LOGFILE, -l LOGFILE
                        Log to this file. The loglevel will be DEBUG.

The backends can either be the name of a backend as defined in
/etc/opsi/backends (file, mysql, ...) or the the url of an opsi configuration
service in the form of http(s)://<user>@<host>:<port>/rpc
Boot files
/tftpboot/linux contains the boot files that are required in conjunction with the PXE network boot.
Securing the shares with encrypted passwords
The 'opsi-client-agent' accesses the shares made available by the 'opsi-server' in order to be able to install the software on the client.
The system user 'pcpatch' is used for this. Securing these shares and the authentication data of the pcpatch user are important for: * General system security and data integrity * Protection of licensed software packages against misuse
In order to provide the 'opsi-client-agent' access to the authentication data, a specific key ('opsi-host-Schlüssel') is generated for each client when it is created in opsi. This key is stored (in the 'file-Backend') in the file /etc/opsi/pckeys and is transferred to the PC during reinstallation. The transferred key is stored during the installation of the 'opsi-client-agent' in the file c:\program files\opsi.org\opsi-client-agent\opsiclientd\opsiclientd.conf in such a way that only Administrators have access. Likewise, on the 'opsi-server' only root and members of the 'opsiadmin' group have access to the file /etc/opsi/pckeys. This way, each PC has a key that is only known to the PC and the 'opsi-server' and which is protected against access by normal users. With this key the current password of the system user 'pcpatch' is encrypted on the 'opsi-server' and stored in the backend. This encrypted password is read by the client each time the 'opsi-client-agent' is activated, so that the 'pcpatch' password can be changed at any time and the client is notified of the changed password in an encrypted way.