Local Images (opsi-local-image)
With this extension you can quickly restore many opsi clients to a certain state — for example in the coffee break during a training or in the classroom after class. The administrator controls everything in a central place: first, the extension creates an image, then it saves it on a separate hard disk partition. This image is then used for fast recovery, with minimal impact on network performance.
Prerequisites
| This module is currently a paid extension. This means that you need an activation file to unlock it. You will receive this file after you have purchased the extension. For evaluation purposes, we’re happy to provide you with a temporary license free of charge. Please contact us via email. |
More details can be found in opsi Extensions.
opsi-local-image comes bundled with the opsi-vhd-reset extension (see Virtual Hard Disk (opsi-vhd-reset)).
The extension requires opsi 4.0.3 or newer. The following table lists the required opsi packages:
| opsi Package | Version |
|---|---|
|
>= 20130207-1 |
The product opsi-local-image-capture requires that the share opsi_depot_rw is writable for the user pcpatch. Therefore please check your Samba configuration.
|
Introduction
opsi is a great tool to install and maintain Windows computers in an automated way — also and especially if heterogeneous hardware is involved. However, a package-based opsi installation is not fast enough to bring computers back to a predefined state within a short time, e.g. during trainings or in a classroom during a break. This chapter therefore introduces a concept which stores the package-based installation locally on a second partition as an image and allows a fast recovery from there.
Here’s how this works:
-
Initial installation followed by a local image backup
-
Fast recovery based on different techniques
-
System maintenance followed by a local image backup
-
Integration of WIM capture
-
Integration of Linux clients into the backup/restore process
Concept
The requirements of educational computer networks differ from those of other networks. Especially in schools, universities and other educational institutions, it is important to quickly restore many computers to a defined state. This restoration should happen within a short time (about 15 minutes), and it should also be possible to install the computer with a different system if necessary. In addition to the installation of certain Windows or Linux versions, continuous maintenance of the systems with security updates should also be ensured.
The usual techniques for installing PCs have advantages and disadvantages:
| Feature | Unattended | Image |
|---|---|---|
Performance |
(-) slow |
(+) fast |
Sensitivity to heterogenous Hardware |
(+) low |
(-) high |
Network Load |
(-) high |
(-) high |
The concept of opsi-local-image tries to combine the advantages of both approaches:
| Feature | Unattended |
|---|---|
Performance |
(+) fast |
Sensitivity to heterogeneous Hardware |
(+) low |
Network Load |
(+) low |
The concept consists of four main steps:
-
initial package-based Windows installation via PXE boot with individual driver integration (opsi Linux boot image)
-
backup of this initial installation in an image on a separate partition of the local hard drive (opsi Linux boot image)
-
fast restore of the installation from the local image (opsi Linux boot image)
-
maintenance of the local installation (security updates) via the opsi software distribution and backup of the updated system to the local backup image (opsi Linux boot image)
Technical Concept
The machines in the computer pools use a static partition table and have with either three or four partitions:
-
Partition 1 (System)
The operating system currently in use (Windows/Linux) is located here.
The size of this partition is controlled by theopsi-local-image-prepareproduct during partitioning via a property. -
Optional: Partition 2 (
sysdata)
User data that should not be overwritten during recovery may be located here. The partition is formatted with NTFS.
The size of this partition is controlled by theopsi-local-image-prepareproduct during partitioning via a property. -
Partition 3 (
winpe/swap)
The size of this partition is set to 4 GB.
On Windows XP, this partition is not used.
On NT6 (Windows 7), this partition is used for the Windows PE required during installation; it is not visible during actual operation.
On Linux, this partition is used as a swap partition. -
Partition 4 (
backup)
This partition is used to store the backed up images and their metadata.
The size of the partition results from the free space left after the other partitions have been created.
The netboot products for OS installation use only the first two or three partitions and leave the last backup partition untouched. Thus, the images located on partition 4 (backup) are preserved even when a new operating system is installed.
Proceedings
Initial Installation
First create the necessary static partitions with the product opsi-local-image-prepare.
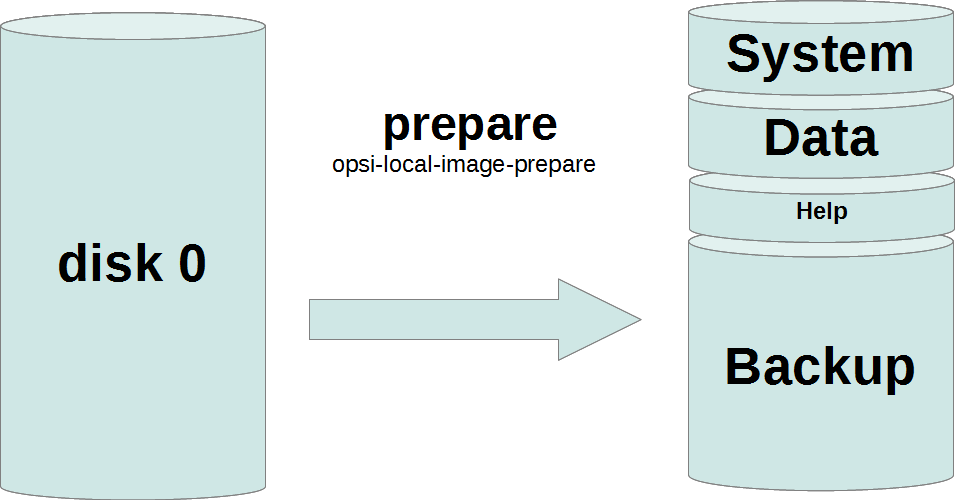
opsi-local-image-restoreNext, you can use opsi-local-image-win* and other products to install the operating systems and provide them with different application software.
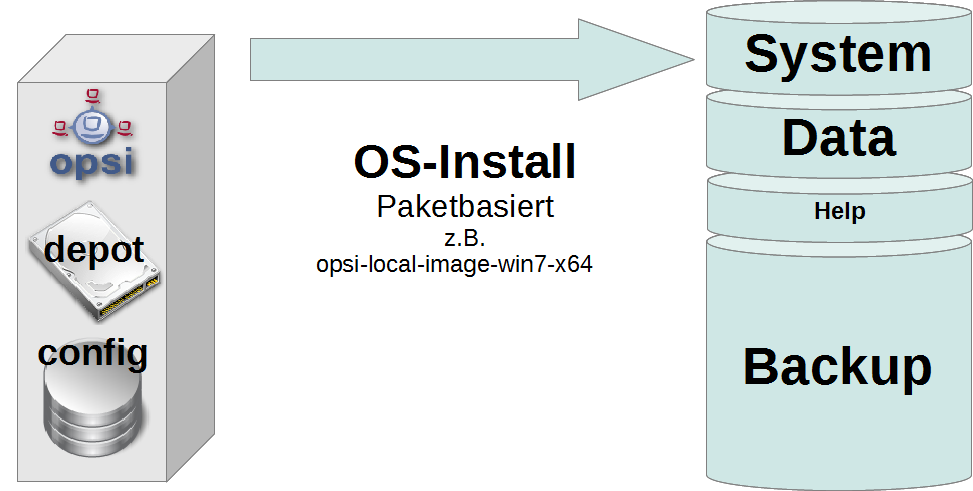
opsi-local-image-win*By default, these are automatically saved as an image after installation.
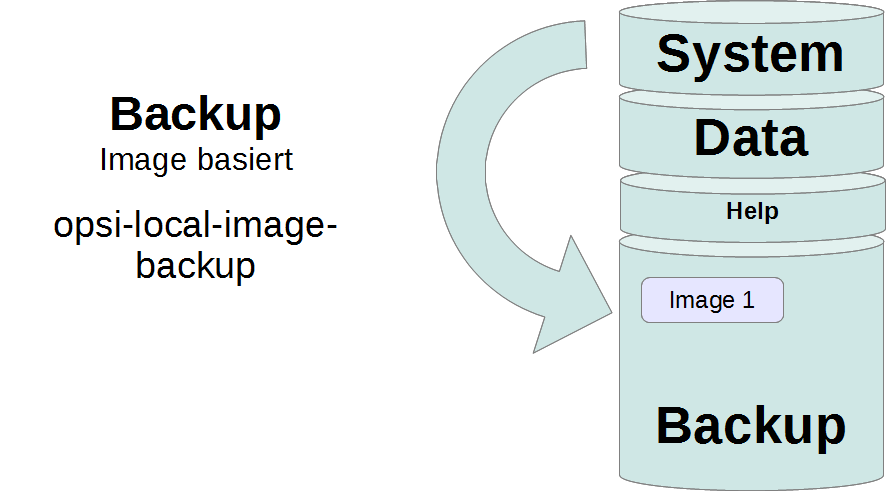
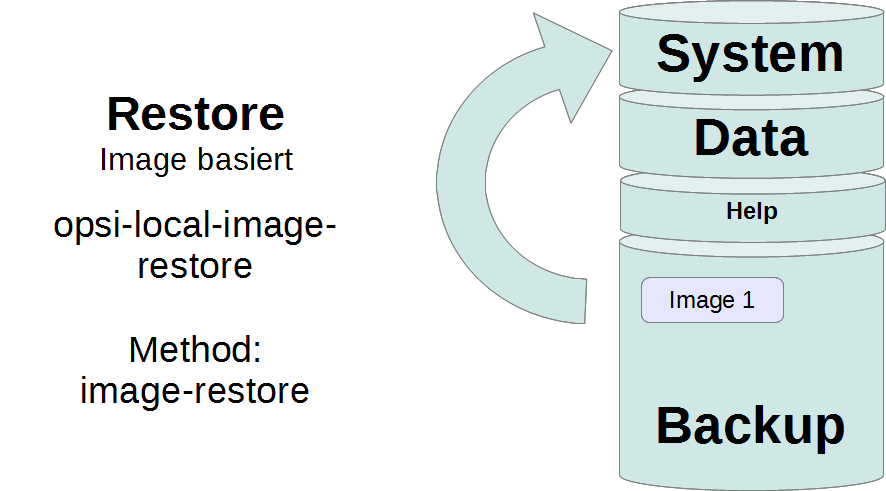
opsi-local-image-backupRestoring an Image
Invoke the opsi-local-image-restore product; this will automatically restore the last image created. To restore a different image, specify it in the imagefile property.
opsi-local-image-restoreDeleting an Image
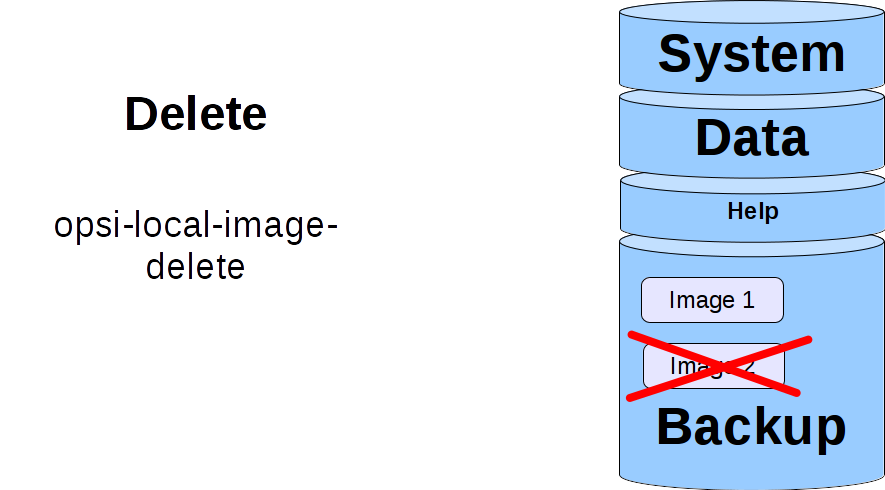
By executing the product opsi-local-image-delete, the image specified in the property imagefile will be deleted.
Updating an Image
To simplify the maintenance of the clients, you can use the product opsi-auto-update.

The main purpose of the opsi-auto-update product is to keep the installed products up to date. To do this, it sets all installed products whose version differs from the one on the server to setup on the client.
This product is quite useful, not just in the context of opsi-local-image. For a detailed description, see the opsi Standard Products chapter, section opsi-auto-update.
|
opsi-local-image Products
Starting with version 4.1, the opsi-local-image products also support systems with multiple disks. See also the section Some hints to the NT6 netboot products.
|
The opsi-local-image package contains the following products:
-
Netboot Product for Partitioning:
-
opsi-local-image-prepare
-
-
Netboot Products for OS Installation:
-
Netboot Products for installing Windows:
-
opsi-local-image-winxp -
opsi-local-image-win7 -
opsi-local-image-win7-x64 -
opsi-local-image-win81 -
opsi-local-image-win81-x64 -
opsi-local-image-win10 -
opsi-local-image-win10-x64
-
-
Netboot Products for installing Linux:
-
opsi-local-image-ubuntu -
opsi-local-image-opensuse13-2
-
-
-
Netboot Products for Backup and Restore:
-
opsi-local-image-backup -
opsi-local-image-restore -
opsi-local-image-delete
-
-
Localboot Products for controlling Processes:
-
opsi-local-image-backup-starter -
opsi-auto-update
-
To install the products, set the active attribute of the uib_local_image repository to True in the /etc/opsi/package-updater.repos.d/uib-local_image.repo file.
After that, run the following command to install the new products:
opsi-package-updater --repo uib_local_image installNetboot Product for Partitioning
The opsi-local-image-prepare product creates the static partition table for all other products.
| Use this product only for initial preparation of the disk, since it will delete all existing images! |
opsi-local-image-prepare supports the following properties:
-
ask_before_inst: Determines if the start of the installation has to be confirmed on the client. (default:true) -
system_partition_size: Determines the size of partition 1 (system). (default:30GB) -
data_partition_size: Determines the size of partition 2 (sysdata). If set to0G, no data partition will be created. (default:0G) -
start_os_installation: Here you can select the operating system which gets installed automatically after partitioning. If you installstart_os_installation, the two propertiesimagefileandimagefiles_listof theopsi-local-image-restoreproduct are deleted, because the repartitioning has made this data invalid. -
delay_for_reboot: Defines the number of seconds between the end of the script and the reboot, all to give the server time to create the netboot pipe. -
minimal_backup_partition_size: This property is used to check if the size entries make sense. (default:55%)
The size of the backup partition results from:
hard disk size - (system_partition_size+data_partition_size+winpe_partition_size)
opsi-local-imageis normally used to create a local backup of the system partition. This requires that there is enough space for the backup partition. If, when calculating the partitioning, the product determines that the remaining space for the backup partition is less thanminimal_backup_partition_size, it terminates with an error message. -
winpe_partition_size: size of the WinPE partition (default:4G) -
multi_disk_mode: Selects a hard disk for installation. (default:0)
Possible values are:0,1,2,3,prefer_ssd, andprefer_rotational. The values0,1,2, and3directly specify the index of the disk, where0means the first disk,1the second, etc. Theprefer_ssdvalue selects the first SSD disk,prefer_rotationalthe first classic (rotational) disk. The property is ignored on systems with only one disk. -
backup_partition_on_same_disk: Determines whether the backup partition is created on the system disk (true) or on the first other free disk (false). (default:true)
Netboot Products for installing Windows
The netboot products for Windows installation are derivatives of the opsi standard products for Windows installation. This means that they are identical in terms of structure and driver integration. You can find corresponding instructions in chapter Getting Started.
The Windows NT6 products from version 4.1 onward are a subset of the NT6 standard product properties (see section Some hints to the NT6 netboot products). For notes about the hard disk drive properties, see the Netboot Product for Partitioning section. The missing properties for disks and partitions are taken from the product opsi-local-image-prepare.
Do not change the property values of the opsi-local-image-prepare product after you have prepared a machine with it, because subsequent products use these values.
|
-
opsi-local-image-winxp: Installation of Windows XP, uses only the first partition and sets an empty administrator password -
opsi-local-image-win7: Installation of Windows 7 (32 bit) -
opsi-local-image-win7-x64: Installation of Windows 7 (64 bit) -
opsi-local-image-win81: Installation of Windows 8.1 (32 bit) -
opsi-local-image-win81-x64: Installation of Windows 8.1 (64 bit) -
opsi-local-image-win10: Installation of Windows 10 (32 bit) -
opsi-local-image-win10-x64: Installation of Windows 10 (64 bit)
All of these products have the following opsi-local-image specific properties:
-
backup_after_install: After OS installation, first the application software is installed and then an image of the installation is created (default:true). In addition, theimageFilevalue of theopsi-local-image-restoreproduct is deleted. As a result, the created backup gets the name of the running netboot product (e.g.opsi-local-image-win7). -
setup_after_install: Specify here one or more products to be set tosetupafter the operating system installation is complete. All dependencies will be resolved automatically.
Netboot Products for installing Linux
The product opsi-local-image-ubuntu installs Ubuntu 18.04/22.04 (32 and 64 bit). It creates two user accounts: root and user. The password for root is set by the root_password property (default: linux123), the password for user is set by the user_password property (default: linux123).
The following properties are used to control the installation:
-
askbeforeinst: Determines if the start of the installation has to be confirmed on the client. (default:true) -
architecture: Select the architecture, this also affects the boot image. (default:64bit) -
additional_packages: Which additional packages should be installed? List of packages is separated by spaces. (default:'') -
language: Which language/locale should be installed? (default:de) -
console_keymap: Keyboard layout (default:de-latin1-nodeadkeys) -
timezone: Timezone (default:Europe/Berlin) -
online_repository: Defines the online repository (default:http://de.archive.ubuntu.com/ubuntu). -
proxy: Defines (if necessary) a proxy server of the formhttp://<ip>:<port>;(default:'') -
backup_after_install: Saves an image immediately after installation (default:true) -
setup_after_install: Specify one or more products which should be set tosetupafter the OS installation; dependencies will be resolved automatically. -
wget_and_execute: URL of a file which will be fetched and executed via HTTP at the end of the installation (default:'') -
release: Ubuntu release to install (default:trusty) -
install_opsi-client-agent: Install the Linux client agent (paid extension, see chapter opsi Extensions, default:false).
The product opsi-local-image-opensuse13-2 installs openSUSE 13.2 (32 and 64 bit). It creates two user accounts: root and user. The password for root is set by the root_password property (default: linux123), the password for user is set by the user_password property (default: linux123).
opsi-local-image-opensuse13-2 supports the following properties:
-
askbeforeinst: Determines if the start of the installation has to be confirmed on the client. (default:true) -
architecture: Select the architecture, this also affects the boot image. (default:64bit) -
additional_packages: Which additional packages should be installed? List of packages is separated by spaces. (default:'') -
language: Which language/locale should be installed? (default:de) -
console_keymap: Keyboard layout (default:de-latin1-nodeadkeys) -
timezone: Timezone (default:Europe/Berlin) -
partition_disk: Which disk should be used? (Default:first) -
proxy: Defines (if necessary) a proxy server of the formhttp://<ip>:<port>;(default:'') -
backup_after_install: Saves an image immediately after installation (default:true) -
setup_after_install: Specify one or more products which should be set tosetupafter the OS installation; dependencies will be resolved automatically. -
install_opsi-client-agent: Install the Linux client agent (paid extension, see chapter opsi Extensions, default:false).
Netboot Products for Backup and Restore
The opsi-local-image-backup product creates an image of the operating system installed on the first partition and stores it on the fourth partition. The image name is set by a property; if no value is set here, the name of the netboot product currently set to installed is used (e.g. opsi-local-image-ubuntu). The name is also set in the opsi-local-image-restore product as property imagefile, so that calling opsi-local-image-restore will restore exactly this image by default. Also, the name is added to the opsi-local-image-restore property imagefiles_list, so the property contains a list of all available images.
For Windows systems the product saves the current state of the opsi product together with the image so that they can be restored together.
| The backup software used is Partclone. This tool creates partition images and restores them if necessary. |
opsi-local-image-backup supports the following properties:
-
askbeforeinst: Determines if the start of the installation has to be confirmed on the client. (default:true) -
free_on_backup: This read-only property displays current information about the backup partition. (device,size,used,remaining,use in %,mount point) -
imagefile: Sets the name of the image file to create (default: empty, i.e. the name of the currently installedopsi-local-imageproduct will be used). The name may contain spaces, but no special characters. If the name contains spaces, they are treated internally as underscores, e.g.my imagebecomesmy_image. -
setup_after_install: Specify one or more products which should be set tosetupafter the OS installation; dependencies will be resolved automatically.
The product opsi-local-image-restore restores the image defined by imagefile to the first partition and makes sure that the bootflag is set. For Windows systems this product saves the current state of the opsi product together with the image, so that they can be restored together.
opsi-local-image-restore supports the following properties:
-
askbeforeinst: Determines if the start of the installation has to be confirmed on the client. (default:true) -
architecture: Select the architecture, this also affects the boot image. (default:64bit) -
imagefile: Defines the name of the image to be restored; the value is automatically set by the last backup. The list of available images is contained in theimagefiles_listproperty. -
imagefiles_list: List of available images -
setup_after_restoreSpecify one or more products which should be set tosetupafter the restore is complete; as a result, they will automatically be installed after the reboot. (Default:windomainto reinstate the restored client to the Windows domain).
The update_and_backup property is no longer recommended. Use the opsi-auto-update product instead. For a detailed description, see the opsi Standard Products chapter, section opsi-auto-update.
|
The opsi-local-image-delete product deletes the image specified in the imagefile property from the backup partition:
-
imagefile: Name des zu löschenden Images (Voreinstellung: leer)
Localboot Products for controlling Processes
The opsi-local-image-backup-starter localboot product sets the opsi-local-image-backup netboot product to setup and then reboots the client. This product has a very low priority (-98), so all other localboot products will be installed first.
The opsi-auto-update product can be used to ensure that the installed products are up to date. It sets all installed client products which have a version number different from the one on the server to setup.
This product is quite useful, not just in the context of opsi-local-image. For a detailed description, see the opsi Standard Products chapter, section opsi-auto-update.
|
Extended Service Methods
You can combine the computers in a training room into a client group and then define actions that you perform for the entire group. The following extensions to the service methods are provided for this purpose:
-
setProductActionRequestForHostGroup
Parameters:hostGroupId,productId,actionRequest
Starts a specific action (e.g. restore an image) for all members of a group (e.g. for all computers in a training room). -
setProductPropertyForHostGroup+. Parameters:productId,propertyId,propertyValue,hostGroupId
Sets a value for specific product property for all members of a group, e.g. an image to be restored. -
getPossibleImagefileValuesForHostGroup
Parameters:groupId
Lists allimagefilenames of images created byopsi-local-image-backupon the clients of the group. If a particular image (e.g.opsi-local-image-win10) is missing on one or more machines, it will not be part of the return list.
We plan to integrate these methods into the opsi standard packages at a later time. Until then, copy the file 40_groupActions.conf with root privileges to /etc/opsi/backendManager/extend.d. Then execute the this command:
|
opsi-setup --set-rights /etc/opsiBackup Partition
The backup partition is (for computers with MBR BIOS and without data partition) the third partition of the system hard disk. If there is a separate partition for the user data (sysdata), then the backup partition is the fourth partition.
On systems with more than one disk, the opsi-local-image-prepare property multi_disk_mode determines the system disk. The backup partition can also be located on the first partition of another disk (depending on the opsi-local-image-prepare property backup_partition_on_same_disk).
|
Among other things, you will find the following data on the backup partition:
-
The
master.logfile with information about all performed image operations. This log file is transferred to the boot image logs. -
The image directories have the same name as the image and contain the images' metadata in addition to the image itself. The size of the images depends not only on the operating system, but also on the software installed there. To give you an idea about the file size, here are a few numbers for different images with standard software installed (LibreOffice, Firefox, Thunderbird, etc.):
-
opsi-local-image-ubuntu: 3,6 GB -
opsi-local-image-winxp: 6,4 GB -
opsi-local-image-win7: 9,4 GB -
opsi-local-image-win7-x64: 13 GB
-
Windows Imaging Format Integration (opsi-local-image-wim-capture)
Starting with NT6, Microsoft has introduced a new image format. A WIM file (Windows Imaging Format) stores the installation settings, including all software, hotfixes and configurations from an existing computer.It’s an archive for files and metadata rather than a hard disk or partition image. You can then use this WIM as a base for future installations on other computers, making the whole process much easier and faster.
A WIM file can contain several images. The normal installation of an NT6 computer is based on the fact that the file setup.exe unpacks an image from the file install.wim, configures it afterwards and provides it with additional drivers.
WIM Components
As of version 4.1, you only need the opsi-local-image-wim-capture product to capture an image in WIM format. The previous products opsi-local-image-capture and opsi-local-image-sysprep are obsolete and can be deleted.
|
In addition, there are target products which are intended to hold the captured images:
-
opsi-local-image-win7-capture -
opsi-local-image-win7-x64-capture -
opsi-local-image-win81-capture -
opsi-local-image-win81-x64-capture -
opsi-local-image-win10-capture -
opsi-local-image-win10-x64-capture
Difference between opsi-local-image-wim-capture and opsi-wim-capture.
The procedures and settings of the opsi-local-image-wim-capture product are similar to those of opsi-wim-capture (see Windows Imaging Format (opsi-wim-capture)). The properties of opsi-wim-capture are described in section opsi WIM Capture.
The main difference between the two products is: opsi-local-image-wim-capture uses the mechanism of opsi-local-image-backup/opsi-local-image-restore to backup and restore the partition. opsi-wim-capture relies on the opsi-clonezilla product for this purpose.
opsi-local-image-wim-capture will fail if your system has a data partition. In this case, reinstall the computer with the opsi-local-image-prepare property data_partition_size=0.
|
Windows Installation from a Target Product
This section describes how to restore opsi metadata to installed products.
The Problem:
If you reinstall a Windows system with opsi, all localboot products which were previously set to installed on this computer are automatically set to setup when the opsi-client-agent is installed. Therefore they will be reinstalled later. When rolling out the WIM images, this works a little differently:
-
The image contains the backup of the opsi data, which was stored there during the capturing process.
-
During the
opsi-client-agentinstallation the backup is detected and restored on the opsi server. -
Thus the products, which were installed in the image at the time of the capture, have the state
installedon the freshly installed computer.
If all products set to installed were now changed to setup, all products installed in the image would be installed again. This is not what we want.
As of version 4.0.7 there are therefore two options for restoring the opsi metadata of installed products:
-
Option 1:
Restore metadata and keepsetupaction requests +. Products set toinstalledare not set tosetup(default behavior, opsi < 4.0.7). -
Option 2:
Restore metadata.
Products marked asinstalledare set tosetupexcept for those which are included in the restored metadata.
Option 1
When rolling out a WIM image, only the products which were already set to setup before the start of the operating system installation are installed automatically afterwards. This may have been done either by a manual intervention or by setting the setup_after_install property.
In this case, only products marked as setup before the operating system installation are installed. This is the default behavior before opsi 4.0.7.
Option 2
Option 2 behaves similarly to installations from non-captured images. After restoring the metadata, products marked as installed are set to setup. Products that are included in the restored metadata are excluded.
This behavior is only available from opsi 4.0.7 and not the default. Option 2 has been made possible by extensions to opsi-script and is part of opsi-client-agent.
|
To use option 2, configure the host parameter accordingly and set the clientconfig.capture.switch_installed_products_to_setup entry to true. If it is set to false, option 1 is used.
These Hostparameter can then be used to enable or disable events for the respective client. You can create the Hostparameter via opsi-configed or opsi-admin. The corresponding opsi-admin command is as follows:
opsi-admin -d method config_createBool clientconfig.capture.switch_installed_products_to_setup "capture.switch_installed_products_to_setup" truePlease note that this will activate the second option for all computers.
In opsi-configed you can create the Hostparameter via Server configuration / clientconfig. Right-click on the right side and select Add Boolean configuration entry.