Integration of own software into the software distribution of opsi.
The installation of software in opsi is performed by the opsi-client-agent and specially by the script controlled setup program opsi-script. Therefore an opsi-script script must be created for each opsi product. Afterwards this script, as well as the installation files and metadata are packed into an opsi product, which can finally be installed on the opsi-server.
A Brief Tutorial: How to write a opsi-script Script
Introduction
This tutorial merely helps you getting started with opsi. It can’t replace professional training (which you may order through uib), or thoroughly studying the complete opsi manuals (which might be time consuming and partially error prone if you lack background knowledge). uib now offers training in English, too.
Get Training by uib gmbh in Europe or possibly Northern America:
https://uib.de/en/support-training/support/
The opsi Manuals can be found at:
https://docs.opsi.org/opsi-docs-en/4.2/index.html
important for scripting:
https://docs.opsi.org/opsi-docs-en/4.2/opsi-script-manual/opsi-script-manual.html
Can bee also found via:
https://uib.de/en/opsi-documentation/documentation/
important for scripting:
opsi-script reference card and opsi-script manual
Methods of non-interactive software installation on macOS.
Apple (unlike Microsoft) standardized its software installation methods very early on. In essence, there are two methods:
-
application Directory:
This is a directory according to the pattern:<application name>.appHowever, such a directory is not displayed in the Finder as a directory, but as an 'application'. Inside this directory, according to a pattern, the files of the application must be located. A typical structure would be:
opsi-script.app
  |--Contents
       |-Info.plist
       |-PkgInfo
       |-MacOS
       |  |-opsi-script
       |  |-opsi-script-gui
       |
       |-Resources
          |- (....)
Such a directory must only be copied into the path /Applications for installation. Possible files in the directory MacOS must be made executable.
Such *.app directories are usually offered packed for download.
-
PKG file:
These files contain software which need to be installed by a special command.
In both cases an unattended (i.e. non-interactive) installation is not an issue.
Often macOS software is offered in packed formats like *.zip, *.dmg or also *.tgz.
All variants mentioned so far can be installed directly by opsi-script, except *.tgz which must be unpacked before.
Structure of an opsi-script script
In the subsequent chapters the basic elements of a opsi-script script will be described with examples for Windows.
First an example for a simple opsi-script script:
[Actions]
WinBatch_tightvnc_silent_install

[WinBatch_tightvnc_silent_install]
"%ScriptPath%\tightvnc-1.3.9-setup.exe" /silent
An opsi-script script consists of primary and secondary sections.
Sections are introduced with a section name in square brackets, as known from the ini files.
The true software installation work takes place in the secondary sections,
which are called by the primary sections.
The secondary sections are "theme specific" and each has a special syntax.
The section name of a secondary section starts with its type, followed by a freely determinable name.
In the shown example, the primary section [Actions] calls a secondary section [WinBatch_tightvnc_silent_install].
The secondary section is of the type WinBatch. The content of a WinBatch section is executed via the Windows API.
So in this case the setup program tightvnc-1.3.9-setup.exe is started with the parameter /silent.
Primary Sections
- Actions
-
The
[Actions]section is the actual main program. This is where the script processing begins. - Sub-sections
-
Program sections that are required constantly can be redistributed to sub sections (subroutines). It’s possible to source sub sections to external files.
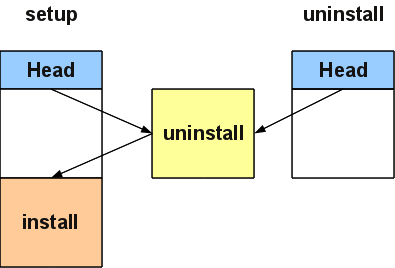
The primary sections are the main program in which the script flow is controlled. For this there are:
-
Variables: Strings and string lists
-
ifelseifelseendifstatements -
forloops over string lists -
Functions
Important secondary sections
- Files
-
File operations, such as:
-
copy (with version control, recursive …).
-
delete
-
create directories
-
…
-
- WinBatch
-
Used to call programs via the Windows API. For example, invokes to setup programs in silent mode are made in these sections.
- ShellScript
-
The content of this section is passed to the operating system on the typical shell for execution. This shell is the
cmd.exefor Windows, for Linux and for macOS thebash. As such, normal batch scripts can be stored here. - ExecWith
-
The contents of these sections are passed to an external program such as an (interpreter) for execution. For example,
ExecWithcan be used to integrate AutoIt scripts http://www.autoitscript.com directly into the opsi-script script. - Registry
-
The Registry sections are used to edit the registry.
- LinkFolder
-
LinkFolder sections are used to create and remove shortcuts. For example, such shortcuts can be created on the desktop or in the start menu.
Global constants
Global constants are text placeholders that can be used in primary and secondary sections
and are textually replaced by their values at runtime.
The use of placeholders can be utilized to ensure
that paths are set correctly in different environments (in the case of systems with different languages or operating system versions for example).
Examples:
- %ProgramFiles32Dir%
-
c:\Program Files (x86)
- %Systemroot%
-
c:\windows
- %System%
-
c:\windows\system32
- %opsiTmpDir%
-
c:\
- %Scriptpath%
-
<path to running script>
Second example: tightvnc
For clarification purposes, now a simple script for the installation of tightvnc. As a matter of fact this script would get on with the call of the silent installation in the Winbatch section. However, during a repeated installation an interactive dialog appears here (because of the restart of the running service). This dialog window is closed (if it appears) with the help of 'AutoIt'.
[Actions]
Message "Installing tightvnc 1.3.9 ..."
ExecWith_autoit_confirm "%ScriptPath%\autoit3.exe" WINST /letThemGo
WinBatch_tightvnc_silent_install
KillTask "autoit3.exe"

[WinBatch_tightvnc_silent_install]
"%ScriptPath%\tightvnc-1.3.9-setup.exe" /silent

[ExecWith_autoit_confirm]
; Wait for the confirm dialog which only appears if tightvnc was installed before as service
; Waiting for the window to appear
WinWait("Confirm")
; Activate (move focus to) window
WinActivate("Confirm")
; Choose answer no
Send("N")
Elementary commands for primary sections
String-Variable
- Variable declaration
-
'DefVar <variable name> [= <initial value>]'
- Variable assignment
-
'Set <variable name> = <value>'
Example:
DefVar $ProductId$
Set $ProductId$ = "firefox"
or
DefVar $ProductId$ = "firefox"
String variables are handled differently in primary and secondary sections.
In primary sections, string variables are independent objects.
Only here they can be declared and assigned values.
Accordingly, the connection of variables and strings to a string expression is to be performed with a ""` operator. +
Example: `"Installing " $ProductId$ +" …"In secondary sections, string variables are replaced with the contents of the variable before the section is executed. For example: "Installing $ProductId$ …"This should be taken into consideration when the corresponding string expressions are cut and pasted in the script. The advantage of this construction is that in sections that are executed outside the 'opsi-script' (ShellScript / Execwith) opsi-script variables can be manipulated at ease. |
Message / ShowBitmap
Text output during installation:
Message <string>
Example:
Message "Installing "+ $ProductId$ +" ..."To output a graphic during the installation:
ShowBitmap <filename> <subtitle>
Example:
ShowBitmap "%ScriptPath%\python.png" "Python"if [elseif] [else] endif
Syntax:
if <condition>
	;statement(s)
[elseif <condition>
;statement(s)]
[
else
	;statement(s)
]
endif
Functions
- HasMinimumSpace
-
Checks for free space on the hard disk.
- FileExists
-
Checks for the existence of a file or directory.
Errors, logging and comments
- Comment characters ';'
-
Lines that start with a semicolon (';') are not interpreted.
- Comment
-
Writes a comment message to the log file.
- LogError
-
Writes an error message to the log file.
- IsFatalError
-
Cancels the execution of the running script and reports the installation as failed.
Other important opsi-script functions
An overview of the opsi-script functions is given by the reference card
https://docs.opsi.org/opsi-docs-en/4.2/opsi-script-manual/reference-card.html
A detailed documentation can be found in the opsi-script manual:
https://docs.opsi.org/opsi-docs-en/4.2/opsi-script-manual/opsi-script-manual.html
Here are a few more notes on particularly important elements:
String lists are very powerful, especially for evaluating output from external programs. Read the opsi-script docs for more information.
Reboot/Shutdown the system and finish the opsi-script.
-
ExitWindows /Reboot
Computer restart after completion of the running script. -
ExitWindows /ImmediateReboot
Immediate reboot. -
ExitWindows /ImmediateLogout
Immediately stop script editing and terminate opsi-script.
For some products it’s necessary to provide options. These are specifically evaluated per client at runtime. How such properties are created is described in the chapter Creation of opsi product packages
The access to the values of the properties is done via the function GetProductProperty:
if GetProductProperty("example-property", "no") = "yes"
	Files_copy_extra_files
endifWrite your scripts in UTF-8 encoding and set the line
encoding=utf8
At the beginning of the file
Special commands for macOS
-
GetOS // returns: Linux or Windows_NT or macos [W/L/M]
-
getMacosVersionInfo [M]
-
getMacosVersionMap [M]
In the following chapters special opsi MacOS commands to install software are presented, which come from the opsi-script library uib_macosinstalllib. This documentation was automatically generated directly from the source code.
Documentation of opsi library: uib_macosinstalllib.opsiscript
-
Email: d.oertel@uib.de
-
Version: 1.0
-
Copyright: AGPLv3
Documentation of local function install_macos_app
- Definition
-
install_macos_app($myapp$ : string) : string - Description
-
try to install the app given by $myapp$
-
Parameter:
$myapp$-
Type:
String- Calltype:CallByValue -
Parameter
$myapp$Description:
string with path to app to install
-
-
Returns: Returns string "true" if all is ok
-
OnError: Returns string "false"; error counter increased ; Error messages in the log
-
References: [install_macos_pkg] [install_macos_dmg] [install_macos_zip] [install_macos_generic]
-
Author: detlef oertel
-
Date: 28.12.2020
-
Email: d.oertel@uib.de
-
Version: 1.0
-
Copyright: AGPLv3
-
Example:
[Actions]
importlib "uib_macosinstalllib"

DefVar $installfile$
DefVar $installresult$

comment "we have a *.app (directory) and install with install_macos_app"
set $installfile$ = "%scriptpath%/files/my_macos_app.app"
set $installresult$ = install_macos_app($installfile$)
if stringtobool($installresult$)
	comment "installation succseeded"
else
	LogError "installation failed"
endif
Documentation of local function install_macos_pkg
- Definition
-
install_macos_pkg($mypkg$ : string) : string - Description
-
try to install the pkg file given by $mypkg$
-
Parameter:
$mypkg$-
Type:
String- Calltype:CallByValue -
Parameter
$mypkg$Description:
string with path to pkg file to install
-
-
Returns: Returns string "true" if all is ok
-
OnError: Returns string "false"; error counter increased ; Error messages in the log
-
References: [install_macos_app] [install_macos_dmg] [install_macos_zip] [install_macos_generic]
-
Author: detlef oertel
-
Date: 28.12.2020
-
Email: d.oertel@uib.de
-
Version: 1.0
-
Copyright: AGPLv3
-
Example:
[Actions]
importlib "uib_macosinstalllib"

DefVar $installfile$
DefVar $installresult$

comment "we have a *.pkg and install with install_macos_pkg"
set $installfile$ = "%scriptpath%/files/my_macos_app.pkg"
set $installresult$ = install_macos_pkg($installfile$)
if stringtobool($installresult$)
	comment "installation succseeded"
else
	LogError "installation failed"
endif
Documentation of local function install_macos_dmg
- Definition
-
install_macos_dmg($mydmg$ : string) : string - Description
-
try to install the dmg file given by $mydmg$
-
Parameter:
$mydmg$-
Type:
String- Calltype:CallByValue -
Parameter
$mydmg$Description:
string with path to dmg file to install
-
-
Returns: Returns string "true" if all is ok
-
OnError: Returns string "false"; error counter increased ; Error messages in the log
-
References: [install_macos_app] [install_macos_pkg] [install_macos_zip] [install_macos_generic]
-
Author: detlef oertel
-
Date: 28.12.2020
-
Email: d.oertel@uib.de
-
Version: 1.0
-
Copyright: AGPLv3
-
Example:
[Actions]
importlib "uib_macosinstalllib"

DefVar $installfile$
DefVar $installresult$

comment "we have a *.dmg and install with install_macos_dmg"
set $installfile$ = "%scriptpath%/files/my_macos_app.dmg"
set $installresult$ = install_macos_dmg($installfile$)
if stringtobool($installresult$)
	comment "installation succseeded"
else
	LogError "installation failed"
endif
Documentation of local function install_macos_zip
- Definition
-
install_macos_zip($myzip$ : string) : string - Description
-
try to install the zip file given by $myzip$ unzips the file and try to find a installable part (*.app, *.pkg, *.dmg) and try to install this
-
Parameter:
$myzip$-
Type:
String- Calltype:CallByValue -
Parameter
$myzip$Description:
string with path to zip file to install
-
-
Returns: Returns string "true" if all is ok
-
OnError: Returns string "false"; error counter increased ; Error messages in the log
-
References: [install_macos_app] [install_macos_dmg] [install_macos_pkg] [install_macos_generic]
-
Author: detlef oertel
-
Date: 28.12.2020
-
Email: d.oertel@uib.de
-
Version: 1.0
-
Copyright: AGPLv3
-
Example:
[Actions]
importlib "uib_macosinstalllib"

DefVar $installfile$
DefVar $installresult$

comment "we have a *.zip and install with install_macos_zip"
set $installfile$ = "%scriptpath%/files/my_macos_app.zip"
set $installresult$ = install_macos_zip($installfile$)
if stringtobool($installresult$)
	comment "installation succseeded"
else
	LogError "installation failed"
endif
Documentation of local function install_macos_generic
- Definition
-
install_macos_generic($myfile$ : string) : string - Description
-
try to install the file given by $myfile$ Checks if the file is a well known installable (*.app, *.pkg, *.dmg, *.zip) and try to install this
-
Parameter:
$myfile$-
Type:
String- Calltype:CallByValue -
Parameter
$myfile$Description:
string with path to pkg file to install
-
-
Returns: Returns string "true" if all is ok
-
OnError: Returns string "false"; error counter increased ; Error messages in the log
-
References: [install_macos_app] [install_macos_dmg] [install_macos_zip] [install_macos_pkg]
-
Author: detlef oertel
-
Date: 28.12.2020
-
Email: d.oertel@uib.de
-
Version: 1.0
-
Copyright: AGPLv3
-
Example:
see: install_macos_generic
[Actions]
importlib "uib_macosinstalllib"

DefVar $installfile$
DefVar $installresult$

comment "we have a *.* and install with install_macos_generic"
set $installfile$ = "%scriptpath%/files/opsi-script.app"
set $installresult$ = install_macos_generic($installfile$)
if stringtobool($installresult$)
	comment "installation succseeded"
else
	Error "installation failed"
endif
Example: macOS template m-opsi-template
You can create this template with the opsi-setup-detector.
; ----------------------------------------------------------------
; This is a opsi-script file.
; See https://opsi.org    https://uib.de
; This code was originally created by opsi-setup-detector 4.2.2.3
; ----------------------------------------------------------------
encoding=utf8

; -------------------------------------
; include file for opsi-setup-detector products
; Define all variables here
;---------------------------
DefVar $arch$
DefVar $errorstring$
DefVar $exitcode$
DefVar $iconfile$
DefVar $installerSourceDir$
DefVar $installCommand$
DefVar $installSuccess$
DefVar $installdir$
DefVar $installdir1$
DefVar $installdir2$
DefVar $installerfile$
DefVar $minimumspace$
DefVar $oldProgFound$
DefVar $os$
DefVar $osshort$
DefVar $ProdVersion$
DefVar $productid$
DefVar $targetfile$
DefVar $tmpstr$

DefVar $targetprogram$; ----------------------------------------------------------------
; This is a opsi-script file.
; See https://opsi.org https://uib.de
; This code was originally created by opsi-setup-detector 4.2.2.3
; ----------------------------------------------------------------
encoding=utf8
[Actions]
requiredOpsiscriptVersion >= "4.12.4.23"
importlib "uib_exitcode.opsiscript"
importlib "osd-lib.opsiscript"
importlib "uib_macosinstalllib.opsiscript"
; All variables are defined here:
include_insert "declarations.opsiinc"
; ----------------------------------------------------------------
; Please edit the following values:
; ----------------------------------------------------------------
; $ProductId$ is the name of the product in opsi, only lower letters, no umlauts, no white spaces, use '-' as a separator
Set $ProductId$ = "m-opsi-template"
; the path were we find the product after the installation
;Set $InstallDir$ = "/Applications/<product.app>"
Set $InstallDir$ = "/Applications/<productid.app>"
; ----------------------------------------------------------------
Message "Installing " + $ProductId$ + " ..."
set $OS$ = GetOS
if not(($OS$ = "macos"))
logError "Installation aborted: wrong OS version: only MacOS"
isFatalError "wrong OS"
endif
comment "Show product picture"
ShowBitmap "%ScriptPath%/" + $ProductId$ + ".png" $ProductId$
if FileExists("%ScriptPath%\delinc.opsiinc")
comment "Start uninstall part"
include_insert "%ScriptPath%\delinc.opsiinc"
endif
Message "Installing " + $ProductId$ + " ..."
set $installerSourceDir$ = ""
comment "Start installer "
ChangeDirectory $installerSourceDir$
;----------------------------------------------
set $installSuccess$ = install_macos_generic("%SCRIPTPATH%/files1/<my macos install file>")
;----------------------------------------------
if $installSuccess$ = "false"
LogError "Installation failed"
isfatalerror "Installation failed"
else
Comment "Installation success"
endif
comment "Copy files"
Files_install
[Files_uninstall]
del -sf "$InstallDir$/"
[Files_install]
; Example of recursively copying some files into the installation directory:
;
; copy -s "%ScriptPath%\files\*.*" "$InstallDir$"
; ----------------------------------------------------------------
; ----------------------------------------------------------------; ----------------------------------------------------------------
; This is a opsi-script file.
; See https://opsi.org https://uib.de
; This code was originally created by opsi-setup-detector 4.2.2.3
; ----------------------------------------------------------------
encoding=utf8
Message "Check for existing installation of " + $ProductId$ + " ..."
comment "Start the Uninstall check:"
set $oldProgFound$ = "false"
if directoryExists($InstallDir$)
set $oldProgFound$ = "true"
endif
if $oldProgFound$ = "true"
comment "Is the Installdir in the Applications directory ?"
if "1" = strPos(lower($InstallDir$),lower("/Applications/"))
comment "Do not delete the whole /Applications dir ..."
if not(lower($InstallDir$) = lower('/Applications/'))
Message "Uninstalling " + $ProductId$ + " ..."
Files_uninstall
endif
endif
endif
;-----------------------------------------------------; ----------------------------------------------------------------
; This is a opsi-script file.
; See https://opsi.org https://uib.de
; This code was originally created by opsi-setup-detector 4.2.2.3
; ----------------------------------------------------------------
encoding=utf8
[Actions]
requiredOpsiscriptVersion >= "4.12.4.23"
importlib "uib_exitcode.opsiscript"
importlib "osd-lib.opsiscript"
importlib "uib_macosinstalllib.opsiscript"
; All variables are defined here:
include_insert "declarations.opsiinc"
; ----------------------------------------------------------------
; Please edit the following values:
; ----------------------------------------------------------------
; $ProductId$ is the name of the product in opsi, only lower letters, no umlauts, no white spaces, use '-' as a separator
Set $ProductId$ = "m-opsi-template"
; the path were we find the product after the installation
;Set $InstallDir$ = "/Applications/<product.app>"
Set $InstallDir$ = "/Applications/<productid.app>"
; ----------------------------------------------------------------
Message "Uninstalling " + $ProductId$ + " ..."
set $OS$ = GetOS
if not(($OS$ = "macos"))
logError "Installation aborted: wrong OS version: only macos"
isFatalError "wrong OS"
endif
comment "Show product picture"
ShowBitmap "%ScriptPath%/" + $ProductId$ + ".png" $ProductId$
if FileExists("%ScriptPath%\delinc.opsiinc")
comment "Start uninstall part"
include_insert "%ScriptPath%\delinc.opsiinc"
endif
[Files_uninstall]
del -sf "$InstallDir$/"
; ----------------------------------------------------------------
; ----------------------------------------------------------------Create an opsi product package
Installation of the opsi-package-builder
The opsi-package-builder is currently available for Windows and Linux and MacOS.
The installation files / packages of the opsi PackageBuilder can be found here:
https://forum.opsi.org/viewtopic.php?p=32473#p32473
There you will find in the first lines of the post links to the installation files for Windows and Linux and MacOS.
The opsi PackageBuilder is not made by 'uib' but by Holger Pandel from the opsi-community (thank you!)..
The opsi PackageBuilder open source license:
https://github.com/pandel/opsiPackageBuilder/blob/master/LICENSE_DE
The opsi PackageBuilder has its own documentation, that is part of the installation.
You can install the opsi PackageBuilder also via opsi:
The package opsipackagebuilder_wlm belongs to the opsi standard products and should be installed on your opsi-server. If not, use:
opsi-package-updater install opsipackagebuilder_wlmto install it on the opsi-server.
Installation of the opsi-setup-detector
The opsi-setup-detector is currently available for Windows and Linux and MacOS.
You can install the opsi-setup-detector via opsi:
The package opsi-setup-detector belongs to the opsi standard products and should be installed on your opsi-server. If not, use:
opsi-package-updater install opsi-setup-detectorto install it on the opsi-server.
A setup program to install the opsi-setup-detector without opsi can be found at :
https://download.uib.de/opsi4.2/misc/helper/
The base functionality of the opsi-setup-detector is the same on all suppoted platforms. While analyzing a installer file some helper programs will be called, that may not availiable or runable.
-
Inno-Setups will be analyzed with innounpack.exe at Windows.
-
wix-setups will be analyzed with dark.exe at Windows.
-
.debor..rpmfiles will be analyzed with the Linux command line tools.
The opsi product opsi-setup-detector has a dependency on the opsi product opsipackagebuilder_wlm. The opsi-setup-detector uses the opsi PackageBuilder if available, but can for the most part also work without it. The installation of the opsi PackageBuilder is recommended.
Installation of the opsi-logviewer
The opsi-logviewer is currently available for Windows, Linux and MacOS.
The opsi-logviewer is part of the opsi-configed package, so this one has to be installed.
You can install the opsi-configed via opsi:
The package opsi-configed is part of the opsi standard products and should be installed on your opsi-server. If not, with:
opsi-package-updater install opsi-configedYou can install it on the opsi-server.
A executable version of the opsi-configed for Windows / Linux / MacOS can be found at :
https://download.uib.de/opsi4.2/stable/misc/
Opsi-setup-detector Start and necessary configurations
The opsi-setup-detector can be started from the programs menu and can be found there under opsi.org. Under Windows the opsi-setup-detector is also integrated into the context menu of the explorer in order to call the setup program directly for analysis with the right mouse button.
Opsi-setup-detector configurations
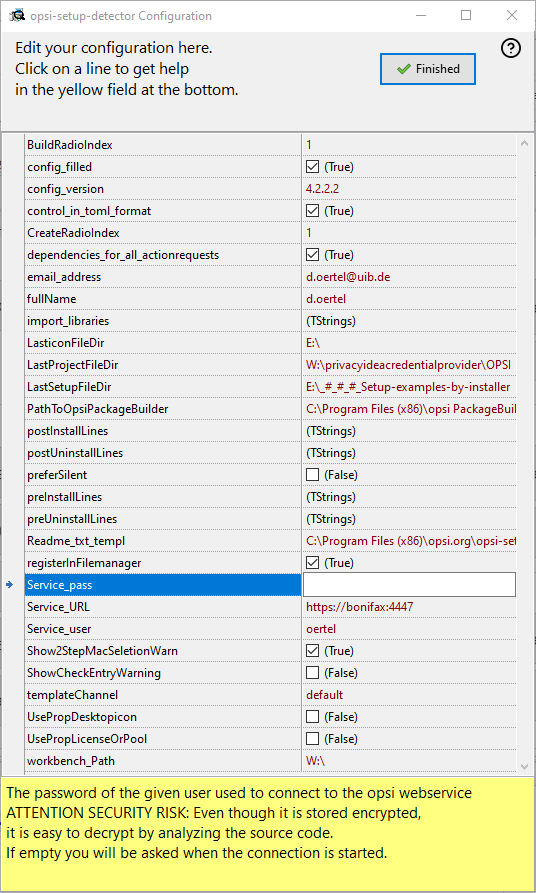
After the first start of the opsi-setup-detector a configuration mask appears. The following information is required here:
-
fullname: (Used for entries in the changelog.txt)
-
email_address: (Used for entries in the changelog.txt)
-
workbench_path: : Path to the directory in which the opsi packages are going to be created. This is ideally the path to the place where the
opsi_workbenchof your opsi-server is mounted.
Optional: Connection data for the opsi-webservice:
-
Service_URL : The URL of the opsi webservice (like: https://<opsi-server>:4447)
-
Service_user : The user name used to connect to the opsi webservice
-
Service_pass : The password of the given user used to connect to the opsi webservice
ATTENTION SECURITY RISK: Even it is stored encrypted, it is easy to decrypt be analyzing the source code. If empty you will be asked if the connection is started.
Optional:
-
control_in_toml_format : Create control file in (opsi 4.3) toml format ?.
If true, you need opsi 4.3 (or up)
and the toml file is the main control file that should be maintained. -
dependencies_for_all_actionrequests : Allow dependencies for all action request ?.
If true, you need opsi 4.3 (or up)
Be careful when creating dependencies for other action requests than "setup".
More details to the configuration you will find over here:
https://docs.opsi.org/opsi-docs-en/4.2/manual/modules/setup-detector.html#opsi-setup-detector-configuration
Opsi-setup-detector Online Help

A click to this question mark icon will open the general or context sensitive online help pages.
Opsi-setup-detector start page
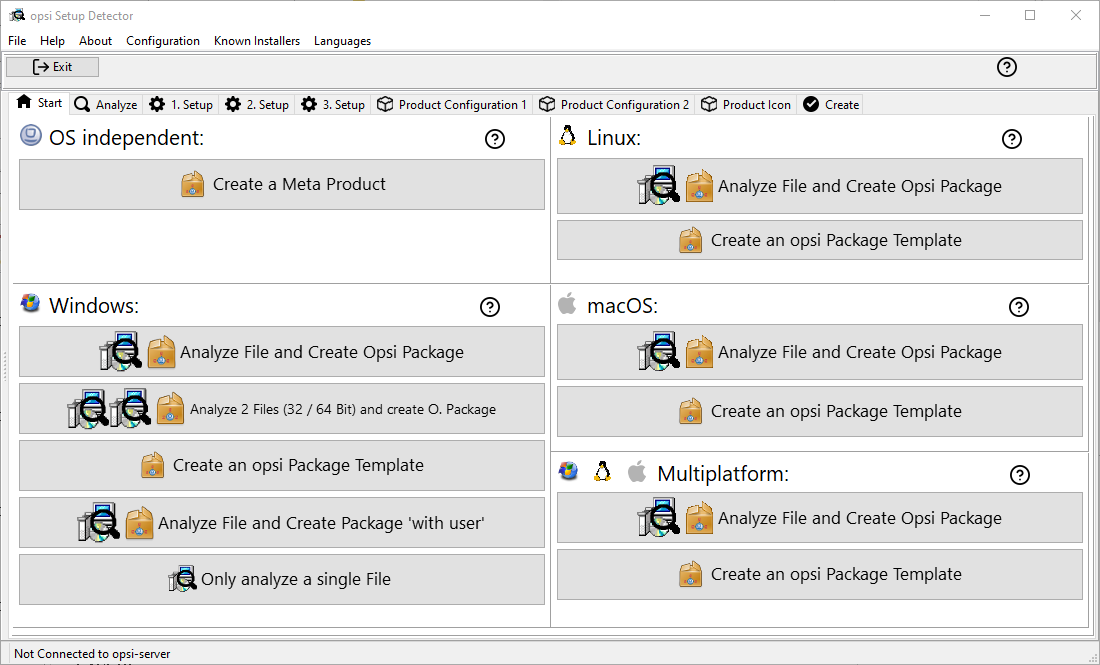
On the main window, select the desired task and follow the dialogs or select the 'Next step' button.
The offered tasks are grouped by:
-
OS independent
-
Windows
-
Linux
-
MacOS
-
multi platform
The offered tasks for macOS:
-
Analyze file and create an opsi package
A macOS installer file is used and the entire process is gone through including the creation of an opsi package. This process is similar to that described for Windows in the next chapter. -
Create an opsi package template
This item does not ask for an installer file, but creates an opsi template product for macOS, with the information from the product configuration already filled in.
The following screenshots show the use of Windows installer files, but they look similar when using MacOS installer files like *.app, *.dmg, *.zip.
opsi-setup-detector: Analyze file and create opsi package
The workflow is here described using Analyze file and create opsi package as an example.

After you selected the task, you will get a file selection dialog. Select now the setup file that has to be analyzed. The analyze will start directly after the selection is done.
opsi-setup-detector: Analyze
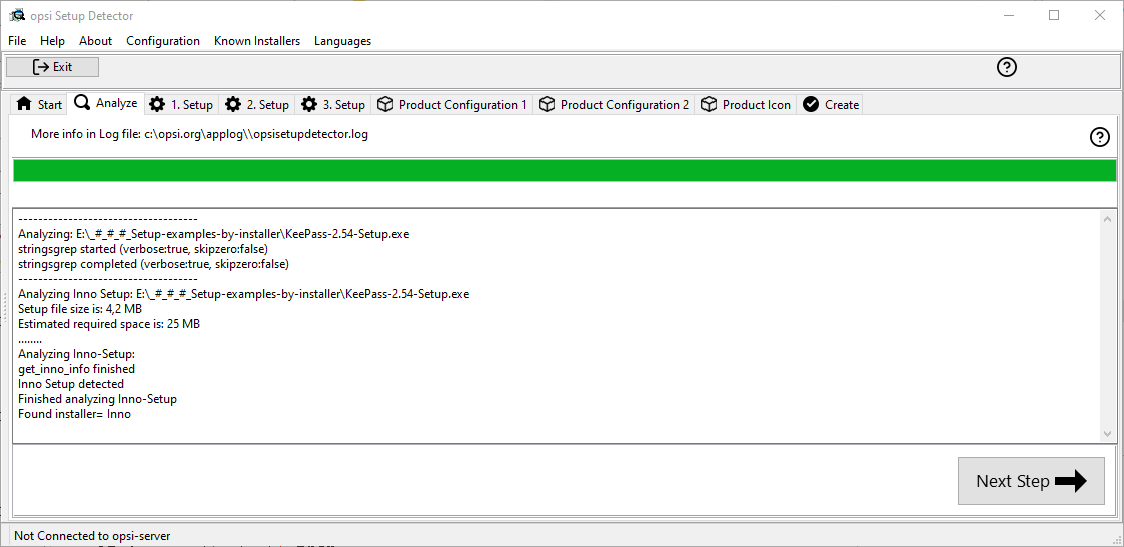
If the analyze found no result, you will get here a Sorry unknown Installer.
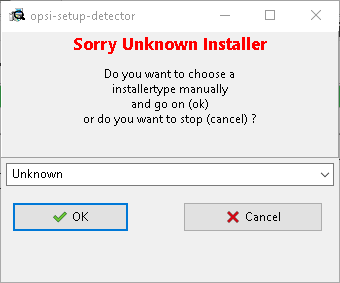
In this dialog you may choose to abort the create process. You may also choose to continue based on the pattern of a choosable installer type.
If we have a successful analyze, you will see the result page.
opsi-setup-detector: Result of the analysis
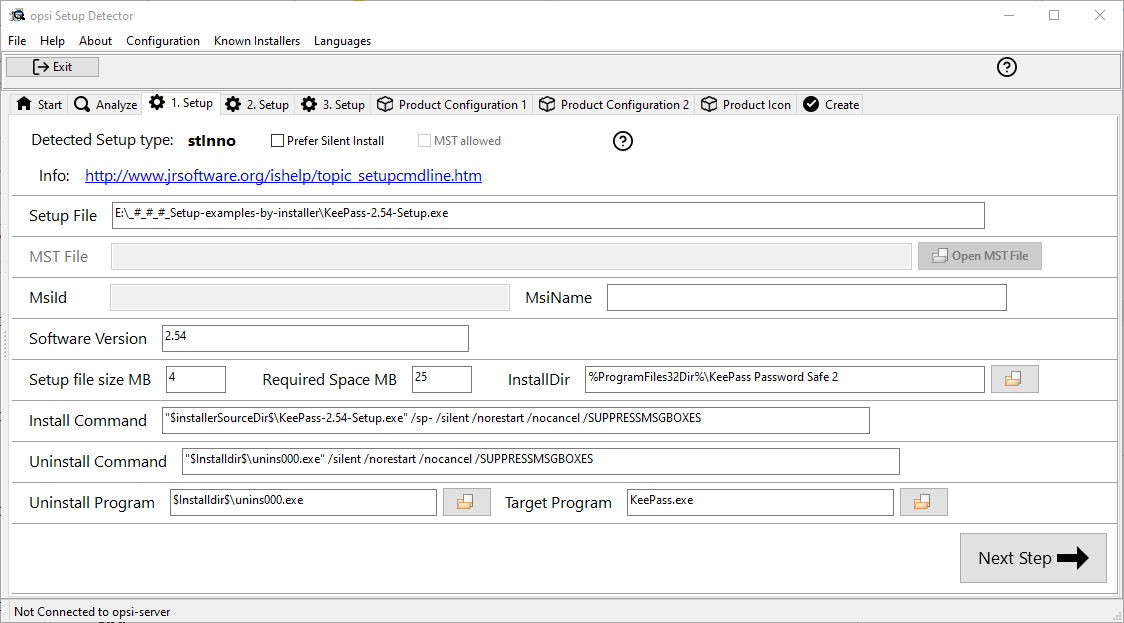
-
Detected Setup Type: Type of detected Installer
-
Prefer Silent Install:
Is a 'silent' installation preferred? (instead of a 'unattended') ? -
MST allowed: Is the additional use of 'mst' files allowed? (msi only)
-
Show Help: image::osd_help-circle20.png["Show Help", pdfwidth=10%]
-
Info Link with information about the installer
-
Setup file: Path and name of the analyzed setup file
-
MST file: For MSI installers or installers which contain MSI, an MST file can be specified here which will be integrated into the MSI call.
-
MsiId: For MSI installers or installers that contain MSI in the form of product code
-
MsiName: For MSI installers or installers that contain MSI in the form of product name as it will be used in the registry as 'DisplayName'.
-
Software version: The version of the software to be installed if determinable.
-
Setup file size MB: Size of the setup file in MB
-
Required space MB: This value is an estimate of six times the size of the setup file and can be adjusted if necessary
-
InstallDir: As far as detected the directory where the software will be installed.
You may also choose the directory via the selection button on the right (if the product is installed on this machine). If you there get a path like 'C:\program Files' or 'C:\program Files (x86)', it will be replaced by the matching opsi-script constant (e.g. '%ProgramFiles32Dir%'). -
Install Command: The determined command for a non-interactive installation. The details are dependent from the value of the checkbox
Prefer Silent Install:. -
Uninstall Command: The determined command for a non-interactive deinstallation. The details are dependent from the value of the checkbox
Prefer Silent Install:. -
Uninstall Program: The determined deinstallation program.
You may also choose the file via the selection button on the right (if the product is installed on this machine). -
Target Program: The main program of the software that has to be installed.
Will be used for creating desktop icons or start menu entries.
Will be not detected. You have to choose it via the selection button on the right (if the product is installed on this machine).
The values determined here can now be corrected or supplemented if necessary. The button Next Step leads to the first page of the product configuration. The metadata of the opsi product to be created is entered here.
|
The values determined here can be incorrect and are probably incomplete! After an initial installation, you should definitely check the values of InstallDir, Uninstall Program, Target Program: and Software version and adjust them in your script if necessary. |
opsi-setup-detector: Product configuration 1
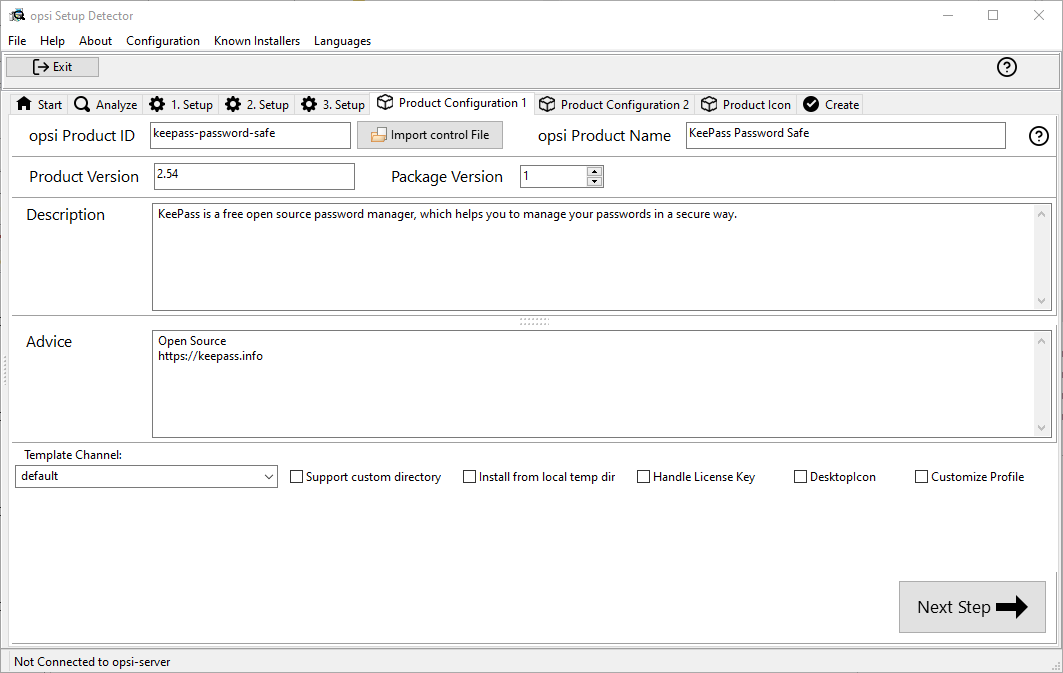
-
opsi Product ID: this is the name of the opsi package to be generated and is generated from the product name below, where spaces and other invalid characters are replaced by a '-'. The proposed opsi Product ID can of course be changed.
-
Import control File: With this Button, it possible to import some data from a existing opsi control file (
control, control.toml) into the running project. The following data will not be imported: version numbers, script names, required space. -
Product Name: the name of the software to install. This may have to be corrected manually.
-
Product Version: The version number determined from the name of the setup file must probably be corrected manually. It may only contain numbers and periods, since it’s used for the versioning of the opsi package.
-
Package Version: The version number of the opsi Package. This helps to make a difference between packages that contain the same software version but foe example different scripts. It may only contain numbers, since it’s used for the versioning of the opsi package.
-
Description: Usually a short description of the purpose of the software or the package.
-
Advice: Additional descriptions for example about origin (download link) and license
-
Template Channel: Here you may select from different sources of template files, that are used to create the product scripts. The following 'template Channels' are available:
-
Default: This is the default and fallback. If you choose any other channel and work with a task that does not provide the templates for this task, so the files from default will be used.
The basic script files for a product are: setup.opsiscript, uninstall.opsiscript, declarations.opsiinc, sections.opsiinc, delinc.opsiinc -
Training: The goal is to be more simple and more commented.
The basic script files for a product are: setup.opsiscript, uninstall.opsiscript, delinc.opsiinc -
Structured: Empty in version 4.2.2 (fallback to default)
-
Custom: This is empty be default. You may add your own templates. Therefor you have to copy your own templates to the directory 'opsi-setup-detector/custom/template-files/' on your opsi-depot.
-
Checkboxes for additional code
The following check boxes will add additional code and settings in order to handle special tasks:
-
Support custom directory : The product will contain a additional directory 'custom' to hold custom specific files. While installation of a new version of the product your custom directory and its content will remain. There will be code added to the scripts to copy files from the custom directory to the client.
More details: Opsi-setup-detector: Support custom directory -
Install from local temp dir : The installation files will be copied to a temporary, local directory in a first step. In a second step the installation will be started from the local directory. This is be useful especially for installation that may interfere wit the network connection (e.g. driver).
More details: Opsi-setup-detector: Install from local temporary directory -
Handle License Key : Adds a property and code for the handling of a license key.
More details: Opsi-setup-detector: Handle License Key -
DesktopIcon : Adds a property and code for the handling of desktop icons.
More details: Opsi-setup-detector: Desktop Icon -
Customize Profile : Add to the installation code a 'Profileactions' section which is used for manipulating the local or roaming user profiles. For 'Roaming Profiles' the script will be also provided as loginscript.
More details: Opsi-setup-detector: Customize Profile
opsi-setup-detector: Priority and dependencies
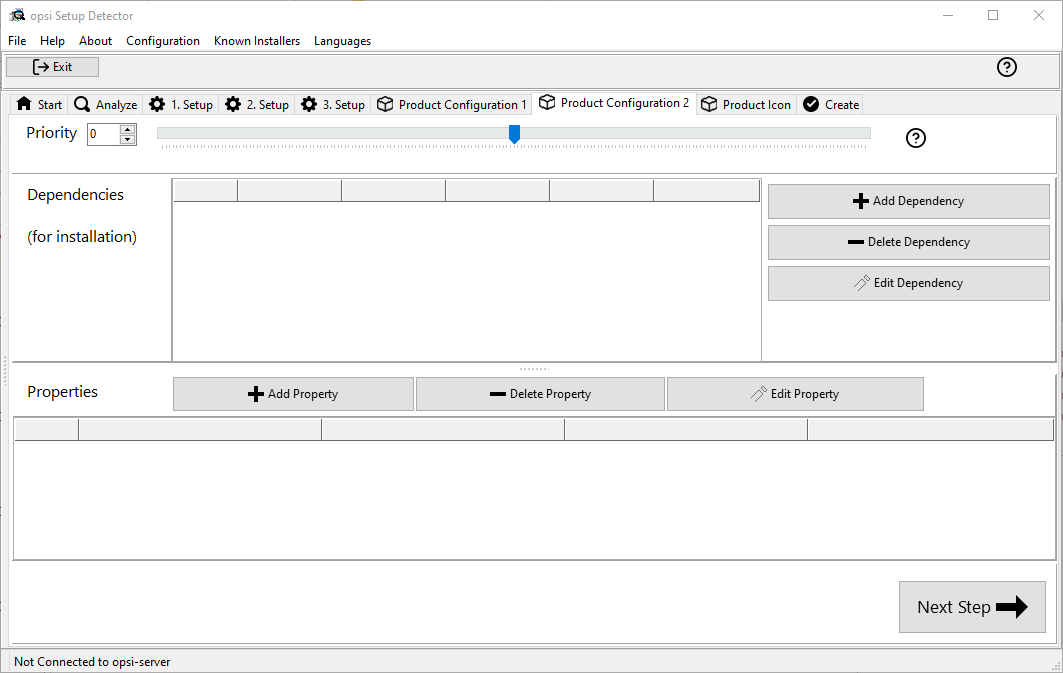
For normal application software you don’t have to do anything here, due to the fact that the default settings 'fit'. You can press the Next Step button.
Otherwise, here is an explanation of the settings that are possible:
- Priority
-
affects the installation order. Recommended for application software: 0
Possible values are between 100 (at the very beginning) and -100 (at the very end). If product dependencies also exist, these will also additionally influence the installation sequence.
Here you can define the dependencies between products.
If the configuration contains the connection data for your opsi-server, the connection will here be started. If the configuration does not contain the password (for security reasons) you will be asked for the password:

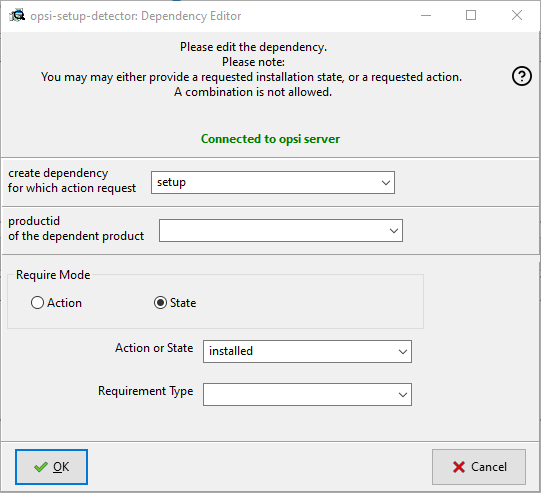
- Actionrequest
-
For which action request do you want to create a dependency ? This is normally
setup. Since opsi 4.3 it is also possible to use all other action request here. Use this possibility with care to avoid circular or contradictory dependencies.
This part is only enabled if you setdependencies_for_all_actionrequests = truein your configuration. - Productid
-
Productid (identifier) of the product to which a dependency exists.
If there is a connection to the opsi-server, this will be noticed in green letters and you may select the productId in the DropDownBox. If there is no connection, this will be noticed in red letters and you have to write the productId in the input field. - Require Mode
-
You can either request the Action setup or (see below) the State (installed).
- Action or State
-
For State: State that the product to which a dependency corresponds, should have (installed). If there is another status, the product is set to setup.
For Action: Action request, which should be set on the product, whereupon there is a dependency (setup).
This control is disabled while creating a Meta Product to avoid sense less changes. - Requirement Type
-
Installation order. If the product for which there is a dependency must be installed before the installation of the current product, then this is before. If it must be installed after the current product, this is after. If the order doesn’t matter then nothing has to be entered here.
This control is disabled while creating a Meta Product to avoid sense less changes.
Hint:
The actual installation order is determined by a combination of product dependencies and product prioritization. Details about this can be found in the opsi manual in the chapter 'Manipulating the installation sequence by priorities and dependencies'.
opsi-setup-detector: Properties
Here, editable properties (product variables) can be defined for the product.
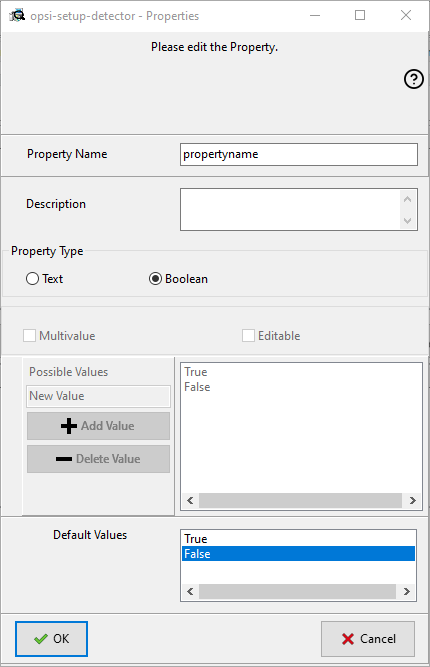
Field / Function |
Description |
Notes |
Property Name |
Name of the product variable |
This identifier is displayed in the product configuration in opsi-configed and can be read within the scripts with the function |
Description |
Variable function description |
Displayed as tooltip in opsi-configed |
Property Type |
Variable type |
Possible values: Text / bool |
Multivalue |
Determines whether the product variable can take only exactly one or multiple values |
Only available for type Text |
Editable |
Determines whether the default values can be overwritten with new or additional values or not |
Only available for type Text |
Possible values |
Comma separated list of possible input values |
If editable is set to “True”, the list can be added later within opsi-configed. |
Default value |
Default value |
Selection list; Only available for type text: Free text field. Only available for type Multivalue: Multiple selection |
opsi-setup-detector: Product Icon
Here you can select an icon to be displayed during the installation or you can accept the default icon (cogwheel) with Next step and switch to the next tab…
To select another icon, use the button Open icon directory to select the directory in which you expect to find icons. As a preselection you get a directory of 'open source' icons: 128x128, supplied with the opsi-setup-detector. Select a subdirectory and the icons will be displayed.
Now you can select an icon from the display.
After the product configuration is performed, the product can be created.
opsi-setup-detector: Create product
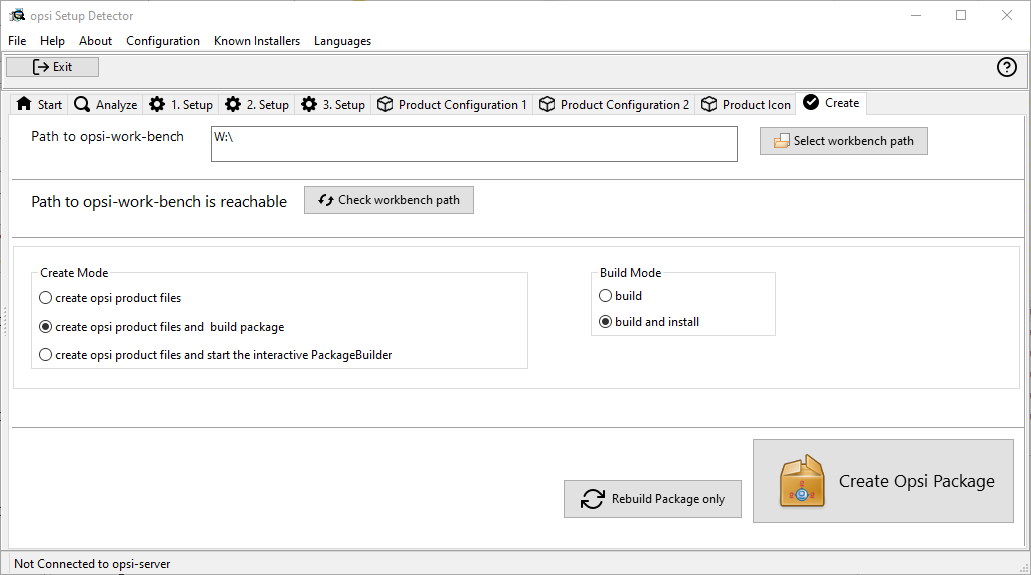
-
Path to opsi-workbench is a drive letter or UNC path where the share opsi_workbench of your opsi-server is mounted.
-
To the left of the button Create opsi package there are three possible options, which refer to the function of the button:
-
Create Mode is a selection area where you can specify what happens when creating the package:
-
Create opsi product files creates the directory tree for the new opsi package on the selected opsi workbench if it does not already exist. The files required for the package will be created or copied.
-
Create opsi product files and build package performs the operations described in the first point.
Additionally, we try to build and perhaps install the package on the opsi server.
If we have the connection data to the opsi web service (see also: Opsi-setup-detector Start and necessary configurations), we connect the opsi web service. If there is no password stored in the configuration, you will be asked for the service password. If the version of the opsi web service is 4.2.0.287 or higher, we use the opsi web service to do this task.
If we can not connect to the opsi web service or if the web service is to old, then the opsi Package Builder is called (without GUI) to create the opsi package from the created directory tree and will be terminated if the job is done.
The exact processes are determined by the selection field Build Mode:-
Only build just create the opsi package like calling the server command
opsi-makepackage. -
build and install create the opsi package like calling the server command
opsi-makepackage. Afterwards the new package is installed like calling the server commandopsi-package-manager --install <package name>.
-
-
Create opsi product files and start interactive package builder performs the operations listed in the first item.
Additionally the opsi Package Builder is called interactively.
You have to quit it yourself to return to the opsi-setup-detector. For installation, configuration and operation of the community project opsi Package Builder check https://forum.opsi.org/viewforum.php?f=22 -
Create opsi package is the button that initiates the package creation.
If a package with this name already exists, you will be asked if the files in the existing directory should be backuped or deleted:
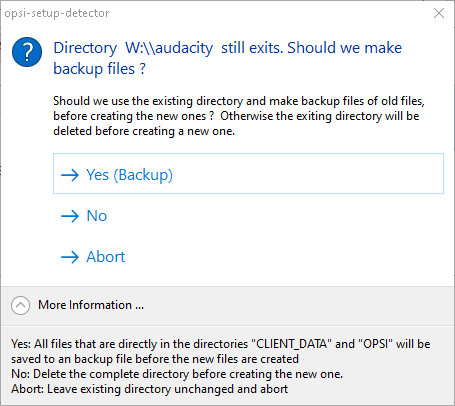
If while creating the new product files a existing directory is detected, you will be asked how to handle the old existing files.
-
Rebuild Package only is the button that initiates the rebuild of the opsi package (via webservice) without recreating the opsi files. So it can be used to rebuild and install the opsi package after you modified the script via editor without loosing your changes.
While creating the new product files, all given data of the project will be stored in the file opsi-project.osd in the base directory of the project. This file may be used later, to reopen the project.
opsi-setup-detector: Reopen a Project
A existing Project can be reopend by the opsi-setup-detector in two ways:
-
If it was created by the opsi-setup-detector, you may use the menue entry:
File / Open Project File. -
If it was not created by the opsi-setup-detector, you may use the menue entry:
File / Open Control Fileto open the filecontrolbzw.control.tomlin theOPSIdirectory of the product.
In this case you will have less information e.g. about the used installer files.
More details about the opsi-setup-detector can be found in the opsi-manual:
https://docs.opsi.org/opsi-docs-en/4.2/manual/modules/setup-detector.html
The opsi PackageBuilder program to modify a script.
At the first start after the installation the opsi PackageBuilder starts in offline mode, because important configuration data for the connection with the opsi-server is missing.
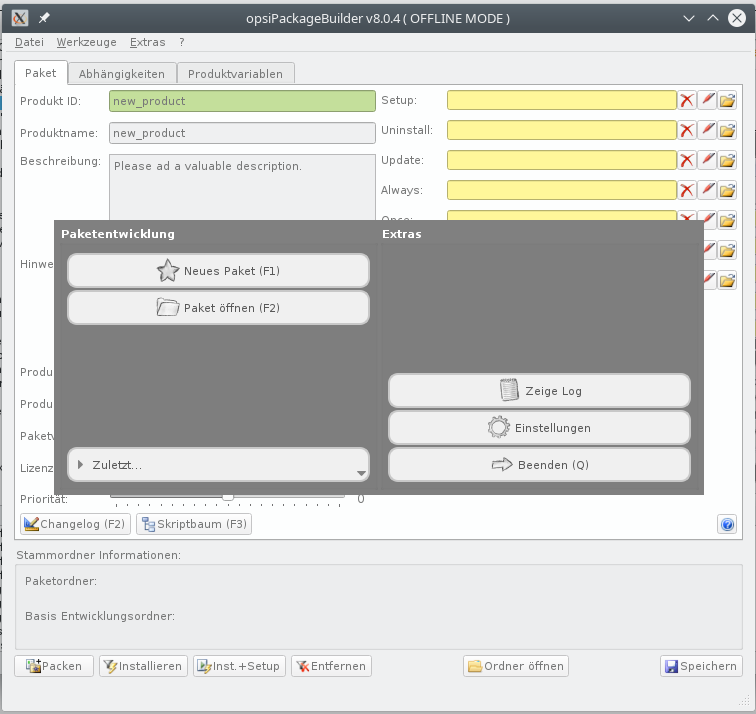
If the startup does not work this way and the start menu does not respond (observed under Linux / KDE), try it from the command line by specifying a path and confirm the error message that the path was not found:
opsipackagebuilder --path /homeInitial configuration of the opsi PackageBuilder
To enter the missing configuration data open the Settings.
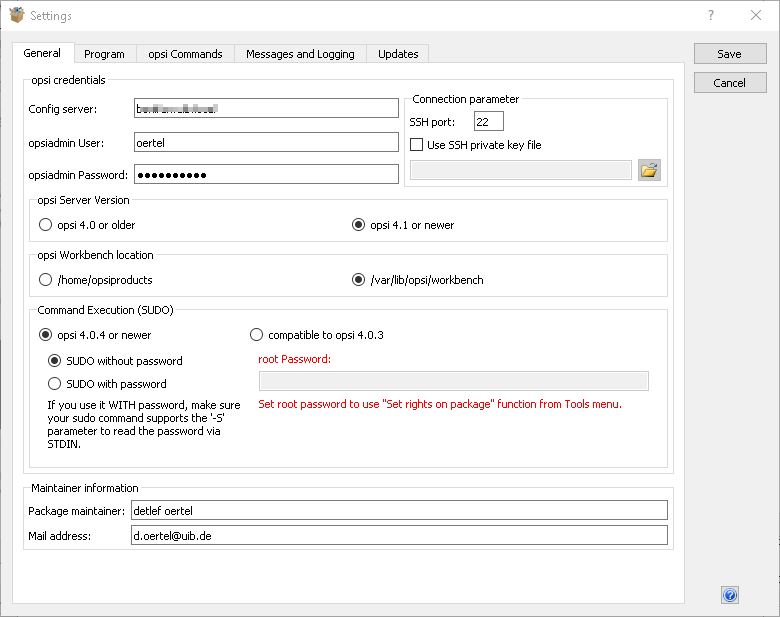
In the General tab please enter the following settings:
-
configserver : full name (FQDN) of your opsi-configserver (e.g. opsi.mycompany.org).
-
opsiadmin user : username of a member of the group opsiadmin (preferably your username)
-
opsiadmin password: the password of the user specified above. This will not be displayed and is stored encrypted. It’s necessary for the opsi PackageBuilder to communicate with the opsi-server.
-
opsi Server Version: opsi 4.1 or higher
-
opsi Workbench :
/var/lib/opsi/workbench -
command execution compatibility : opsi 4.0.4 or newer / Sudo without password
-
User : your full name (used in changelogs)
-
Email : your email address (used in changelogs)
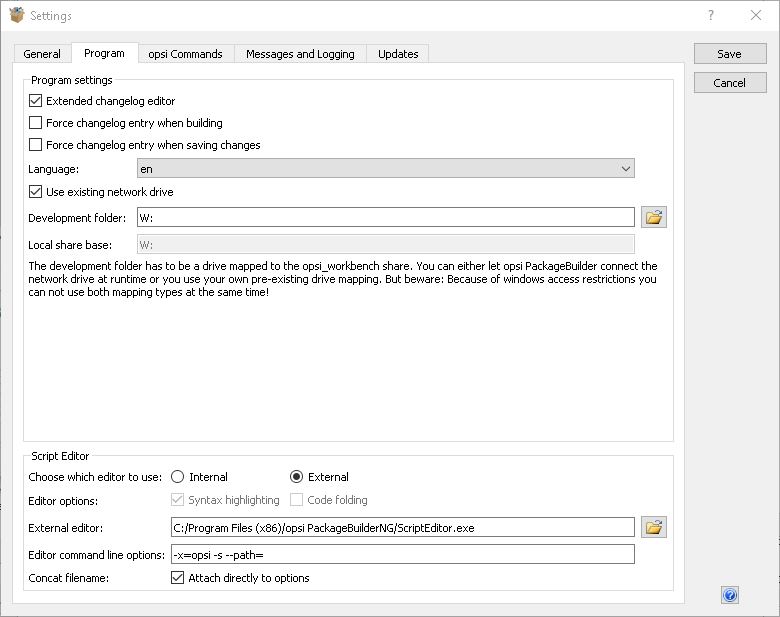
In the tab Program please enter the following settings:
-
Use existing network drive : Check the box.
-
Development folder : Path to the directory where the opsi packages should be created. This is ideally the path to where the opsi_workbench of your opsi server is mounted.
-
script editor :
The script editor of the opsi PackageBuilder is only available for Windows unfortunately.-
Under Windows leave it with the default settings.
-
Under Linux: External editor:
/usr/local/bin/jedit
Command line options: (empty) -
On MacOS: External editor:
/Application/jedit
Command line options: (empty)
-
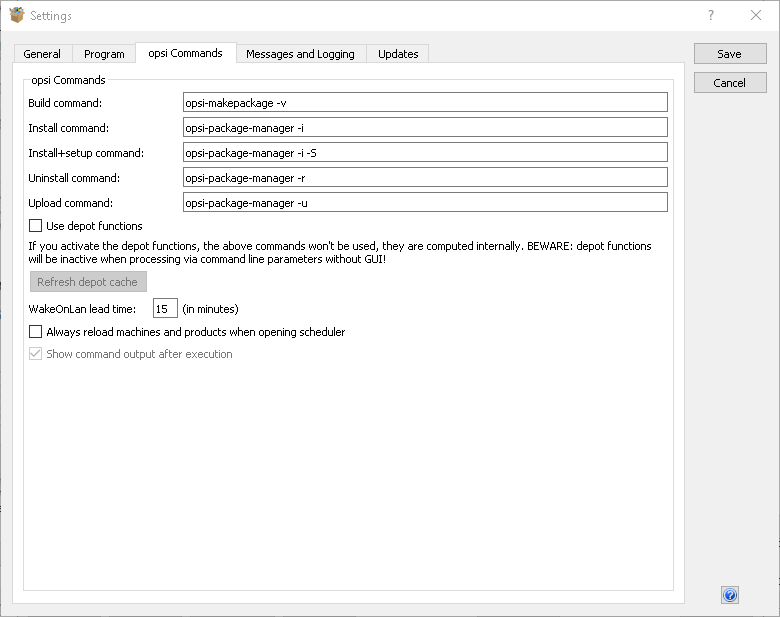
In the Administration tab, we recommend the following setting, deviating from the default
-
Package :
opsi-makepackage -v.
Save the settings and restart the opsi PackageBuilder. The opsi PackageBuilder should now no longer report Offline mode.
Install, modify and pack packages with the opsi PackageBuilder.
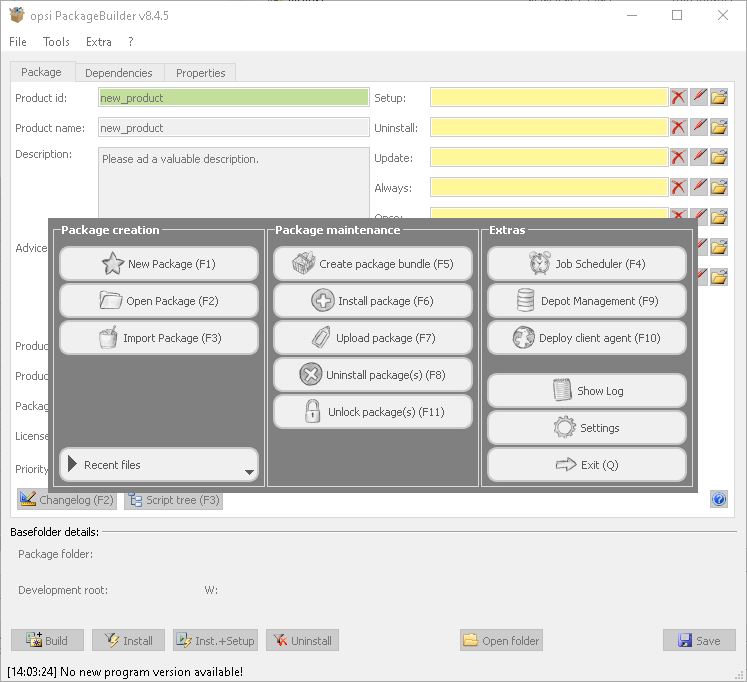
Use Open package (F2) and select the directory in which you have created with the opsi-setup-detector a package. (e.g.: w:\newprod2 )
The product window opens with different tabs. The default tab is Package.
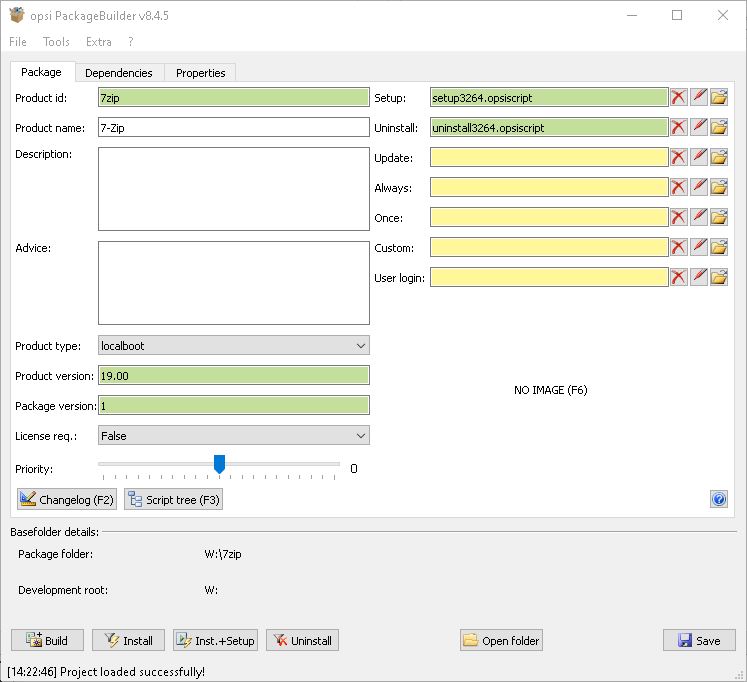
In this tab you see on the left side the general metadata of the opsi product as you have already been explained in opsi-setup-detector: Product configuration 1.
On the right side you see the script files and next to it the button:
With the button you can invoke the file in the script editor specified in the configuration and modify the script. On Windows this is the script editor of the opsi PackageBuilder.
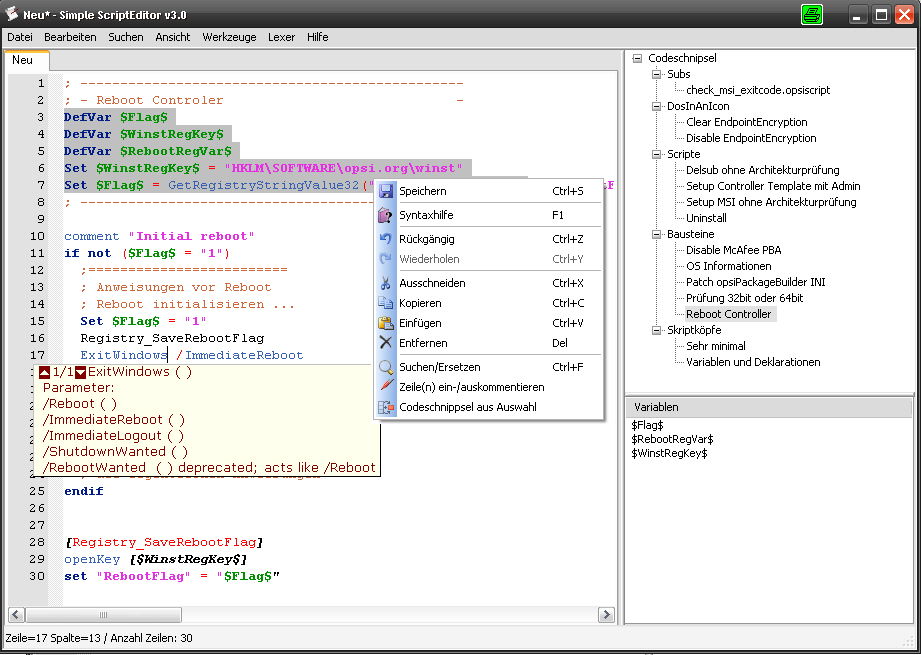
Key features:
-
Color syntax highlighting.
-
"Folding" of source code (optional: compact, with comments)
-
Lexical definition customizable (to do this, the editor must be invoked via start menu entry)
-
Autocomplete for syntax elements and variables
-
Freely definable and reusable code blocks ("snippets")
The core component of the editor is the module Scintilla, which is also used in other well known editors, such as Notepad++. The lexical elements (syntax highlighting and folding) for the representation of the script language valid for opsi are however completely written in AutoIt, since Scintilla does not supply its own representation module for opsi scripts. Because AutoIt is an interpreter language, it’s slower than other editors and is therefore only conditionally suitable for editing very large scripts, especially when source code convolution is switched on. In the settings, however, it’s possible to specify whether the editor is invoke with these functions or not, provided that the call is made directly via the script tree. If the editor is open via the link in the start menu, syntax highlighting and convolution are generally switched off at startup and can be activated via the editor menu "View".
(The editor can also be open via the command line. More information about the possible command line parameters can be check with the "-help" option).
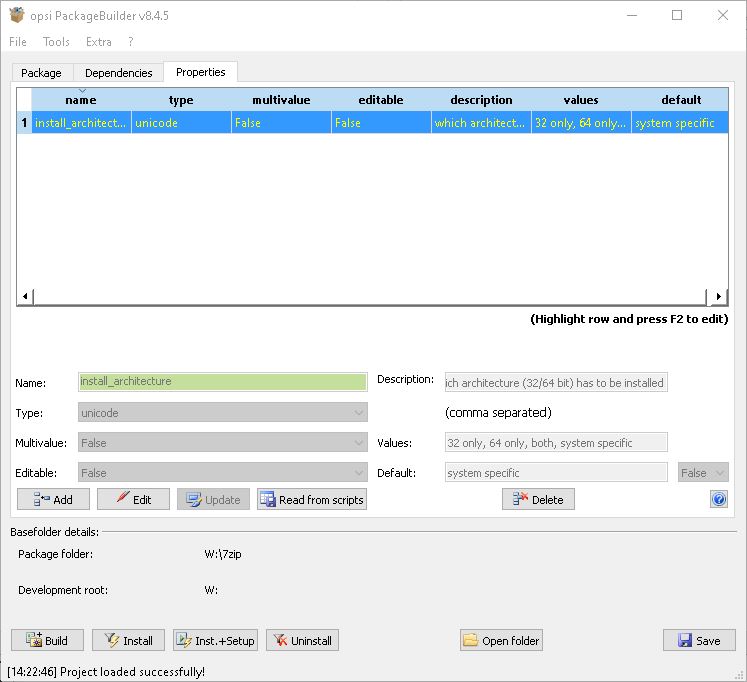
In this tab you see on the left side the product properties of the opsi product like they are already explained in opsi-setup-detector: Properties.
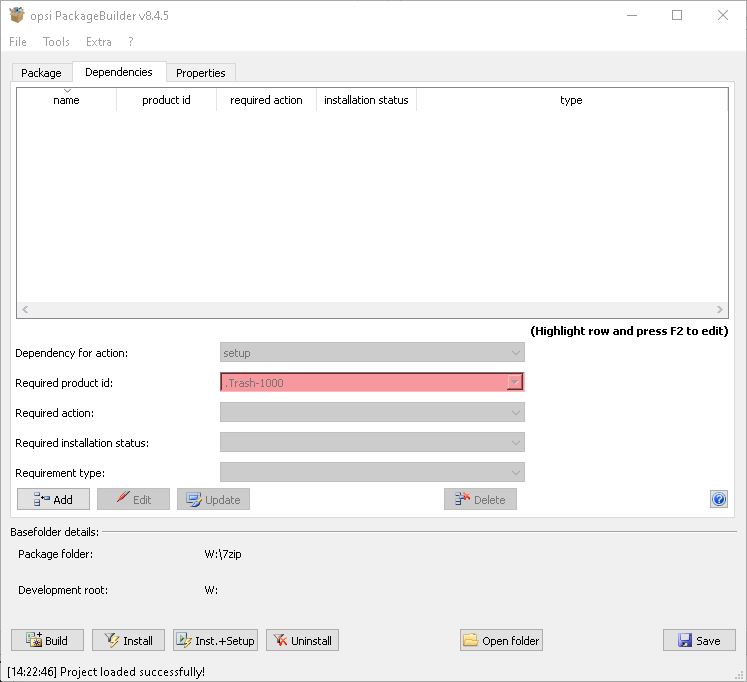
In this tab you can see on the left side the product dependencies of the opsi product like they are already explained in opsi-setup-detector: Priority and dependencies.

This button starts an SSH connection from the server and executes the packaging command there.
You can also do the same in a terminal itself as described in
Packing with opsi-makepackage

This button starts an SSH connection from the server and executes the installation command there to install the product on the server.
You can also do the same in a terminal itself as described in
Installing with opsi-package-manager

Do not use it!
Testing and improving an opsi-script script
For testing and improving a script / product there are two different variants:
-
Testing the created script as 'standalone' i.e. without installing it on the opsi-server and deploying it from there to the client.
-
'Integrated' testing of the complete product with installation on the server and deployment on a client.
In both cases it will be assumed here that you have created a project with the opsi-setup-detector.
'Standalone' tests
Start the application opsi-script-gui: with double click.
-
Windows: Double-click the file
opsi-script.exe.
(When starting the program on a Windows 7 / 10 client, "run as administrator" must be used with the right mouse button). If the opsi-client-agent is already installed on your computer, you will find it inC:\Program files (x86)\opsi.org\opsi-client-agent\opsi-script\opsi-script.exe. If not, copy from the share\\<opsiserver\opsi_depot, from theopsi-script\windows\x86\directory the content of this directory. -
Linux: start file
/usr/bin/opsi-script. -
MacOS: Start the application
/Applications/opsi-script.
You’ll see the following window:
-
With Select Script you can select the script you want to run.
-
With Start you can start the script. With it, the script will be executed on this computer.
-
With Test_Syntax you may check the script for syntax errors. The script will not be executed on this computer.
see also: https://docs.opsi.org/opsi-docs-de/4.2/opsi-script-manual/cli-params.html#opsi-script-testsyntax -
Now open the log file with the opsi-logviewer to see how the opsi-script interprets the script.
Make sure that you can adjust the displayed log level with the slider in the lower right hand corner. -
Open the script
setup.opsiscriptin an editor and make the desired changes (do not forget to save). There are several ways to do this:-
Open the project in opsi PackageBuilder and open the editor from there.
-
In principle you can use any other editor of your choice.
We recommend the editor jEdit with opsi-script syntax highlighting, that you can find in the basic opsi products.
-
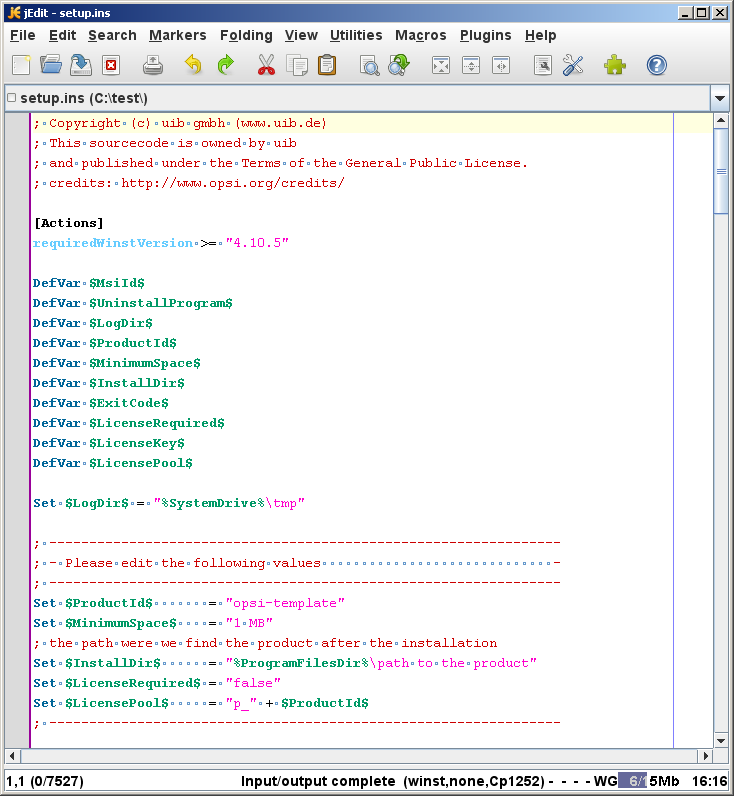
-
You can now customize and save the script in the editor (you can leave the editor open).
Switch to the opsi-script window and start the script again with the Start button (the script does not have to be selected again).
View the log modified based on your changes in the script with the opsi-logviewer. (Don’t forget reload via context menu or toolbar button). -
In this way, i.e. by repeating the points:
-
Customize the script and save it
-
Execute script
-
Check log
you can gradually tailor your scripts to do what you need.
-
Hints for solving detailed problems can be found in the next chapter. The chapter after the following explains how to create an opsi product from the scripts created in this manner, which you can install on the opsi-server.
'Integrated' tests
With the 'integrated tests' the whole project is always executed by opsi on a test client. Proceed as follows:
-
Open the script
setup.opsiscriptin an editor and make desired changes (do not forget to save). There are several ways to do this:-
Open the project in opsi PackageBuilder and open the editor from there.
-
In principle you can also use any other editor.
We recommend the editor jEdit with opsi-script syntax highlighting, that you can find in the basic opsi products.
-
-
Product Packing
-
Variant 1: Open the project in the opsi PackageBuilder and start the packing via the button Pack.
-
Variant 2: Login via terminal (e.g. Putty) to the opsi-server and change to the project directory on the workbench. Pack the product with the command
opsi-makepackage.
-
-
Install the product on the opsi-server.
-
Variant 1: Start the install in the opsi PackageBuilder with the button install.
-
Variant 2: Start the install in the terminal in the project directory with the command
opsi-package-manager -i <myproctid_version.opsi>. Where <myproctid_version.opsi> is the filename that was output in the previous step when packing.
-
-
Select and start product via opsi-configed
-
Select the test client in the tab Clients
-
In the tab Product configuration select the product. If the product is not visible (which is normal after the first installation) reload the data via the menu File / Reload all data or the button on the very left of the toolbar.
-
For the selected product set the action request setup and save.
-
Start the client or start it via context menu on_demand if the client is running.
-
Wait until the product has run through on the client.
-
In the tab Logfiles / instlog inspect the log file to see how the opsi-script interprets the script.
Note that you can adjust the log level displayed here with the slider in the lower right hand corner.
-
-
-
In this way, repetition of the points mentioned:
-
Adaptation of the script and saving
-
Pack product
-
Install product on the server
-
Run product on the client
-
check log
you can gradually customize your scripts to do what you need.
-
Packing with opsi-makepackage
Afterwards you can pack the product. To do this, go to the root directory of the product and execute opsi-makepackage. Now the product will be packed.
It’s recommended to create the packages immediately with an associated md5 checksum file.
This file is used by opsi-package-updater among others to ensure package integrity after package transfer.
Such a file is created automatically, but for special usage scenarios its creation can be avoided.
When transferring packages on the opsi-depotserver, 'zsync' can be used to transfer only differences between different packages.
In order to use this method, a special .zsync file is needed.
Such a file is created automatically, but for special usage scenarios the creation can be avoided.
If there are space problems in the temporary directory /tmp when creating large packages, it’s possible to specify an alternate temporary directory using --temp-directory.
If a package of this version already exists, opsi-makepackage will show a query:
Package file '/var/lib/opsi/workbench/mytest/mytest_3.14-1.opsi' already exists.
Press <O> to overwrite, <C> to abort or <N> to specify a new version:
With o you can choose to overwrite, with c you cancel the process and with n you can choose to be asked for a new product or package version.
You can install the packed package on the server with opsi-package-manager --install <package-file>
More details about the opsi-makepackage can be found in the opsi-manual:
opsi-makepackage
Installing with opsi-package-manager
To install the packed product there is a command opsi-package-manager . To do this, go to the root directory of the product and execute the following command.
opsi-package-manager -i <myproductid_version.opsi>More details about the opsi-package-manager can be found in the opsi-manual:
opsi-package-manager
Example of a 'control' / 'control.toml' file
[Package]
version: 1
depends:

[Product]
type: localboot
id: mytest
name: My Test
description: A test product
advice:
version: 3.14
priority: 0
licenseRequired: False
productClasses:
setupScript: setup.opsiscript
uninstallScript:
updateScript:
alwaysScript:
onceScript:
customScript:
userLoginScript:

[ProductDependency]
action: setup
requiredProduct: javavm
requiredStatus: installed

[ProductProperty]
type: unicode
name: mytextprop
multivalue: False
editable: True
description: hint
values: ["off", "on"]
default: ["off"]

[ProductProperty]
type: bool
name: myboolprop
description: yes or no
default: False

[Changelog]
mytest (3.14-1) testing; urgency=low

  * Initial package

-- jane doe <j.doe@opsi.org> Mi, 14 Jul 2010 12:47:53 +0000[Package]
version = "1"
depends = []
[Product]
type = "localboot"
id = "mytest"
name = "My Test"
description = """A test product"""
advice = """"""
version = "3.14"
priority = 0
licenseRequired = false
productClasses = []
setupScript = "setup.opsiscript"
uninstallScript = "uninstall.opsiscript"
updateScript = ""
alwaysScript = ""
onceScript = ""
customScript = ""
userLoginScript = ""
windowsSoftwareIds = []
[[ProductDependency]]
action = "setup"
requiredProduct = "javavm"
requiredStatus = "installed"
requirementType = ""
[[ProductProperty]]
type = "bool"
name = "myboolprop"
description = "hint"
default = [false]mytest (3.14-1)
* Initial package
-- jane doe <j.doe@opsi.org> Di, 29 Aug 2023 10:36:09Create opsi-package with CLI tool opsi-newprod
This is a 'command line tool', intended for the use in text terminals. If you work with a graphical interface, so take a look at:
opsi-setup-detector
| Do not use any country-specific symbols (umlaut), since the actual country code might vary for different code tables. |
To start creating a new product, change directories to the product directory, and start the creation of the new product by entering the command opsi-newprod. The next question will ask you about the type of product you want to create. Choose the type localboot for products which should be installable by opsi-client-agent/opsi-script. The product type netboot is used for products which are activated as a bootimage (like OS installation)
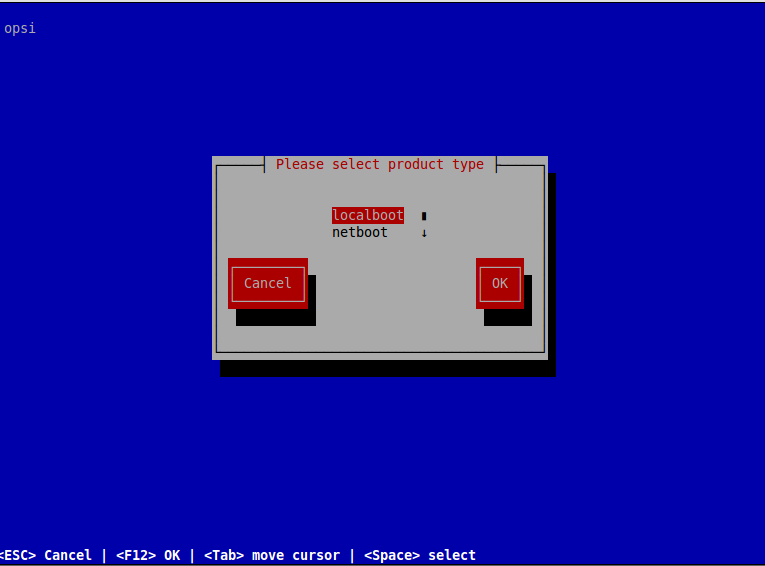
Confirm your choice with tab (or F12). Next, fill in the basic product parameters. At the top of the window there is an explanation for the current input field.
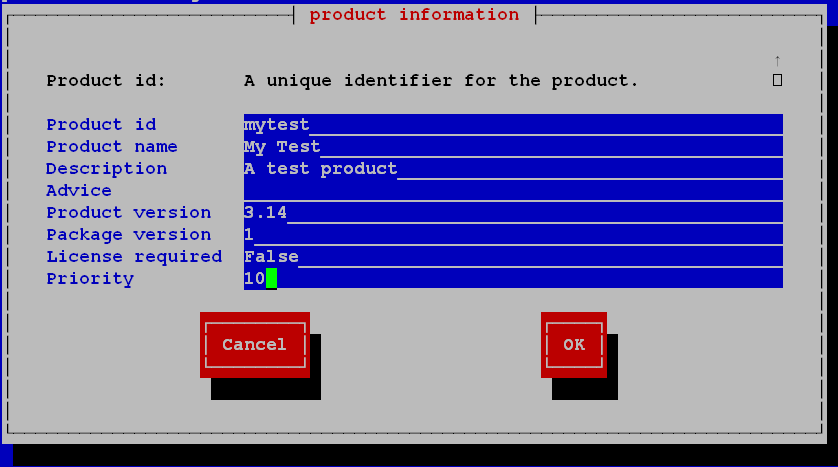
- Product Id
-
is a distinct short name for the product, independent from the product version (we recommend to use only plain ASCII letters and '-', no white space, no special characters)
- Product name
-
is the full name of the product
- Description
-
is an additional description of the product.
- Advice
-
is some additional information on how to handle the product (a note).
- Product version
-
is the version of the packed software (max 32 chars).
- Package Version
-
is the version of the package for the product version. For example, this helps to distinguish between packages with the same product version but with modified opsi-script scripts.
- License required
-
is only relevant to netboot products.
- Priority
-
controls the installation sequence. Possible Values are between 100 (at the very beginning) and -100 (at the end). Note: product dependencies also have influence on the installation sequence. See the opsi manual for more information.
After the product information is completed, fill in which action scripts should be provided:
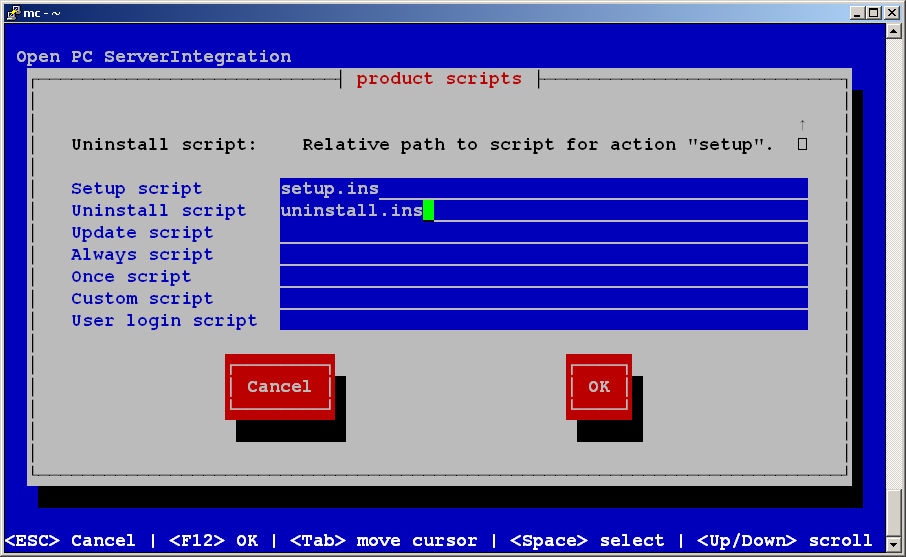
After editing the product information you should mention the script you want to use for different activities.
Usually the Setup script is named setup.opsiscript
Usually the Uninstall script is named uninstall.opsiscript
An Update-Script will be used for minor changes on existing big installations. If this product is switched to the required action setup, then the update script will be automatically executed after the setup script.
An Always-Script will be executed at the beginning of every activity of opsi-client-agent (e.g. on every boot).
A Once-Script has the resulting state not_installed. It is a very special kind of script, and you should only use it if you really know what you are doing.
A Custom-Script doesn’t change the resulting state. It is a very special kind of script, and you should only use it if you really know what you are doing.
A userLoginScript is used to modify the user’s profile after the user logs into the system. It only works with the opsi extension User Profile Management, which is described at the User Profile Management chapter in the opsi-manual.
Type |
resulting state |
resulting action |
setup |
installed |
none |
uninstall |
not_installed |
none |
update |
installed |
none |
always |
installed |
always |
once |
not_installed |
none |
custom |
unchanged |
unchangend |
User login |
unchanged |
unchanged |
The next step is to define one or more product dependencies. If there are no product dependencies, select No.
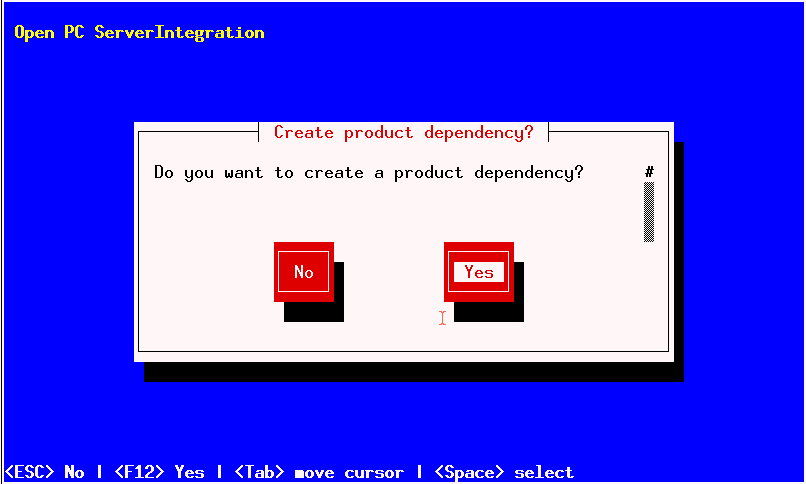
To create a product dependency, enter the following data (help is available at the top of the window):
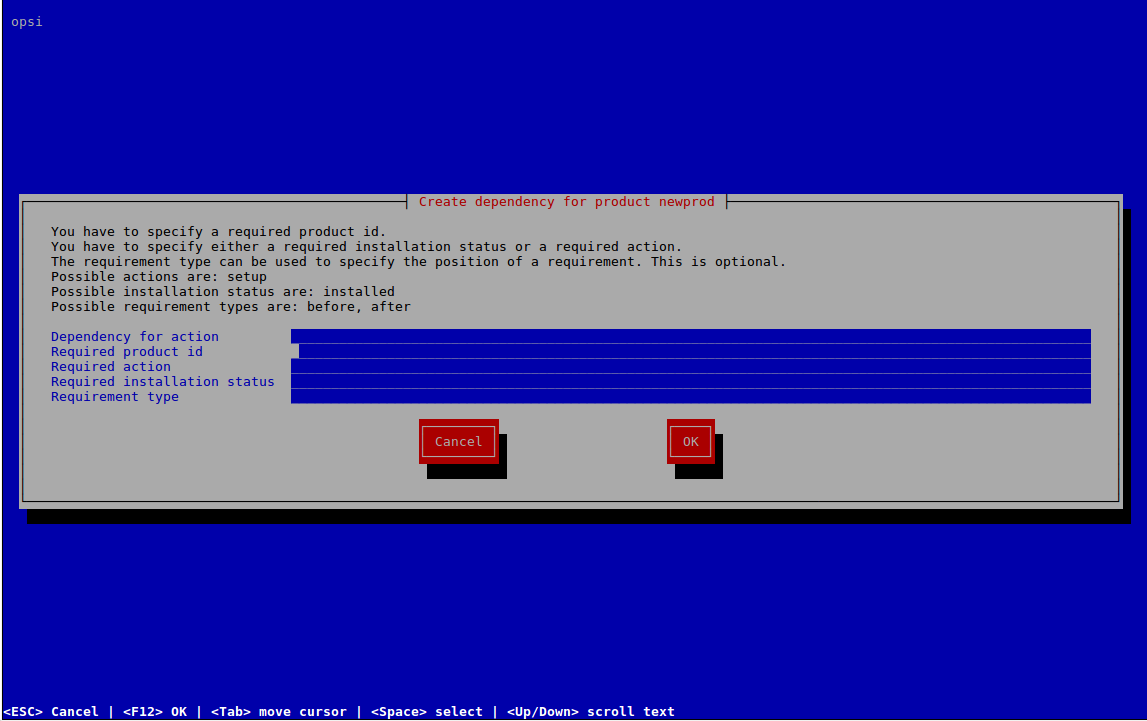
- Dependency for Action
-
Which product action shall the dependency create, or when should the dependency be checked (only setup).
- Required product id
-
Product id of the required product.
- Required action
-
Select the required action (setup) for the required product. If no required action is set, a required installation status must be set
- Required installation status
-
Select the required status of the required product (installed). So the required product will be installed if it isn’t installed on the client yet. If no required installation status is set, a required action must be set
- Requirement type
-
This is regarding the installation order. If the required product has to be installed before the installation of the actual product, this is set to before. If it has to be installed after the actual product, set requirement type to after. Leave it blank if the installation order doesn’t matter.
| The possibility to define uninstall actions or dependencies is broken. After defining a product dependency, you will be asked if you want to create another product dependency. If you choose Yes, then the procedure for defining a product dependency is repeated. If you choose No, then you will be asked to define some product properties, which means defining additional switches for product customization. |
| The installation sequence results from a combination of product dependencies and product priorities. For details on how this is done, and what you can configure, see the opsi-manual. |
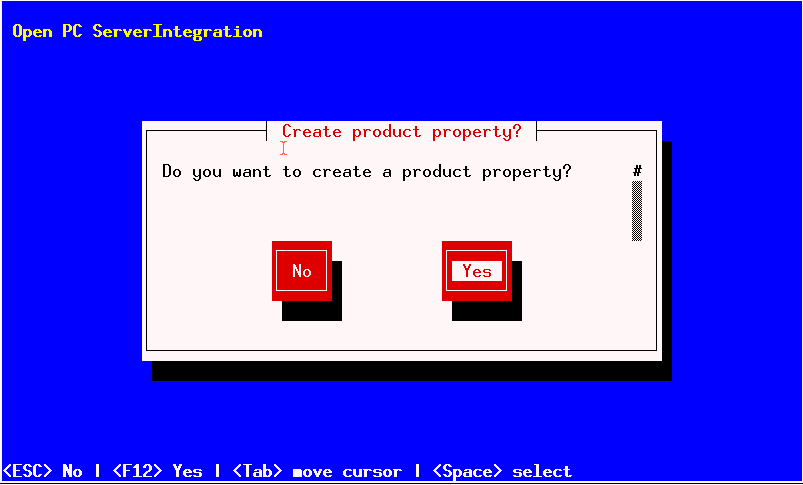
If you answer Yes, you will have to describe the product properties.
The product properties are client specific, and have names (keys) which can hold different values. These values can be evaluated by the opsi-script script, and result in installing different options at installation time.
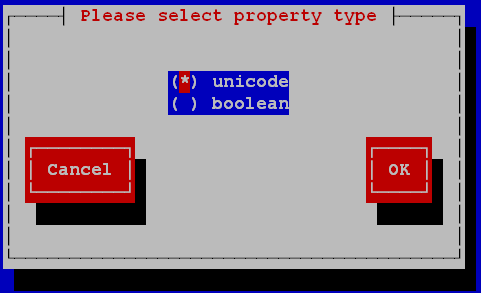
First we have to decide if our property is a text value (unicode) or a logical value e.g. true/false (boolean). If you are not sure choose unicode.
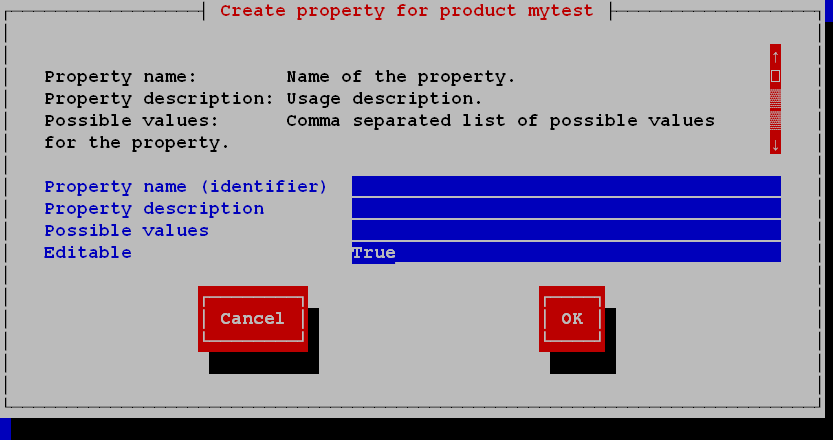
Next, a description for the switch needs to be specified. This description will be shown in the opsi-configed as a help text. Next, you can define the set of values for the switch (separated by comma). If this is left blank, then any value is allowed for the switch.
If a values contains a backslash \ it has to be doubled.An example showing how a path would be defined: C:\\temp
|
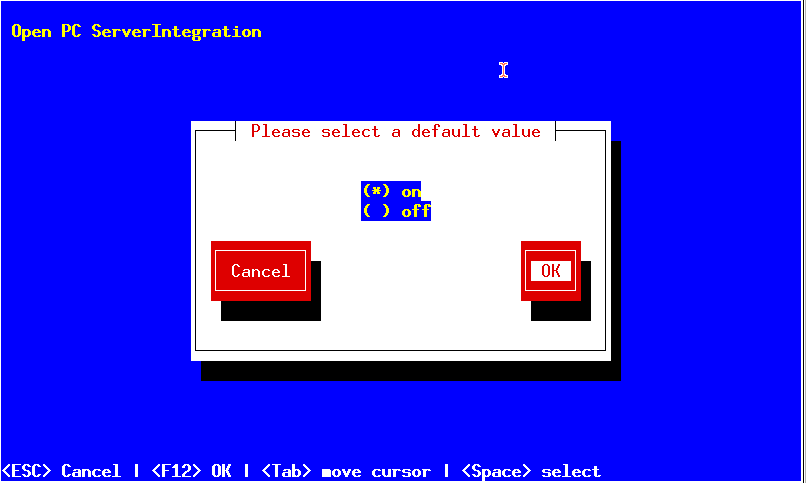
Next, you can decide if the product property has a default value (switch).
If you choose boolean as the data type, then the description will contain only the Property name and Property description.

After defining a product property, you will be asked if you want to create another product property. If you choose Yes, then the procedure of defining a property will be repeated. If you choose No, then you will be asked for name and email of the product maintainer. This data will be written on the changelog.

Finally, the basic definitions for the new product are done.
Using the list command (ls), you can see the directory structure as described above. Change to the OPSI folder and list the content. The control file now contains the data you just defined, and you can load the file into an editor to view or change the entries.
At opsi >= 4.3 opsi-newprod will produce a control file in the .toml format and a stand-alone changelog.txt file.
|
Suggestions on How to Solve Problems with opsi-script Scripts
Opsi-setup-detector: Support custom directory
The opsi-setup-detector has a checkbox in the tab "Product Configuration 1":
Support custom directory : The product gets an additional directory 'custom' which can contain customer-specific files. When installing a new version of the package on the server, the existing custom directory is preserved. The code contains templates to add files from this directory to the installation.
In setup.opsiscript is inserted:
A files section to copy files from the 'custom' directory to the client:
; copy custom files to install dir
Files_copy_from_custom_dir
and the related section. In this example the contents of the 'custom' directory is copied to the installation directory:
[Files_copy_from_custom_dir]
copy -s "%scriptPath%\custom\*" "$installdir$"
Furthermore, the 'custom' directory is created and a OPSI\preinst and a OPSI\postinst file, which ensure that the contents of the 'custom' directory is retained on the depot when product updates are installed.
Opsi-setup-detector: Install from local temporary directory
The opsi-setup-detector has a checkbox in the tab "Product Configuration 1":
Install from local temp dir : The installation files are first copied to a local, temporary directory and then installed from this directory. Particularly useful for everything that could affect the network connection during installation (e.g. drivers).
An additional boolean property is created: install_from_local_tmpdir with a default of 'False' and the description: 'Determines whether the installation files are copied to a local directory'.
In setup.opsiscript is inserted:
A files section to copy the installer files from the $installerSourceDir$ directory to the client. And the command to delete the temporary files after installation:
set $Install_from_local_tmpdir$ = GetProductProperty("Install_from_local_tmpdir","False")

; before the installation:
if $Install_from_local_tmpdir$ = "true"
	; copy installer files to tempdirectory
	Files_copy_installer_to_temp
	; set $installerSourceDir$ to tmpdir
	set $installerSourceDir$ = forcePathDelims("%opsiTmpDir%\"+$ProductId$)
endif

; do the installation

; after the installation
if $Install_from_local_tmpdir$ = "true"
	; cleanup installer tempdirectory
	Files_del_installer_from_temp
endif
and the related sections.
; copy installer files to tempdirectory
[Files_copy_installer_to_temp]
copy -s "$installerSourceDir$\*.*" "%opsiTmpDir%\$ProductId$"

; cleanup installer tempdirectory
[Files_del_installer_from_temp]
del -sf "%opsiTmpDir%\$ProductId$\"
Opsi-setup-detector: Handle License Key
The opsi-setup-detector has a checkbox in the tab "Product Configuration 1":
Handle License Key : Adds property and code to handle license keys.
An additional property is created: secretlicense_or_pool with the a default of '' and the description: 'license key or opsi licensepool'. The keyword 'secret' in the property name means that the value of the property is shown masked in opsi-configed.
In setup.opsiscript is inserted:
The call of get_licensekey_byPoolOrKey checks whether the property value is possibly the name of a licensepool from the opsi extension license management.
If so, a license key is supplied from this pool.
If not, the contents of the property is supplied as a license key.
DefVar $LicenseHandledByScript$ = "true"

set $LicenseOrPool$ = GetConfidentialProductProperty("SecretLicense_or_Pool","")

; before the installation:
; ---------------------------------------------------------------
comment "handle license "
; ----------------------------------------------------------------
if $LicenseHandledByScript$ = "true"
	comment "we should handle license"
	;reserve license and get license key
	set $LicenseKey$ = get_licensekey_byPoolOrKey($LicenseOrPool$)
	; here the section or function calls should follow which
	; make use of the license key resp the license reservation
endif
In uninstall.opsiscript is inserted:
DefVar $LicenseHandledByScript$ = "true"

set $LicenseOrPool$ = GetConfidentialProductProperty("SecretLicense_or_Pool","")

; after the uninstallation

; ---------------------------------------------------------------
comment "handle license "
; ----------------------------------------------------------------
if $LicenseHandledByScript$ = "true"
	comment "we should free license used"
	Set $tmpstr$ = FreeLicense($LicenseOrPool$)
endif
Opsi-setup-detector: Desktop Icon
The opsi-setup-detector has a checkbox in the tab "Product Configuration 1":
DesktopIcon : Adds property and code to handle desktop icons.
An additional Boolean property is created: desktopicon with a default of 'False' and the description: 'Should there be a desktop icon?'.
In setup.opsiscript is inserted:
A Linkfolder section to create or remove the desktop icon:
set $desktopicon$ = GetProductProperty("desktopicon", "False")


; after the installation
; handle desktop icon
if $DesktopIcon$ = "true"
	comment "Create Desktop Icon"
	Linkfolder_create_desktop_icon
else
	comment "Remove Desktop Icon"
	Linkfolder_remove_desktop_icon
endif
as well as the associated sections, which are also inserted into uninstall.opsiscript:
[Linkfolder_remove_desktop_icon]
; check delete_element
set_basefolder common_desktopdirectory
set_subfolder ""
delete_element $productId$

[Linkfolder_create_desktop_icon]
; check name, target and working_dir
set_basefolder common_desktopdirectory
set_subfolder ""
set_link
	name: $productId$
	target: $Installdir$\$targetprogram$
	parameters:
	working_dir: $Installdir$
	icon_file:
	icon_index:
end_link
In delinc.opsiinc is inserted:
comment "Start Remove Desktop Icon Handling :"
Linkfolder_remove_desktop_icon
Opsi-setup-detector: Customize Profile
The opsi-setup-detector has a checkbox in the tab "Product Configuration 1":
Customize Profile : Adds a 'Profileactions' section to the code to make adjustments to the local user profiles. This functionality is also provided via a loginscript for 'Roaming Profiles'.
In the OPSI/control file setup.opsiscript is not only provided as a 'setupScript', but also as a 'userLoginScript'.
In setup.opsiscript is inserted:
A ProfileActions section. Depending on the type of execution, this is carried out for all local profiles or for the user who is currently logged in:
For details see: https://docs.opsi.org/opsi-docs-en/4.2/manual/modules/user-profile.html
; Run the customization for user profiles
ProfileActions
and the associated sections, which are templates to manipulate user profiles:
[ProfileActions]
; all section that called from [ProfileActions]
; will be executed for all user profiles
;
; if this script runs as loginscript
; only the [ProfileActions] will be executed

; copy some files to every user profile
Files_copy_to_user_profiles

; make entries in every currentuser hive
Registry_current_user

; modify or create ini files in all user profiles
;Patches_in_user_profiles  "%UserProfileDir%\Appdata\Roaming\<path_to_ini_file>"
Patches_in_user_profiles  "%UserProfileDir%\Appdata\Roaming\osd_profile_example\osd_profile_example.ini"

[Files_copy_to_user_profiles]
; example structure:
;copy "%Scriptpath%\profile_files\*.*" "%UserProfileDir%\Appdata\Roaming\<path_to_application_dir>"
; example:
;copy "%Scriptpath%\profile_files\*.*" "%UserProfileDir%\Appdata\Roaming\osd_profile_example"

[Registry_current_user]
; example structure:
;openkey [HKCU\Software\<application key>]
;set "<var name>" = "<var value>"
; example:
;openkey [HKCU\Software\osd_profile_example]
;set "osd_profile_example_entry" = "example_value"

[Patches_in_user_profiles]
; example structure:
; set [<section name>] <key name>=<value>
; example:
;set [example_section] example_key=example_value