Client-Agent (Linux)
opsi enables the seamless and automatic distribution of software to client computers by facilitating installations and updates directly from the server. This process requires no user interaction, as it operates in the background, going unnoticed by users. This also ensures that insecure users cannot simply cancel installations.
For all automated processes, opsi relies on a specialized agent installed on client computers: it plays a crucial role in ensuring that installations and updates are executed efficiently and autonomously, without the need for any user intervention.
Overview
You need to install the client agent on all computers that are to be managed with opsi. When these computers start up (before the user logs on), the client agent reaches out to the opsi config server. It then checks for any updates or new packages for the client, based on the information stored on the server.
The opsi-script program handles the installation process. The necessary scripts and software packages are stored in the opsi depot (a file share). During the installation, there is neither a possibility nor a need for any intervention in the process.
To prevent users from logging onto the system before the installation is complete, a feature known as the login blocker is also installed, particularly on Windows. This ensures that a user can only log in after the installation process has been fully completed.
Installation
When you (re)install an operating system via opsi, the client agent is automatically installed. If needed, you can alternatively use the Install Client Agent Later method. It’s important to note that this applies only to Windows and Linux systems; opsi does not currently support an OS installation for macOS.
| To uninstall the opsi client agent from a client, simply set the product to uninstall in the management interface. |
Install Client Agent Later
Various methods are available for the subsequent installation or repair of the client agent:
-
Installation via an MSI package (Windows only, refer to section Client agent as MSI Package)
-
Automatic installation as part of an operating system installation (applicable to both Windows and Linux)
-
Manual installation from a (depot) directory using
oca-installation-helper[.exe](see section windows-client/windows-client-agent.adoc#opsi-manual-clientagent-subsequent-installation-oca-installation-helper) -
Deployment via push from the server using
opsi-deploy-client-agent -
Installation using specific installers (
opsi-client-agent-installer.exe,opsi-linux-client-agent-installer.run,opsi-mac-client-agent-installer.command) -
Self-updating within the opsi service context (client agent updates itself)
The installer can be downloaded (without authentication) from an opsi server in your network via the address https://<opsi-server>:4447/public/opsi-client-agent/. Here, you will find packages for Windows, Linux, and macOS.
|
In most scenarios (except for updates in the opsi service context), the oca-installation-helper[.exe] is used. This application primarily serves the following purposes:
-
It transfers the installation files to a local temporary directory when necessary (for example, when invoked via a UNC path).
-
It presents a dialog window where you can input additional installation details, such as the client ID, opsi service URL, username, and password.
-
It registers the client in the opsi service if it’s not already existing.
-
It initiates
opsi-scriptto execute the actual installation process.
| The installer consistently establishes a service connection, ensuring that the product properties from the server are always used (regardless of the mode of installation). |
oca-installation-helper Parameters
The program oca-installation-helper[.exe] requires root privileges to operate. It recognizes various parameters and options, which you can view by using the --help command.
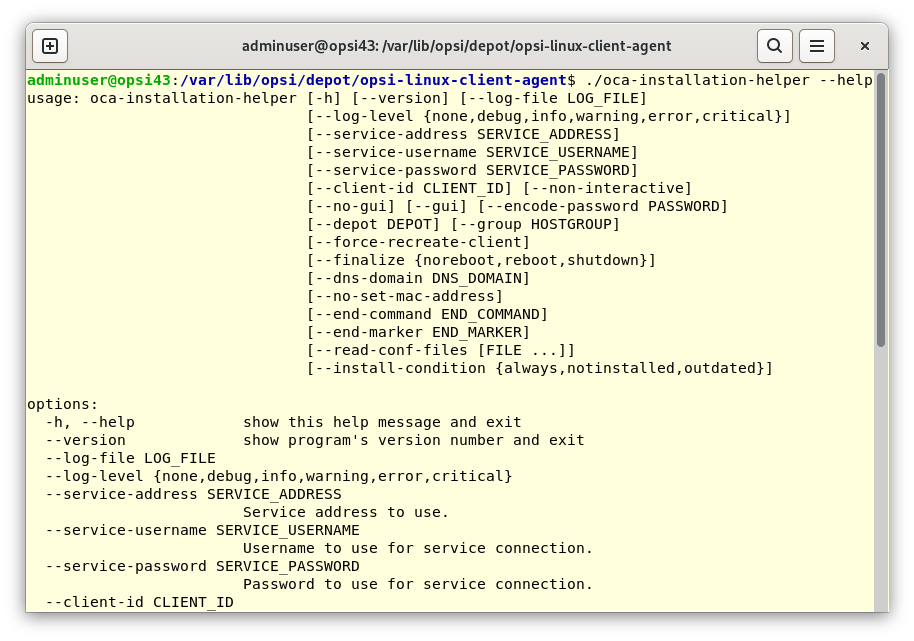
You can automate the installation with these parameters:
oca-installation-helper --service-address https://10.1.2.3:4447 --service-username adminuser --service-password <password> --non-interactiveYou can encrypt the password. To do this, first generate the encrypted password by following these steps:
oca-installation-helper --encode-password <password>The result is a character string that starts with {crypt}. You can then use this encrypted password with the parameter --service-password as follows:
oca-installation-helper --service-password \{crypt}w5TDjcOQw5PDjsOrWhen initiating the installation manually, the following configuration files are considered, in descending order of priority, to determine the parameters:
-
.\files\custom\install.conf(or./files/custom/install.conf) -
.\install.conf(or./install.conf) -
The local file
opsiclientd.confspecific to the installation
Below is an example of an install.conf file designed to automate the installation process:
client_id =
service_address = server.domain.tld
service_username = adminuser
service_password = {crypt}w5TDjcOQw5PDjsOr
dns_domain = subdomain.domain.tld
interactive = false| Keep in mind that parameters set via the command line always override those set in the configuration file! |
When the address for the opsi service (--service-address) is not specified, the installer attempts to automatically determine it using Zeroconf.
You can assign a client to a specific depot and host group using the --depot and --group parameters. Administrative rights are required for this action.
The --finalize parameter allows you to define the post-installation action. Options include noreboot (the default setting, where opsiclientd starts without triggering any event), reboot, and shutdown.
By default, the oca-installation-helper records its operations in a logfile. On Linux and macOS, this logfile is located at /tmp/oca-installation-helper.log, while on Windows, it can be found in C:\Users\<userid>\AppData\Local\Temp.
Components
The opsi client agent is composed of multiple components:
-
opsiclientd: This is the central client agent service. For more information, refer to section opsiclientd. -
opsi-notifier: A dialog window that informs users about ongoing processes. Details can be found in section opsi-notifier/opsi-login-blocker. -
opsi-login-blocker: This component prevents user login until the installation is complete. It is applicable only to Windows. More information is available in section opsi-notifier/opsi-login-blocker.
opsiclientd
The opsiclientd serves as the central client agent service in opsi. Running continuously in the background, it is capable of executing specific actions in response to certain situations, referred to as events. The key functions and features of the opsiclientd service include:
-
Event-Based Control: The
opsiclientdresponds to various system events. An example is the initiation of theopsiclientdservice itself. -
Control via Web Service: This interface is accessible over the network and is used for triggering installations (push) as well as for maintenance activities.
-
Remote Configuration: All essential settings can be adjusted globally through host parameters or individually for each client using
opsi-configed. -
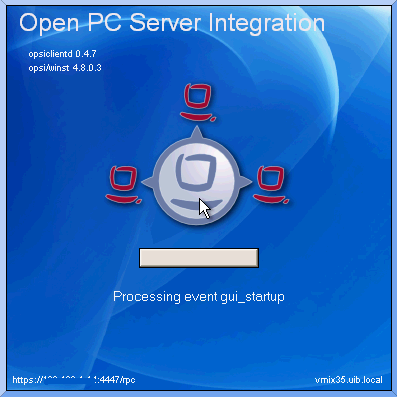
Contact with the opsi Config Server: When a configured event occurs,
opsiclientdconnects with the opsi config server. It retrieves configurations and pending action requests via JSON-RPC. A standard event isgui_startup, which happens at the computer or graphical user interface startup, before user login. -
opsi-notifier: For user interaction and communication,
opsiclientdinitiates theopsi-notifier. -
opsi-depot: When necessary,
opsiclientdconnects to the depot server, updates the localopsi-scriptinstallation, and launchesopsi-scriptto process the pending action requests, including the installation or uninstallation of packages.
opsi-notifier/opsi-login-blocker
The opsi-notifier is designed for user interaction. It serves two main purposes: displaying status messages from opsiclientd and providing dialog boxes for controlling opsiclientd. The function and appearance of these dialog boxes are determined by configuration files.
The opsi-notifier can manifest in different scenarios, each with a distinct appearance:
- Blocklogin Notifier
-
This notifier appears on Windows systems when the opsi login blocker is active (refer to section opsi Login Blocker). By default, a padlock icon is displayed in the top right corner of the screen.
opsi-notifier is used for interaction with the users. It outputs opsiclientd status messages on the one hand and dialogs for controlling the opsiclientd on the other. Configuration files define the function and appearance of the dialogs.

- Event Notifier
-
This notifier activates upon the occurrence of an event. It informs about the ongoing event process and offers the user the option to cancel the event’s processing.
- Action Notifier
-
This notifier is activated when there are actions to be executed. It provides the user with the option to cancel these actions or to execute them at a later time.
- Shutdown Notifier
-
This notifier is activated when a shutdown or reboot is scheduled to be executed on the client. Users have the option to cancel the process or select a different time for the action from a drop-down menu.
| For more detailed information on configuring the shutdown notifier, refer to the following section. This section will discuss the sequence of events and highlight the most crucial parameters for controlling these events. |
Event Flow
As previously mentioned, the opsiclientd service continuously operates in the background, initiating events under certain conditions. After establishing a connection with the opsi server and authenticating itself, opsiclientd inquires about any pending actions. For instance, if there is a new version of software available, the server communicates this update to the client agent, including details on which depot to access for the package. opsiclientd then mounts the appropriate share and launches opsi-script with the necessary service credentials. Once opsi-script completes the installation, opsiclientd unmounts the share and, if needed, triggers a reboot of the client.
The precise sequence of an event can be flexibly configured (see section Configuring Events). To tailor settings to your specific environment, understanding the flow logic is crucial. An overview of the typical event flow (specifically the standard event event_gui_startup) and the interaction between various opsi components is illustrated in Figure 6, “Overview of a Standard Event”.
In addition to the event_gui_startup event for Windows, there is now the event_startup event for Linux. Both events are quite similar and are activated when the opsiclientd service starts (i.e., during client boot-up). There are also events triggered by client shutdown, network connections, and other conditions.
|
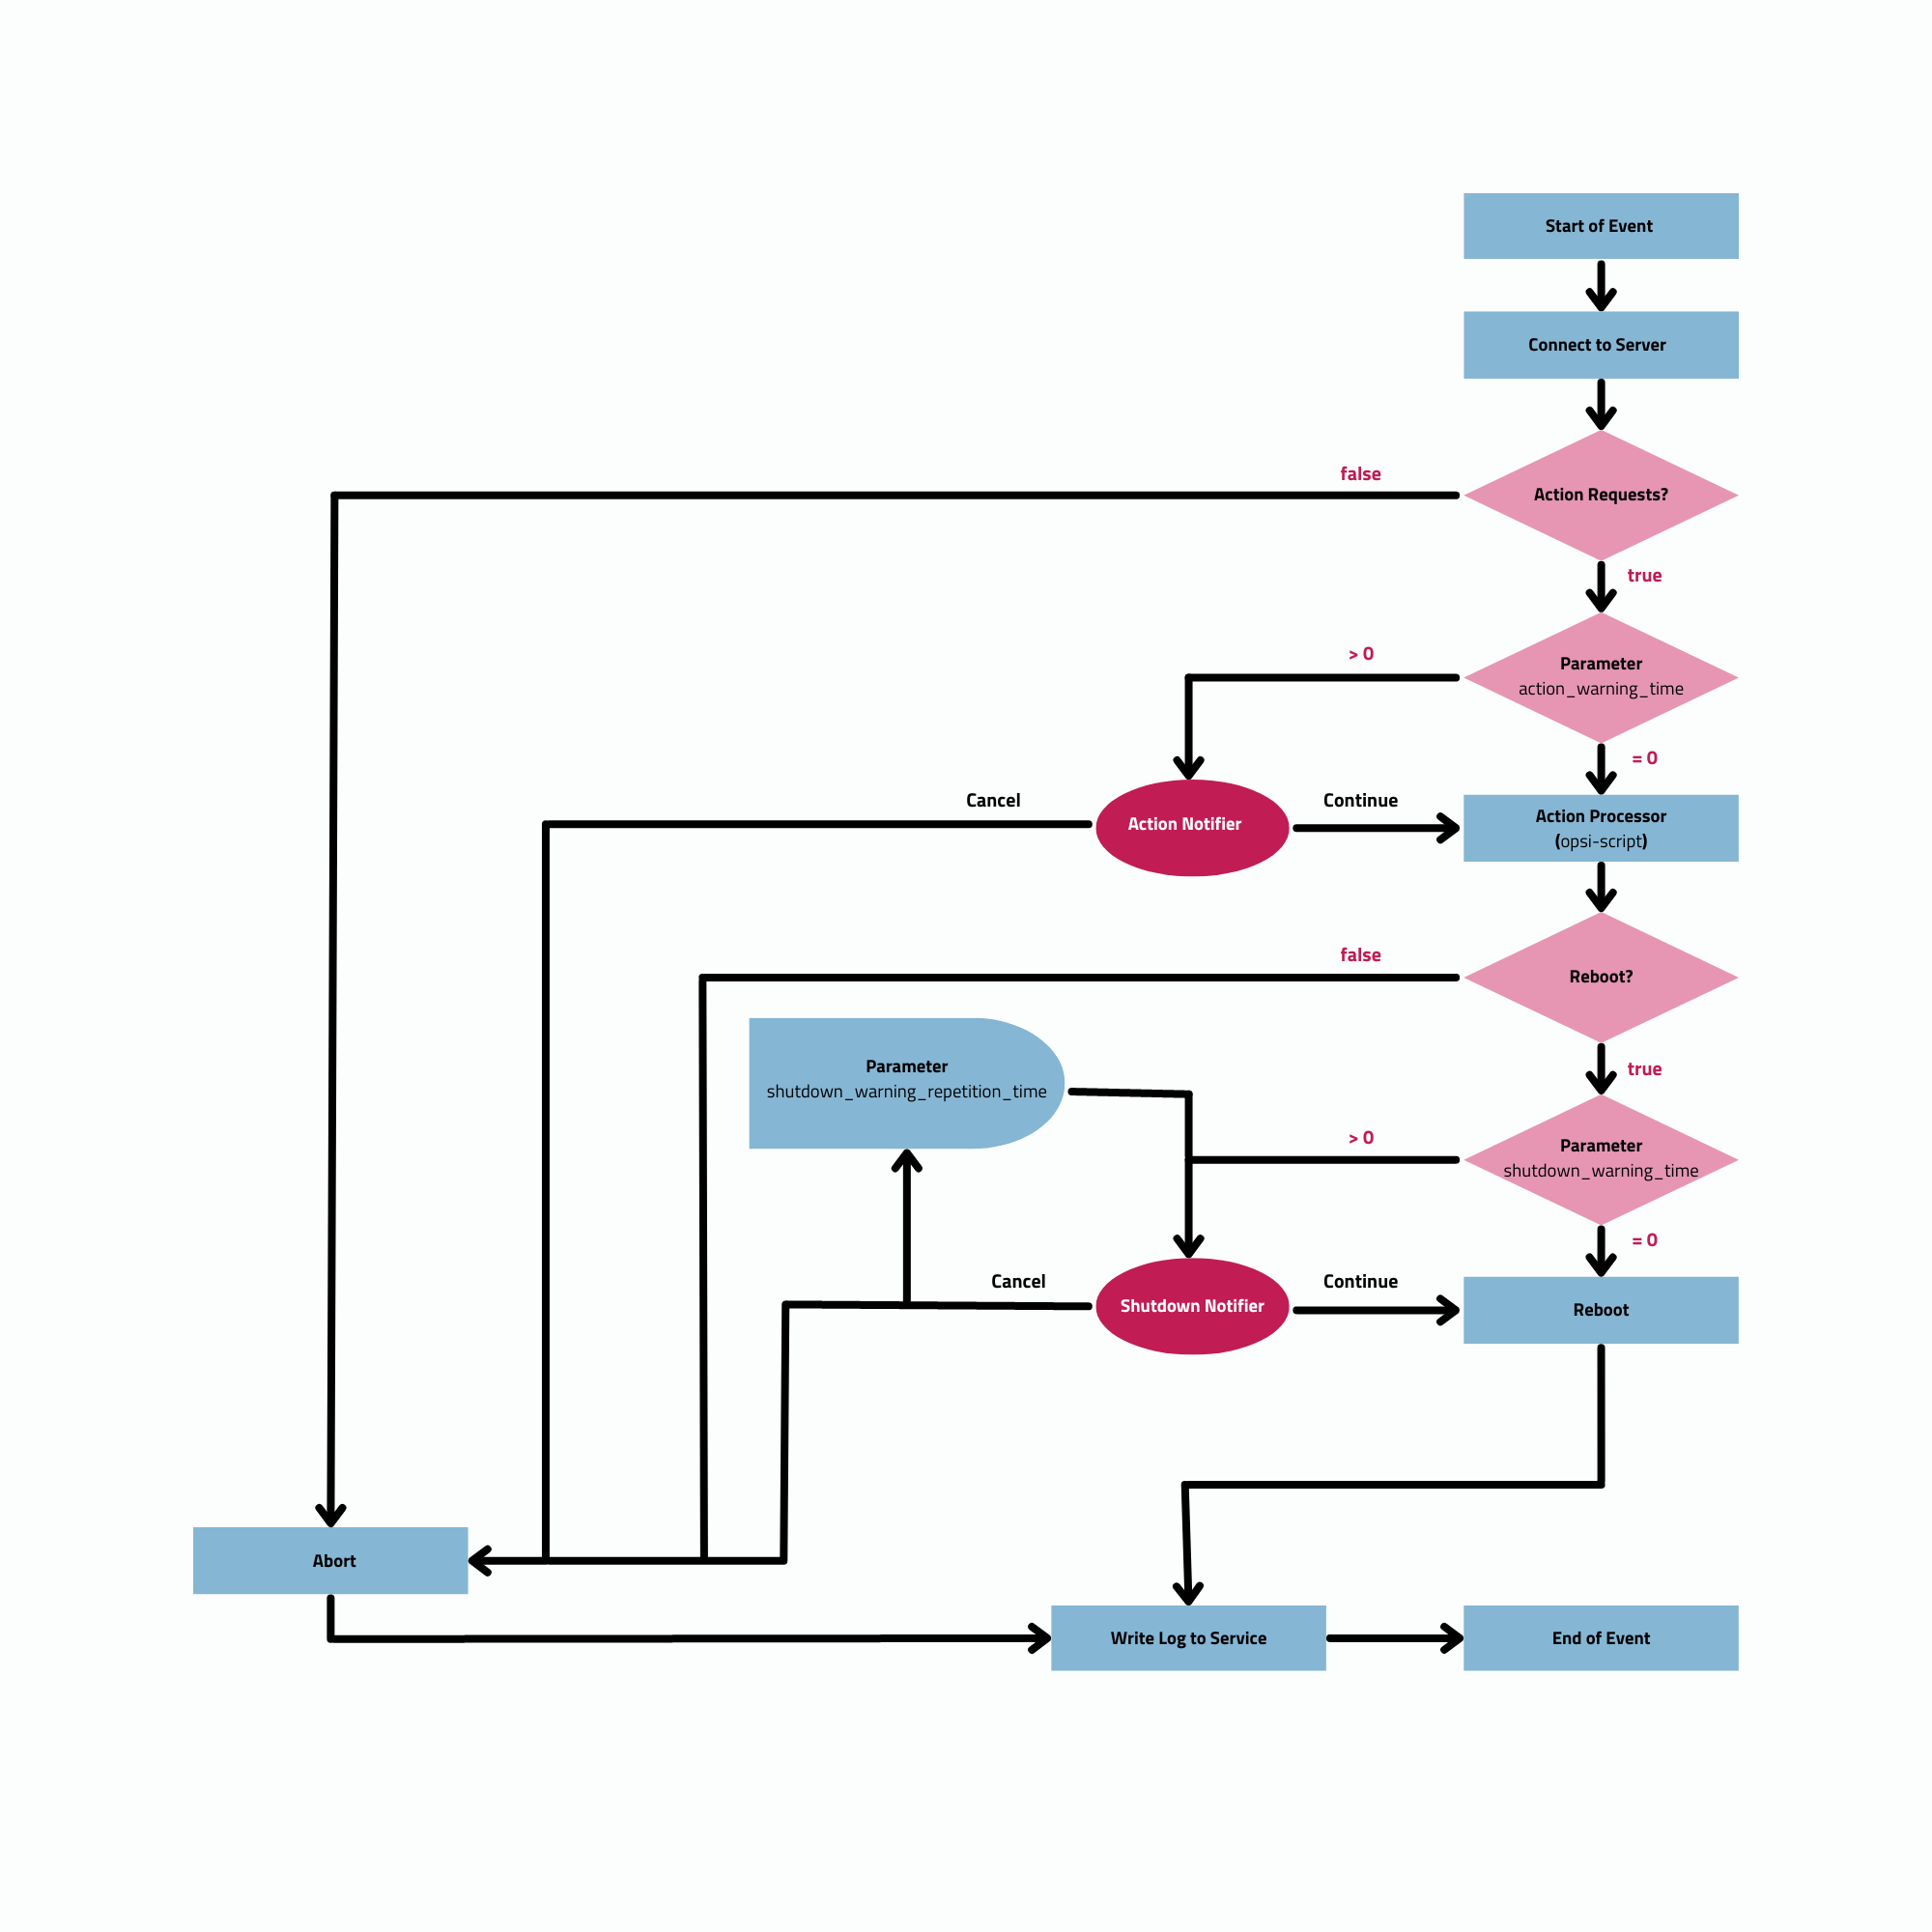
Below is a step-by-step summary of the process for a standard event in the opsi system:
-
When an event starts, the
event_notifier_commandis executed. The client tries to establish contact with the opsi config server. If a connection isn’t made withinconnection_timeoutseconds, the event is terminated with an error. If no connection is established afteruser_cancelable_afterseconds, a button becomes active in theopsi-notifierallowing the user to cancel the connection attempt. To prevent user cancellation, setuser_cancelable_afterto a value greater than or equal toconnection_timeout. If an event is canceled,opsiclientdsends its logfile to the service, concluding the event. -
Once the connection to the opsi config server is established, it cannot be terminated. The
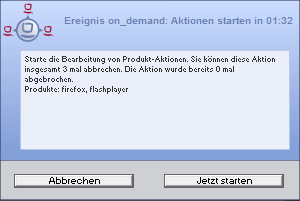
opsiclientdthen checks for any action requests for the client. If there are none, the event concludes. If there is an action request, the system checks if anaction_warning_timeis defined. The default is 0, meaning the event proceeds without an action notifier and noaction_notifier_commandis executed. Ifaction_warning_time> 0, it indicates the duration (in seconds) the notifier is visible. The action notifier (refer to Figure 4, “opsiclientd: Action Notifier”) informs about the pending action and displays the countdown. If the user does not click Cancel or the countdown expires, the action proceeds automatically.
The availability of a Cancel button depends on the action_user_cancelable parameter. If this is > 0, it represents the number of consecutive cancellations allowed. Once the maximum value is reached (or if action_user_cancelable = 0), the action cannot be postponed further. A button to interrupt the waiting time and start the action immediately is always visible.
|
The action_user_cancelable parameter is useful in scenarios like a user opening their laptop during a meeting or conference and wanting to delay an Office package update. The system administrator decides how many times an update can be deferred before it is enforced.
|
-
The
action_messageandaction_message[lang]parameters configure the message text displayed in the notifier. Additionally, two placeholders are available:%action_user_cancelable%(total number of possible cancellations) and%action_cancel_counter%(number of cancellations already made). If the user does not cancel the action,action_cancel_counteris reset, andopsi-scriptbegins its operation. -
After
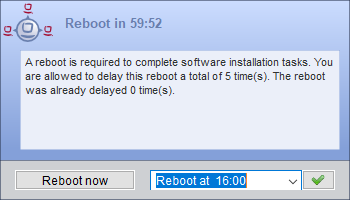
opsi-scriptcompletes its task, it checks if the client requires a reboot. If so,opsi-scriptinformsopsiclientdof the need for a reboot and initiates theshutdown_notifier_command. If no reboot is necessary, the event concludes. However, if a reboot is required, the process evaluates whether ashutdown_warning_timeis set. If this is 0, the client restarts immediately without warning. If the parameter is greater than 0, the Shutdown Notifier shows a countdown similar to the Action Notifier, visible forshutdown_warning_timeseconds. -
The
shutdown_user_cancelableparameter determines how often a user may cancel and thus postpone a reboot. The Shutdown Notifier always includes the option to execute the shutdown/reboot immediately. If the user postpones the request, the shutdown notifier will reappear aftershutdown_warning_repetition_timeseconds. -
The
shutdown_warning_messageandshutdown_warning_message[lang]parameters set the message text displayed in the shutdown notifier. Additionally, two placeholders are available:%shutdown_user_cancelable%(total number of possible shutdowns) and%shutdown_cancel_counter%(number of shutdowns already performed). After the shutdown/reboot, theshutdown_cancel_counteris reset.
Setting the host parameter opsiclientd.event_on_demand.shutdown_user_selectable_time = true alters the shutdown notifier for the on_demand event. This dialog then displays a dropdown menu where users can choose their preferred time for shutdown/reboot. In this case, shutdown_warning_repetition_time is no longer relevant. This behavior can also be configured for other events; the next section provides more details on these settings.
|
Please be aware that if the connection between the client and server fails, no logfile is sent to the opsi config server. In such cases, a detailed error description can be found in the opsiclientd.log file on the client.
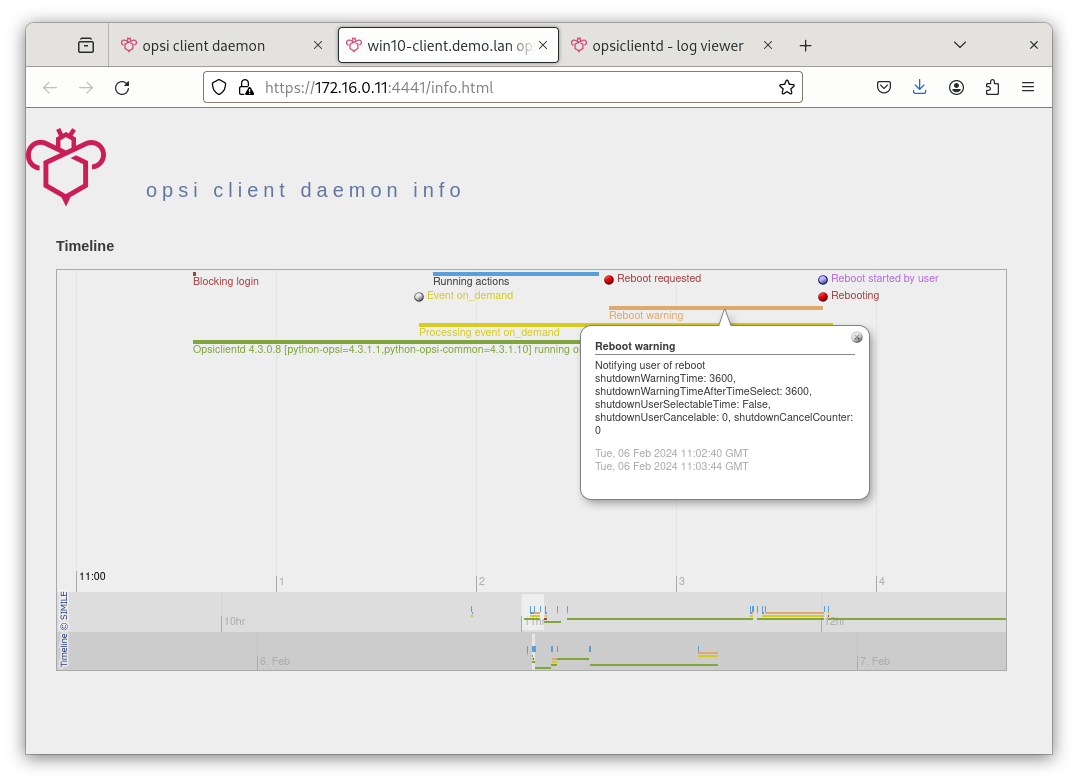
The timeline on the opsiclientd info page (refer to section opsiclientd Info Page) illustrates the sequence of events and user actions.
|
Web Interface
The opsiclientd service offers a web interface accessible at https://<client-address>:4441. To access it, enter this URL in the address bar of your web browser. To authenticate, use either the local administrator account of the client (note that an empty password is not permitted) or the host ID (FQDN, full hostname including DNS domain) as the username and the opsi host key as the password.

The web interface provides access to three distinct subpages:
-
opsiclientd Info page: This page presents a concise overview of the activities of
opsiclientd. For more information, refer to section opsiclientd Info Page. -
opsiclientd log viewer: This feature allows you to view and search through logfiles. Additional details can be found in section Logfiles.
-
opsiclientd control interface: You can use this interface to invoke JSON-RPC methods. For further details, see section opsiclientd Control Interface.
opsiclientd Info Page
Due to the simultaneous activity and collaboration of various components, the opsiclientd logfile can become quite complex. To simplify this, there is a dedicated info page for each client, accessible via a web browser at the URL https://<Client-IP>:4441/info.html.
opsiclientd Control Interface
You can execute JSON-RPC methods through the opsiclientd control interface page. The following two sections will provide examples demonstrating how to initiate these JSON-RPC queries.
Viewing Logfiles
The JSON-RPC method log_read is designed to retrieve an existing logfile from the client and display its contents in the browser window. This method accepts three parameters:
-
logType: This parameter specifies the type of logfile you wish to access. Possible values includeopsiclientd,opsi-client-agent,opsi-script,opsi_loginblocker,notifier_block_login, andnotifier_event. -
extension: This parameter allows you to view rotated logfiles (like_1.log,_2.log, etc.). The acceptable values range from0to9. -
maxSize: This parameter limits the displayed output to the specified size in bytes.
Updating Client Agent’s Component
The JSON-RPC method updateComponent is used to update a client agent component. It recognizes the following two parameters:
-
component: The component to be updated. Currently, the accepted value isopsiclientd. -
url: This is the location from where the update will be downloaded. Supported protocols includehttp,https, andfile. The update should be provided in the form of an archive, with supported formats being.zip,.tar,tar.gz, ortar.bz2.
As an alternative approach, you can also upload the update archive directly to the server using a POST request to /upload/update/opsiclientd:
curl --insecure --request POST \
        --user ':<opsi-client-host-key>' \
        --header 'Content-Disposition: filename=oca.zip' \
        --data-binary '@path/to/opsiclientd_windows_x86_<version>.zip' \
        https://<client-address>:4441/upload/update/opsiclientd
Configuration
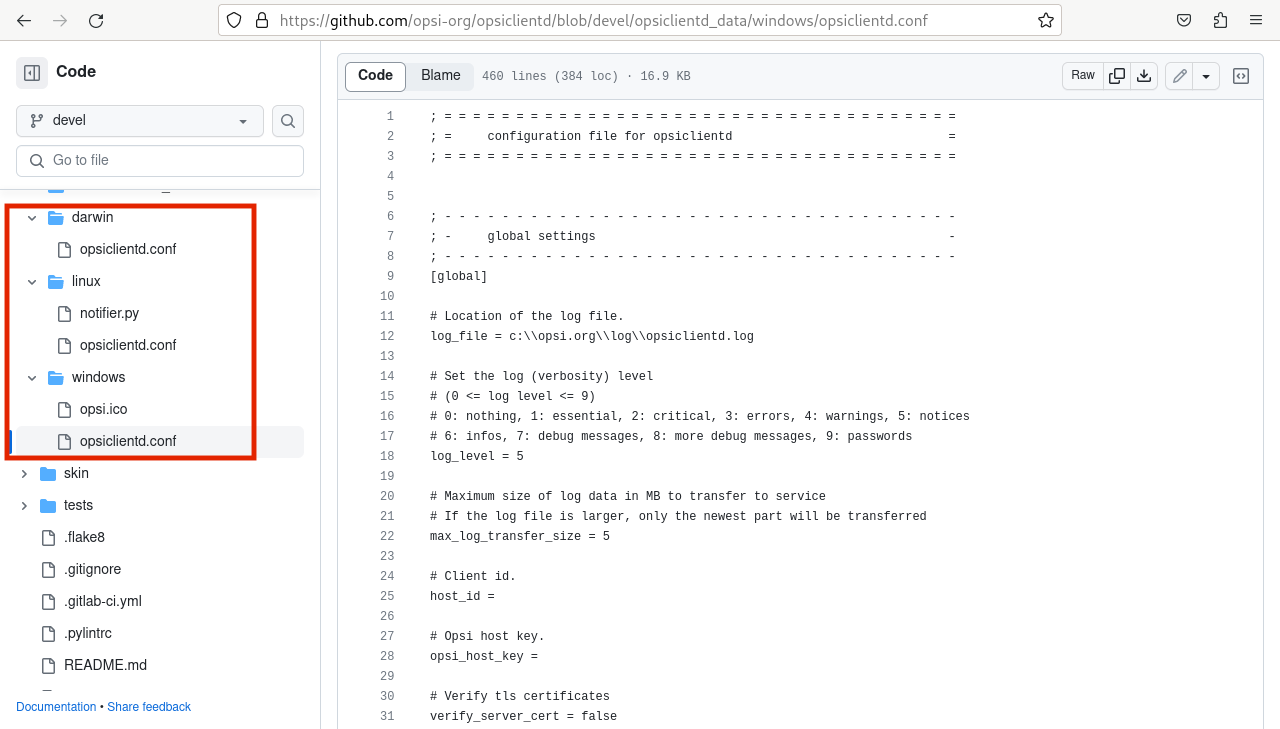
The upcoming sections will explore various ways to configure the client agent. The central configuration file for this purpose is opsiclientd.conf, which can be found in different directories on the client computer, varying based on the operating system. You can refer to our GitHub repository for the default configuration files for Windows, Linux, and macOS, showcasing the standard values for each platform.
Because the opsi config server automatically overwrites the opsiclientd.conf file, it’s advisable to edit this file only for testing purposes. For configuring the client agent, you should use the methods outlined in the forthcoming sections.
|
When editing the opsiclientd.conf file in a text editor, ensure that the editor supports UTF-8 encoding. Some editors, like notepad.exe, do not support UTF-8, which can result in issues with characters like umlauts.
|
Host Parameters
To configure the client agent and modify or create entries in the opsiclientd.conf file, you should set host parameters. These entries adhere to the following format: opsiclientd.<name of section>.<name of option>. Here’s an example:
opsiclientd.event_gui_startup.action_warning_time = 20This host parameter sets the value for the action_warning_time option in the [event_gui_startup] section to 20.
Generally, there are two types of settings in the configuration: Boolean and Unicode. Boolean configurations have two possible values: true or false. Unicode configurations, on the other hand, accept string values, and multiple strings can be specified.
|
To change host parameters, there are two available methods:
opsi-configed
In the graphical management interface, opsi-configed, you can set host parameters for either all clients or individual clients. To access the host parameters for all clients, simply select the Server configuration view and then navigate to the Host parameters tab.
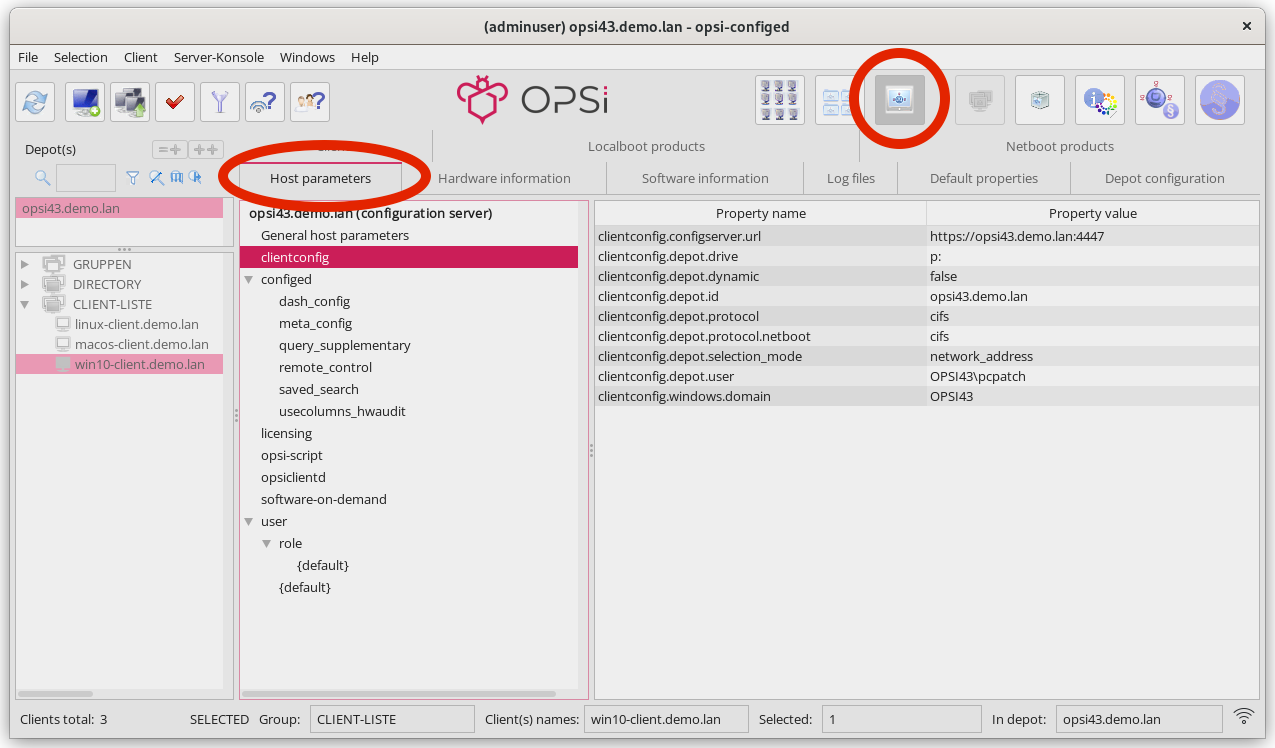
In the interface, the property name is displayed in the left-hand column and its corresponding value in the right-hand column. To modify a value, click on an entry in the right-hand column. This action will open a dialog box with a selection menu, allowing you to change the value.
Alternatively, if you wish to configure individual clients, you can do so via the Client configuration view. First, select a client from the list on the left-hand side. Then, in the right-hand window area, open the Host parameters tab. You can change a value by clicking on it in the Property value column, which will bring up a selection menu for adjustments.

opsi-cli
Alternatively, you can use the command line tool opsi-cli to create, modify, or delete host parameters (see section opsi-cli):
opsi-cli jsonrpc execute config_createUnicode opsiclientd.event_gui_startup.action_warning_time
opsi-cli jsonrpc execute config_delete opsiclientd.event_gui_startup.action_warning_time
The first command is used to create a host parameter in Unicode format, while the second command is for deleting a host parameter, irrespective of whether it’s Unicode or Boolean. Both of these examples apply the changes to all clients. If you need to modify host parameters for a specific client, then include the name of the client in the command:
opsi-cli jsonrpc execute configState_create opsiclientd.event_gui_startup.action_warning_time "client1.domain.de" "120"
opsi-cli jsonrpc execute configState_delete opsiclientd.event_gui_startup.action_warning_time "client1.domain.de"
Configuring Events
The client agent is designed to function in a variety of scenarios, which is why there are numerous configuration options available for setting up events (for more details, see section Event Flow). Each event is configured in a section formatted as [event_<event name>]. You can deactivate an event by setting active = false within its configuration section. If an event type lacks a configuration section or if it’s deactivated, that particular event type is entirely disabled.
Event configurations can "inherit" settings from one another. For instance, if you set the ID of another event configuration using the super option, the child configuration inherits all the options of the parent configuration, except for the active setting. Any inherited options can be overridden as needed. Note that deactivating events does not impact their ability to be inherited.
|
Types
There are various event types. In addition to templates (type = template), the following event types are available:
-
gui_startup: This event type is triggered when the client’s graphical user interface (GUI) starts. It’s the most common event and is active by default. -
custom: Custom events are unique in that they determine their own triggers. For example, in Windows, a WQL (Windows Management Instrumentation Query Language) query, which is an SQL-like language for querying the Windows Management Instrumentation (WMI), can be used as a trigger. You specify a WQL expression using thewqloption, and whenever this expression yields a result, a custom event is initiated with the respective configuration. Note: If thewqloption is not set, this event type will never occur naturally but can be triggered through theopsiclientdweb service interface if needed. -
user_login: This event is activated when a user logs into the system. -
timer: This event happens at regular intervals, occurring every<interval>seconds. -
sync_completed: Triggered upon the completion of synchronization processes, whether it’s syncing configurations (sync_config_from_server,sync_config_to_server) or products (cache_products). -
on_demand: An on-demand event occurs when explicitly requested, such as through theopsi-configed(refer to chapter Management Interface opsi-configed) or via the module Software On Demand.
Preconditions
Event preconditions are used to describe specific system states, such as whether a user is currently logged in. These preconditions have dedicated sections within the configuration file, introduced with the notation [precondition_<precondition-id>]. Some of the possible options for preconditions include:
-
user_logged_in: This precondition is met if a user is logged into the system. -
config_cached: Fulfilled when the caching of configurations is complete. -
products_cached: Satisfied once the caching of products is finished.
A precondition is considered fulfilled when all specified options apply.
Assigning a precondition to an event configuration can be accomplished by specifying it within curly brackets in the declaration. For instance, [event_on_demand{user_logged_in}] indicates that the event_on_demand configuration is contingent upon the user_logged_in precondition being met.
It’s important to ensure that for every event configuration with a precondition, there exists a corresponding event configuration without a precondition. For example, if there is an event_on_demand{user_logged_in} configuration, there must also be a standard event_on_demand configuration.
|
The event configuration with a precondition automatically inherits settings from the corresponding event configuration without a precondition. When an event occurs, the client agent first assesses which preconditions are met. If no preconditions are satisfied, the standard event configuration (without any precondition) is applied. If any precondition is met, the event configuration associated with that particular precondition is employed. In scenarios where multiple preconditions are satisfied, the system will prioritize the precondition that is defined most specifically, meaning the one with the most options.
Example: Informing Users about a Reboot
The following example illustrates a configuration using preconditions, tailored to manage system reboots during installations. Let’s consider a scenario where a reboot is necessary after an installation. If a user is currently logged into the system, they should be notified about the impending reboot. Additionally, it’s beneficial to provide a waiting period before the reboot occurs, along with the option for the user to postpone the reboot to a later time. Conversely, if no user is logged in when the reboot is required, the system should reboot immediately without any delay.
To accommodate these requirements, the event_on_demand can be configured as follows:
-
Define a precondition
user_logged_in, which is fulfilled if a user is logged into the system:
[precondition_user_logged_in]
user_logged_in = true
-
Define an event without precondition (
event_on_demand) and set theshutdown_warning_timeto0(immediate reboot without message):
[event_on_demand]
shutdown_warning_time = 0
-
Also, define an event with precondition (
event_on_demand{user_logged_in}) and set theshutdown_warning_timeto300(300 seconds, 5 minutes):
[event_on_demand{user_logged_in}]
shutdown_warning_time = 300
Working Window
For all events, you can specify a working window that restricts the event to occur only within a designated start and end time. This is achieved by defining the working_window option in the event configuration. If this option is absent, has no value, or the value is invalid, the working_window is considered to be undefined, implying that there is no time restriction for the event.
The start and end times should be entered in the hh:mm format, and they should be separated by a single hyphen without any spaces. Spaces between start and end time are not permitted!
|
working_window = 07:00-22:00Use the host parameter working_window to set up a working window, either via the management interface opsi-configed or on the command line (see the section Host Parameters).
Examples: Working window globally and for individual clients
The following examples show how to define different working windows as host parameters with the command line tool opsi-cli.
-
Example 1: To globally create an empty
working_windowfor theevent_gui_startupevent, with the time restriction being individually set for clients (as shown in Example 3), you would use the following command:
opsi-cli jsonrpc execute config_createUnicode opsiclientd.event_gui_startup.working_window
-
Example 2: Create a global
working_windowfor the time between 20:00 and 07:00 for the eventevent_gui_startup:
opsi-cli jsonrpc execute config_createUnicode opsiclientd.event_gui_startup.working_window "gui_startup.working_window" "20:00-07:00"
-
Example 3: Define a specific time window for the client
client1.domain.de(between 07:00 and 19:00 for the eventevent_gui_startup):
opsi-cli jsonrpc execute configState_create opsiclientd.event_gui_startup.working_window "client1.domain.de" "07:00-19:00"
To accommodate events that span overnight, set the start time later than the end time in the working window (e.g., 23:59-00:00). This configuration ensures the time window extends across the midnight transition. For defining distinct day and night time windows, use start and end times where the start is earlier than the end for daytime (e.g., 07:00-19:00), and later than the end for nighttime (e.g., 20:00-07:00).
|
IP Version (IPv4/IPv6)
The central client agent service, opsiclientd, is compatible with both IPv4 and IPv6 protocols. Typically, the protocol used for connecting to the opsi service is automatically determined, and this is specified in the [global] section of the opsiclientd.conf file:
[global]
ip_version = auto
However, you can permanently configure opsiclientd to use one of the two protocols. To do this, assign either 4 or 6 to the ip_version option in the opsiclientd.conf file:
[global]
ip_version = 4
Proxy Server
You can configure an HTTP(S) proxy for opsiclientd using the host parameter opsiclientd.global.proxy_url. The format for this parameter is http://<user>:<password>@<proxy-url>:<proxy-port>, for example, http://proxyuser:proxypass123@proxy.domain.local:8080.
The three basic options for setting this parameter are:
-
proxy_url = system: This option uses the system-wide proxy server settings as the default configuration. -
proxy_url =: If this parameter is left empty, no proxy server will be used, and the system’s proxy settings will be disregarded. -
proxy_url = <url>: When a specific URL is provided,opsiclientdwill use the specified proxy server, overriding the system-wide settings. The URL should follow the format\http(s)://<proxy-user>:<proxy-password>@<proxy-url>:<proxy-port>.
Including/Excluding Product Groups
As of opsi version 4.3, you have the ability to define product groups for each event in the configuration. These product groups determine which products are to be processed. There are two methods for this:
-
Negative List (Exclusion): To exclude one or more product groups from being processed, list their IDs after the
exclude_product_group_idsoption, separating multiple IDs with commas. Products within these group(s) are ignored during the event, even if they are set tosetup. -
Positive List (Inclusion): Specify one or more product groups after the
include_product_group_idsoption (separate them with commas) whose products are eligible for processing, assuming the appropriate action is set.
These settings can be applied globally in [event_default] or specifically within a certain event. For instance, you can set exclude_product_group_ids in the on_demand event to omit packages set to setup from push installations. However, if the client regularly restarts with gui_startup (the default), these excluded packages would still be installed on the client.
|
For clients where the WAN/VPN extension is installed, it’s important to include these options in the [cache_service] section as well. While the cache service is activated by the sync event, it does not have access to the sync event’s configurations.
|
| Be aware that this feature does not account for product dependencies. Ensure that your configuration does not unintentionally override any dependencies! |
Logfiles
The opsiclientd service sends its logfiles to the opsi config server (refer to the illustration Figure 6, “Overview of a Standard Event”). These logfiles can be found in the directory /var/log/opsi/clientconnect/. The filenames of the individual logs either contain the name of the client or its IP address and are suffixed with .log.
You can also access these logfiles through the management interface opsi-configed. To do this, select a client from the client list on the left-hand side and then navigate to the Logfiles / clientconnect tab. Below the display area, you’ll find a search field, filter options, and a slider to adjust the log level.
|
The entries in the logfile follow this specific structure:
[<log level>] [<date time>] [source of the message] Message (source code file|line number)opsi uses a range of 10 different log levels, varying from 0 (no messages) to 9 (confidential information). For more detailed information about these log levels, you can refer to the chapter opsiconfd Service, specifically in the section Logfiles.
Remote Control
Through the web service interface of opsiclientd, not only can you configure the client agent, but you can also send various other commands, such as:
-
Sending messages (pop-ups)
-
Triggering events (e.g.,
on_demand)
These instructions can be transmitted either via the management interface opsi-configed or by using the command line tool opsi-cli (for more details, see section opsi-cli). To issue these commands, you would execute JSON-RPC methods named hostControlSafe_* (detailed in section jsonrpc). These methods are structured as follows:
opsi-cli jsonrpc execute hostControlSafe_xx *hostIdsThe parameter *hostIds can take various values:
-
["*"], indicating that the call applies to all clients -
a specific client name, for example,
"client.uib.local" -
a list of clients in the format
["<client1>", "<client2>", …], such as["client1.uib.local", "client2.uib.local"] -
a wildcard, with
*serving as a placeholder, for example,"client.*"or"*.uib.*"
In cases where a client computer is unreachable (for instance, if it is switched off), an error message will be generated for that particular client.
Sending Messages (Pop-ups)
Section Sending messages ('Show popup message') shows how to send messages to the clients via the management interface. On the command line, use opsi-cli and execute the JSON-RPC method hostControlSafe_showPopup:
opsi-cli jsonrpc execute hostControlSafe_showPopup "A message..." "client.uib.local"Triggering Events
You can also prompt a client to execute action requests set on the opsi server. The process of doing this via opsi-configed is detailed in section Triggering Events (Push Installation).
For command line execution with opsi-cli, use the JSON-RPC method hostControlSafe_fireEvent. When calling this method, specify the name of the event, followed by one or more clients:
opsi-cli jsonrpc execute hostControlSafe_fireEvent "on_demand" "client.uib.local"Maintenance Work (Shutdown/Reboot)
You can also shut down and restart clients through the opsiclientd web service. This function is accessible via the opsi-configed management interface. To use it, first select a client, then choose either Shutdown or Reboot from the Client menu. Alternatively, you can right-click on a client in the Clients tab of the main window and select Shutdown or Reboot from the context menu.
To perform a shutdown using opsi-cli on the command line, follow this process:
opsi-cli jsonrpc execute hostControlSafe_shutdown *hostIdsTo reboot, enter the following command:
opsi-cli jsonrpc execute hostControlSafe_reboot *hostIdsCustomize Client Agent to Corporate Identity
Adapting the appearance of the client agent to your corporate identity (CI) can significantly enhance user acceptance. For instance, incorporating your company logo into the background can create a familiar and reassuring environment for users.
All visual elements, including opsi-notifier and opsi-script, use consistent components for displaying graphics, and they can be customized in the following ways:
-
Colors can be defined using symbolic names (e.g.,
clRed), hexadecimal values (e.g.,$FF00FF), or RGB value lists (e.g.,(255,0,0)). -
For the background image, you can use bitmap formats like BMP, PNG, JPEG, etc.
| It’s important to remember that the image formats mentioned are container formats, and not all PNG files, for example, are created equal. If an image does not display correctly, try converting it into a different format. |
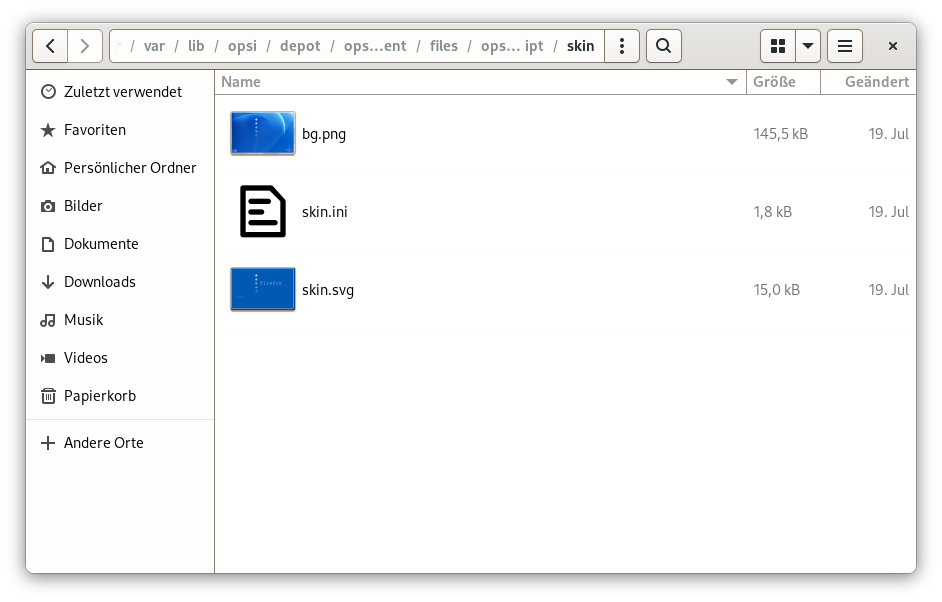
opsi-script
The files used to configure the appearance of opsi-script are located in the directory /var/lib/opsi/depot/opsi-client-agent/files/opsi-script/skin. These include:
-
bg.png: This is the default background image on which text messages and product logos are displayed at runtime. The name of this image can be customized in theskin.inifile. -
skin.ini: This configuration file specifies the background image and dictates where messages appear, as well as their color and font.
opsiclientd
The /var/lib/opsi/depot/opsi-client-agent/files/opsi-notifier/notifier.d directory contains files that determine the appearance of the various notifiers. Each notifier has its own background image and a configuration file:
-
action.bmp/action.ini: Setup for the action notifier (displays pending action) -
block_login.bmp/block_login.ini: Configuration for the blocklogin notifier -
event.bmp/event.ini: Configuration for the event notifier (shows active event with connection to the opsi server) -
popup.bmp/popup.ini: Configuration of pop-ups sent by the server -
shutdown.ini: Setup for the shutdown notifier, which indicates a pending shutdown or reboot -
shutdown_select.bmp/shutdown_select.ini: Configures the dialog for the shutdown notifier with time selection -
userlogin.bmp/userlogin.ini: Configuration for the user login notifier -
wait_for_gui.bmp/wait_for_gui.ini: Configuration of the notifier that waits for the start of the graphical user interface
The custom Directory
The files located in /var/lib/opsi/depot/opsi-client-agent/files/opsi-script/skin and /var/lib/opsi/depot/opsi-client-agent/files/opsi-notifier/notifier.d are not protected against changes and will be replaced when upgrading to a new version of the client agent.
|
To preserve your customizations, you should use the directory /var/lib/opsi/depot/opsi-client-agent/files/custom. When the client agent is updated, all data in this directory is automatically backed up and restored, ensuring that your custom modifications are not lost during an update. Within the custom directory, you will find the following subdirectories:
-
files/custom/install.conf: The values defined in this file influence the behavior of theoca-installation-helper[.exe]program from a depot share. This file overwrites the existing/var/lib/opsi/depot/opsi-client-agent/install.conf. -
files/custom/opsi-script/skin/: Files in this directory are copied to/var/lib/opsi/depot/opsi-client-agent/files/opsi-script/skinwhen the client agent is installed. -
files/custom/notifier/: All files from this directory are copied to/var/lib/opsi/depot/opsi-client-agent/files/opsi-notifier/notifier.dduring the installation of the client agent.
| To prevent errors, it is important to correct the access rights of files and directories on an opsi server (refer to the section opsi-set-rights): |
opsi-setup --set-rights /var/lib/opsi/depot/opsi-client-agentThe Systray Program
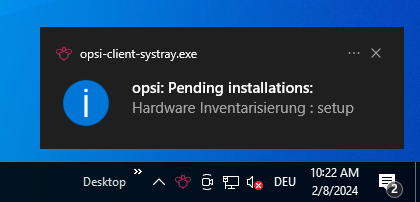
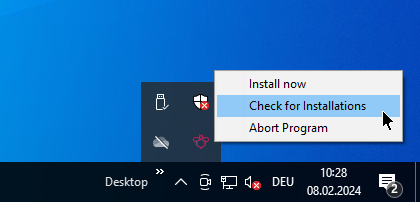
The client agent includes a systray program that operates in the taskbar of the respective desktop environment. This program facilitates quick access to essential functions and is responsible for the following tasks:
-
Regularly notifying you about upcoming installations, which is an optional feature.
-
Enabling you to actively request a pending installation via the right-click context menu.
-
Allowing you to check if there are any pending installations, also accessible through the context menu.

By default, the systray program of the client agent is not installed. If you want to add this tool and configure it, you should access the product properties of the localboot product opsi-client-agent (Windows), opsi-linux-client-agent (Linux), or opsi-mac-client-agent (macOS) in the opsi-configed management interface. The relevant settings include:
-
systray_install: Determines whether the systray program should be installed. The possible values aretrueorfalse, with the default beingfalse. -
systray_check_interval: Sets the frequency at which the program checks for pending installations for the client. This is measured in seconds, with the default value being180. Note: Smaller values can result in higher load on the server. If set to0, no regular checks are conducted. -
systray_request_notify_format: Specifies the format for notifications about pending installations. The options are"productid : request","productname : request"(which is the default), and"productname productversion : request".

| Should the systray icon not be visible on a Linux client, check the settings of the desktop environment. For users of recent GNOME and Unity versions, it might be necessary to install and activate the AppIndicator extension. You can find more detailed instructions on how to do this in the manuals or documentation specific to your Linux distribution. |

Important directories
In a Linux environment, the components of the client agent are primarily located under /usr/lib. Symbolic links to the programs opsiclientd, opsi-notifier, and opsi-script are located under /usr/bin, ensuring their inclusion in the standard PATH. The configuration file opsiclientd.conf is located in /etc/opsi-client-agent/ and can only be read and written by the user root. This directory also contains files that are necessary for the operation of the Linux client agent.
Logfiles can be found in the directory /var/log/. The logs for opsiclientd and opsi-notifier are located in /var/log/opsi-client-agent. The opsi-script logs are stored in /var/log/opsi-script.