opsi-setup-detector (free)
opsi-setup-detector Quickstart
After the first start of the opsi-setup-detector a configuration mask appears. The following information is required:
-
fullname: (Used for entries in the changelog.txt) -
email_address: (Used for entries in the changelog.txt) -
workbench_path: Path to the directory in which the opsi packages are going to be created.
This is ideally the path to the place where theopsi_workbenchof your opsi-Server is mounted.
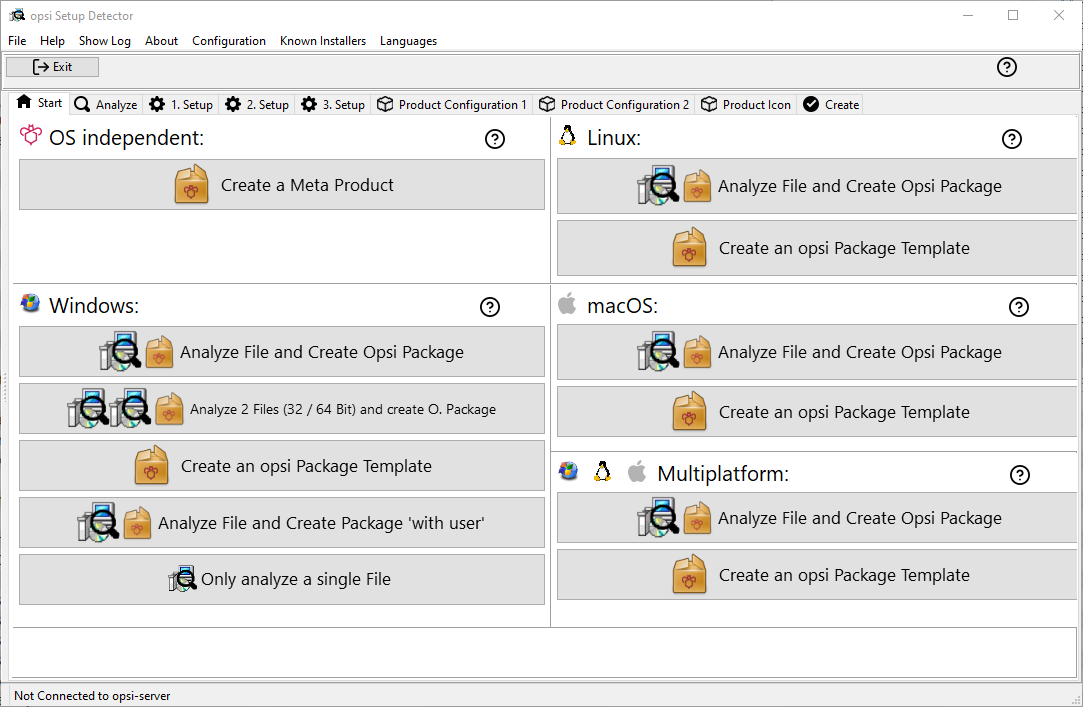
At the start page select the desire task and follow the dialogs (click Next step)
Introduction: opsi-setup-detector - What is this ?
The creation of opsi-packages from available setup programs is a recurring task when operating opsi. The opsi-setup-detector should help you to simplify this in two ways:
-
Detection of the type of the setup program and the determination of the necessary command line parameters
-
Creation of an opsi package with the necessary scripts for installation and deinstallation.
-
If necessary, include the opsi-package-builder for further processing of the provided package or to build and install the package.
Most setup programs are not written by the developers themselves, but are based on different frameworks. The opsi-setup-detector now tries to find patterns in the setup program which are specific for certain frameworks and to recognize the framework on the basis of these and thus to determine the necessary information.
This can lead to you getting a finished opsi package with just a few clicks. Often you get an opsi-package to which you have to add further information after the first installation of the program (e.g. with the created opsi-package).
Of course there can also be problems. The most common are described in the chapter opsi-setup-detector: Problems and solutions There is also described how you can help us to improve the opsi-setup-detector after solving a problem.
Installation of the opsi-setup-detector and opsi-package-builder
Preparation
To create opsi packages, you will require the following tools:
Installing opsi-setup-detector
The opsi-setup-detector is currently available for Windows, Linux, and macOS. You can install this program directly through opsi. It’s one of the standard localboot products and is typically available on the opsi server. If it’s not already installed, you can deploy the product using the following command:
opsi-package-updater install opsi-setup-detector
The localboot product opsi-setup-detector also requires the installation of the product opsipackagebuilder_wlm, because the setup detector uses the PackageBuilder (if available).
|
You should therefore also install the product opsipackagebuilder_wlm:
opsi-package-updater install opsipackagebuilder_wlmYou can then deploy the two products to the desired clients, for example, using the opsi-configed management interface.
| For Windows computers, we provide the setup detector as a stand-alone package, which can be installed independently of opsi: https://tools.43.opsi.org/stable/ |
Differences Across Windows, Linux, and macOS
While the opsi-setup-detector generally operates similarly across Windows, Linux, and macOS, there are distinct differences in how it analyzes installation files, using various auxiliary programs specific to each operating system:
-
On Windows, detailed analyses of Inno Setups are conducted using the integrated tool
innounpack.exe. Such in-depth analysis of Inno Setups is thus exclusive to the Windows environment. -
For working with the Windows Installer XML (commonly known as the WiX Toolset), the integrated tool
Dark.exeis employed under Windows. Therefore, this level of detailed analysis is also specific to Windows. -
On Linux systems,
.debor.rpmpackages are analyzed using the standard package management tools on Linux. Consequently, this type of detailed analysis is possible only on Linux systems.
Installing opsi PackageBuilder
The opsi PackageBuilder (oPB) is available for Windows, Linux, and macOS.
The product opsipackagebuilder_wlm is one of the opsi standard products. If it is not yet installed on your server, use this command to install it:
opsi-package-updater install opsipackagebuilder_wlmYou can proceed to deploy the localboot product to the clients, for instance, using the opsi-configed management interface.
Alternative approach to using the product:
You can install the opsi PackageBuilder (oPB) either as an opsi product on the opsi server and then deploy it to clients via opsi-configed. Alternatively, you can use one of the installation packages available at forum.opsi.org - opsi PackageBuilder.
| The opsi PackageBuilder (oPB) is a community-driven product, developed by Holger Pandel. Many thanks! |
You can find the source code and license details at GitHub: opsi PackageBuilder (oPB).
Installing opsi-logviewer
The opsi-logviewer is compatible with Windows, Linux, and macOS and is a component of the opsi-configed management interface.
The opsi-configed package is one of the standard opsi products and is typically pre-installed on your opsi server. If it’s not already installed, you can do so with this command:
opsi-package-updater install opsi-configed
You can find an executable version of the management interface opsi-configed for Windows, Linux, and macOS on our website at opsi Tools.
|
Requirements in order to use the opsi-setup-detector
Recommendation:
-
You should have mounted the share
opsi_workbenchof your opsi-Server on your computer. -
Ideally you should have the opsi-Package-Builder installed on your computer.
Integration of the opsi-package-builder through the opsi-setup-detector

On the tab Create Mode you will find a selection for the creation mode.
The default is create opsi product files.
If you choose one of the other modes, an installed opsi-package-builder will be called.
In case of … and build package the opsi-package-builder is called in the background to build the directory created by the opsi-setup-detector with the opsi files to a package. The checkboxes 'Build Mode' can be used to select whether the build should be 'silent', if the package should be built and if the built package should be installed.
Without any of these options, this call corresponds to the last build mode: '… and start interactive PackageBuilder'.
Usage of the opsi setup detector
Start and Condfigurartion
On Windows, you can launch the opsi-setup-detector from the Start menu, where it is located at opsi.org / opsi-setup-detector. For macOS users, the opsi-setup-detector can be accessed via Programs, while on Linux, it is typically found in the start menus at System Tools. Additionally, on most Linux desktop environments, you have the option to directly enter the full path to the executable file (/opt/opsi-setup-detector/opsisetupdetector) in a quick launcher ([Alt]+[F2]) or terminal window.
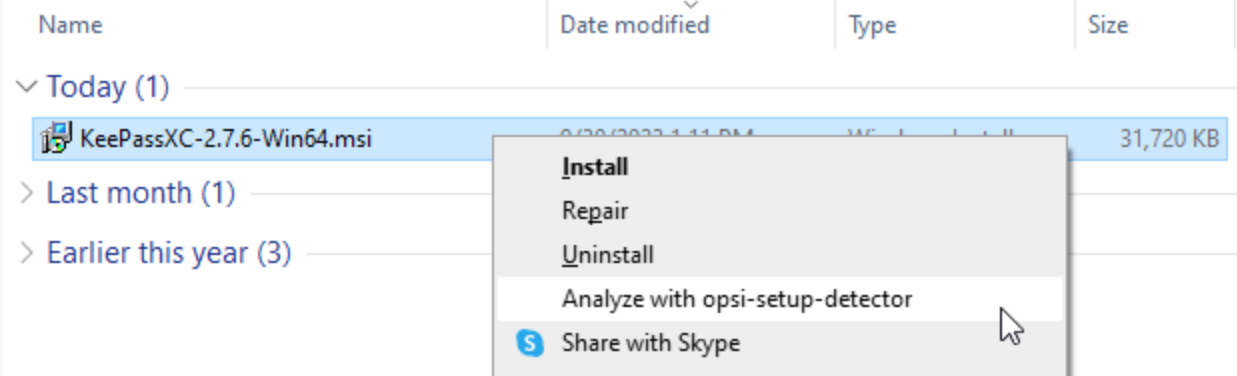
In Windows, the opsi-setup-detector can be conveniently started directly from the Explorer. By right-clicking on an installation file for an application, you will find an option in the context menu that allows you to initiate the tool for analysis.
|
Upon the initial launch of the program, a configuration dialog will appear. It’s essential to provide information for the following three entries:
-
fullName: Enter your full name as you wish it to appear in thechangelog.txtfile. -
email_address: Provide your email address, which will also be included in thechangelog.txtfile. -
workbench_Path: Specify the path to the directory where you will create the opsi packages.
Ideally, this should be the path to the share where your opsi server’s workbench is mounted (see the chapter Samba).
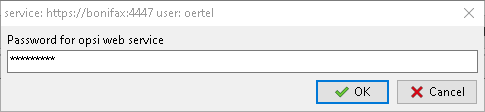
Additionally, you can configure further (optional) settings. For the opsi web service opsiconfd (https://<opsi-server>:4447, see the chapter The opsiconfd Service), you should complete the following fields:
-
Service_URL: Enter the URL of the opsi web service, formatted ashttps://<opsi-server>:4447. -
Service_user: Specify the username required for connecting to the opsi web service. -
Service_pass: Input the password associated with theService_userfor the web service connection. Skip this, and the theopsi-setup-detectorwill prompt for it when necessary.
| Possible security risk: Even if the password is stored in encrypted form, it can still be decrypted after analyzing the (open) source code. |
Other optional settings include:
-
control_in_toml_format: Check this box if you want to create acontrolfile in TOML format (refer to the section Example: control File for more details).
Attention: This option requires at least opsi 4.3! -
dependencies_for_all_actionrequests: This setting determines whether dependencies should be allowed for action requests other thansetup.
Attention: This feature requires at least opsi 4.3 and should be used with extreme caution!
| For a comprehensive explanation of all the available settings, refer to the chapter [opsi-setup-detector (free). |
Once the configuration is saved, you will see the start page.
Online Help
Click on the question mark to display the online help.

A click to this question mark icon will open the general or context sensitive online help pages.
Select the task that fits your needs. The dialog offers tasks for Windows, Linux, and macOS, as well as options that are operating system-independent. There is also a dedicated section for packages designed for multi-platform compatibility.
The offered tasks for OS independent:
-
Create a Meta Product
A Meta Product is an opsi product, that installs nothing but contains a bundle of dependencies to other products.
By switching the action request for Meta Product to setup all the dependecies will be handled. So a Meta Product can be used to describe a target state for a complete installation. Meta Products can be nested: A Meta Product may have a dependency to an other Meta Product.
The workflow is similar to the process described in the next chapter but you will not be asked for any installation file to analyze.
All information is also stored in a fileopsi-project.osdin the base directory of the product. This file may be opened and used to modify the product.
The following tasks are available for Windows:
-
Analyze File and create Opsi Package: Starting from a setup file, the entire process is executed until an opsi package is created (see the section Analyze File and Create a Package).
-
Analyze 2 Files (32 / 64 bit) and create O. Package: The procedure is similar, but here two setup programs for the two architectures (32 bit and 64 bit) are queried and analyzed. The product receives an additional property:
install_architecture(possible values:32bitonly,64bitonly,both, andsystemspecific). -
Create an opsi Package Template: Doesn’t ask for a setup file, but creates an opsi template product for Windows and takes the information from the product configuration.
-
Analyze File and Create Package 'with user': Similar to Analyze File and create Opsi Package, creates the package for an installation with a logged in user (see section opsi_template_with_userlogin). The product receives additional properties:
-
execution_method, possible values:loginOpsiSetupUser,runAsOpsiSetupUser, andrunOpsiScriptAsOpsiSetupUser. -
boolean properties:
uninstall_before_install,copy_files_locally, anddebug
-
-
Only analyze a single File: Similar to Analyze File and create Opsi Package, but the process is interrupted after the analysis, and no package is built.
The following functions are available under Linux:
-
Analyze File and Create Opsi Package: Starting with a Linux installer file, this function guides you through the entire process until an opsi package is created, similar to the process described for Windows (see the section Analyzing File & Creating the Package).
-
Create an opsi Package Template: This option does not require an installer file. Instead, it creates an opsi template product for Linux, drawing information directly from the product configuration.
The possible options for macOS:
-
Analyze file and create an opsi package
A macOS installer file is used and the entire process is gone through including the creation of an opsi package. This process is similar to that described for Windows in the next chapter. -
Create an opsi package template
This item does not ask for an installer file, but creates an opsi template product for macOS, with the information from the product configuration already filled in.
The available tasks for multiplatform:
-
Analyze a installer file and create an opsi package
A Windows, Linux and macOS installer file is used and the entire process is gone through including the creation of a multiplatform opsi package. This process is similar to that described for Windows in the next chapter. -
Create an opsi package template
This item does not ask for an installer file, but creates a multiplatform opsi template product for Windows, Linux and macOS, with the information from the product configuration already filled in.
Analyzing File & Creating the Package
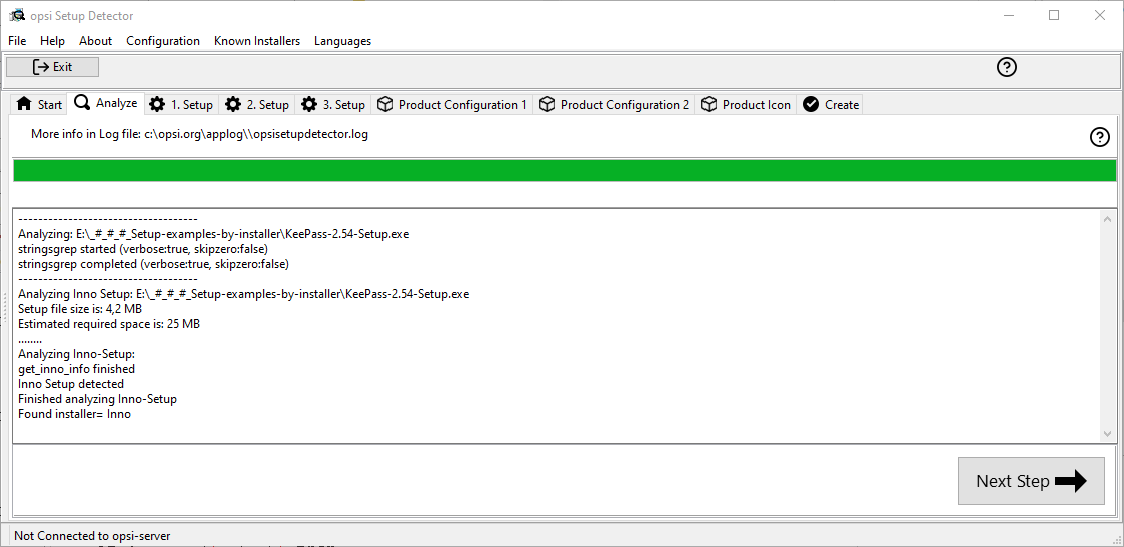
The following sections describe how to analyze a setup file and create an opsi product from it. To do this, click the Analyze File and Create Opsi Package button on the start page (Figure 8, “opsi-setup-detector Start Page”). Then navigate to the desired .exe or .msi file in the file selection dialog. The opsi-setup-detector starts the analysis immediately.
Analysis
After successfully analyzing a setup file, you will see this dialog:
If the analysis was not successful, you will see this dialog instead:
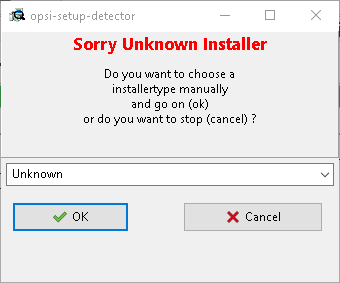
Now, you have the option to either terminate the process by clicking on Cancel or to proceed with the analysis by selecting an installer type from the drop-down menu.
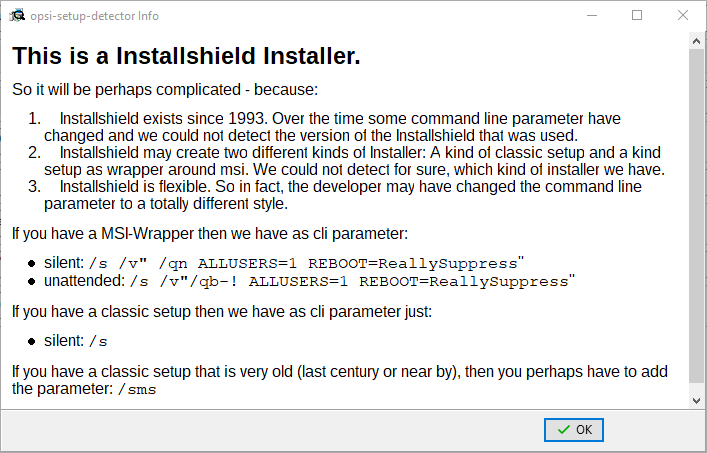
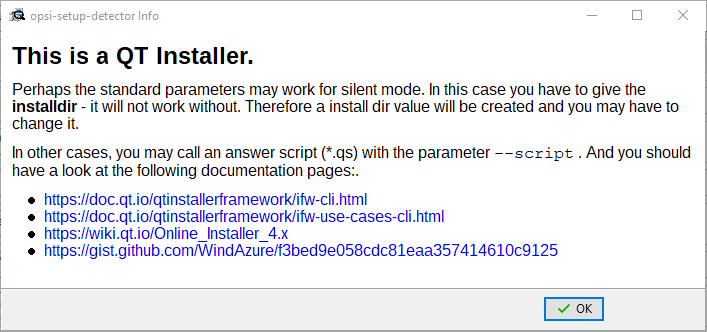
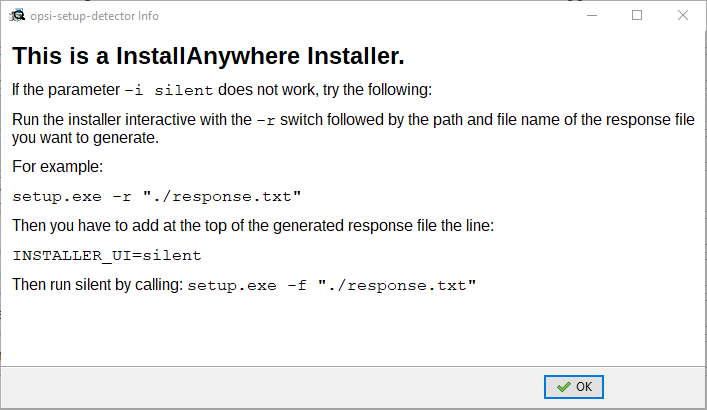
Should the analysis prove successful, a window might pop up providing additional details about the identified installer type. This informational window is typical for installer types like InstallShield, Qt Installer, or InstallAnywhere.
If the analysis has been successful, the opsi-setup-detector will display the result:
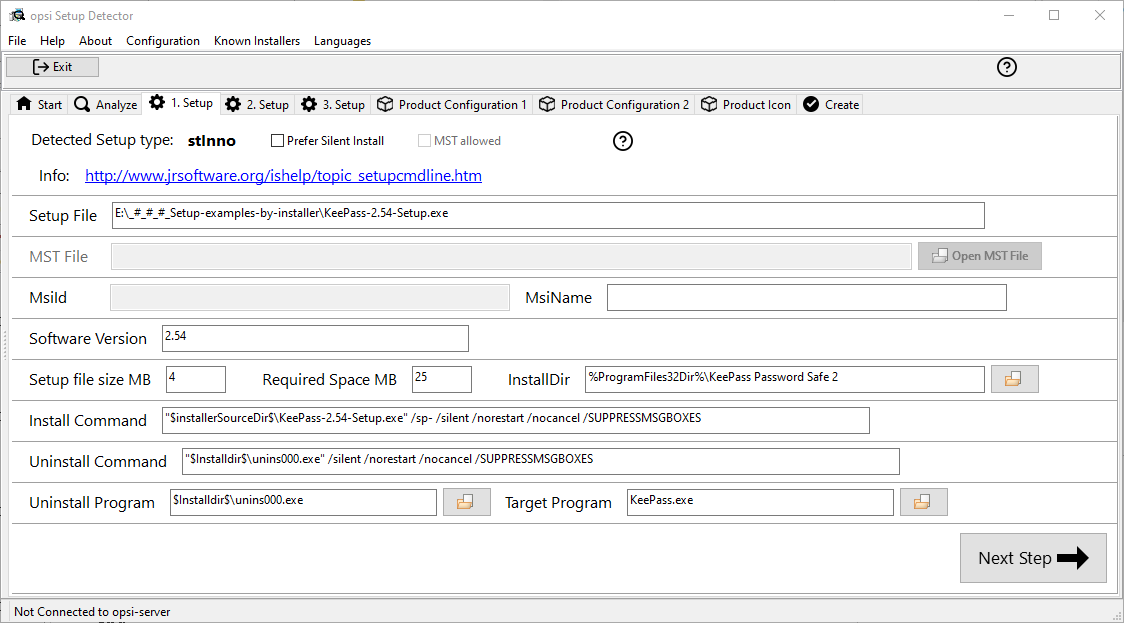
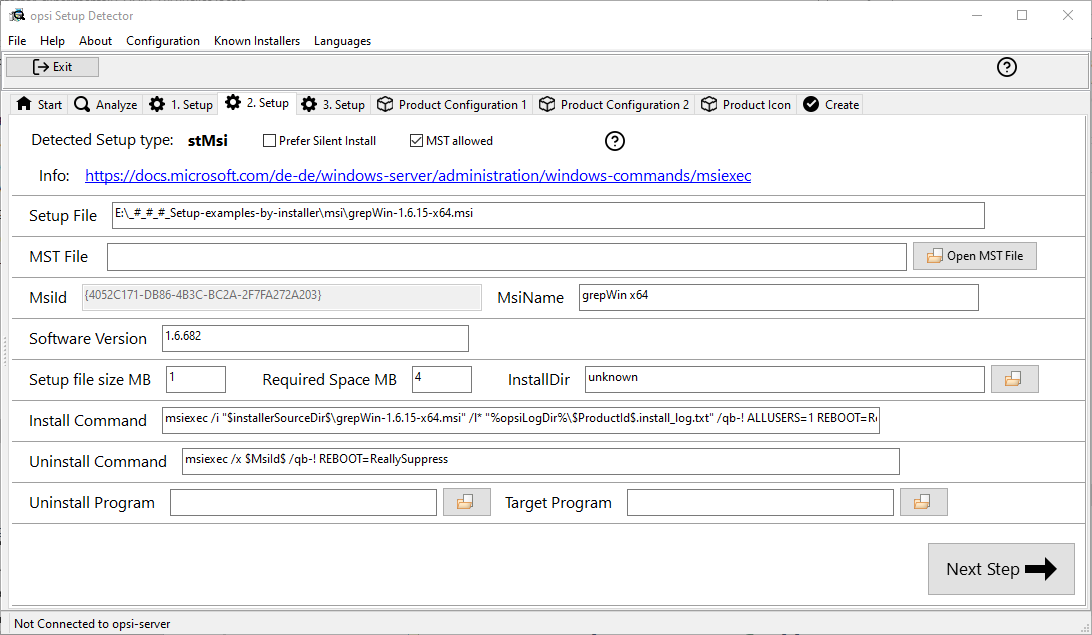
On the 1. Setup tab, you will find detailed information and various functions as follows:
-
Detected Setup type: Type of installer detected
-
Prefer Silent Install: Activate this checkbox to prefer a silent installation to an unattended installation (if possible).
-
MST allowed: Should additional
mstfiles be used to customize the settings for Microsoft Windows Installer (MSI) applications? -
Info: Link with further information about the installer
-
Setup File: Path and name of the analyzed setup file
-
MST File: To specify the MST file to be integrated into the MSI call
-
MsiId: Product code for MSI installers or installers that contain MSI
-
MsiName: Product name for MSI installers or installers that contain MSI; stored in the registry as DisplayName.
-
Software version: Version of the software to be installed (if this can be determined)
-
Setup file size MB: Size of the setup file in MB
-
Required Space MB: Estimated value (size of the setup file times 6), can be adjusted if necessary
-
InstallDir: Directory where the software will be installed, assuming it is correctly identified. If the installation directory is not accurately recognized, you can manually specify the correct directory by clicking the folder icon next to this field to open a file selection dialog. Standard paths like
C:\program FilesorC:\program Files (x86)are automatically substituted with the relevantopsi-scriptconstants, such as%ProgramFiles32Dir%. -
Install Command: This represents the command determined for a non-interactive installation. The specifics of this command vary depending on whether the Prefer Silent Install checkbox is selected.
-
Uninstall Command: The command determined for a non-interactive uninstallation. The specifics of this command vary depending on whether the Prefer Silent Install checkbox is selected.
-
Uninstall Program: Program detected for uninstallation; if not detected correctly, you can open a file selection dialog via the folder icon next to the field and navigate to the desired application. MSI files do not (usually) have an uninstall program.
-
Target Program: Main executable of the software being installed. It’s commonly used for creating desktop shortcuts or start menu entries. The main program is not automatically determined. If the software is already installed on the computer, you can select the executable file using the folder icon to open a selection dialog.
After the analysis is complete, any values that have been determined can be adjusted or supplemented as needed. Once you have made any necessary changes, click on the Next Step button to proceed to the first tab of the product configuration.
| There is a high probability that the values obtained from the analysis might be incomplete or partially incorrect. After conducting an initial installation, it is crucial to thoroughly review and verify the accuracy of values such as InstallDir, Uninstall Program, Target Program, and Software Version in your script! |
Product Configuration 1
Make the following settings on this tab:
-
opsi Product ID: This is the identifier for the new opsi package, generated from the product name specified in the opsi Product Name field. Spaces and special characters in the product name are replaced with hyphens. You can modify the suggested product ID.
-
Import control File: Click on this button to open a file selection dialog allowing you to import data from an existing
controlfile (control, control.toml) into your current project. Note that information like version numbers, script names, or required disk space is not imported. -
opsi Product Name: This field allows you to correct or adjust the name of the software that is being installed.
-
Product Version: Here, you can correct the version number that was determined from the setup file’s name. It should only include digits and periods, as it is used for the versioning of the opsi package.
-
Package Version: This version number differentiates between opsi products that contain the same software version but may have varying scripts or properties. Like the product version, it should only contain digits and periods.
-
Description: In this field, provide a brief description of the application. With opsi 4.3 and later, this text can be formatted using Markdown. An editing area is provided on the left side and a preview on the right.
-
Advice: Provide extra details about the software, such as its origin, download link, licensing information, etc. Starting with opsi 4.3, this text can be formatted using Markdown. An editing area is provided on the left side and a preview on the right.
-
Template Channel: Choose from the following templates in the drop-down menu to generate the scripts:
-
default: Serves as the standard and fallback option. If another selected template does not provide the necessary files for your project, default will be automatically employed. Key scripts of the product include:
setup.opsiscript,uninstall.opsiscript,declarations.opsiinc,sections.opsiinc, anddelinc.opsiinc. -
training: Offers a simple structure with detailed comments; key scripts for the product are
setup.opsiscript,uninstall.opsiscript, anddelinc.opsiinc. -
structured: Defaults to default; not useed in version 4.2.2 and above.
-
custom: Initially empty, this template provides space for your own template files. To use custom templates, copy them to the
opsi-setup-detector/custom/template-files/directory on the depot server, and then reinstall theopsi-setup-detectoron the relevant clients.
-
At the bottom of the window, there are several checkboxes that allow you to integrate additional code and settings for specific purposes:
-
Support custom directory: This option adds an extra directory named
customto the product, which can hold (customer-specific) customizations. When a new version of the package is installed on the server, thiscustomdirectory will not be overwritten. The included code provides templates to include files from this directory (see the section Custom Directory). -
Install from local temp dir: With this option, the installation files are initially copied to a local, temporary directory and installed from there. This approach is especially beneficial for components that might disrupt the network connection during installation, such as drivers (see the section Local, temporary Directory).
-
Handle License Key: This option generates an additional property dedicated to managing license keys (see the section License Key).
-
DesktopIcon: This creates an additional boolean property (defaulted to
false) to manage the creation of desktop icons (see the section Desktop Icon). -
Customize Profile: This option includes a
ProfileActionssection in the code, allowing for customizations in local user profiles. For an in-depth explanation, refer to the section Customize local User Profiles.
Priority and Dependencies
You can define priorities and dependencies more precisely on the Product Configuration 2 tab:
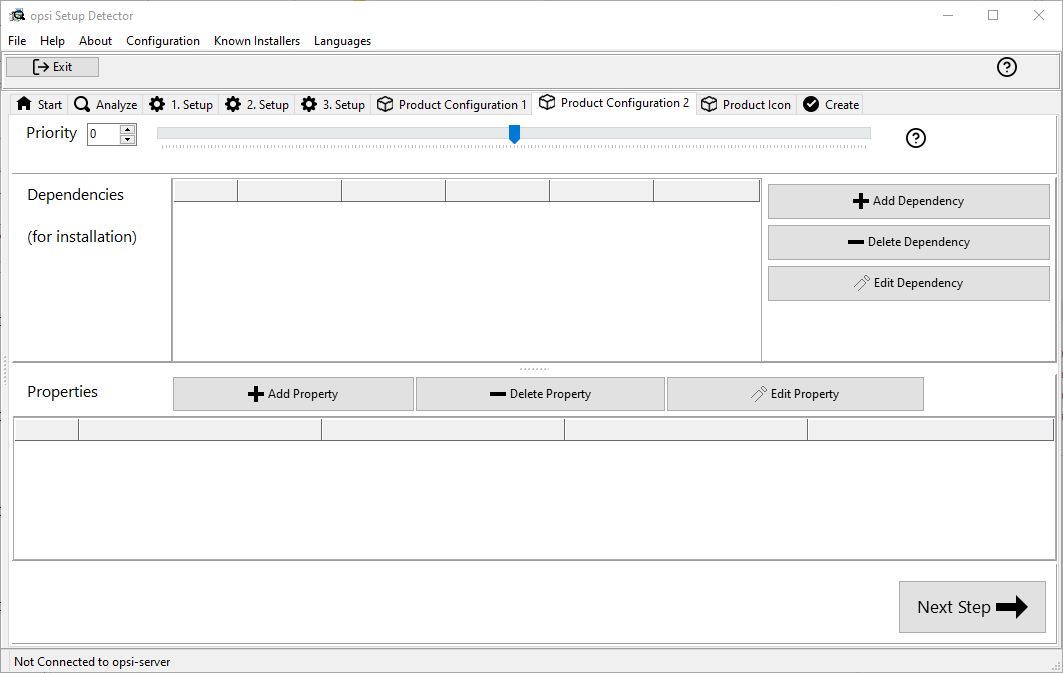
| For "standard" application software, it’s usually unnecessary to configure anything in this section, and you can proceed by clicking on Next Step. |
The following settings can be adjusted on this tab:
-
Priority: This setting affects the installation order. Possible values range from 100 (indicating early installation) to -100 (signifying late installation). For application software, a priority of 0 is generally recommended. Note that the installation order can also be influenced by dependencies between products.
-
Dependencies: This area allows you to specify dependencies among products. If your opsi server’s access credentials are saved in the configuration, the tool will attempt to connect to the server. If the password hasn’t been stored for security reasons, a password prompt will appear at this stage (see the section Defining Dependencies).
-
Properties: Here you can define variable properties of the producti (see the section Defining Propertys).
Defining Dependencies
Click the button Add Dependency to open the Depency Editor:
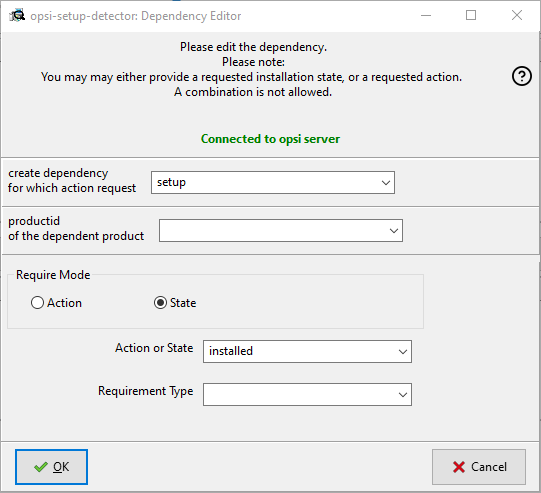
Here you can make the following settings:
-
create dependency for which action request: The default selection here is setup. Starting with opsi 4.3, other action requests are also supported, including
uninstall,update,always,custom, andonce. Exercise caution with this setting to avoid creating unsolvable or contradictory conditions!
This drop-down menu is only active if the dependencies_for_all_actionrequests option has been enabled in the opsi-setup-detector configuration (refer to section Start and Condfigurartion for more details).
|
-
productid of the dependent product: Through the drop-down menu, you can select the product that has a dependency. If there’s an active connection to the opsi server, the dialog will indicate this in green and will list the installed products. If the connection is not established, a red message will appear, and you’ll need to manually enter the product ID.
-
Require Mode: This setting is disabled when creating a meta product to prevent illogical configurations. There are two selectable options in this area:
-
Action: This option requests an ActionRequest (like setup) to be set for the product with which there is a dependency.
-
State: This refers to the product’s state that has a dependency (such as installed). If the status is different, the product is set to setup.
-
| The actual order of installation is determined by a combination of the dependencies and the priority assigned to the products (see the section Dependencies and Order). |
Defining Propertys
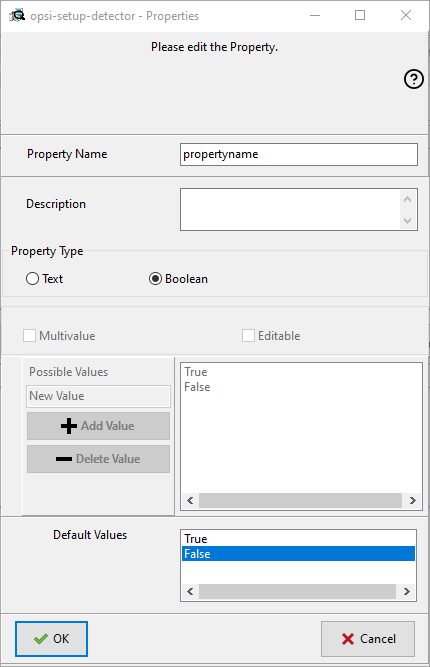
On the Product Configuration 2 tab, you can define modifiable properties (variables) for the product. To do this, simply click on the Add Property button:
| Field/Function | Description | Notes |
|---|---|---|
Property Name |
Name of the product variable |
Displayed as an identifier in the |
Property Type |
Type of the variable |
Possible values are Text and Boolean. |
Multivalue |
Number of values |
Determines whether the variable can take exactly one or multiple values; available only for Text type. |
Editable |
Values can be overwritten |
Specifies whether the default values can be overwritten with new or additional values or not; available only for Text type. |
Possible Values |
Input values |
A comma-separated list of possible input values. If set to True, you can later add to this list in |
Default Values |
Default value |
For Text type: a free text field. For Multivalue type: a multiple-choice selection. |
Selecting Product Icon
On this tab, you can select an icon for the product that will be displayed during installation:
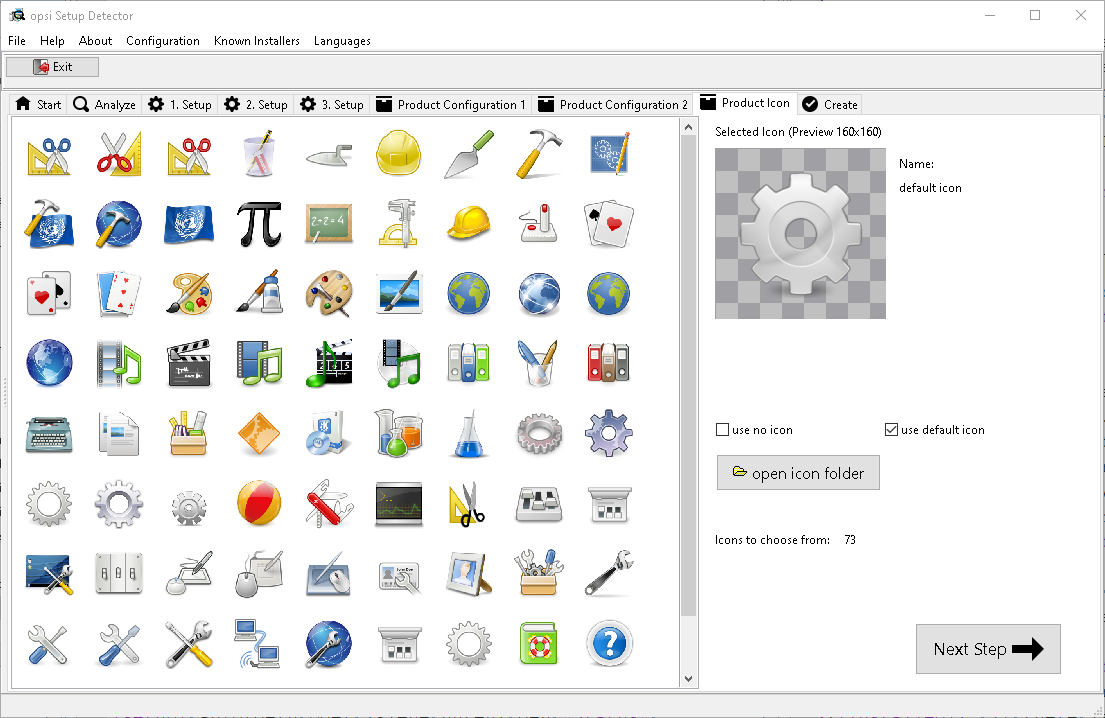
Should you decide to skip this optional step, the opsi-setup-detector will default to selecting an icon with gears and automatically proceed to the next tab.
|
To select a different icon, click on the open icon folder button located on the right side of the windowi to open a selection dialog where you can navigate to the folder containing your preferred icons. Initially, you will be directed to the 128x128 folder, which includes a variety of icons provided with the opsi-setup-detector under a free license. Once you open this folder, all available icons will be displayed on the left side of the window, allowing you to choose one for your product.
Creating the Product
After you have finished configuring the product, you can proceed to create it using the options provided on the last tab.
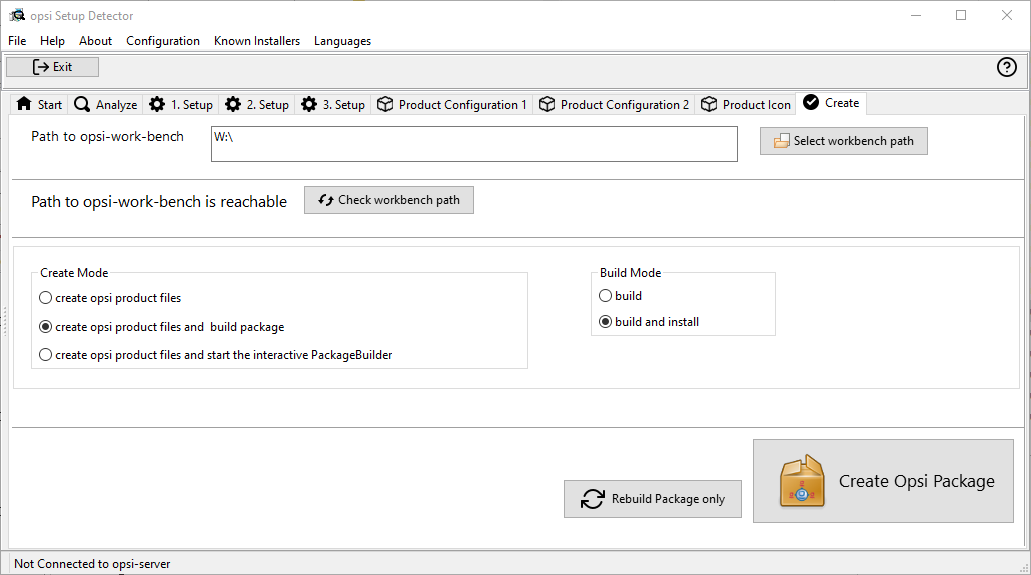
The following options are available on this tab:
-
Path to opsi-work-bench: Displays the directory you configured during setup for the workbench share on your opsi server. This can be either a drive letter or a UNC path.
-
Check workbench path button: Use this to verify whether the workbench share is accessible.
-
Create mode: Choose how the package should be created:
-
create opsi product files: This option will create (if not already existing) the directory structure for the new opsi product on the workbench. It also generates or copies the necessary files for the package.
-
create opsi product files and build package: In addition to creating the directory structure, this option attempts to build the package on the opsi server. If the build and install checkbox is selected in the Build Mode area on the right, the product will be installed on the server after being built. If the connection to the opsi web service is configured, the service is contacted, and if necessary, it will prompt for the password.
-
The building and installation process via the web service only works if the opsiconfd is of version 4.2.0.287 or newer. If the service is either unavailable or outdated, the opsi PackageBuilder (non-GUI version) will step in to create the package.
|
-
create opsi product files and start the interactive PackageBuilder creates the directory tree for the new opsi product (if it doesn’t exist on the workbench) and starts the opsi PackageBuilder in an interactive mode. You need to exit this application explicitly to return to the
opsi-setup-detector.-
Build Mode: There are two options here, which define the actions performed when you select Create Opsi Package:
-
-
build: This option solely creates the opsi package, similar to the
opsi-makepackagecommand. -
build and install: This option not only creates the opsi package (
opsi-makepackage) but also installs it, equivalent to the commandopsi-package-manager --install <package>.-
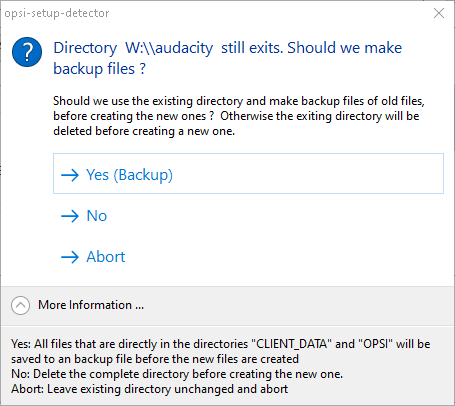
Create Opsi Package: Click on this button to start the build process. If there is an opsi product with the same name, you will see the following dialog:
-
-
Rebuild Package only: This button initiates the building of the opsi package without re-generating the opsi files first. Hence, it’s a convenient option for rebuilding a package after making modifications to the script in an external editor.
During the creation of the opsi product, the opsi-setup-detector records all the information you’ve entered into a file named opsi-project.osd, located in the root directory of the product.
At a later stage, you can reopen an opsi-project.osd file with the opsi-setup-detector if you need to make adjustments to an already existing package.
|
Opening an existing Project
To open an existing project structure as a project with the opsi-setup-detector, there are two approaches:
-
For products created with the
opsi-setup-detector: Navigate to the File menu, then select Open, and select theopsi-project.osdfile located in the root directory of the project. -
For products not created with the
opsi-setup-detector: Open thecontrolfile (eithercontrolorcontrol.toml) via the menu entry File / Open Control File. It’s located in theOPSIdirectory of the product.
The second method provides less comprehensive information, particularly regarding the setup file used by the installer.
Opsi-setup-detector: Analyze two setup files (32 and 64 bit) and create one opsi package
This item corresponds to the Analyze file and create an opsi package described above with the following addition:
Two setup programs for the 32 and 64 bit architectures are queried and analyzed. The product gets an additional property: install_architecture with the possible values: 32bitonly, 64bitonly, both, systemspecific.
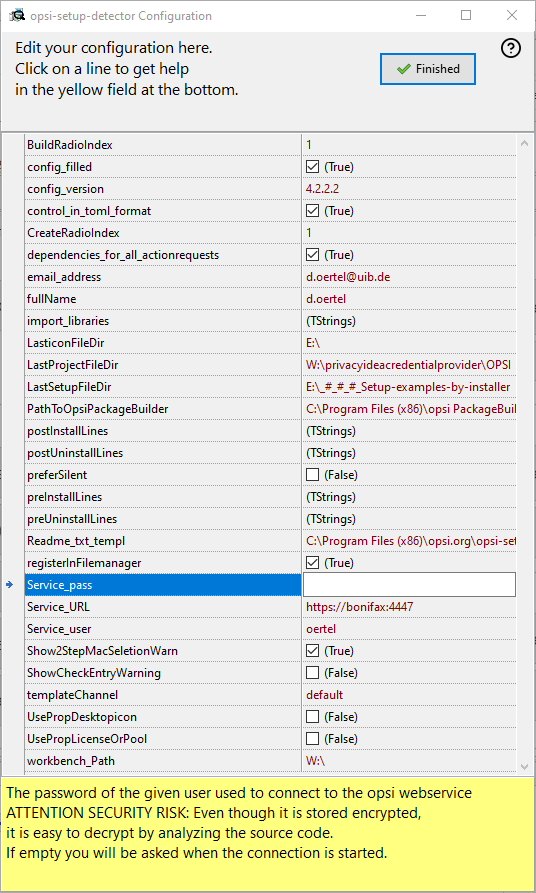
Opsi-setup-detector: Configuration
-
Name:
(Used for entries in the changelog.txt) -
Email:
(Used for entries in the changelog.txt) -
Path to the opsi-workbench:
Path to the directory in which the opsi packages should be created. This is ideally the path to the place where the opsi_workbench of your opsi-Server is mounted. -
Path to the OpsiPackageBuilder:
Path to the OpsiPackageBuilder. OpsiPackageBuilder is used to build the opsi packages via ssh.
see also: https://forum.opsi.org/viewtopic.php?f=22&t=7573
-
Service_URL:
The URL of the opsi webservice (like: https://<opsi-server>:4447) -
Service_user:
The username used to connect to the opsi webservice -
Service_pass:
The password of the given user used to connect to the opsi webservice
ATTENTION SECURITY RISK: Even it is stored encrypted, it is easy to decrypt be analyzing the source code. If empty you will be asked if the connection is started.
-
BuildRadioIndex :
Selects theBuild ModeRadiobutton. -
CreateRadioIndex :
Selects theCreate ModeRadiobutton. -
control_in_toml_format :
Create control file in (opsi 4.3) toml format ?.
If true, you need opsi 4.3 (or up)
and the toml file is the main control file that should be maintained. -
dependencies_for_all_actionrequests :
Allow dependencies for all action request ?.
If true, you need opsi 4.3 (or up)
Be careful when creating dependencies for other action requests than "setup". -
preferSilent :
Default value forPrefer Silent Install:
Should really silent installs (with no output) be preferred ? Default is false = unattended is preferred. -
Readme_txt_templ :
Path to the text file that is used as Read-me template. -
registerinfilemanager :
Should this program be registered to the Filemanager (Explorer) context menu ? -
templateChannel :
Default value for the 'Template Channel' to use. -
UsePropDesktopicon :
Default value for:
Should we create a "DesktopIcon" property and add code to handle desktop icons ? -
UsePropLicenseOrPool :
Default value for:
Should we create a "LicenseOrPool" property and add code to handle license keys ? -
workbench_mounted :
Automatically detected. Is the opsi workbench reachable at workbench_Path.
-
import_libraries :
List of opsi-script libraries that have to be imported.
One per line. May be empty. Example:
myinstallhelperlib.opsiscript
Configurations where you can enter opsi-script code for certain jobs :
opsi-script code lines which will be inserted.
List of opsi-script code lines that should be included.
One per line. May be empty. Example:
comment "Installation finished…"
-
preinstall lines:
opsi-script code lines that should be included before the installation starts. -
postinstall lines:
Lines that should be included after the installation finished. -
preuninstall lines:
opsi-script code lines that should be included before the uninstallation starts. -
postuninstall lines:
opsi-script code lines that should be included after the uninstallation finished.
-
config_filled :
Automatically detected. Do we have all needed configurations ? -
config_version :
Do not change. Version of the config structure. -
LasticonFileDir :
Last directory used to open a icon file. -
LastProjectFileDir :
Last directory used to open a project file. -
LastSetupFileDir :
Last directory used to open a installer or setup file. -
Show2StepMacSeletionWarn :
Do not change here - Internally set by a dialog. -
ShowCheckEntryWarning :
Do not change here - Internally set by a dialog.
opsi-setup-detector: Problems and solutions
The opsi-setup-detector is designed in such a way that it is as easy as possible to be continuously maintained and expanded.
Certain customization options and help with problems are presented in the following.
If you have ideas and / or wishes beyond that, please contact us at (info@uib.de) - we are looking forward to your suggestions.
Logging
The opsi-setup-detector creates logfiles under
c:\opsi.org\applog\opsisetupdetector.log.
Older logfiles are located in the same directory as opsisetupdetector_0.log to opsisetupdetector_8.log.
The logfile becomes very large because it contains the complete data of the analysis of the setup file(s). For the analysis of the logfile we recommend the opsi-log-viewer or another editor which can hide the unneeded log levels, because the text patterns found in the setup (on log level 8) in many cases are not so relevant.
Language support
When the program is started, the language of the Windows system is automatically determined. If a suitable language file is found for the language, it is used. If no supported language is found, English is used.
You can select the language via the menu item Languages or via the command line parameter --lang=xx where xx stands for the selected language.
Currently the 'opsi setup detector' supports :
-
German
-
English
-
French
-
Spanish (incomplete)
Additional languages can be easily added to be translated via a language file.
Translations are done via the portal:
https://www.transifex.com/opsi-org/
We look forward to your support
Unknown Installer
Surely you will come across the message Unknown Installer while working with the opsi-setup-detector. Then the opsi-setup-detector did not recognize the installer framework with which this installer was made.
Suggestions:
-
Check if the file is really an installer. (Sounds stupid, but it happened to me already)
-
Search the Internet for the keywords 'silent' and product name
-
Maybe the links on this page will help you:
https://forum.opsi.org/wiki/doku.php?id=userspace:software_integration_web_links
Once you have solved the problem, let us, (and the opsi community) know about experience.
The new (internal) design of the opsi-setup-detector makes it possible to easily add new installers. What we need is :
-
Example setup program
-
Manufacturer or typical command line Switch for installation and uninstallation
-
Informative links to the problem
False detection
Especially in the context of the increasing number of supported (i.e. detected) installers, false detection can occur.
This happens especially when an installer contains several software components which are packed with different installers.
Should you discover such a problem, please inform us and have the appropriate example and the correct solution ready.
Program error
If the opsi-setup-detector behaves strangely or does something unexpected, please backup the corresponding logfile from c:\opsi.org\applog\ (see also: Logging) and inform us about the problem at info@uib.de. Also have the sample file ready, as we may need it to reproduce the problem.