Management Interface opsi-configed
The opsi-configed program is a graphical user interface that communicates with the opsi server via HTTPS. As such, it can be operated on any computer capable of connecting to the server through this protocol.
This chapter provides detailed guidance on the installation and initial setup of opsi-configed, including its startup parameters and the login process. It also covers the diverse functionalities of the program, such as client administration, depot management, and server configuration. Additionally, the chapter introduces the integrated server console and discusses the validation status of the various opsi modules.
Installation
The latest version of the program is available at https://opsipackages.43.opsi.org/, provided as an opsi package for local installation on Windows, Linux, and macOS. This option is convenient if the client agent is already installed on your computer, allowing you to install the localboot product opsi-configed.
Alternatively, a portable application for all three operating systems can be found at https://tools.43.opsi.org/stable/. These versions run without installation. Download opsi-configed-windows.exe for Windows, opsi-configed-linux.run for Linux, or opsi-configed-macos for macOS, depending on your operating system.
You can also download the version tailored to your operating system via a web browser. Enter the address https://<opsidepotserver>:4447/, switch to the Links tab, and click on the download link.
|
Prerequisites
The management interface opsi-configed requires opsiconfd 4.1 or newer (see the section opsiconfd Service).) For those opting to use the portable Java application instead of the opsi package, it’s important to have a current Java runtime environment installed.
If your’re using a virtual machine, make sure the virtual screen’s resolution is adequate. opsi-configed demands a minimum screen resolution of 1024 x 768 pixels. For enhanced graphics, screen resolution, or improved mouse and keyboard integration, consider installing VMware Tools or the VirtualBox guest extensions.
|
Start
If you’ve installed opsi-configed as a localboot product, launch the management interface using the shortcut in your start menu. For macOS users, the tool is accessible in the Applications folder via the Finder.
However, if you are using the portable Java application, first make the downloaded file executable under Linux and macOS. To do this, open a terminal window and enter the following command:
chmod +x opsi-configed-linux.run
chmod +x opsi-configed-macos
On Windows, start the portable application by double-clicking opsi-configed-windows.exe. Under Linux and macOS, start the program from the terminal using this command:
./opsi-configed-linux.run
./opsi-configed-macos
Start Parameters
Various parameters are available to modify how opsi-configed behaves when launched from a terminal. These parameters enable you to preselect specific clients or client groups, input your username and password for login, and specify an SSH key along with its passphrase. To view all the available parameters, simply use --help when starting the application:
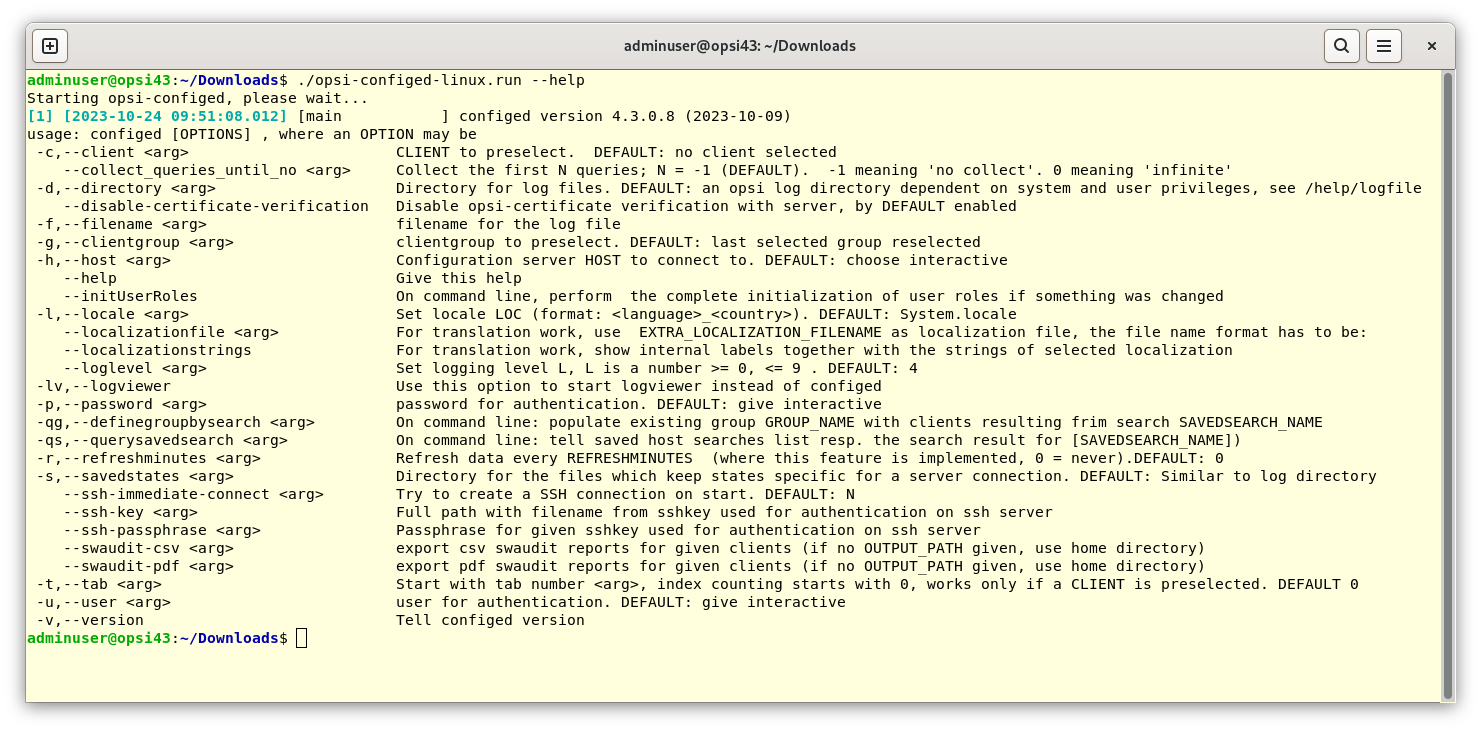
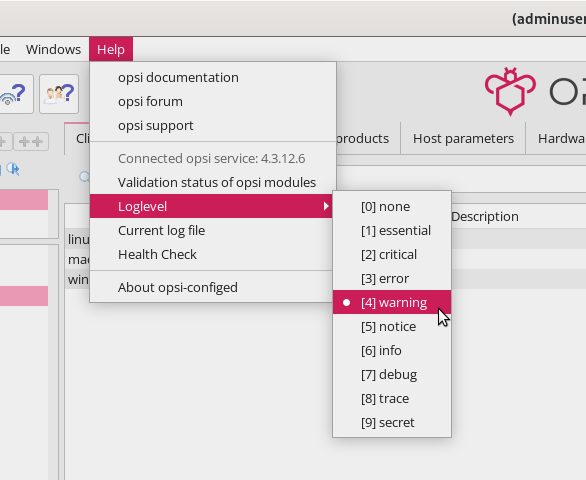
Setting the Loglevel
By default, opsi-configed logs at level 4 (warning). You can also set the log level lower or higher, for example to log level 6 (info) or level 7 (debug). In total, opsi distinguishes between 10 different log levels:
-
0 - none: Logging is completely deactivated
-
1 - essential: Very important messages
-
2 - critical: Critical errors
-
3 - error: Errors
-
4 - warning: Warnings
-
5 - notice: Important information
-
6 - info: Further information 7 - debug: Messages for troubleshooting 8 - trace: Lots of details, e.g. recorded communication 9 - secret: Confidential information
To set the loglevel when starting the application, use the parameter --loglevel <number>; you can choose a number between 0 and 9.
| Use caution with enabling level 7 and higher, as these loglevels should be reserved for situations where the program is experiencing startup issues. Activating these levels can lead to extensive and detailed logfiles. |
If opsi-configed is already running, you can set the log level via the Help menu.
Directory for Logfiles
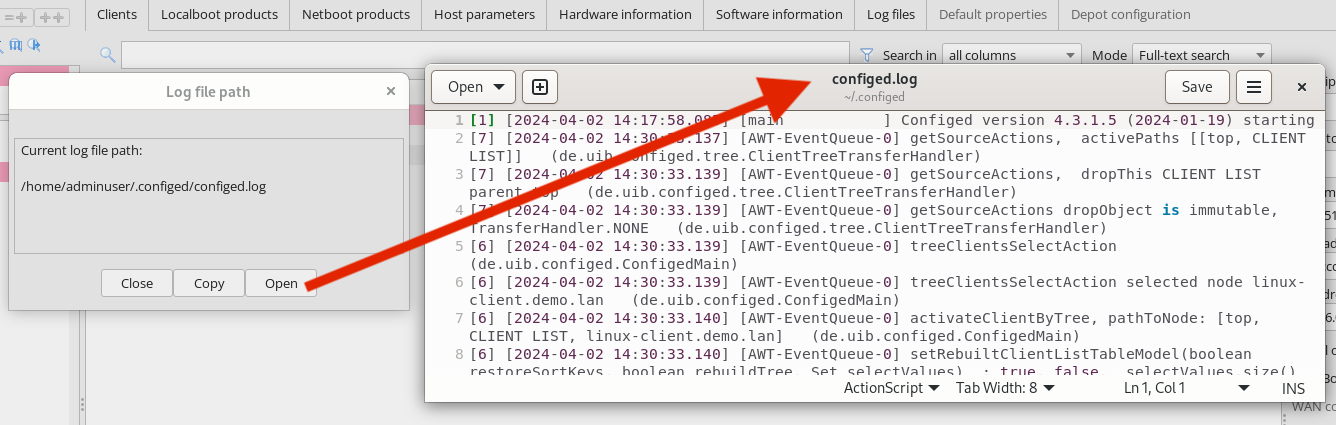
For Linux and macOS, logfiles are by default located in the hidden .configed folder in your home directory. On Windows, you’ll find the logs at C:\Users\<username>\AppData\Roaming\opsi.org\log. The latest logfile is named configed.log, while older logs are marked with an underscore and a sequential number, like configed_0.log, configed_1.log, and so on.
When starting opsi-configed you can use the parameter -d (long form: --directory) to specify a different directory for the logfiles:
./opsi-configed-linux.run -d ~/.logs/opsi/| You can find out which logfile is currently being used by clicking on Current log file in the Help menu. In the dialog box that opens, you can copy the path to the clipboard or open it in the standard text editor. |
Choosing the Language
opsi-configed uses your operating system’s language settings. If there’s no localization available for that language, the interface will default to English. Additionally, if a translation is missing for a specific term within the language file, that term will also appear in English.
To select a different language for the interface when launching the program, use the -l parameter (or its extended form --locale):
./opsi-configed-linux.run -l en_USInstead of specifying the full format <language>_<region> (such as en_US, de_DE), you can simply use the language code (en or de). This will apply the available localization files for all language variants.
To change the language in an active opsi-configed session, navigate to File / Select language. The program will reinitialize, rebuilding (almost) all components in the new language.
With the --localizationfile parameter, you can set a custom localization file. Additionally, using --localizationstrings ensures that opsi-configed shows all terms from the localization file that need translation.
| The last two parameters are especially useful for testing your own localization files. |
Login
Once launched, the login window of opsi-configed appears. Here, you’ll need to input the full host name (FQDN) of your opsi server or its IP address, along with your username and password.
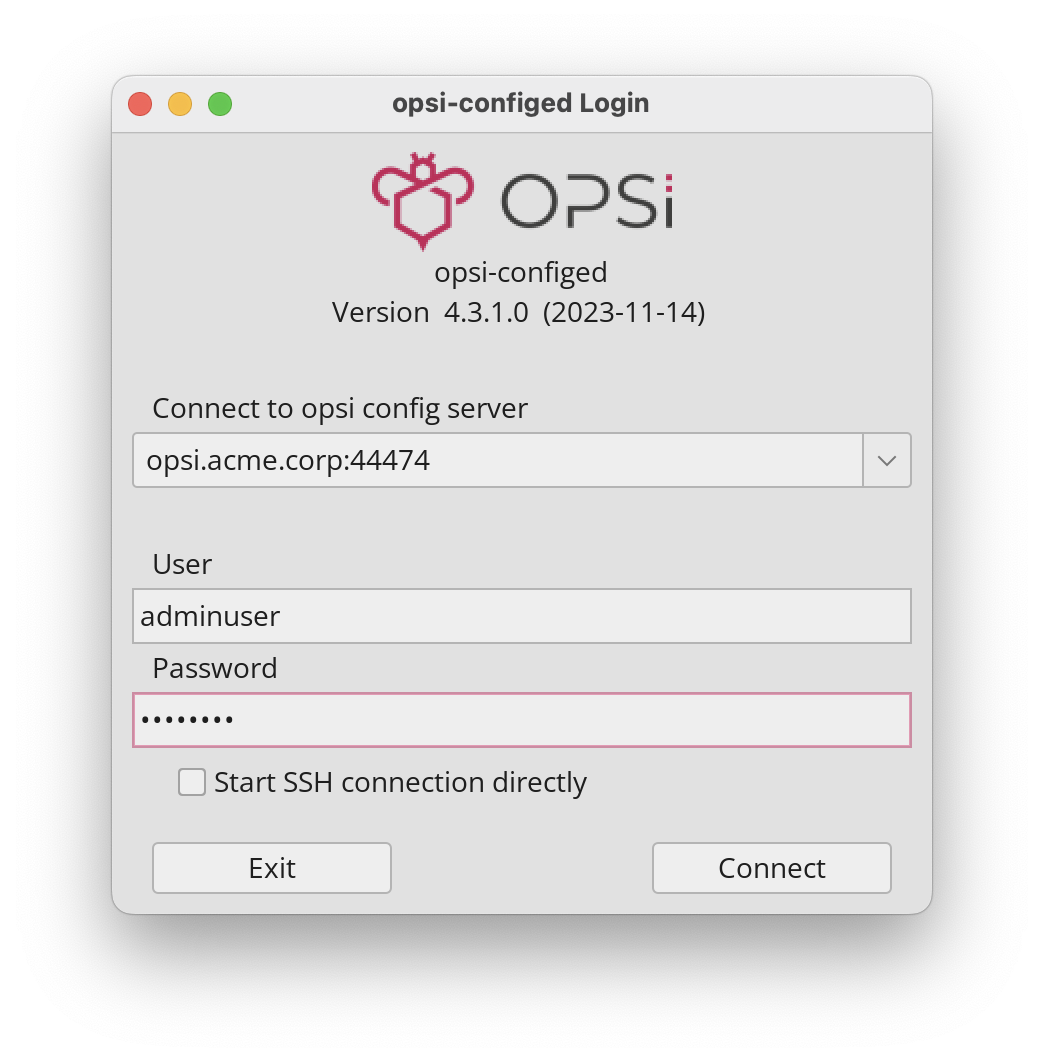
The user must be a member of the opsiadmin group (see the chapter Authorizations).
|
While logging in, opsi-configed tries to connect to the opsiconfd on the specified server and port via HTTPS. If opsiconfd is using the default port, 4447, there’s no need to mention it specifically.
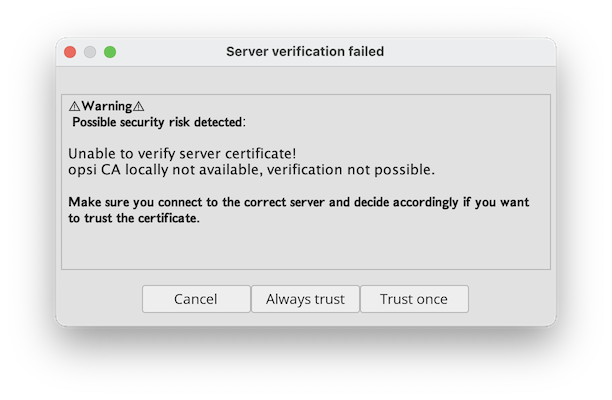
opsi-configed checks the opsi CA certificate before connecting to a server for the first time. A dialog will appear, prompting you to confirm your trust in the server’s certificate. You’re presented with three choices:
-
Cancel: Aborts the connection process and exits
opsi-configed. -
Always trust: The certificate is saved on the local computer and will also be used for future connections. You will only see the warning again if the server certificate has changed or if someone tries to access the login data with a fake certificate.
-
Trust once: Accepts the certificate for the duration of the current session. You will see the warning again the next time you start the program.
The program stores certain session information in the local user profile to restore the working environment upon a new login. This primarily includes selected client groups. From version 4.0.7, opsi-configed also uses session information to create a list of recently connected opsi servers, such as production and test servers, with the most recently used server appearing at the top of the list.