Integrating custom Software
Software installation in opsi is performed by the Client Agent or rather the setup program opsi-script. When packaging your software, you have to create an opsi-script script for each product. This script, alongside the necessary installation files and metadata, forms an opsi product which is deployed on the opsi server (see the chapter Adding Products (opsi Server)).
Tutorial: Creating an opsi-script Script
This tutorial serves as an introductory guide and should not be considered a complete substitute for formal training or a thorough study of the manuals. For more in-depth learning and resources, we recommend the following:
-
Training:
uib GmbH offers comprehensive opsi training courses in Mainz, on-site at your location, or online:
https://www.uib.de/en/training/opsi-training -
Manuals:
-
We provide a range of manuals in both German and English for different versions of opsi:
https://docs.opsi.org/ -
For this tutorial, the opsi-script chapter is particularly useful.
-
-
Blog:
Read the latest news about opsi, announcements, release notes, tips and tricks in our blog:
https://opsi.org/en/blog/ -
Wiki:
You can find our opsi Wiki here: https://wiki.opsi.org/ -
Support Forum:
The opsi forum (community support, announcements and news) can be found here: https://forum.opsi.org
Non-interactive software installation (Linux)
Linux systems offer more consistency in package formats and installation methods than Windows, but the variety of Linux distributions introduces its own complexities. Each distribution tends to use distinct package formats and installation commands. Here’s a quick overview of the main types you’re likely to encounter:
-
Installing a package from a repository
-
Installing a package from a file (
.rpm,.deb) -
Installation with a third-party installer
-
Installation from the source code (
.tgzor.ziparchive) with the three stepsconfigure,make,make install.
All the variants we’ve talked about so far can be directly installed by opsi-script, except for .tgz archives, which need to be unpacked beforehand.
|
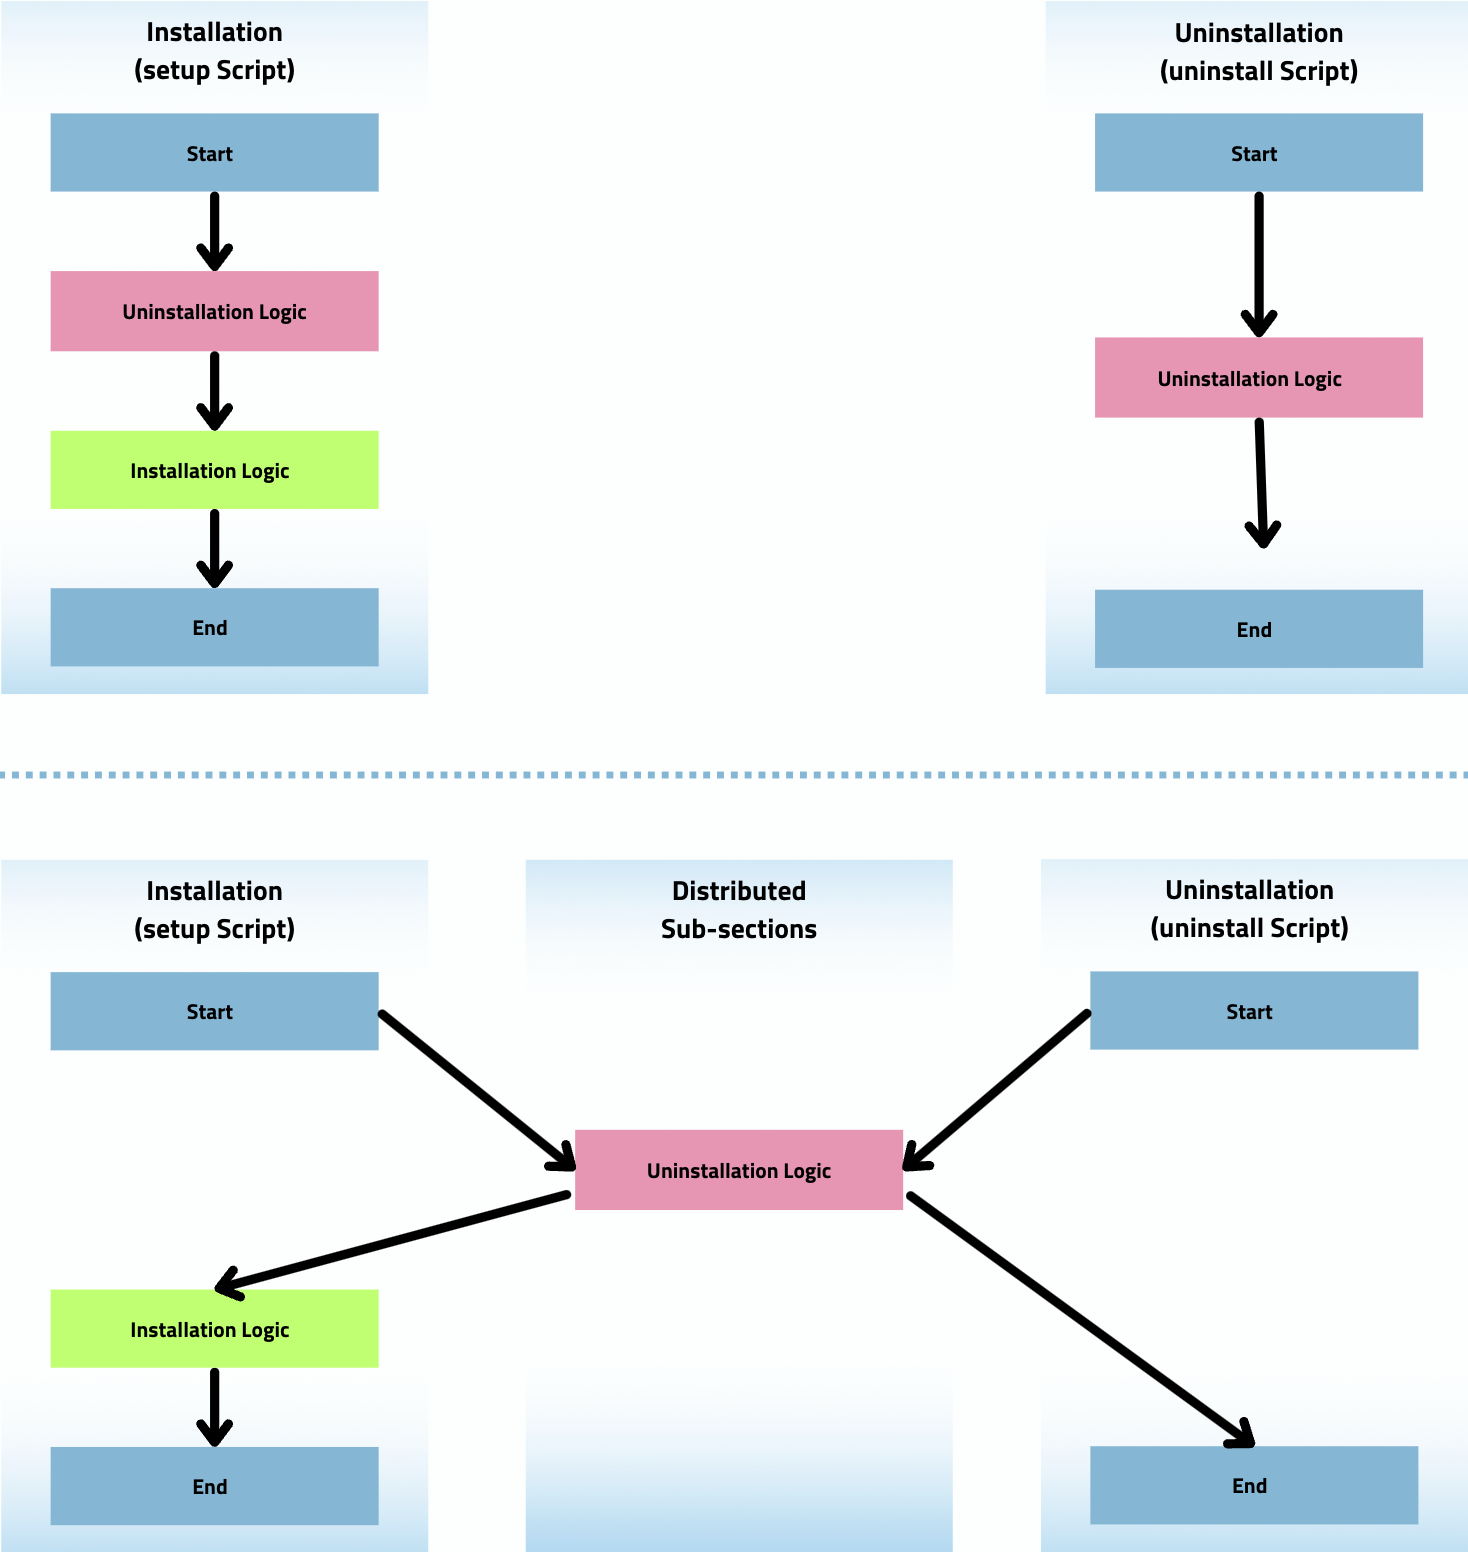
Structure of an opsi-script Script
The following sections will detail the key components of an opsi-script script tailored for Windows computers. As an illustration, here is an example of a basic opsi-script script:
[Actions]
WinBatch_tightvnc_silent_install

[WinBatch_tightvnc_silent_install]
"%ScriptPath%\tightvnc-1.3.9-setup.exe" /silent
An opsi-script script is structured into two main types of sections: primary and secondary sections. Similar to INI files, each section is introduced by its name enclosed in square brackets.
The core activities of software installation are carried out in the secondary sections, which are invoked by the primary sections. Each secondary section is designated for specific topics and follows a unique syntax: the section name starts with the type, followed by a user-defined name.
In the provided example, the primary section [Actions] triggers the secondary section [WinBatch_tightvnc_silent_install]; this section belongs to the WinBatch type. The contents of a WinBatch section are executed using the Windows API. Here, the msiexec tool is employed to install (/i) the 64 bit version of TightVNC silently (using the /quiet option). The /norestart option is included to prevent the computer from rebooting after the installation, which is a specific requirement for TightVNC.
Primary Sections
-
Actions: The
[Actions]section is essentially the main program, marking the commencement of script processing. -
Sub-Sections: Sections of the program required to be executed multiple times can be organized into sub-sections. These sub-sections can also be externalized into separate files for ease of use and reference.
The primary sections, which function as the main programs, dictate the script’s flow. In these sections, you can use variables, conditional statements, functions, and other programming constructs. For more detailed information on these elements, please refer to the section Important Commands for Primary Sections.
Secondary Sections
-
Files: For file operations, such as
-
Copying (with version control, recursive, etc.)
-
Deleting
-
Creating directories
-
etc.
-
-
WinBatch: For executing through the Windows API. Typically, setup programs are run in a non-interactive mode within these sections.
-
ShellScript: This section’s content is executed by the operating system’s standard shell. For Windows, this shell is
cmd.exe, whereas for Linux and macOS, it’s typicallybash. So, this is the place to put regular batch scripts. -
ExecWith: The content of this section is passed on to an external program (like an interpreter) for execution. For instance,
ExecWithis used to integrate AutoIt scripts into theopsi-scriptscript. -
Registry: These sections contain specific instructions for modifying the Windows registry.
-
LinkFolder: These sections are used to create or delete shortcuts, such as those on the desktop or in the start menu.
Global constants
opsi-script also supports the use of global constants. These constants act as placeholders and you can use them in primary and secondary sections. By employing global constants, you can ensure that paths are correctly set across various environments, such as systems with different languages or operating system versions.
Below are some examples of global constants:
-
%ProgramFiles64Dir%:
c:\program filesat 64 Bit -
%ProgramFiles32Dir%:
c:\program files (x86)at 64 Bit -
%SystemRoot%:
c:\windows -
%System%:
c:\windows\system32 -
%opsiTmpDir%:
c:\opsi.org\tmp -
%ScriptPath%: <path to running script>
Example: installing TightVNC
In order to illustrate this concept, let’s consider another example script. For installing the program, a silent execution of setup.exe in the secondary section WinBatch_tightvnc_silent_install would typically suffice. However, if the installation is repeated, an interactive dialog will appear (because of a running service). In such cases, AutoIt can be used to automatically close the dialog box:
[Actions]
Message "Installing tightvnc 1.3.9 ..."
ExecWith_autoit_confirm "%ScriptPath%\autoit3.exe" WINST /letThemGo
WinBatch_tightvnc_silent_install
KillTask "autoit3.exe"

[WinBatch_tightvnc_silent_install]
"%ScriptPath%\tightvnc-1.3.9-setup.exe" /silent

[ExecWith_autoit_confirm]
; Wait for the confirm dialog which only appears if tightvnc was installed before as service
; Waiting for the window to appear
WinWait("Confirm")
; Activate (move focus to) window
WinActivate("Confirm")
; Choose answer no
Send("N")
More details on using AutoIt with opsi you will find here:
Automated Answers for the setup program.
Important Commands for Primary Sections
The next sections provide a concise overview of the fundamental commands used in primary sections of opsi-script scripts. This includes the use of variables, statements, conditional statements, functions, and more. For a comprehensive reference and detailed explanations, please refer to the opsi-script chapter.
String Variables
- Variable Declaration
-
DefVar <variable name> [= <initial value>] - Variable Assignment
-
Set <variable name> = <value>
In the following example, a variable $ProductId$ is declared and assigned the value "firefox":
DefVar $ProductId$
Set $ProductId$ = "firefox"
Alternatively, it’s shorter to write:
DefVar $ProductId$ = "firefox"| The handling of string variables differs between primary and secondary sections. In primary sections, string variables are treated as independent objects. However, in secondary sections, they are replaced by the content of the variable before the section is executed. This distinction is crucial, especially when copying and pasting string expressions within the script. |
Consequently, string variables can only be declared and assigned values in primary sections. When combining variables and strings into a string expression, the operator "+" is required:
"Installing "+ $ProductId$ +" ..."In secondary sections, string variables are replaced by the content of the variable before the section is executed:
"Installing $ProductId$ ..."This has the advantage that you can easily work with opsi-script variables in sections that are executed outside the script (ExecWith, ShellScript).
Statements: Message and ShowBitmap
To display text during installation, use the command Message <string>. Here, substitute <string> with the specific text message you wish to show:
Message "Installing "+ $ProductId$ +" ..."Instead of text messages, you can also display graphics using the ShowBitmap statement. The images should be in BMP, JPG, or PNG formats, ideally sized at 160 x 160 pixels. Additionally, you can include a caption with the subtitle parameter:
ShowBitmap "%ScriptPath%\python.png" "Python"Conditional Statements: if, elseif/else, and endif
You can conditionally execute code based on specific criteria:
-
if: This initiates the conditional statement. If the specified condition is true, the script executes the instructions within the subsequent block. If the condition is false, the block is bypassed. -
;statement(s): These are the instructions executed when the condition in theifstatement is true. This block can contain one or multiple statements that run only if the specified condition is met. -
elseif <condition>: This is an optional part. If the condition in theifstatement isn’t met, this condition is then evaluated. If it’s true, the script executes the instructions in the subsequent block. It allows for additional, sequential conditions to be checked if earlier conditions aren’t fulfilled. -
else: This optional section executes if all the preceding conditions are false. It acts as a fallback, containing instructions that run when none of the previous conditions are met. -
endif: This marks the end of the conditional structure, indicating the conclusion of the conditional checks.
if <condition>
	;statement(s)
[elseif <condition>
;statement(s)]
[
else
	;statement(s)
]
endif
Functions
-
HasMinimumSpace: Checks for free space on the hard disk.
-
FileExists: Checks if a file or directory exists.
Comments, Errors and Logging
-
Comment Marker: Lines starting with a semicolon (
;) are not interpreted. -
Comment: Writes a comment to the logfile.
-
LogError: Writes an error message to the logfile.
-
IsFatalError: Cancels the execution of the running script and reports the installation as failed.
Condition for Execution
-
requiredOpsiscriptVersion: This specifies the minimum version of
opsi-scriptthat is required for the script to function properly:
requiredOpsiscriptVersion >= "4.12.3.6"Other important opsi-script Functions
-
String Lists: String lists are quite powerful and particularly useful for processing output from external programs (refer to the section Processing String Lists for more details).
-
Function
ExitWindows: This function is used to restart or shut down the system and exitopsi-script.-
ExitWindows /Reboot: Triggers a system reboot upon completion of the script. -
ExitWindows /ImmediateReboot: Executes an immediate system reboot. -
ExitWindows /ImmediateLogout: Immediately terminates script processing and exitsopsi-script.
-
-
Product Properties: Certain products may require the configuration of options, which are evaluated on a client-specific basis at runtime (see section Creating opsi Products for more information).
Access to the property values is provided through the GetProductProperty function:
if GetProductProperty("example-property", "no") = "yes"
    Files_copy_extra_files
endif-
Encoding: Use UTF-8 encoding in your scripts and place the instruction at the beginning of the file:
encoding=utf8Special Commands for Linux
-
GetOS: Returns the operating system, e.g.Linux,Windows_NT(Windows NT to Windows 11) ormacOS. -
getLinuxDistroType: Returns the Linux distribution, e.g.debian,redhatorsuse. -
getLinuxVersionMap: Queries the operating system information locally and writes the information to a string list.
For further information on the Linux-specific opsi-script commands, please read the chapter opsi-script on Linux or macOS.
|
Linux Commands for Installation
The following sections present special Linux commands for installing software. They are taken from the opsi-script library uib_lin_install. This part of the documentation is automatically generated from the source code.
|
To give you a clearer picture, let’s start with a rundown of the different strategies employed by each method:
-
Distribution-independent methods:
-
cleanupPackageSystem -
installupdates
-
-
Installation of one or more packages from the online repositories of a specific distribution, ensure the package names in the list correspond to the distribution/version. To install a single package, use the following syntax instead of
$packagelist$:createStringList(<package name>)-
debinstall($packagelist$ : stringlist) : string(available from version 4.12.4 [L]) -
redinstall($packagelist$ : stringlist) : string(available from version 4.12.4 [L]) -
suseinstall($packagelist$ : stringlist) : string(available from version 4.12.4 [L]) -
ucsinstall($packagelist$ : stringlist) : string(available from version 4.12.4 [L])
-
-
Installation/uninstallation of one or more packages for a specific distribution/version; ensure the package names in the list correspond to the distribution/version. The appropriate command is automatically selected based on the distribution:
-
genericLinInstall($packagelist$ : stringlist) : string -
linuxRemoveOnePackage($packagename$ : string) : string -
linuxInstallOneFile($packagefile$ : string) : string
-
-
Installation, verification, or uninstallation of a package from online repositories, which may have different names across versions or distributions. (It is assumed that the package names in the list refer to the same software, but are specific to various distributions). The appropriate command is automatically determined based on the distribution:
-
linuxInstallOneOf($packagelist$ : stringlist) : string -
isOneInstalled($packagelist$ : stringlist) : string -
linuxRemoveOneOf($packagelist$ : stringlist) : string
-
opsi Library uib_lin_install.opsiscript
Local Function cleanupPackageSystem
- Definition
-
cleanupPackageSystem() : void - Description
-
reads repo list und try to repair well known problems should be called after modifying the repo list or after failed installs
-
Returns: nothing
-
OnError: error counter increased ; Error messages in the log
-
Author: Detlef Oertel
-
Date: 19.08.2020
-
Example:
[Actions]
importlib "uib_lin_install"

DefStringlist $packages$
DefVar $installresult$
DefStringlist $errorList$
DefVar $fatal_error$
DefVar $result_string$

comment "update and clean package system"
cleanupPackageSystem()
comment "install pending updates"
set $result_string$ = installupdates()
comment "install new needed packages"
set $packages$ = CreateStringlist("lsb-release","cifs-utils","xterm", "dnsutils","lsof","openssl","pkg-config","desktop-file-utils","libnotify-bin","libgtk2.0-0")
comment "if we are on debian / ubuntu we can use debinstall()"
set $installresult$ = debinstall($packages$)
if not(stringtobool($installresult$))
	if waitForPackageLock("300", "false")
		comment "we got the package lock."
	else
		LogError "could not get Package Lock"
	endif
	cleanupPackageSystem()
	set $installresult$ = debinstall($packages$)
	if not(stringtobool($installresult$))
		LogError "failed dependent packages"
		Message "failed dependent packages"
		;isFatalError "failed dependent packages"
		set $fatal_error$ = "true"
		setloglevel = 6
		set $errorList$ = addtolist($errorList$, " failed dependent_packages")
	endif
endif
Local Function installupdates
- Definition
-
installupdates() : string - Description
-
try to install pending updates from the known repsitories should be called after modifying the repo list or after failed installs
-
Returns: nothing
-
OnError: Returns string "false"; error counter increased ; Error messages in the log
-
Author: Detlef Oertel
-
Date: 19.08.2020
-
Example:
see: cleanupPackageSystem()Local Function runCommandWithList
- Definition
-
runCommandWithList($command$ : string, $list$ : stringlist) : string - Description
-
-
Parameter:
$command$-
Type:
String- Calltype:CallByValue
-
-
Parameter:
$list$-
Type:
Stringlist- Calltype:CallByValue
-
-
Local Function debinstall
- Definition
-
debinstall($packagelist$ : stringlist) : string - Description
-
try to install the packages given by $packagelist$
-
Parameter:
$packagelist$-
Type:
Stringlist- Calltype:CallByValue -
Parameter
$packagelist$Description:
stringlist with packages to install
-
-
Returns: Returns string "true" if all is ok
-
OnError: Returns string "false"; error counter increased ; Error messages in the log
-
References: Local Function cleanupPackageSystem,
Local Function installupdates,
Local Function redinstall,
Local Function suseinstall,
Local Function ucsinstall -
Author: Detlef Oertel
-
Date: 09.02.2022
-
Example:
see: cleanupPackageSystem()Local Function redinstall
- Definition
-
redinstall($packagelist$ : stringlist) : string - Description
-
try to install the packages given by $packagelist$
-
Parameter:
$packagelist$-
Type:
Stringlist- Calltype:CallByValue -
Parameter
$packagelist$Description:
stringlist with packages to install
-
-
Returns: Returns string "true" if all is ok
-
OnError: Returns string "false"; error counter increased ; Error messages in the log
-
References: Local Function cleanupPackageSystem,
Local Function installupdates,
Local Function debinstall,
Local Function suseinstall,
Local Function ucsinstall -
Author: Detlef Oertel
-
Date: 19.08.2020
-
Example:
see: cleanupPackageSystem()Local Function suseinstall
- Definition
-
suseinstall($packagelist$ : stringlist) : string - Description
-
try to install the packages given by $packagelist$
-
Parameter:
$packagelist$-
Type:
Stringlist- Calltype:CallByValue -
Parameter
$packagelist$Description:
stringlist with packages to install
-
-
Returns: Returns string "true" if all is ok
-
OnError: Returns string "false"; error counter increased ; Error messages in the log
-
References: Local Function cleanupPackageSystem,
Local Function installupdates,
Local Function debinstall,
Local Function redinstall,
Local Function ucsinstall -
Author: Detlef Oertel
-
Date: 19.08.2020
-
Example:
see: cleanupPackageSystem()Local Function ucsinstall
- Definition
-
ucsinstall($packagelist$ : stringlist) : string - Description
-
try to install the packages given by $packagelist$
-
Parameter:
$packagelist$-
Type:
Stringlist- Calltype:CallByValue -
Parameter
$packagelist$Description:
stringlist with packages to install
-
-
Returns: Returns string "true" if all is ok
-
OnError: Returns string "false"; error counter increased ; Error messages in the log
-
References: Local Function cleanupPackageSystem,
Local Function installupdates,+ Local Function debinstall,
Local Function redinstall,
Local Function suseinstall -
Author: Detlef Oertel
-
Date: 19.08.2020
-
Example:
see: cleanupPackageSystem()Local Function genericLinInstall
- Definition
-
genericLinInstall($packagelist$ : stringlist) : string - Description
-
try to determine the Linux familily and try to install the packages given by $packagelist$
-
Parameter:
$packagelist$-
Type:
Stringlist- Calltype:CallByValue -
Parameter
$packagelist$Description:
stringlist with packages to install
-
-
Returns: Returns string "true" if all is ok
-
OnError: Returns string "false"; error counter increased ; Error messages in the log
-
References: Local Function cleanupPackageSystem,
Local Function installupdates,
Local Function debinstall,
Local Function redinstall,
Local Function suseinstall -
Author: Detlef Oertel
-
Date: 08.03.2021
-
Example:
see: cleanupPackageSystem()Local Function linuxInstallOneOf
- Definition
-
linuxInstallOneOf($packagelist$ : stringlist) : string - Description
-
try to install any package given by $packagelist$ This can be used specifying a package with different names for different linux distributions.
-
Parameter:
$packagelist$-
Type:
Stringlist- Calltype:CallByValue -
Parameter
$packagelist$Description:
stringlist with packages to install
-
-
Returns: Returns string 'True' if one package was successfully installed
-
OnError: Returns string 'False'
-
References: Local Function isOneInstalled,
Local Function getLinuxCommand -
Author: Nils Doerrer
-
Date: 16.11.2020
-
Example:
[Actions]
importlib "uib_lin_install"
if isOneInstalled(createStringList("lsusb", "usbutils")) = "False"
	message "installing lsusb or usbutils"
	set $success$ = linuxInstallOneOf(createStringList("lsusb", "usbutils"))
endif
Local Function isOneInstalled
- Definition
-
isOneInstalled($packagelist$ : stringlist) : string - Description
-
check for installation status and return if any of $packagelist$ exists This can be used to check a package with different names for different linux distributions.
-
Parameter:
$packagelist$-
Type:
Stringlist- Calltype:CallByValue -
Parameter
$packagelist$Description:
stringlist with packages to check
-
-
Returns: Returns string 'True' if one specified package is installed
-
OnError: Returns string 'False'
-
References: Local Function linuxInstallOneOf,
Local Function getLinuxCommand -
Author: Nils Doerrer
-
Date: 16.11.2020
-
Local Function getLinuxCommand
- Definition
-
getLinuxCommand($type$ : string) : string - Description
-
Determine package manager and return command.
-
Parameter:
$type$-
Type:
String- Calltype:CallByValue -
Parameter
$type$Description:
type of desired command 'install','check', 'localpackage'
-
-
Returns: Package manager command according to type
-
OnError: Returns string 'False'
-
References: Local Function linuxInstallOneOf,
Local Function isOneInstalled -
Author: Nils Doerrer, Detlef Oertel
-
Date: 14.01.2021
-
Local Function getLinuxCommandAgnostic
- Definition
-
getLinuxCommandAgnostic($type$ : string) : string - Description
-
Determine package manager and return command.
-
Parameter:
$type$-
Type:
String- Calltype:CallByValue -
Parameter
$type$Description:
type of desired command 'install' or 'check'
-
-
Returns: Package manager command according to type
-
OnError: Returns string 'False'
-
References: Local Function linuxInstallOneOf,
Local Function isOneInstalled,
Local Function getLinuxCommand -
Author: Nils Doerrer
-
Date: 16.11.2020
-
Local Function linuxInstallOneFile
- Definition
-
linuxInstallOneFile($packagefile$ : string) : string - Description
-
try to install the local file package given by $packagefile$ This can be used specifying a package with different names for different linux distributions.
-
Parameter:
$packagefile$-
Type:
String- Calltype:CallByValue
-
-
Returns: Returns string '0' if one package was successfully installed
-
OnError: Returns string '-1'
-
References: Local Function isOneInstalled,
Local Function getLinuxCommand -
Author: Detlef Oertel
-
Date: 08.02.2021
-
Example:
[Actions]
importlib "uib_lin_install"
if if "0" = linuxInstallOneFile("/tmp/dummy.deb")
	comment "success"
endif
Local Function linuxRemoveOnePackage
- Definition
-
linuxRemoveOnePackage($packagename$ : string) : string - Description
-
try to remove the package given by $packagename$ This can be used specifying a package with different names for different linux distributions.
-
Parameter:
$packagename$-
Type:
String- Calltype:CallByValue -
Parameter
$packagename$Description:
string with the name of a package to remove
-
-
Returns: Returns string '0' if package was successfully removed or was not installed
-
OnError: Returns string '-1'
-
References: Local Function isOneInstalled,
Local Function getLinuxCommand -
Author: Detlef Oertel
-
Date: 08.02.2021
-
Example:
[Actions]
importlib "uib_lin_install"
if "0" = linuxRemoveOnePackage("dummy")
	comment "success"
endif
Local Function linuxRemoveOneOf
- Definition
-
linuxRemoveOneOf($packagelist$ : stringlist) : string - Description
-
try to remove any package given by $packagelist$ This can be used specifying a package with different names for different linux distributions.
-
Parameter:
$packagelist$-
Type:
Stringlist- Calltype:CallByValue -
Parameter
$packagelist$Description:
stringlist with packages to install
-
-
Returns: Returns string 'True' if one package was successfully installed
-
OnError: Returns string 'False'
-
References: Local Function isOneInstalled,
Local Function getLinuxCommand -
Author: Nils Doerrer, Detlef Oertel
-
Date: 16.11.2020
-
Example:
[Actions]
importlib "uib_lin_install"
if isOneInstalled(createStringList("lsusb", "usbutils")) = "True"
	message "installing lsusb or usbutils"
	set $success$ = linuxRemoveOneOf(createStringList("lsusb", "usbutils"))
endif
Example: Linux Template l-opsi-template
You can create this template using the opsi-setup-detector (see section opsi-setup-detector: Creating a Script).
declarations.opsiinc: Variablen-Deklaration/Declaration of Variables; ----------------------------------------------------------------
; This is a opsi-script file.
; See https://opsi.org https://uib.de
; This code was originally created by opsi-setup-detector 4.2.2.3
; ----------------------------------------------------------------
encoding=utf8
; -------------------------------------
; include file for opsi-setup-detector products
; Define all variables here
;---------------------------
DefVar $arch$
DefVar $errorstring$
DefVar $exitcode$
DefVar $iconfile$
DefVar $installerSourceDir$
DefVar $installCommand$
DefVar $installSuccess$
DefVar $installdir$
DefVar $installdir1$
DefVar $installdir2$
DefVar $installerfile$
DefVar $minimumspace$
DefVar $oldProgFound$
DefVar $os$
DefVar $osshort$
DefVar $ProdVersion$
DefVar $productid$
DefVar $targetfile$
DefVar $tmpstr$
DefVar $PackageName$
DefStringList $ListOfPackageNames$
DefVar $targetprogram$setup.opsiscript: Installations-Skript/Script for Installation; ----------------------------------------------------------------
; This is a opsi-script file.
; See https://opsi.org https://uib.de
; This code was originally created by opsi-setup-detector 4.2.2.3
; ----------------------------------------------------------------
encoding=utf8
[Actions]
requiredOpsiscriptVersion >= "4.12.4.23"
importlib "uib_exitcode.opsiscript"
importlib "osd-lib.opsiscript"
importlib "uib_lin_install.opsiscript"
; All variables are defined here:
include_insert "declarations.opsiinc"
; ----------------------------------------------------------------
; Please edit the following values:
; ----------------------------------------------------------------
; $ProductId$ is the name of the product in opsi, only lower letters, no umlauts, no white spaces, use '-' as a separator
Set $ProductId$ = "l-opsi-template"
; the path were we find the product after the installation
; enter here names of the package at the supported Distributions / Versions
Set $ListOfPackageNames$ = CreateStringList("<packagename>")
; ----------------------------------------------------------------
Message "Installing " + $ProductId$ + " ..."
set $OS$ = GetOS
if not(($OS$ = "linux"))
logError "Installation aborted: wrong OS version: only linux"
isFatalError "wrong OS"
endif
comment "Show product picture"
ShowBitmap "%ScriptPath%\" + $ProductId$ + ".png" $ProductId$
set $installerSourceDir$ = ""
comment "Start setup "
ChangeDirectory $installerSourceDir$
;----------------------------------------------
cleanupPackageSystem()
;----------------------------------------------
; To create a new repo: described in the opsi-script manual (Linux)
;
; install a package from a existing repo:
; set $installSuccess$ = linuxInstallOneOf($ListOfPackageNames$)
; set $exitcode$ = boolToGenericExitcode($installSuccess$)
;
; install a deb/rpm file:
; Belongs on the distribution. tyr to analyze with opsi-setup-detector
;----------------------------------------------
cleanupPackageSystem()
;----------------------------------------------
if "true" = isGenericExitcodeFatal($exitcode$, "true", $ErrorString$ )
LogError $ErrorString$
isfatalerror $ErrorString$
else
Comment $ErrorString$
endif
comment "Copy files"
Files_install
[Files_install]
; Example of recursively copying some files into the installation directory:
;
; copy -s "%ScriptPath%\files\*.*" "$InstallDir$"
; ----------------------------------------------------------------
; ----------------------------------------------------------------delinc.opsiinc: Deinstallations-Skript (Include)/Script for Deinstallation (Include); ----------------------------------------------------------------
; This is a opsi-script file.
; See https://opsi.org https://uib.de
; This code was originally created by opsi-setup-detector 4.2.2.3
; ----------------------------------------------------------------
encoding=utf8
comment "Start the Uninstall check:"
set $oldProgFound$ = "false"
if stringToBool(isOneInstalled(CreateStringlist('<packageId>')))
set $oldProgFound$ = "true"
endif
if $oldProgFound$ = "true"
Message "Uninstalling " + $ProductId$ + " ..."
comment "Start uninstall program"
ChangeDirectory "%SCRIPTPATH%\files1"
;----------------------------------------------
; Delete an installed OS package out of a list of names:
; set $installSuccess$ = linuxRemoveOneOf('list of packageIDs')
; set $exitcode$ = boolToGenericExitcode($installSuccess$)
;
; Delete one installed OS package with a known name:
; set $exitcode$ = linuxRemoveOnePackage('<packageId>')
;----------------------------------------------
if "true" = isGenericExitcodeFatal($exitcode$, "true", $ErrorString$ )
LogError $ErrorString$
isfatalerror $ErrorString$
else
Comment $ErrorString$
endif
endif
;----------------------------------------------uninstall.opsiscript: Deinstallations-Skript/Script for Deinstallation; ----------------------------------------------------------------
; This is a opsi-script file.
; See https://opsi.org https://uib.de
; This code was originally created by opsi-setup-detector 4.2.2.3
; ----------------------------------------------------------------
encoding=utf8
[Actions]
requiredOpsiscriptVersion >= "4.12.4.23"
importlib "uib_exitcode.opsiscript"
importlib "osd-lib.opsiscript"
importlib "uib_lin_install.opsiscript"
; All variables are defined here:
include_insert "declarations.opsiinc"
; ----------------------------------------------------------------
; Please edit the following values:
; ----------------------------------------------------------------
; $ProductId$ is the name of the product in opsi, only lower letters, no umlauts, no white spaces, use '-' as a separator
Set $ProductId$ = "l-opsi-template"
; the path were we find the product after the installation
Set $InstallDir$ = "<none>"
; enter here names of the package at the supported Distributions / Versions
Set $ListOfPackageNames$ = CreateStringList("<packagename>")
; ----------------------------------------------------------------
Message "Uninstalling " + $ProductId$ + " ..."
set $OS$ = GetOS
if not(($OS$ = "linux"))
logError "Installation aborted: wrong OS version: only linux"
isFatalError "wrong OS"
endif
comment "Show product picture"
ShowBitmap "%ScriptPath%\" + $ProductId$ + ".png" $ProductId$
if FileExists("%ScriptPath%\delinc.opsiinc")
comment "Start uninstall part"
include_insert "%ScriptPath%\delinc.opsiinc"
endifCreating opsi Products
The following sections outline the steps for packaging software, specifically for creating opsi products. The fundamental process involves:
-
Creating the basic framework of a package using the
opsi-setup-detector(refer to section opsi-setup-detector: Creating a Script). -
Testing the
opsi-scriptscript (see the section Testing and improving a Script). -
Using the opsi PackageBuilder (oPB) to transform the initial form into a complete opsi package, which is then stored on the opsi server.
Preparation
To create opsi packages, you will require the following tools:
Installing opsi-setup-detector
The opsi-setup-detector is currently available for Windows, Linux, and macOS. You can install this program directly through opsi. It’s one of the standard localboot products and is typically available on the opsi server. If it’s not already installed, you can deploy the product using the following command:
opsi-package-updater install opsi-setup-detector
The localboot product opsi-setup-detector also requires the installation of the product opsipackagebuilder_wlm, because the setup detector uses the PackageBuilder (if available).
|
You should therefore also install the product opsipackagebuilder_wlm:
opsi-package-updater install opsipackagebuilder_wlmYou can then deploy the two products to the desired clients, for example, using the opsi-configed management interface.
| For Windows computers, we provide the setup detector as a stand-alone package, which can be installed independently of opsi: https://tools.43.opsi.org/stable/ |
Differences Across Windows, Linux, and macOS
While the opsi-setup-detector generally operates similarly across Windows, Linux, and macOS, there are distinct differences in how it analyzes installation files, using various auxiliary programs specific to each operating system:
-
On Windows, detailed analyses of Inno Setups are conducted using the integrated tool
innounpack.exe. Such in-depth analysis of Inno Setups is thus exclusive to the Windows environment. -
For working with the Windows Installer XML (commonly known as the WiX Toolset), the integrated tool
Dark.exeis employed under Windows. Therefore, this level of detailed analysis is also specific to Windows. -
On Linux systems,
.debor.rpmpackages are analyzed using the standard package management tools on Linux. Consequently, this type of detailed analysis is possible only on Linux systems.
Installing opsi PackageBuilder
The opsi PackageBuilder (oPB) is available for Windows, Linux, and macOS.
The product opsipackagebuilder_wlm is one of the opsi standard products. If it is not yet installed on your server, use this command to install it:
opsi-package-updater install opsipackagebuilder_wlmYou can proceed to deploy the localboot product to the clients, for instance, using the opsi-configed management interface.
Alternative approach to using the product:
You can install the opsi PackageBuilder (oPB) either as an opsi product on the opsi server and then deploy it to clients via opsi-configed. Alternatively, you can use one of the installation packages available at forum.opsi.org - opsi PackageBuilder.
| The opsi PackageBuilder (oPB) is a community-driven product, developed by Holger Pandel. Many thanks! |
You can find the source code and license details at GitHub: opsi PackageBuilder (oPB).
Installing opsi-logviewer
The opsi-logviewer is compatible with Windows, Linux, and macOS and is a component of the opsi-configed management interface.
The opsi-configed package is one of the standard opsi products and is typically pre-installed on your opsi server. If it’s not already installed, you can do so with this command:
opsi-package-updater install opsi-configed
You can find an executable version of the management interface opsi-configed for Windows, Linux, and macOS on our website at opsi Tools.
|
opsi-setup-detector: Creating a Script
The following sections explain in detail how to use the opsi-setup-detector to analyze a setup file and create an opsi product.
Start and Condfigurartion
On Windows, you can launch the opsi-setup-detector from the Start menu, where it is located at opsi.org / opsi-setup-detector. For macOS users, the opsi-setup-detector can be accessed via Programs, while on Linux, it is typically found in the start menus at System Tools. Additionally, on most Linux desktop environments, you have the option to directly enter the full path to the executable file (/opt/opsi-setup-detector/opsisetupdetector) in a quick launcher ([Alt]+[F2]) or terminal window.
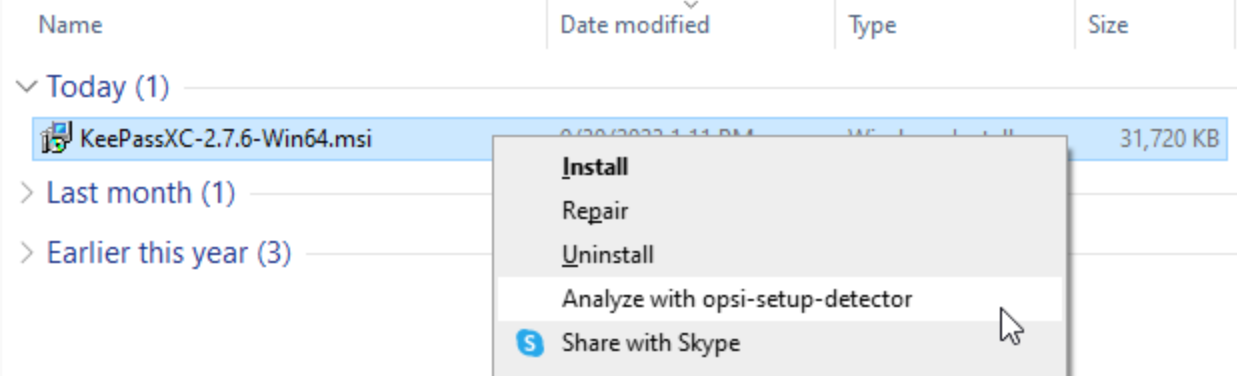
In Windows, the opsi-setup-detector can be conveniently started directly from the Explorer. By right-clicking on an installation file for an application, you will find an option in the context menu that allows you to initiate the tool for analysis.
|
Upon the initial launch of the program, a configuration dialog will appear. It’s essential to provide information for the following three entries:
-
fullName: Enter your full name as you wish it to appear in thechangelog.txtfile. -
email_address: Provide your email address, which will also be included in thechangelog.txtfile. -
workbench_Path: Specify the path to the directory where you will create the opsi packages.
Ideally, this should be the path to the share where your opsi server’s workbench is mounted (see the chapter Samba).
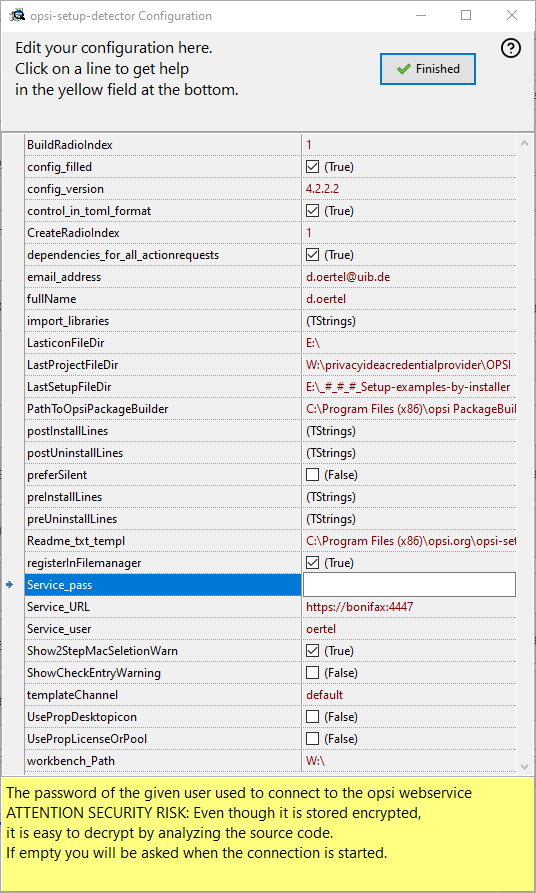
Additionally, you can configure further (optional) settings. For the opsi web service opsiconfd (https://<opsi-server>:4447, see the chapter The opsiconfd Service), you should complete the following fields:
-
Service_URL: Enter the URL of the opsi web service, formatted ashttps://<opsi-server>:4447. -
Service_user: Specify the username required for connecting to the opsi web service. -
Service_pass: Input the password associated with theService_userfor the web service connection. Skip this, and the theopsi-setup-detectorwill prompt for it when necessary.
| Possible security risk: Even if the password is stored in encrypted form, it can still be decrypted after analyzing the (open) source code. |
Other optional settings include:
-
control_in_toml_format: Check this box if you want to create acontrolfile in TOML format (refer to the section Example: control File for more details).
Attention: This option requires at least opsi 4.3! -
dependencies_for_all_actionrequests: This setting determines whether dependencies should be allowed for action requests other thansetup.
Attention: This feature requires at least opsi 4.3 and should be used with extreme caution!
| For a comprehensive explanation of all the available settings, refer to the chapter [opsi-setup-detector (free). |
Once the configuration is saved, you will see the start page.
Online Help
Click on the question mark to display the online help.

A click to this question mark icon will open the general or context sensitive online help pages.
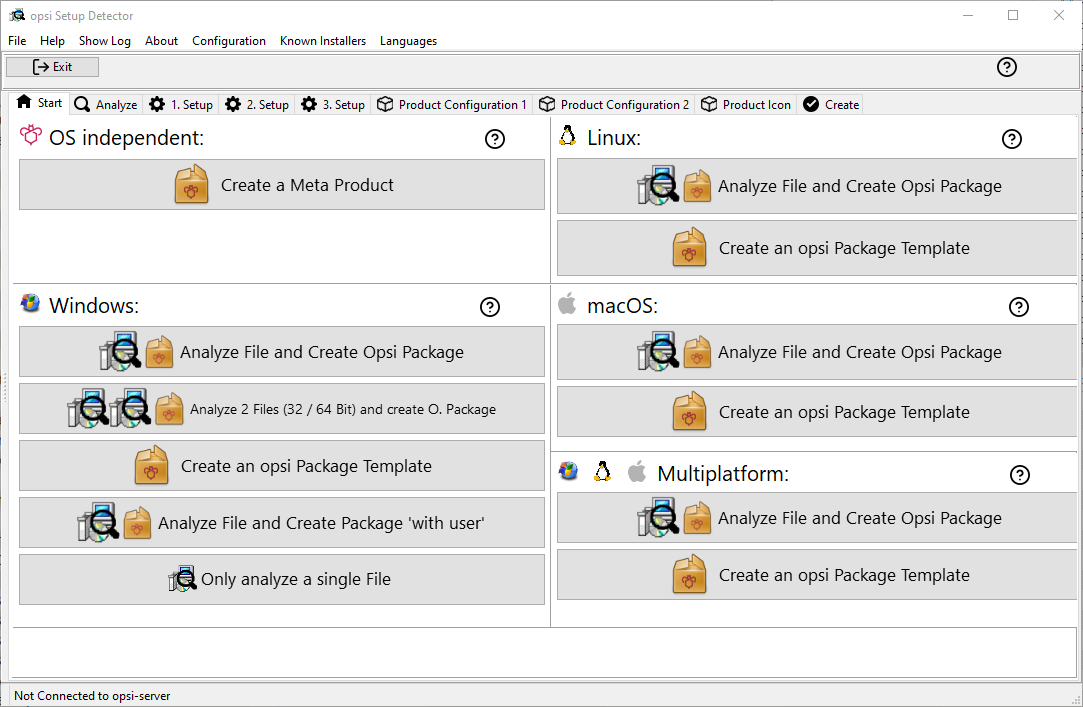
Select the task that fits your needs. The dialog offers tasks for Windows, Linux, and macOS, as well as options that are operating system-independent. There is also a dedicated section for packages designed for multi-platform compatibility.
The following functions are available under Linux:
-
Analyze File and Create Opsi Package: Starting with a Linux installer file, this function guides you through the entire process until an opsi package is created, similar to the process described for Windows (see the section Analyzing File & Creating the Package).
-
Create an opsi Package Template: This option does not require an installer file. Instead, it creates an opsi template product for Linux, drawing information directly from the product configuration.
The following screenshots show the process for Windows installer files. However, the procedures look similar on Linux when using package formats like .deb or .rpm.
|
Analyzing File & Creating the Package
The following sections describe how to analyze a setup file and create an opsi product from it. To do this, click the Analyze File and Create Opsi Package button on the start page (Figure 6, “opsi-setup-detector Start Page”). Then navigate to the desired .exe or .msi file in the file selection dialog. The opsi-setup-detector starts the analysis immediately.
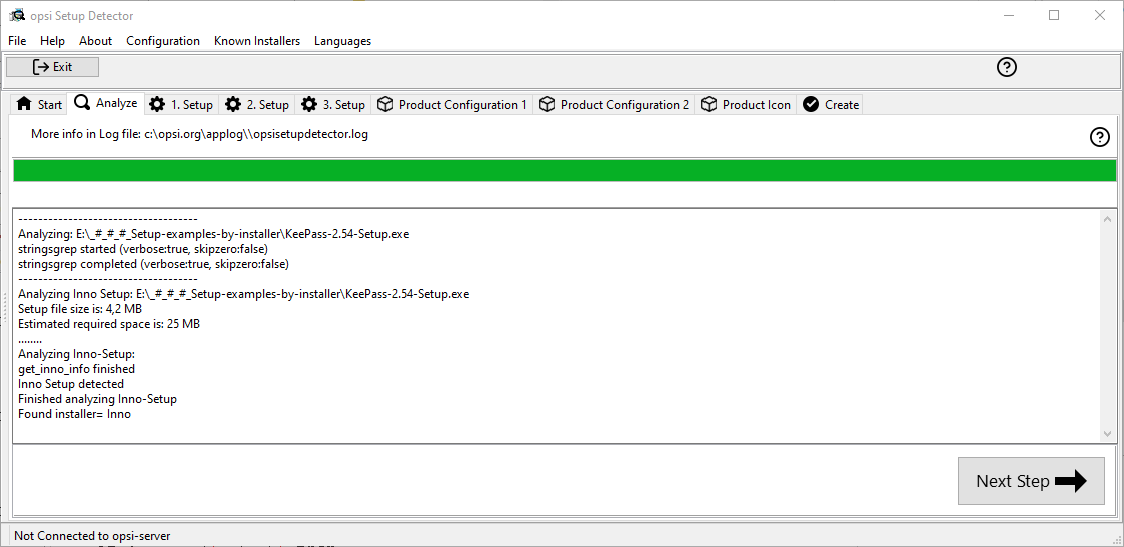
Analysis
After successfully analyzing a setup file, you will see this dialog:
If the analysis was not successful, you will see this dialog instead:
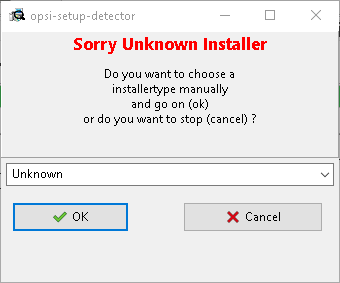
Now, you have the option to either terminate the process by clicking on Cancel or to proceed with the analysis by selecting an installer type from the drop-down menu.
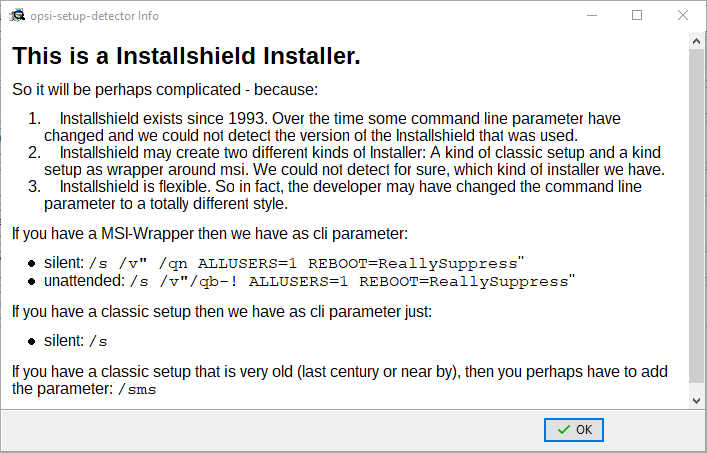
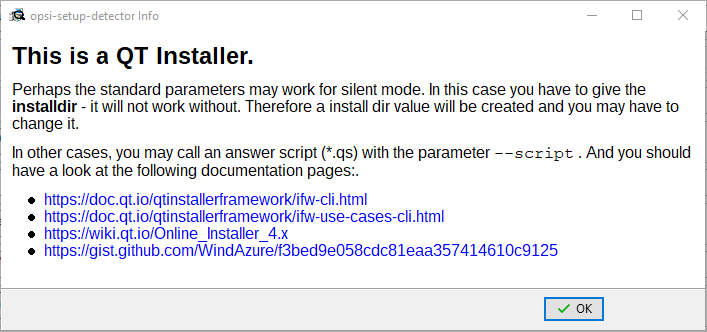
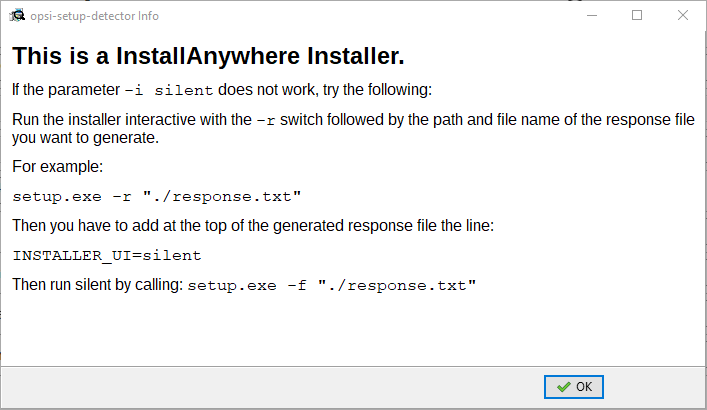
Should the analysis prove successful, a window might pop up providing additional details about the identified installer type. This informational window is typical for installer types like InstallShield, Qt Installer, or InstallAnywhere.
If the analysis has been successful, the opsi-setup-detector will display the result:
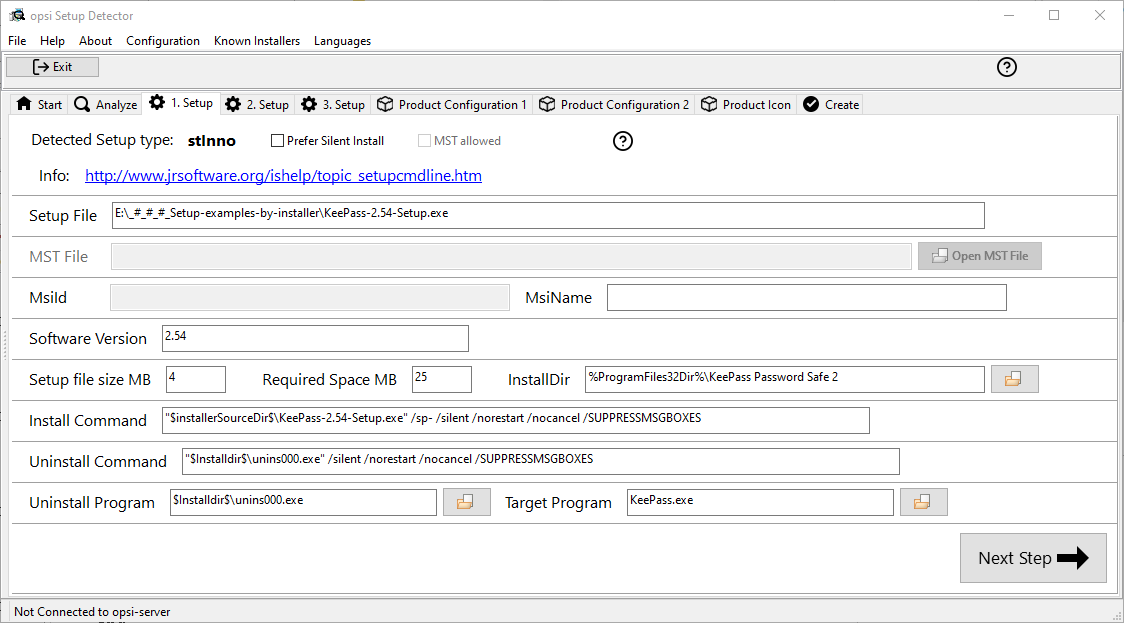
On the 1. Setup tab, you will find detailed information and various functions as follows:
-
Detected Setup type: Type of installer detected
-
Prefer Silent Install: Activate this checkbox to prefer a silent installation to an unattended installation (if possible).
-
MST allowed: Should additional
mstfiles be used to customize the settings for Microsoft Windows Installer (MSI) applications? -
Info: Link with further information about the installer
-
Setup File: Path and name of the analyzed setup file
-
MST File: To specify the MST file to be integrated into the MSI call
-
MsiId: Product code for MSI installers or installers that contain MSI
-
MsiName: Product name for MSI installers or installers that contain MSI; stored in the registry as DisplayName.
-
Software version: Version of the software to be installed (if this can be determined)
-
Setup file size MB: Size of the setup file in MB
-
Required Space MB: Estimated value (size of the setup file times 6), can be adjusted if necessary
-
InstallDir: Directory where the software will be installed, assuming it is correctly identified. If the installation directory is not accurately recognized, you can manually specify the correct directory by clicking the folder icon next to this field to open a file selection dialog. Standard paths like
C:\program FilesorC:\program Files (x86)are automatically substituted with the relevantopsi-scriptconstants, such as%ProgramFiles32Dir%. -
Install Command: This represents the command determined for a non-interactive installation. The specifics of this command vary depending on whether the Prefer Silent Install checkbox is selected.
-
Uninstall Command: The command determined for a non-interactive uninstallation. The specifics of this command vary depending on whether the Prefer Silent Install checkbox is selected.
-
Uninstall Program: Program detected for uninstallation; if not detected correctly, you can open a file selection dialog via the folder icon next to the field and navigate to the desired application. MSI files do not (usually) have an uninstall program.
-
Target Program: Main executable of the software being installed. It’s commonly used for creating desktop shortcuts or start menu entries. The main program is not automatically determined. If the software is already installed on the computer, you can select the executable file using the folder icon to open a selection dialog.
After the analysis is complete, any values that have been determined can be adjusted or supplemented as needed. Once you have made any necessary changes, click on the Next Step button to proceed to the first tab of the product configuration.
| There is a high probability that the values obtained from the analysis might be incomplete or partially incorrect. After conducting an initial installation, it is crucial to thoroughly review and verify the accuracy of values such as InstallDir, Uninstall Program, Target Program, and Software Version in your script! |
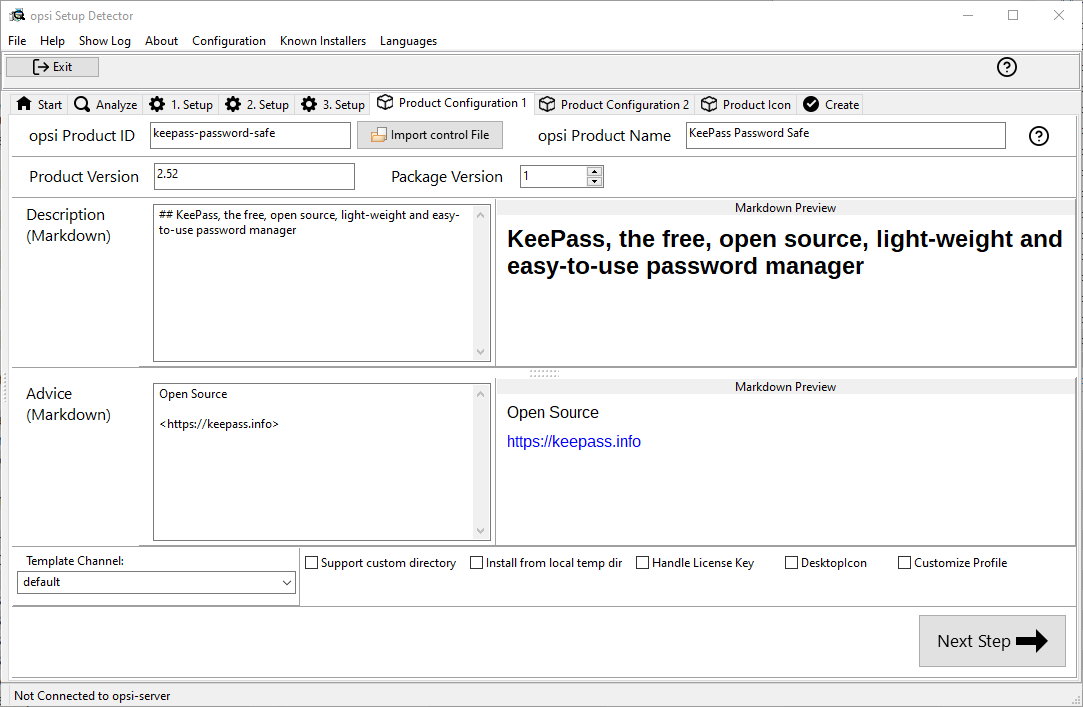
Product Configuration 1
Make the following settings on this tab:
-
opsi Product ID: This is the identifier for the new opsi package, generated from the product name specified in the opsi Product Name field. Spaces and special characters in the product name are replaced with hyphens. You can modify the suggested product ID.
-
Import control File: Click on this button to open a file selection dialog allowing you to import data from an existing
controlfile (control, control.toml) into your current project. Note that information like version numbers, script names, or required disk space is not imported. -
opsi Product Name: This field allows you to correct or adjust the name of the software that is being installed.
-
Product Version: Here, you can correct the version number that was determined from the setup file’s name. It should only include digits and periods, as it is used for the versioning of the opsi package.
-
Package Version: This version number differentiates between opsi products that contain the same software version but may have varying scripts or properties. Like the product version, it should only contain digits and periods.
-
Description: In this field, provide a brief description of the application. With opsi 4.3 and later, this text can be formatted using Markdown. An editing area is provided on the left side and a preview on the right.
-
Advice: Provide extra details about the software, such as its origin, download link, licensing information, etc. Starting with opsi 4.3, this text can be formatted using Markdown. An editing area is provided on the left side and a preview on the right.
-
Template Channel: Choose from the following templates in the drop-down menu to generate the scripts:
-
default: Serves as the standard and fallback option. If another selected template does not provide the necessary files for your project, default will be automatically employed. Key scripts of the product include:
setup.opsiscript,uninstall.opsiscript,declarations.opsiinc,sections.opsiinc, anddelinc.opsiinc. -
training: Offers a simple structure with detailed comments; key scripts for the product are
setup.opsiscript,uninstall.opsiscript, anddelinc.opsiinc. -
structured: Defaults to default; not useed in version 4.2.2 and above.
-
custom: Initially empty, this template provides space for your own template files. To use custom templates, copy them to the
opsi-setup-detector/custom/template-files/directory on the depot server, and then reinstall theopsi-setup-detectoron the relevant clients.
-
At the bottom of the window, there are several checkboxes that allow you to integrate additional code and settings for specific purposes:
-
Support custom directory: This option adds an extra directory named
customto the product, which can hold (customer-specific) customizations. When a new version of the package is installed on the server, thiscustomdirectory will not be overwritten. The included code provides templates to include files from this directory (see the section Custom Directory). -
Install from local temp dir: With this option, the installation files are initially copied to a local, temporary directory and installed from there. This approach is especially beneficial for components that might disrupt the network connection during installation, such as drivers (see the section Local, temporary Directory).
-
Handle License Key: This option generates an additional property dedicated to managing license keys (see the section License Key).
-
DesktopIcon: This creates an additional boolean property (defaulted to
false) to manage the creation of desktop icons (see the section Desktop Icon). -
Customize Profile: This option includes a
ProfileActionssection in the code, allowing for customizations in local user profiles. For an in-depth explanation, refer to the section Customize local User Profiles.
Priority and Dependencies
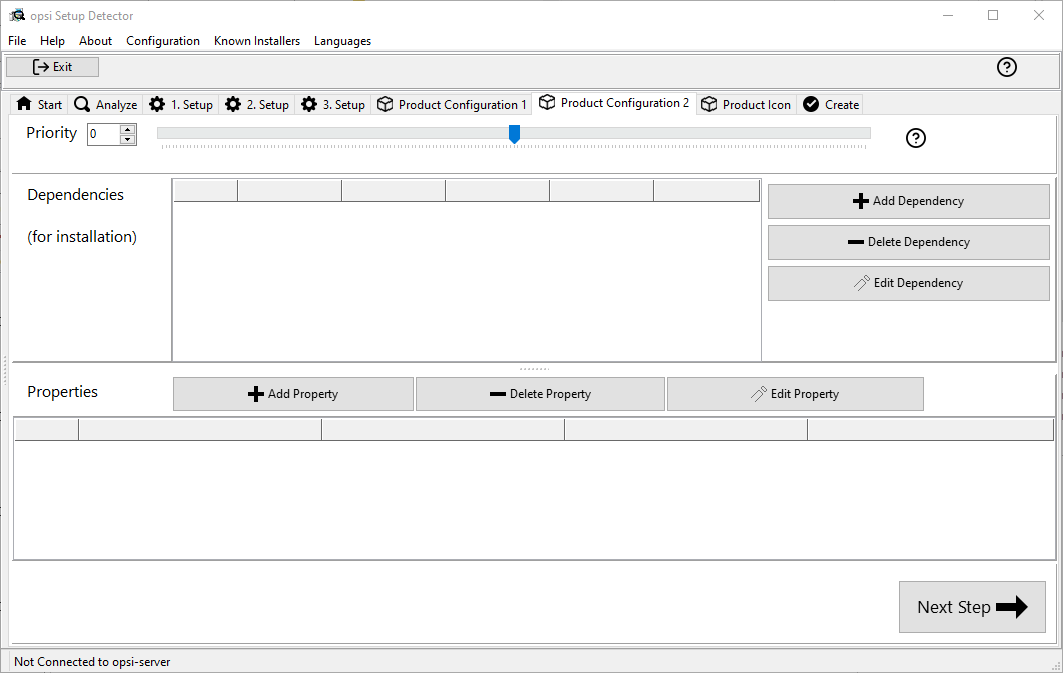
You can define priorities and dependencies more precisely on the Product Configuration 2 tab:
| For "standard" application software, it’s usually unnecessary to configure anything in this section, and you can proceed by clicking on Next Step. |
The following settings can be adjusted on this tab:
-
Priority: This setting affects the installation order. Possible values range from 100 (indicating early installation) to -100 (signifying late installation). For application software, a priority of 0 is generally recommended. Note that the installation order can also be influenced by dependencies between products.
-
Dependencies: This area allows you to specify dependencies among products. If your opsi server’s access credentials are saved in the configuration, the tool will attempt to connect to the server. If the password hasn’t been stored for security reasons, a password prompt will appear at this stage (see the section Defining Dependencies).

-
Properties: Here you can define variable properties of the producti (see the section Defining Propertys).
Defining Dependencies
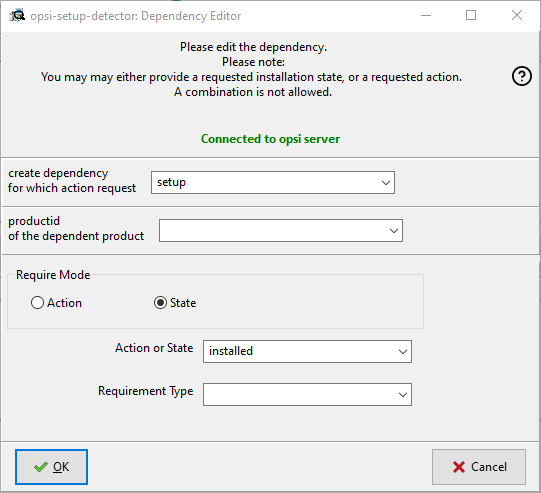
Click the button Add Dependency to open the Depency Editor:
Here you can make the following settings:
-
create dependency for which action request: The default selection here is setup. Starting with opsi 4.3, other action requests are also supported, including
uninstall,update,always,custom, andonce. Exercise caution with this setting to avoid creating unsolvable or contradictory conditions!
This drop-down menu is only active if the dependencies_for_all_actionrequests option has been enabled in the opsi-setup-detector configuration (refer to section Start and Condfigurartion for more details).
|
-
productid of the dependent product: Through the drop-down menu, you can select the product that has a dependency. If there’s an active connection to the opsi server, the dialog will indicate this in green and will list the installed products. If the connection is not established, a red message will appear, and you’ll need to manually enter the product ID.
-
Require Mode: This setting is disabled when creating a meta product to prevent illogical configurations. There are two selectable options in this area:
-
Action: This option requests an ActionRequest (like setup) to be set for the product with which there is a dependency.
-
State: This refers to the product’s state that has a dependency (such as installed). If the status is different, the product is set to setup.
-
| The actual order of installation is determined by a combination of the dependencies and the priority assigned to the products (see the section Dependencies and Order). |
Defining Propertys
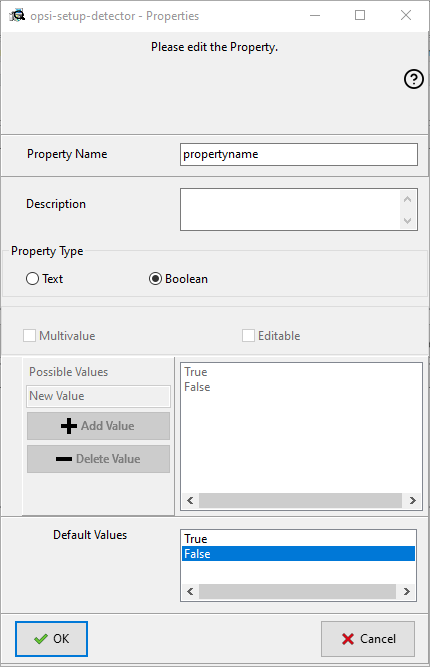
On the Product Configuration 2 tab, you can define modifiable properties (variables) for the product. To do this, simply click on the Add Property button:
| Field/Function | Description | Notes |
|---|---|---|
Property Name |
Name of the product variable |
Displayed as an identifier in the |
Property Type |
Type of the variable |
Possible values are Text and Boolean. |
Multivalue |
Number of values |
Determines whether the variable can take exactly one or multiple values; available only for Text type. |
Editable |
Values can be overwritten |
Specifies whether the default values can be overwritten with new or additional values or not; available only for Text type. |
Possible Values |
Input values |
A comma-separated list of possible input values. If set to True, you can later add to this list in |
Default Values |
Default value |
For Text type: a free text field. For Multivalue type: a multiple-choice selection. |
Selecting Product Icon
On this tab, you can select an icon for the product that will be displayed during installation:
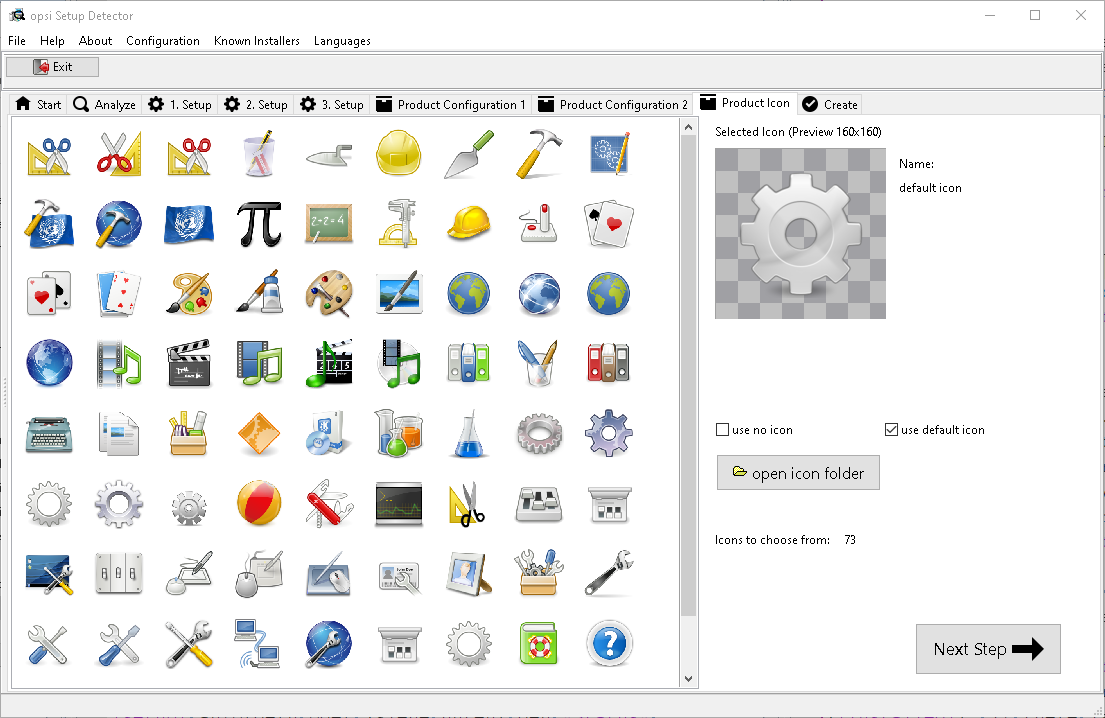
Should you decide to skip this optional step, the opsi-setup-detector will default to selecting an icon with gears and automatically proceed to the next tab.
|
To select a different icon, click on the open icon folder button located on the right side of the windowi to open a selection dialog where you can navigate to the folder containing your preferred icons. Initially, you will be directed to the 128x128 folder, which includes a variety of icons provided with the opsi-setup-detector under a free license. Once you open this folder, all available icons will be displayed on the left side of the window, allowing you to choose one for your product.
Creating the Product
After you have finished configuring the product, you can proceed to create it using the options provided on the last tab.
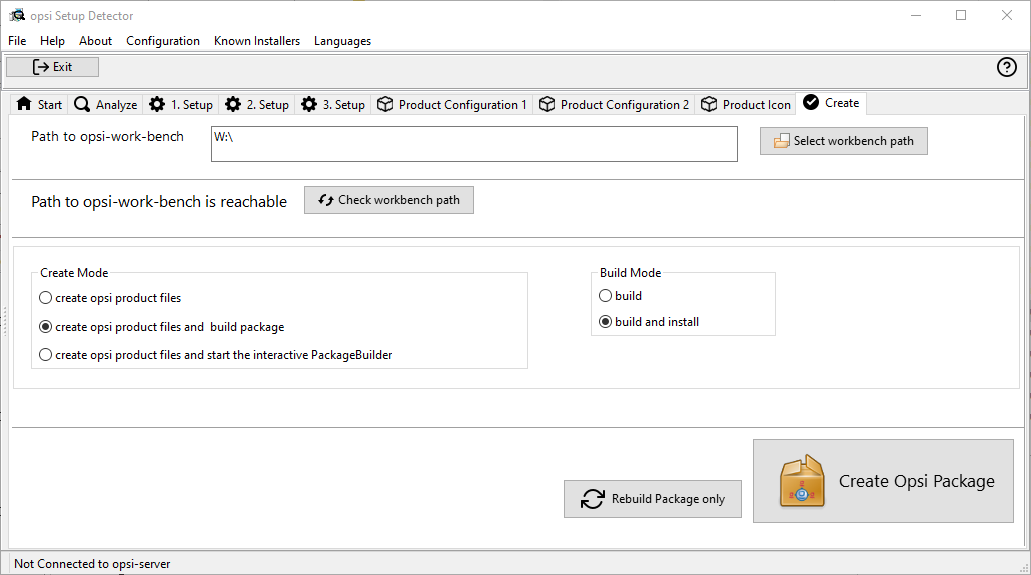
The following options are available on this tab:
-
Path to opsi-work-bench: Displays the directory you configured during setup for the workbench share on your opsi server. This can be either a drive letter or a UNC path.
-
Check workbench path button: Use this to verify whether the workbench share is accessible.
-
Create mode: Choose how the package should be created:
-
create opsi product files: This option will create (if not already existing) the directory structure for the new opsi product on the workbench. It also generates or copies the necessary files for the package.
-
create opsi product files and build package: In addition to creating the directory structure, this option attempts to build the package on the opsi server. If the build and install checkbox is selected in the Build Mode area on the right, the product will be installed on the server after being built. If the connection to the opsi web service is configured, the service is contacted, and if necessary, it will prompt for the password.
-
The building and installation process via the web service only works if the opsiconfd is of version 4.2.0.287 or newer. If the service is either unavailable or outdated, the opsi PackageBuilder (non-GUI version) will step in to create the package.
|
-
create opsi product files and start the interactive PackageBuilder creates the directory tree for the new opsi product (if it doesn’t exist on the workbench) and starts the opsi PackageBuilder in an interactive mode. You need to exit this application explicitly to return to the
opsi-setup-detector.-
Build Mode: There are two options here, which define the actions performed when you select Create Opsi Package:
-
-
build: This option solely creates the opsi package, similar to the
opsi-makepackagecommand. -
build and install: This option not only creates the opsi package (
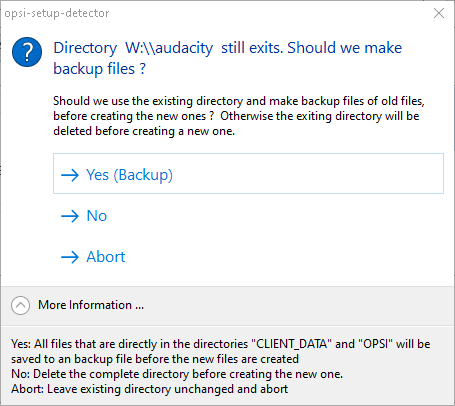
opsi-makepackage) but also installs it, equivalent to the commandopsi-package-manager --install <package>.-
Create Opsi Package: Click on this button to start the build process. If there is an opsi product with the same name, you will see the following dialog:
-
-
Rebuild Package only: This button initiates the building of the opsi package without re-generating the opsi files first. Hence, it’s a convenient option for rebuilding a package after making modifications to the script in an external editor.
During the creation of the opsi product, the opsi-setup-detector records all the information you’ve entered into a file named opsi-project.osd, located in the root directory of the product.
At a later stage, you can reopen an opsi-project.osd file with the opsi-setup-detector if you need to make adjustments to an already existing package.
|
Opening an existing Project
To open an existing project structure as a project with the opsi-setup-detector, there are two approaches:
-
For products created with the
opsi-setup-detector: Navigate to the File menu, then select Open, and select theopsi-project.osdfile located in the root directory of the project. -
For products not created with the
opsi-setup-detector: Open thecontrolfile (eithercontrolorcontrol.toml) via the menu entry File / Open Control File. It’s located in theOPSIdirectory of the product.
The second method provides less comprehensive information, particularly regarding the setup file used by the installer.
Testing and improving a Script
There are two distinct methods for testing and enhancing a product:
-
Test the script you’ve developed without installing it on the opsi server or deploying it to a client (Standalone Tests).
-
Evaluate the entire product by installing it on the server and deploying it to a client (Integrated tests).
The instructions that follow are based on the assumption that the product you are testing was created using the opsi-setup-detector.
|
Standalone Tests
Start the application opsi-script-gui:
-
Windows: Double-click to open
opsi-script.exe. If the client agent is installed on your computer, locate the program at C:\Program Files (x86)\opsi.org\opsi-client-agent\opsi-script\opsi-script.exe. Otherwise, manually copy the contents of theopsi-script\windows\x86\directory from the\\<opsiserver>\opsi_depotshare to your Windows computer.
On Windows 10, you should right-click the opsi-script.exe file in Explorer and choose Run as administrator from the context menu.
|
-
Linux: Start
/opt/opsi-script/opsi-script-gui. -
macOS: Launch the application via the /Applications/opsi-script menu.
Upon starting the application, you will be presented with the following window:

Use Select Script to choose the script you’re looking to test. Next, click Start to execute the script on your computer. Alternatively, for a syntax check, select Test_Syntax. This action checks the script for syntax errors but does not run it on your computer (see the section Checking the Script Syntax).
To observe how opsi-script interprets the script, you can use the opsi-logviewer.
Adjust the log level using the slider in the bottom right corner of the opsi-logviewer to display more or fewer details.
|
If you need to modify the script, you have a couple of options for editing:
-
Open the project in the opsi PackageBuilder and use the editor provided there.
-
Alternatively, use a text editor like jEdit that supports
opsi-scriptsyntax highlighting. This feature is typically included in the basic setup of the opsi products.
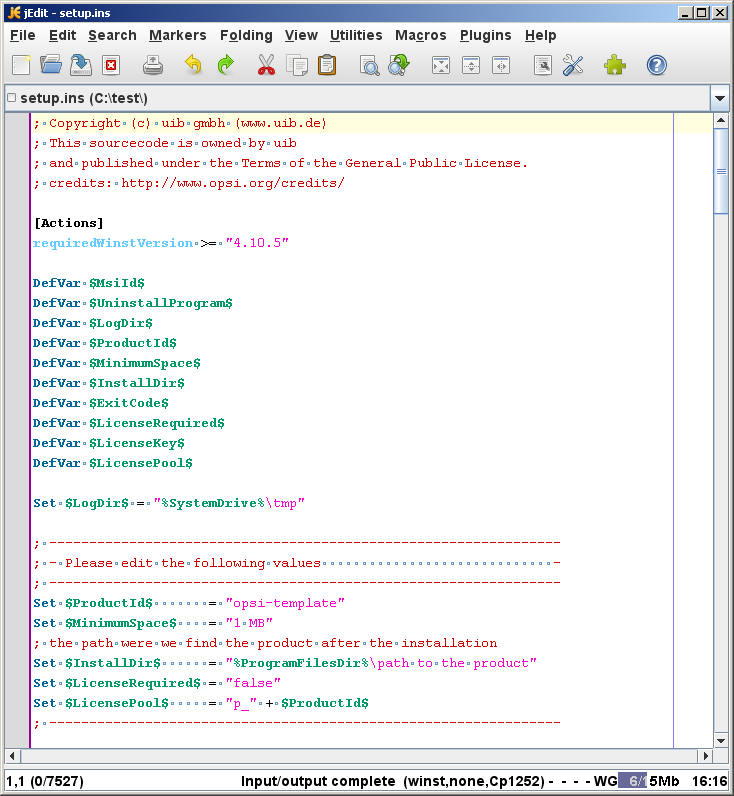
Now, you can save the changes and keep the editor open. Simply switch back to the opsi-script window and click on the Start button again; there’s no need to reselect the script. To observe the modifications, refer to the opsi-logviewer. You can refresh the log by choosing Reload from the right-click context menu or by clicking the reload button on the toolbar.
To fine-tune your scripts to perfection, you can repeat these steps as needed:
-
Edit and save the script in your text editor.
-
Run the script (again) in
opsi-script. -
Check the updated logs to confirm the impact of your changes.
Integrated tests
For the integrated tests, roll out the product on a test client:
-
Open the script
setup.opsiscriptin an editor and make changes if necessary; save the changes:-
Open the project in opsi PackageBuilder and start the editor provided here.
-
Use a text editor such as jEdit with
opsi-scriptsyntax highlighting (included in the basic setup of the opsi products).
-
-
Build the product:
-
Variant 1: Open the project in opsi PackageBuilder and click on the Build button.
-
Option 2: Open a terminal on the opsi server or log in via SSH, e.g. with PuTTY. Switch to the workbench (
/var/lib/opsi/workbench) and then to the project directory. Call the following command:
opsi-makepackage
-
-
Install the product on the opsi server:
-
Variant 1: Click on the Install button in the opsi PackageBuilder.
-
Variant 2: Run the following command in the project directory in the terminal:
opsi-package-manager -i <myproctid_version.opsi>
Replace<myproctid_version.opsi>with the name of the opsi package (as it was output during the build process).
-
-
Deploy the product via the
opsi-configedmanagement interface:-
Select the test client on the Clients tab.
-
Select the product on the Localboot products tab. If your opsi package does not appear there (which is normal after the first installation), press the button on the very left of the toolbar or select File / Reload all data from the menu.
-
Set the product to setup and save the changes.
-
Start the client or call up on_demand from the context menu for running clients.
-
Wait until the product has been installed on the client.
-
Switch to the Logfiles tab and then to instlog and view the log file.
-
| Adjust the log level using the slider in the bottom right corner to display more or fewer details. |
To further customize your scripts, you can repeat these steps:
-
Edit the script in the editor and save your changes.
-
Build the product.
-
Install the product on the server.
-
Deploy the product on the client.
-
Check the log file.
opsi PackageBuilder: Modifying a Script
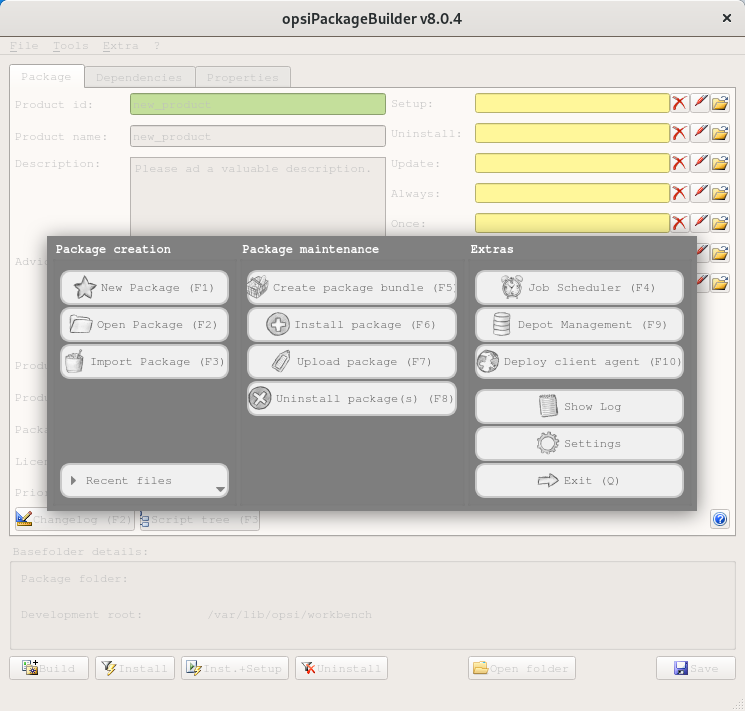
Launch the opsi PackageBuilder (oPB) from the start menu. If you encounter difficulties (particularly when using a KDE desktop environment), you might need to start the program from a terminal instead. Simply input any path, and if an error message appears indicating that the path was not found, acknowledge it to proceed:
opsipackagebuilder --path /homeWhen you start opsi PackageBuilder for the first time, it will be in offline mode because it hasn’t yet established a connection with the opsi server:
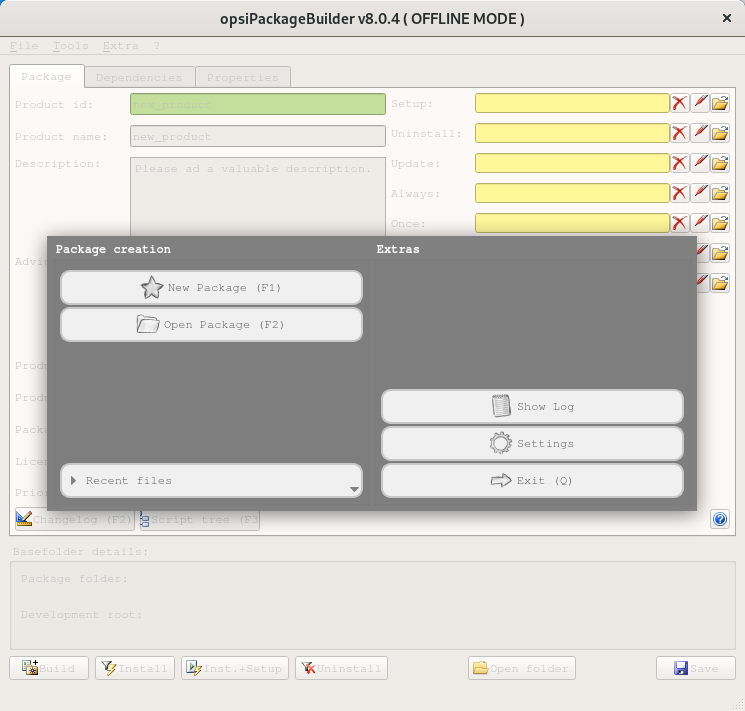
Initial Configuration
To set up the opsi PackageBuilder, click on the Settings button.
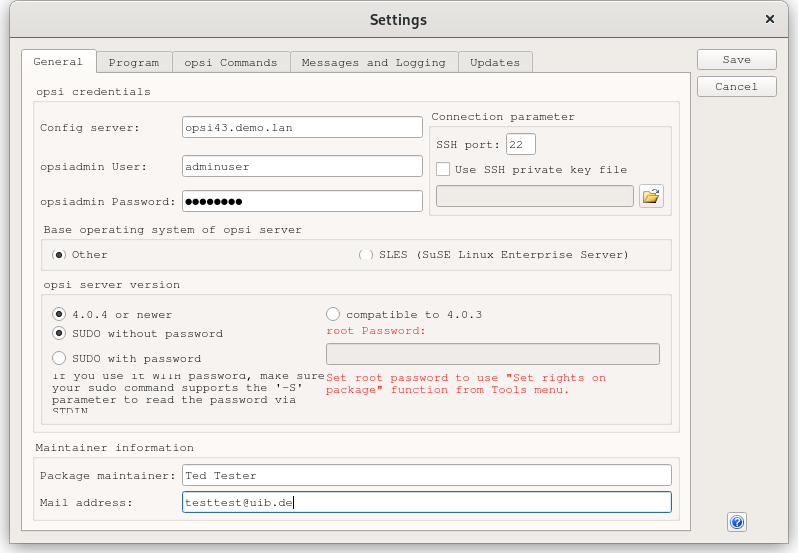
Configure the following on the General tab:
-
Config server: Input the fully qualified domain name (FQDN) of your opsi config server, such as
opsi.mycompany.org. -
opsiadmin User: Enter the username of an administrator with access to the opsi service. This account should be a part of the
opsiadmingroup (refer to the section Users and Groups). -
opsiadmin Password: Provide the corresponding password for the opsiadmin user. This password will be encrypted and is not visible. It’s essential for the opsi PackageBuilder to communicate with the opsi server.
-
4.0.4 or newer: Activate this checkbox.
-
SUDO without password: This is the default setting; accept it as it is.
-
Package maintainer: Enter your full name. This will be included in the changelogs.
-
Mail address: Provide your email address here; it will also be featured in the changelogs.
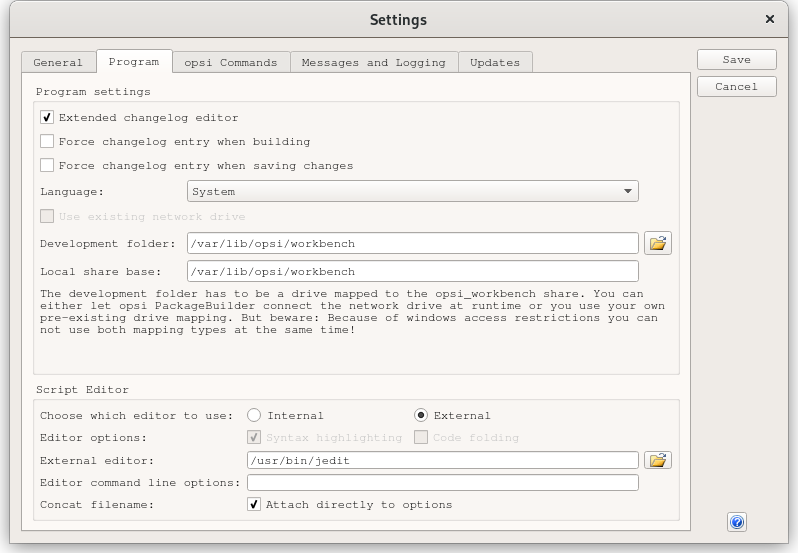
On the Program tab, configure the following settings:
-
Activate the checkbox Extended changelog editor.
-
Select a Development folder; enter the full path to the directory in which the opsi packages are to be created. Ideally, this is the path to the mounted share with the opsi workbench. Optionally, you can select Use existing network drive.
-
Script eEditor: Choose the text editor for script editing according to your operating system:
-
Windows: Accept the default setting (path to the oPB ScriptEditor).
-
Linux: Path to the editor, e.g.
/usr/bin/jedit; leave the Editor command line options field empty. -
macOS: Path to the editor, e.g.
/Application/jedit; Editor command line options field remains empty.
-
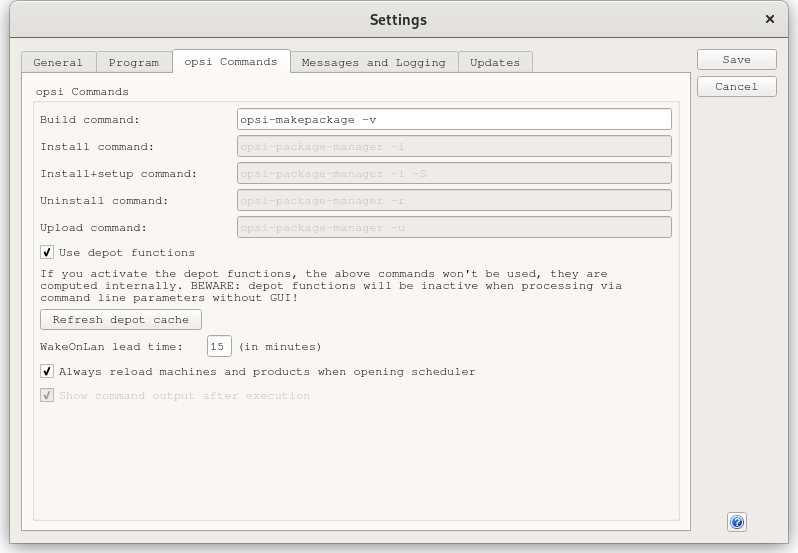
On the opsi Commands tab, adjust the following setting, which deviates from the default configuration:
-
Build command: We recommend the following command:
opsi-makepackage -v -
Activate the checkbox Use depot functions.
Save the settings and restart the opsi PackageBuilder. After restarting, the program should switch to online mode.
Modifying, packing and installing packages
To edit a package, select the Open Package (F2) button and locate the directory created by the opsi-setup-detector, for instance, w:\develop\newprod2. This action will open the following dialog:
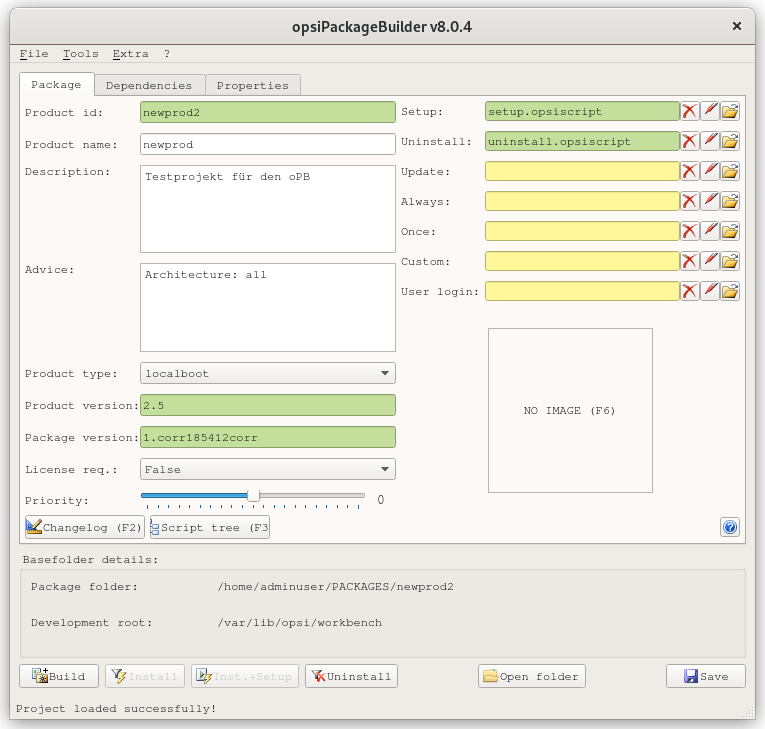
On the Package tab, the metadata of the opsi product is displayed in the left column (refer to section Product Configuration 1 for details). Script files are situated on the right. Next to each script file, you will find this button:

When you click on this button, the script editor specified in the settings will launch, allowing you to modify the script. On Windows, this typically defaults to the oPB-ScriptEditor. This editor comes equipped with features like colored syntax highlighting, optional source code folding (for a more compact view with comments), customizable lexer definition (accessible when launched from the start menu), auto-completion for syntax elements and variables, as well as customizable and reusable code blocks known as snippets.
The editor’s core component is the Scintilla module, which is also used by other renowned text editors like Notepad\++, CodeLite, etc. However, the lexical elements for opsi scripts, such as syntax highlighting and folding, are implemented using AutoIt. This is because Scintilla does not inherently provide specific highlighting for opsi scripts. Since AutoIt is an interpreter language, the ScriptEditor might not be as fast as other editors, particularly when editing very large scripts or with code folding activated.
The settings provide an option to enable or disable these functions when the editor is initiated via oPB. By default, syntax highlighting and folding are turned off when the editor is started from the start menu. However, you can activate them via the View menu if needed.
Launch the editor from the command line to access specific options directly. The --help option displays information about available parameters.
|
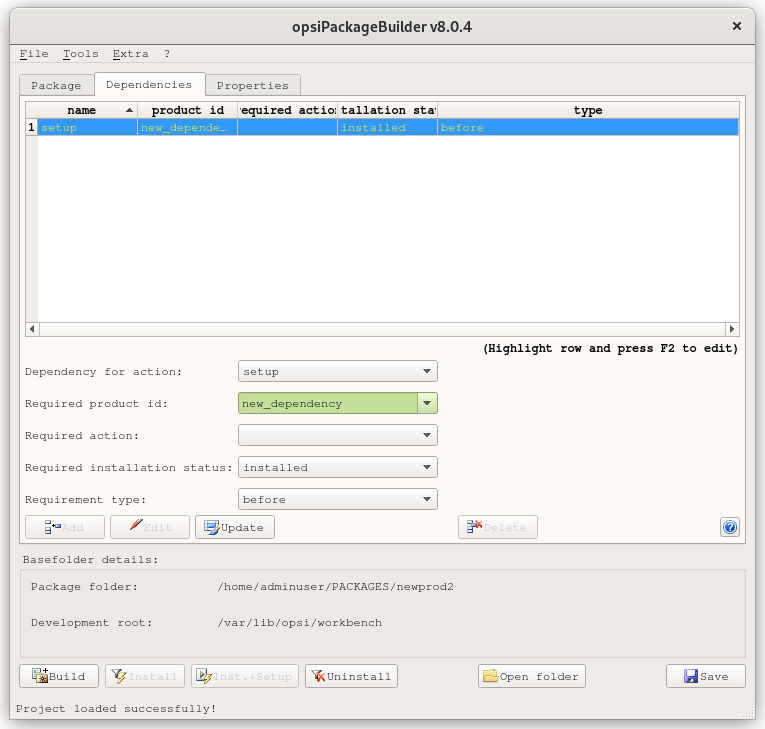
On the Dependencies tab, the dependencies established with other opsi products are displayed, as detailed in the section Priority and Dependencies.
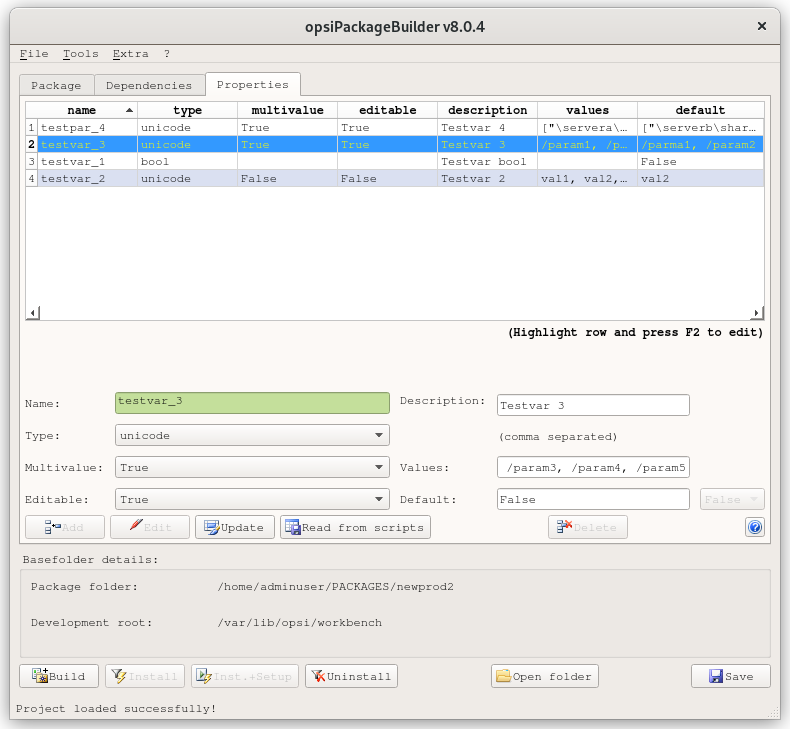
The Properties tab shows the product properties, including type, value, etc:
At the bottom of the window, you can see the following buttons:
| Button | Description |
|---|---|
|
Starts an SSH connection to the opsi server and executes the command for packaging (see section opsi-makepackage: Packaging the Product). |
|
Starts an SSH connection to the opsi server and executes the install command (see section opsi-package-manager: Installing the Product). |
|
Similar to Install, but the package is also set to setup on all clients on which it is marked as installed. |


| Be very cautious when using the Inst.+Setup button. Only use it when you’re certain of its function and implications! |
opsi-makepackage: Packaging the Product
To package the product, navigate to the product’s main directory and execute the command opsi-makepackage.
It’s a good practice to generate an accompanying MD5 checksum file. Tools like opsi-package-updater use this file to verify the package’s integrity post-transfer.
|
By default, opsi-makepackage automatically creates an MD5 checksum file. Should you wish to disable this feature, use the following parameter when executing the command:
opsi-makepackage --no-md5When transferring packages to opsi depot servers, opsi-makepackage uses the zsync tool, which only transmits the differing parts of packages, thereby conserving bandwidth. This process needs a .zsync file, which opsi-makepackage automatically generates. To turn off this functionality, disable the feature using the following parameter:
opsi-makepackage --no-zsyncIf you encounter storage issues in the /tmp temporary directory while creating large packages, you can define an alternative temporary directory using --temp-directory.
Additionally, before building a package, opsi-makepackage examines if a package with an identical name or version number already resides in the directory. Should this occur, the tool will prompt you for your preferred course of action:
Package file '/var/lib/opsi/workbench/mytest/mytest_3.14-1.opsi' already exists.
Press <O> to overwrite, <C> to abort or <N> to specify a new version:
Press [O] to overwrite the existing package, press [C] to halt the process, or opt for [N] to provide a fresh version number for the product or package.
More details about the opsi-makepackage tool and its various options are available in the section opsi-makepackage.
|
opsi-package-manager: Installing the Product
To install opsi products, use the opsi-package-manager command. First, navigate to the main directory of the product and execute the following command:
opsi-package-manager -i <myproductid_version.opsi>
For additional details about the opsi-package-manager tool and its parameters, refer to section opsi-package-manager.
|
Example: control File
Since opsi 4.3, you can create a control file in TOML format. If such a control.toml file exists, it is considered the definitive source and should be properly maintained.
[Package]
version: 1
depends:

[Product]
type: localboot
id: mytest
name: My Test
description: A test product
advice:
version: 3.14
priority: 0
licenseRequired: False
productClasses:
setupScript: setup.opsiscript
uninstallScript:
updateScript:
alwaysScript:
onceScript:
customScript:
userLoginScript:

[ProductDependency]
action: setup
requiredProduct: javavm
requiredStatus: installed

[ProductProperty]
type: unicode
name: mytextprop
multivalue: False
editable: True
description: hint
values: ["off", "on"]
default: ["off"]

[ProductProperty]
type: bool
name: myboolprop
description: yes or no
default: False

[Changelog]
mytest (3.14-1) testing; urgency=low

  * Initial package

-- jane doe <j.doe@opsi.org> Mi, 14 Jul 2010 12:47:53 +0000[Package]
version = "1"
depends = []
[Product]
type = "localboot"
id = "mytest"
name = "My Test"
description = """A test product"""
advice = """"""
version = "3.14"
priority = 0
licenseRequired = false
productClasses = []
setupScript = "setup.opsiscript"
uninstallScript = "uninstall.opsiscript"
updateScript = ""
alwaysScript = ""
onceScript = ""
customScript = ""
userLoginScript = ""
windowsSoftwareIds = []
[[ProductDependency]]
action = "setup"
requiredProduct = "javavm"
requiredStatus = "installed"
requirementType = ""
[[ProductProperty]]
type = "bool"
name = "myboolprop"
description = "hint"
default = [false]mytest (3.14-1)
* Initial package
-- jane doe <j.doe@opsi.org> Di, 29 Aug 2023 10:36:09opsi-newprod: Creating a Product
Apart from the graphical tools for creating opsi products introduced in this chapter, the opsi-newprod command line tool is available to create a basic structure for opsi products. Upon launching, it initially inquires whether you want to create a localboot or a netboot product.
For products installed via the client agent or opsi-script, opting for localboot is appropriate. Choose netboot for products that are executed via the opsi Linux boot image, like operating system installations.
|
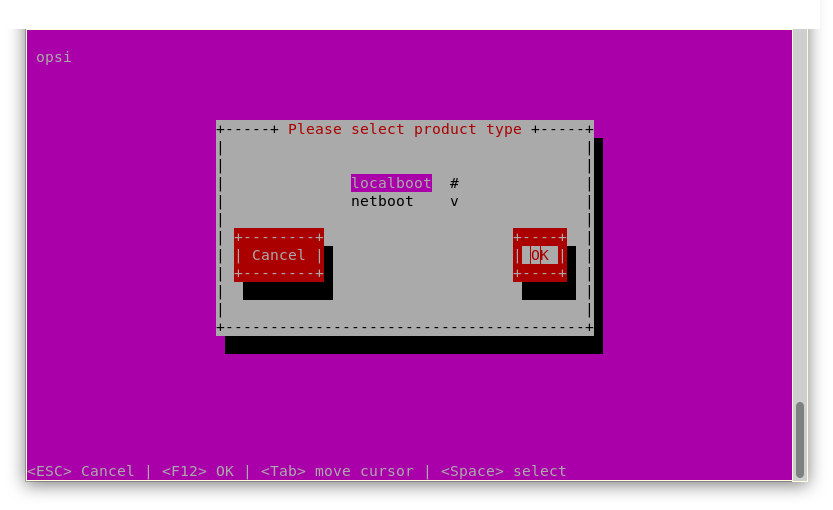
Use the [Tab] key to navigate to the OK option, or press [F12] to confirm your selection. In the next dialog, enter the information for your new opsi product:
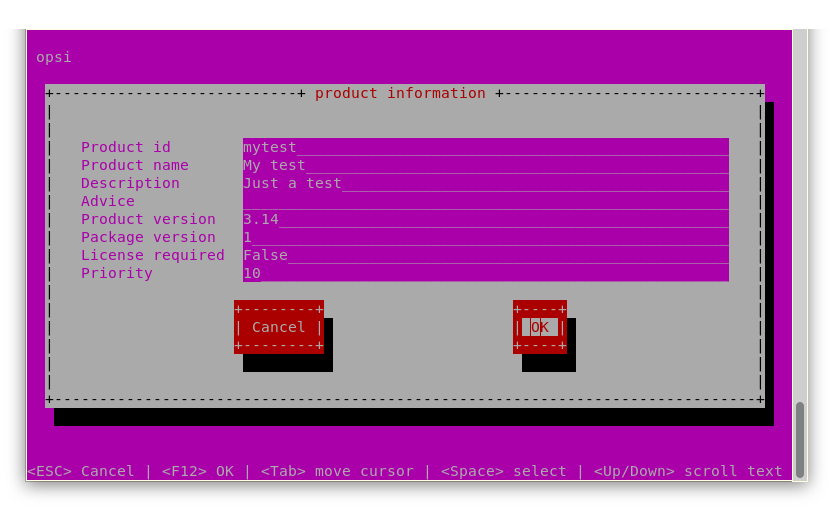
Fill in the fields with the appropriate information:
-
Product id: This is a unique identifier for the product and is generally independent of the version. Only use lower case letters, no spaces or special characters; the hyphen
-is permitted as a separator. -
Product name: This is the name of the product; we recommend avoiding special characters.
-
Description: Enter additional information about the product. Tools like
opsi-configedwill display this under Description. -
Advice: If you want to include further information, for example, on how to use the product, this is the place.
opsi-configeddisplays these under Note. -
Product version: The version of the packaged software is shown here; a maximum of 32 characters are allowed.
-
Package version: This is the version of the package for the specified product version. It’s used to differentiate between packages that have the same product version but, for example, have updated or corrected
opsi-scriptscripts. -
License required: This setting does not impact localboot products. For netboot products, however, it specifies whether a license key should be obtained from the license management system.
-
Priority: The value affects the order in which installations are executed, with possible values ranging from
100(indicating installation at the very beginning) to-100(indicating installation at the very end). Additionally, dependencies on other products may also influence the sequence of installation.
Next, specify the scripts that you provide for the various actions:
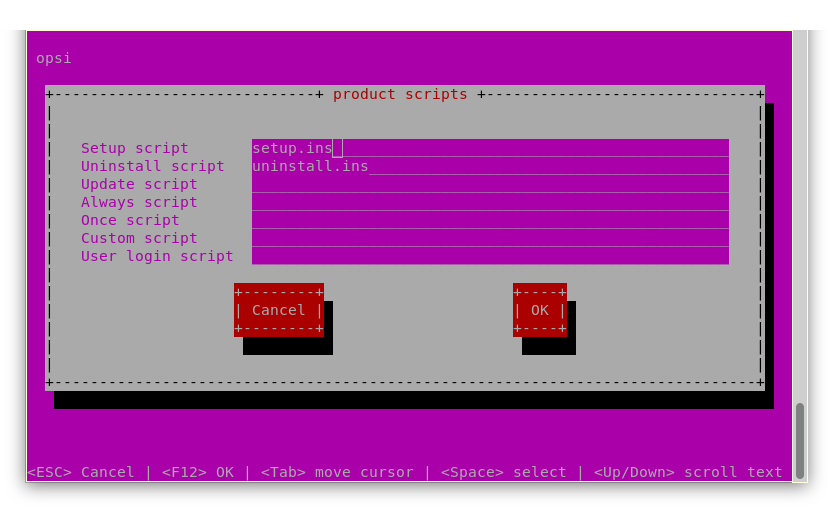
Enter the following information:
-
Setup script: Usually, this is
setup.ins. -
Uninstall script: Usually, this is
uninstall.ins. -
Update script: The script is designed to apply small modifications to an existing, large installation. When the product’s action request is set to
setup, this update script is automatically run following the completion of the setup script’s execution. -
Always script: This script runs each time the client agent is activated, for instance, following every system startup.
-
Once script: The script has the resulting state
not_installed. It’s a rarely used option that should be ignored unless you have a specific purpose for it. -
Custom script: Such a script neither alters subsequent actions nor affects the resulting state. It’s a seldom-used option, best left alone unless you’re certain of its application.
-
User login script: This is used to make modifications to the profile of the currently logged-in user after they’ve logged in. This only works if you’re using the User Profile Management extension.
| Typ | Resulting State | Subsequent Action |
|---|---|---|
|
|
|
|
|
|
|
|
|
|
|
|
|
|
|
|
unchanged |
unchanged |
|
unchanged |
unchanged |
Now that the product details are specified, you can define dependencies with other products if needed. Otherwise, select No to proceed.
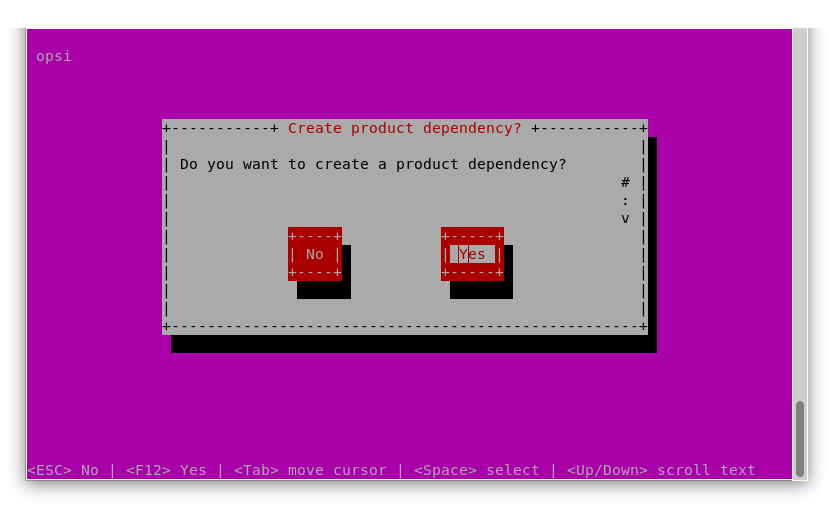
If you’ve chosen Yes, the following dialog appears:

Enter the following information:
-
Dependency for action: This contains the action of the product (that you are currently creating) for which the dependency applies (since opsi 4.3: not only setup`).
-
Required product id: Enter the ID of the produc for which there is a dependency.
-
Required action: You can either request the
setupaction or theinstalledstatus (see below). -
Required installation status: This setting indicates the expected status of the dependent product, typically
installed. If the actual status differs, the system will automatically set the product tosetup. -
Requirement type: This option defines the installation sequence for the product dependencies. If the dependent product must be installed before the installation of the current product can commence, select
before. Conversely, if it should be installed after the current product, chooseafter. If the installation order is irrelevant, you can leave this field empty.
| The actual installation order is determined by a mix of product dependencies and their set priorities. For more details on how these factors interact, refer to the section Priority and Dependencies. |
Next, opsi-newprod focuses on properties, prompting you with the following questions:
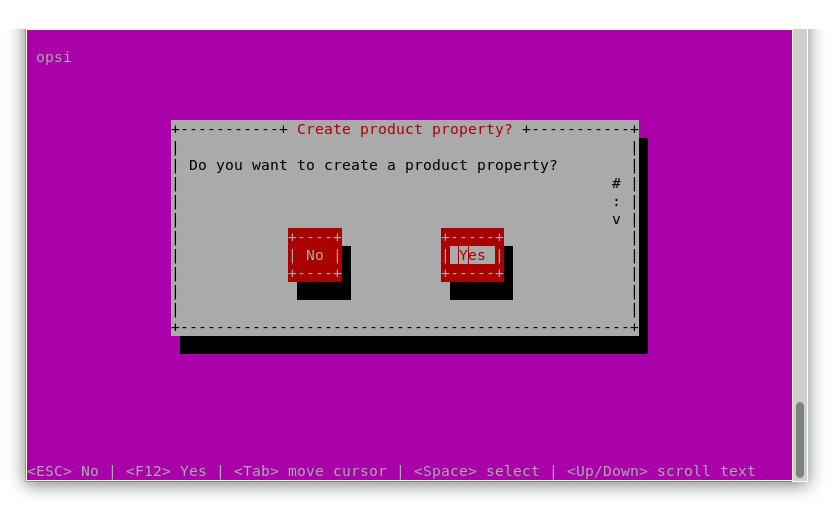
Product properties are stored on a client-specific basis and consist of a name (key) that can have different values. These are then queried by the opsi-script script. Initially, you determine whether it’s a text value (unicode) or a logical value (boolean):

For a unicode property, complete the following fields:
-
Property name (identifier): Input the name of the property.
-
Property description: This text appears as a tooltip in
opsi-configedfor assistance. -
Possible values: Type a comma-separated list of all possible values the key can assume. Leaving this field empty allows any value to be entered later in
opsi-configed. -
Editable: Choose whether additional values can be entered beyond the specified list; you’ll see options True or False.
If a value includes a backslash \, it must be entered twice. For example, a path specification should look like this: C:\\temp.
|
In the next dialog, you can set a default value for the property.
For boolean type properties, as opposed to unicode, the dialog differs. Here, you simply provide a name and a description for the property.
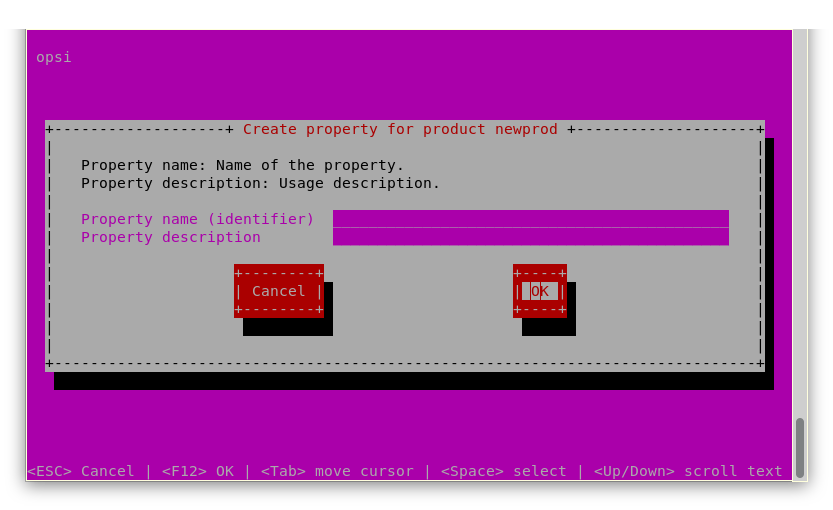
You can define multiple product properties. Once you choose not to define any more properties by responding negatively to Do you want to create a product property?, the final dialog will appear. In this dialog, you’re required to enter your name and email address, which are essential for the changelog.
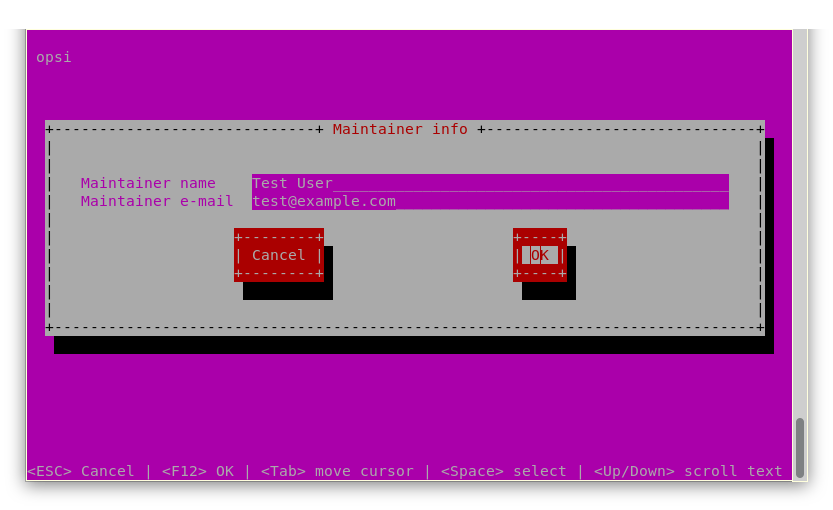
The basic structure of the product is now ready. In the new directory you will find the files and directories described above. Change to the OPSI folder and list the content (ls). The control file now contains the data you just defined, and you can load the file into an editor to view or change the entries.
Starting from opsi version 4.3 and onwards, the opsi-newprod tool will generate a control file in the TOML format (.toml), along with a separate changelog.txt file.
|
Advanced Configuration with opsi-setup-detector
The following sections provide additional configuration options for the opsi-setup-detector. They include the use of a custom directory, installation from a local temporary directory, management of license keys, and customization of user profiles and desktop icons.
Custom Directory
When you activate the Support custom directory checkbox on the Product Configuration 1 tab, the product gets supplemented with an extra directory named custom. This directory is ideal for storing client-specific customizations. Importantly, when you upgrade to a new version of the package, the custom directory remains untouched. The script includes templates for integrating files from this directory into the installation process.
Here’s what gets added to the setup.opsiscript file:
; copy custom files to install dir
Files_copy_from_custom_dir
This calls a Files section to copy files from a custom directory to the client. The corresponding section looks like this:
[Files_copy_from_custom_dir]
copy -s "%scriptPath%\custom\*" "$installdir$"
In this example, the contents of the custom directory are transferred to the installation directory, and the custom directory itself is created. It contains the two files OPSI\preinst and OPSI\postinst. These files ensure that the contents of the custom directory remain intact on the depot, even when updates occur.
Local, temporary Directory
When you activate the Install from local temp dir checkbox on the Product Configuration 1 tab in opsi-setup-detector, it adjusts the installation process such that the installation files are initially copied to a local, temporary directory, and the installation is carried out from there. This method is particularly beneficial in scenarios where the installation might disrupt the network connection, a common situation with driver installations.
As a result, opsi-setup-detector creates a new boolean property named install_from_local_tmpdir, which defaults to false and has this description: Determines whether the installation files are copied to a local directory.
To accommodate this feature, modifications are made to the setup.opsiscript file as follows:
set $Install_from_local_tmpdir$ = GetProductProperty("Install_from_local_tmpdir","False")

; before the installation:
if $Install_from_local_tmpdir$ = "true"
	; copy installer files to tempdirectory
	Files_copy_installer_to_temp
	; set $installerSourceDir$ to tmpdir
	set $installerSourceDir$ = forcePathDelims("%opsiTmpDir%\"+$ProductId$)
endif

; do the installation

; after the installation
if $Install_from_local_tmpdir$ = "true"
	; cleanup installer tempdirectory
	Files_del_installer_from_temp
endif
Now the installation files are temporarily moved to a temporary directory and deleted after the installation if the condition Install_from_local_tmpdir is set to true.
The corresponding sections look like this:
; copy installer files to tempdirectory
[Files_copy_installer_to_temp]
copy -s "$installerSourceDir$\*.*" "%opsiTmpDir%\$ProductId$"

; cleanup installer tempdirectory
[Files_del_installer_from_temp]
del -sf "%opsiTmpDir%\$ProductId$\"
License Key
Activating the Handle License Key checkbox on the Product Configuration 1 tab within the opsi-setup-detector adds the necessary property and code for managing license keys.
This action creates an additional property named secretlicense_or_pool. By default, this property is left blank and carries the description license key or opsi licensepool. The inclusion of secret in the property name signifies that the value of this property will be masked in opsi-configed, meaning it won’t be displayed in plain text.
This code is inserted into the setup.opsiscript file:
DefVar $LicenseHandledByScript$ = "true"

set $LicenseOrPool$ = GetConfidentialProductProperty("SecretLicense_or_Pool","")

; before the installation:
; ---------------------------------------------------------------
comment "handle license "
; ----------------------------------------------------------------
if $LicenseHandledByScript$ = "true"
	comment "we should handle license"
	;reserve license and get license key
	set $LicenseKey$ = get_licensekey_byPoolOrKey($LicenseOrPool$)
	; here the section or function calls should follow which
	; make use of the license key resp the license reservation
endif
get_licensekey_byPoolOrKey checks if the value entered in the secretlicense_or_pool property corresponds to the name of a license pool as defined in the opsi extension License Management. If it matches, a license key is retrieved from this specified pool. Otherwise, the content of the property is treated and used directly as the license key.
This code is inserted into the uninstall.opsiscript:
DefVar $LicenseHandledByScript$ = "true"

set $LicenseOrPool$ = GetConfidentialProductProperty("SecretLicense_or_Pool","")

; after the uninstallation

; ---------------------------------------------------------------
comment "handle license "
; ----------------------------------------------------------------
if $LicenseHandledByScript$ = "true"
	comment "we should free license used"
	Set $tmpstr$ = FreeLicense($LicenseOrPool$)
endif
Desktop Icon
Activate the checkbox DesktopIcon on the Product Configuration 1 tab to add a property and corresponding code for managing desktop icons.
A new boolean property named desktopicon is then created, set to false by default, and described as Should there be a desktop icon?
The corresponding code snippet is then integrated into the setup.opsiscript file:
set $desktopicon$ = GetProductProperty("desktopicon", "False")

; after the installation
; handle desktop icon
if $DesktopIcon$ = "true"
	comment "Create Desktop Icon"
	Linkfolder_create_desktop_icon
else
	comment "Remove Desktop Icon"
	Linkfolder_remove_desktop_icon
endif
If desktopicon is set to true, a section Linkfolder is called. The corresponding code (which is also inserted in the uninstall.opsiscript file) looks like this:
[Linkfolder_remove_desktop_icon]
; check delete_element
set_basefolder common_desktopdirectory
set_subfolder ""
delete_element $productId$

[Linkfolder_create_desktop_icon]
; check name, target and working_dir
set_basefolder common_desktopdirectory
set_subfolder ""
set_link
	name: $productId$
	target: $Installdir$\$targetprogram$
	parameters:
	working_dir: $Installdir$
	icon_file:
	icon_index:
end_link
Additionally, these two lines are added to the delinc.opsiinc file:
comment "Start Remove Desktop Icon Handling :"
Linkfolder_remove_desktop_icon
Customize local User Profiles
The Product Configuration 1 tab includes a checkbox named Customize Profile. When selected, a section Profileactions is added to the code which facilitates modifications to local user profiles. This feature also extends to Roaming Profiles through a login script.
In the OPSI/control file, the setup.opsiscript is designated not only as a setupScript but also as a userLoginScript.
The following segment is added to the setup.opsiscript file:
; Run the customization for user profiles
ProfileActions
The code triggers the execution of a section named ProfileActions. Depending on the context in which it’s invoked, this section is executed for all local profiles or specifically for the profile of the currently logged-in user (see the chapter User Profile Management).
The sections relevant to this process, which serve as templates for modifying user profiles, are structured as follows:
[ProfileActions]
; all section that called from [ProfileActions]
; will be executed for all user profiles
;
; if this script runs as loginscript
; only the [ProfileActions] will be executed

; copy some files to every user profile
Files_copy_to_user_profiles

; make entries in every currentuser hive
Registry_current_user

; modify or create ini files in all user profiles
;Patches_in_user_profiles  "%UserProfileDir%\Appdata\Roaming\<path_to_ini_file>"
Patches_in_user_profiles  "%UserProfileDir%\Appdata\Roaming\osd_profile_example\osd_profile_example.ini"

[Files_copy_to_user_profiles]
; example structure:
;copy "%Scriptpath%\profile_files\*.*" "%UserProfileDir%\Appdata\Roaming\<path_to_application_dir>"
; example:
;copy "%Scriptpath%\profile_files\*.*" "%UserProfileDir%\Appdata\Roaming\osd_profile_example"

[Registry_current_user]
; example structure:
;openkey [HKCU\Software\<application key>]
;set "<var name>" = "<var value>"
; example:
;openkey [HKCU\Software\osd_profile_example]
;set "osd_profile_example_entry" = "example_value"

[Patches_in_user_profiles]
; example structure:
; set [<section name>] <key name>=<value>
; example:
;set [example_section] example_key=example_value