opsi as Docker Container
Since 2022, a Docker image has been available, enabling you to establish either an opsi config server or an opsi depot server. This setup utilizes Docker Compose, an orchestration tool that lets you define, interconnect, and execute multiple containers on a Docker host. To use this, you need Docker Compose version 1.17.0 or later and Docker Engine 17.09.0 or newer.
| Please note that exclusively WebDAV is used as the protocol for communication with the opsi depot in this setup; there is no Samba support in this variant. |
Docker Installation
Install Docker or Docker Desktop on Linux, Windows, or macOS:
| On Linux, you can also work directly with the Docker Engine. Simply install the relevant packages for your Linux distribution. |
To check that the installation was successful, run the following command in the terminal:
docker run --rm hello-world
By default, the docker command requires root privileges, meaning that working with our helper scripts also requires root privileges. You can either prefix the commands shown in this chapter with sudo, or you can add a user account to the docker group. For more information, see the Docker manual, chapter Linux post-installation steps for Docker Engine.
|
You should expect to see an output similar to this:
Hello from Docker!
This message shows that your installation appears to be working correctly.
[...]
Quick Start
A helper script is provided for straightforward setup and management of an opsi Docker environment.
| Docker experts can ignore the helper script and access all information directly in our GitHub repository at opsi-docker. |
Windows
On Windows systems, follow these steps:
-
Create an
opsi-serverfolder. -
Download the script from opsi-server.ps1 and save it in the
opsi-serverfolder. -
Open PowerShell with administrator privileges.
-
Run the following command in the terminal window:
PowerShell.exe -ExecutionPolicy Bypass -
Navigate to the
opsi-serverfolder using the commandcd. -
Execute the script by typing
.\opsi-server.ps1 start.
Linux and macOS
On Linux and macOS, follow these steps:
To set up under Linux, follow these steps:
-
Create an
opsi-serverfolder. -
Download the script from opsi-server.sh and place it in the
opsi-serverfolder. -
Open a terminal with
rootprivileges. -
Navigate to the
opsi-serverfolder usingcd. -
Make the script executable:
chmod +x opsi-server.sh -
Execute the script with the command
./opsi-server.sh start.
This process will automatically download the required Docker images and start the containers.
-
Use
.\opsi-server.ps1 statusor./opsi-server.sh statusto check the status of the containers. -
View the container logs with
.\opsi-server.ps1 logsor./opsi-server.sh logs. -
Update the containers to the latest versions using
.\opsi-server.ps1 upgradeor./opsi-server.sh upgrade.
There is now a file docker-compose.yml in the opsi-server folder. Open this file with a text editor and look for the environment variable OPSI_ADMIN_PASSWORD. You will need the specified password for logging into the opsi server as the opsiadmin user in subsequent steps.
|
| We strongly recommend changing this password for security reasons. |
If you modify the docker-compose.yml file, restart the containers to apply the changes. Do this by entering .\opsi-server.ps1 recreate or ./opsi-server.sh recreate.
Docker Compose
The docker-compose.yml configuration file defines networks, volumes and the following four services (section services):
-
mysql: Sets up the database server MariaDB. -
redis: Installs the in-memory database Redis with the RedisTimeSeries module. -
grafana: Deploys a current version of Grafana. -
opsi-server: Installs the latest versions of the packagesopsiconfd,opsipxeconfd,opsi-tftpd-hpa, andopsi-utils.
At the beginning of the file, several X properties (extension fields) like x-restart-policy, x-common-variables, etc., are defined. These YAML anchors are used to exchange settings between services.
You will also find several environment variables for the containers. You can edit these directly in the docker-compose.yml file or set the variables in the provided opsi-server.env file, which is read at startup (defined in the docker-compose-env.yml file). The .env file then keeps the configuration in one central location, and you do not need to search for the variables in the docker-compose.yml. You can then start the stack with this command:
docker compose -f docker-compose-env.yml up
For enhanced security, it’s crucial to change all passwords in the docker-compose.yml file: MYSQL_ROOT_PASSWORD, MYSQL_PASSWORD, REDIS_PASSWORD, GF_SECURITY_ADMIN_PASSWORD, and OPSI_ADMIN_PASSWORD.
|
A password for the root user is not set by default. You can assign it using OPSI_ROOT_PASSWORD:
OPSI_ROOT_PASSWORD: <password>
If you do not need TFTP network boot (thus excluding opsipxeconfd and opsi-tftp-hpa), you can disable it by setting the OPSI_TFTPBOOT variable to "false".
|
The next two sections will guide you on customizing the docker-compose.yml configuration file to configure a config server or a depot server.
opsi Config Server
Once you have modified the settings for the hostname and the domain in the opsi-server section to align with your network configuration, set the OPSI_HOST_ROLE variable to configserver:
OPSI_HOST_ROLE: configserverOn Linux and macOS, you can start all services using the command ./opsi-server.sh start. For Windows, use .\opsi-server.ps1 start (refer to section The Helper Scripts for more details). To check the status of the containers, use ./opsi-server.sh status (Linux, macOS) or .\opsi-server.ps1 status. To view the logfiles, use ./opsi-server.sh logs or .\opsi-server.ps1 logs.
image::opsi-server-script.png["Check the status and the logfiles with the script opsi-server.sh.", width=800, pdfwidth=80%
opsi Depot Server
You can use our Docker image to set up an opsi depotserver. This assumes that an opsi configserver already exists and that it is accessible over the network. Specifically, you should verify whether the Docker host can reach the configserver on port 4447 via HTTPS (see section Used Protocols and Ports). You can use curl on the command line for this purpose (Windows: Command Prompt, Linux/macOS: Terminal):
curl --insecure https://<fqdn>:4447/publicReplace <fqdn> with the FQDN or IP address of the opsi configserver; the public directory is usually accessible without authentication on the configserver. You will receive an XML file as a response.
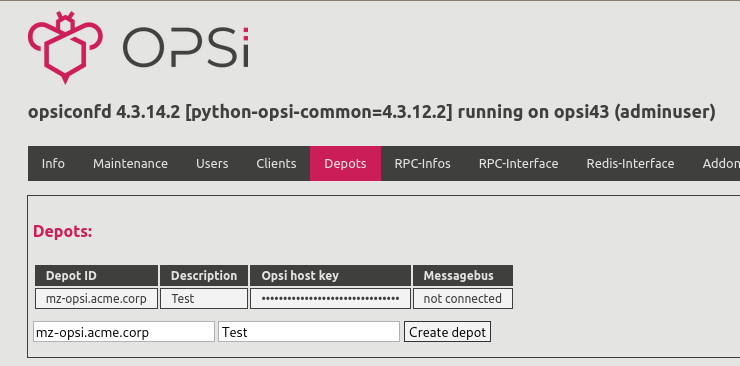
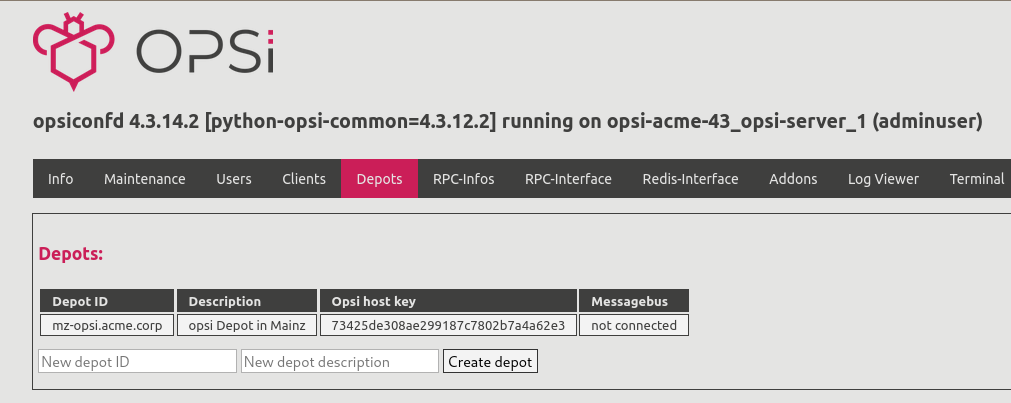
Additionally, create a new depot on the configserver. The easiest way to do this is via the Admin Page on the Depots tab. Enter the FQDN of the Docker host and an optional description, then click on Create depot. The new depot should appear immediately in the list; you will need the host key for configuring the depot server.
Now you can edit the docker-compose.yml file in the text editor of your choice. For a depot server, you do not require the two services mysql and grafana, so you can either comment them out or delete them. It’s important to also remove mysql from the depends_on attribute in the opsi-server section if you choose to exclude these services.
To configure the server as a depot server, set the OPSI_HOST_ROLE variable to depotserver:
OPSI_HOST_ROLE: depotserverFor setting up a depot server, you also need to configure two additional variables: OPSI_SERVICE_ADDRESS (the service URL of the opsi config server) and OPSI_HOST_KEY (the host key of the depot). Once these variables are set, start all services using ./opsi-server.sh start (Linux, macOS) or .\opsi-server.ps1 start (Windows).
| You can locate the host key of the opsi depot server in the admin interface of the opsi config server, specifically on the Depots tab. Click on the dots to display the key. |
The Helper Scripts
We have included two auxiliary scripts to simplify the usage of the opsi Docker container. For Linux and macOS users, the opsi-server.sh script is available. To start using it, first make it executable:
chmod +x opsi-server.shAfter that, you can invoke it as a normal user without any additional parameters or options to access the online help:
./opsi-server.sh
Usage: ./opsi-server.sh <command>

Commands:
  edit                      Edit docker-compose.yml.
  start                     Start all containers.
  status                    Show running containers.
  stop                      Stop all containers.
  logs [service]            Attach to container logs (all logs or supplied service).
  shell [service]           Exexute a shell in a running container (default service: opsi-server).
  update                    Update and restart all containers.
  open-volumes              Open volumes directory in explorer.
  inspect [service]         Show detailed container informations (default service: opsi-server).
  diff [service]            Show container's filesystem changes (default service: opsi-server).
  prune                     Delete all containers and unassociated volumes.
  export-images             Export images as archive.
  import-images [archive]   Import images from archive.
  build [--no-cache]        Build opsi-server image. Use --no-cache to build without cache.
  publish                   Publish opsi-server image.
The second script, opsi-server.ps1, is designed for Windows users and is to be used with Windows PowerShell. It offers essentially the same options and parameters as the script for Linux and macOS; however, the last two commands, build and publish, are not available.
The opsi server is now set up and ready for the next steps.