Linux Support (opsi-linux-client-agent)
opsi Client: supported Linux Distributions
As of 01.10.2023
| Distribution | OS Installation | Netboot Products | Client Agent |
|---|---|---|---|
Debian 12 Bookworm |
|
|
|
Debian 11 Bullseye |
|
|
|
Debian 10 Buster |
|
|
|
Debian 9 Stretch |
|
|
|
Debian 8 Jessie |
|
|
|
Ubuntu 22.04 LTS Jammy Jellyfish |
|
|
|
Ubuntu 20.04 LTS Focal Fossa |
|
|
|
Ubuntu 18.04 LTS Bionic Beaver |
|
|
|
Linux Mint 21.2 |
|
|
|
Linux Mint 21.1 |
|
|
|
Linux Mint 21 |
|
|
|
Linux Mint 20.3 |
|
|
|
Linux Mint 20.2 |
|
|
|
Linux mint 20.1 |
|
|
|
RHEL 9 |
|
|
|
RHEL 8 |
|
|
|
RHEL 7 |
|
|
|
AlmaLinux 9 |
|
|
|
AlmaLinux 8 |
|
|
|
Rocky Linux 9 |
|
|
|
Rocky Linux 8 |
|
|
|
Oracle Linux 9 |
|
|
|
Oracle Linux 8 |
|
|
|
CentOS 8 |
|
|
|
CentOS 7 |
|
|
|
SLES 15 SP5 |
|
|
|
SLES 15 SP4 |
|
|
|
SLES 15 SP3 |
|
|
|
SLES 15 SP2 |
|
|
|
SLES 15 SP1 |
|
|
|
SLES 12 SP5 |
|
|
|
SLES 12 SP4 |
|
|
|
SLES 12 SP3 |
|
|
|
SLES 12 SP2 |
|
|
|
SLES 12 SP1 |
|
|
|
SLES 12 |
|
|
|
openSUSE Leap 15.5 |
|
|
|
openSUSE Leap 15.4 |
|
|
|
openSUSE Leap 15.3 |
|
|
|
UCS 5.0 |
|
|
|
UCS 4.4 |
|
|
|
![]() : Supported
: Supported
![]() : Unsupported
: Unsupported
![]() : Under development
: Under development
![]() : Discontinued
: Discontinued
As of 01.10.2023
| Netboot Product | Installer | State | Remark |
|---|---|---|---|
|
opsi |
|
Stretch - Bullseye |
|
Distribution |
|
|
|
Distribution |
|
|
|
Distribution |
|
|
|
Distribution |
|
|
|
opsi |
|
Trusty - Jammy |
|
Distribution |
|
|
|
Distribution |
|
|
|
Distribution |
|
|
|
Distribution |
|
|
|
Distribution |
|
|
|
Distribution |
|
|
|
Distribution |
|
|
|
Distribution |
|
|
|
Distribution |
|
|
|
Distribution |
|
|
|
Distribution |
|
|
|
Distribution |
|
|
|
Distribution |
|
|
|
Distribution |
|
|
|
Distribution |
|
|
|
Distribution |
|
|
|
Distribution |
|
|
|
Distribution |
|
|
|
Distribution |
|
|
|
Distribution |
|
|
|
Distribution |
|
|
|
Distribution |
|
|
|
Distribution |
|
|
|
Distribution |
|
|
|
Distribution |
|
|
|
Distribution |
|
|
|
Distribution |
|
|
|
Distribution |
|
|
|
Distribution |
|
|
|
Distribution |
|
|
|
Distribution |
|
|
|
Distribution |
|
|
|
Distribution |
|
|
|
Distribution |
|
|
|
Distribution |
|
![]() : Supported
: Supported
![]() : Unsupported
: Unsupported
![]() : Under development
: Under development
![]() : Discontinued
: Discontinued
Prerequisites
Technical precondition is opsi 4.0.5 with following packet versions:
| opsi packet | version |
|---|---|
opsi-linux-bootimage |
>= 20140805-1 |
The opsi support for Linux is based on a free Open Source component (the netboot products) and a co-funded component (the client-agent).
The opsi-linux-client-agent is a
co-funded opsi extension module.
In order to use the opsi Linux extension module, an activation file is required, this file can be acquired by buying the extension module. To obtain a temporary activation file for evaluation, please email us at info@uib.de.
For further details on handling extension modules please refer to the opsi manual.
opsi-linux-client-agent: 15 Free starts
The opsi-linux-client-agent includes 15 free starts by which the agent can be used without any activation
In detail: After the initial Install from the opsi-linux-client-agent the opsi-script can be started 15 times in service context without the need of activation.
This gives you the possibility to set a Linux computer with the corresponding opsi-products for the configuration needed.
For example, after the installation of the system you could use the product l-opsi-server to make of the newly installed computer an opsi-server.
For a long lasting maintenance of the installed Linux computers after the 15 free starts, it is recommended the activation of the feature, in order to continue taking advantage of its benefits.
Installation of the packages
The Linux-related packages can be loaded over the opsi-package-updater.
By default it already has the repository for the linux packages activated.
You can use the following command to install the packages:
opsi-package-updater -v --repo uib_linux installIntroduction
A single management tool for Windows and Linux
The objective of the opsi Linux extension module is to provide an homogenous management system for heterogenous environments. The focus is on integrating both worlds into the same management processes and tools
This means, that a Linux installation is triggered the same way as a Windows installation. The Linux opsi-client-agent is based on the same source code as the Windows client and provides (when applicable) the same opsiscript instruction sets.
Independent from Linux distribution
The opsi Linux Support is designed to be independent from any special Linux distribution.
The following distributions are supported:
-
Debian
-
Ubuntu
-
Linux Mint
-
OpenSuse / SLES (Suse Linux Enterprise Server)
-
RHEL (RedHat Enterprise Linux)
-
AlmaLinux 8
-
Rocky Linux 8
-
CentOS
-
UCS
Please keep in mind that you need at least 4GB of RAM in the machine or VM if you want to install Linux Mint.
Using opsi to install Linux
This chapter describes how to install various Linux distributions on a computer without an existing operating system using opsi. Suitable client computers, whether physical or virtual, should meet the following requirements:
-
2 GB of RAM; Ubuntu 22.04: at least 4 GB of RAM
-
Network card that supports network booting (PXE protocol capability for boot media loading via the network).
| Check the settings in the BIOS. Netboot must be activated and be at the top of the boot options so that you can install Linux via opsi. |
There are basically two different ways:
Netboot Products (Distribution Installer)
Let’s start with the installer provided by the distribution. Like with the unattended Windows installation, the Linux installer is equipped with an answer file, enabling a non-interactive installation process.
The distribution’s installer is not a standalone program that opsi directly executes. Rather, it comprises the distribution’s kernel and initrd.
|
The basic OS installation, including tasks like partitioning, LVM setup, and basic software installation, is managed by the installer after initiating the opsi Linux boot image. The method of supplying installation sources varies depending on the Linux distribution or the specific opsi netboot package:
-
Debian-based distributions (Debian, Ubuntu): These distributions acquire their installation sources over the network. The depot share only contains the netboot versions of the kernels and the related
initrdfiles. These files, being relatively small, are included in the opsi package. There are, however, some exceptions:-
Ubuntu 22.04: The
ubuntu22-04package expects an ISO image in the product’sisosubdirectory. -
Linux Mint: Starting from version 4.2.0.2-1, the netboot packages expect an ISO image in the product’s
isosubdirectory.
-
-
Distributions based on SUSE and Red Hat: Users provide the installation sources and store an ISO image on the depot share.
| TIP: It’s advisable to install not just the operating system, but also the Linux Client Agent for effective management of the new client with opsi. |
Installation Process
This is what the individual steps look like during installation with the distribution’s own installer and the opsi-Netboot product:
-
Boot the opsi Linux boot image, which clears any existing partition tables and creates a small, temporary auxiliary partition.
-
The opsi Linux boot image retrieves the distribution’s
initrdand unpacks it on the temporary partition. -
The opsi Linux boot image fetches the generic answer file, patches it (personalizes it,) and moves it to the
initrddirectory. -
The opsi Linux boot image creates some helper scripts and configuration files (e.g. for installing the client agent) and moves them to the
initrddirectory. -
The modified
initrddirectory is repackaged. -
The opsi Linux boot image boots the distribution kernel with the patched
initrdviakexec. -
The system now performs an unattended installation of the target system and, upon completion, installs the
opsi-linux-client-agent.
This method has the following advantages:
-
The installation aligns precisely with the requirements of the distribution, which can be important for organizations with support contracts.
-
Integrating new releases into opsi is simpler and therefore faster.
-
Distributions based on SUSE and Red Hat, as well as Linux Mint and Ubuntu 22.04, are installed from sources located on the opsi server, offering a quicker and more reliable installation compared to using internet repositories.
Installation Media via WebDAV
For distributions based on SUSE and Red Hat, as well as for Linux Mint and Ubuntu 22.04, the official installation media need to be stored on the opsi depot server. Store this data in the iso or isocontent subdirectory of the respective netboot product located in /var/lib/opsi/depot:
-
iso: This directory is for an ISO image. -
isocontent: This directory holds the contents of an ISO image (similar to theinstallfilesdirectory of a Windows netboot package).
To make the contents of an ISO image available, mount the image temporarily, copy the data and the two hidden files .treeinfo and .discinfo recursively, and then unmount the ISO. For instance, for the product sles15-3, the process would go as follows:
mount SLE-15-SP3-Full-x86_64-GM-Media1.iso /mnt
cp -r /mnt/* /var/lib/opsi/depot/sles15-3/isocontent/
cp /mnt/.treeinfo /var/lib/opsi/depot/sles15-3/isocontent/
cp /mnt/.discinfo /var/lib/opsi/depot/sles15-3/isocontent/
umount /mnt
The file .discinfo is not present on all distribution installation media and might be missing.
|
General Properties
If you select a Netboot product in the opsi-configed management interface, the properties of the product will be displayed in the right-hand pane:
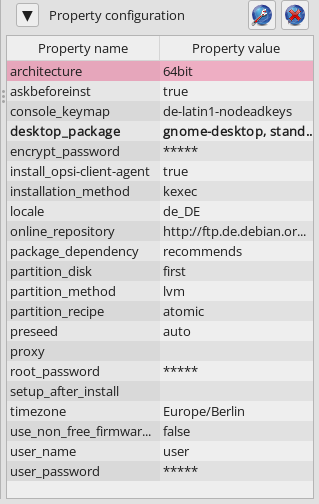
The current Netboot products for Linux installations include the following properties:
-
architecture: Select the architecture for the system you want to install. This also influences the boot image used. (Default:64bit) -
askbeforeinst: Should the start of the installation have to be confirmed on the client? (Default:true) -
console_keymap: Determines the keyboard layout, not underubuntu22-04. (Default:enor depending on distribution) -
languageorlocale: Select the language to be installed (locale). (Default:de DEor depending on distribution) -
timezone: What’s the time zone of the Linux system? (Default:Europe/Berlin) -
root_password: Sets the password forroot. (Default:linux123) -
user_name: This is the name of the non-privileged user withoutrootrights. (Default:user) -
user_password: Sets the password for theuseraccount. (Default:linux123) -
proxy: If required, enter the address of the proxy server here (http://<ip>:<port>). -
setup_after_install: Enter a list of opsi products which should be set tosetupafter the OS installation. -
install_opsi-client-agent: Installs the Linux client agent at the same time. (Default:true)
| The Linux client agent is currently a paid extension. This means that you need an activation file to unlock it. You will receive this file after you have purchased the extension. For evaluation purposes, we’re happy to provide you with a temporary license free of charge. Please contact us via email. |
Debian, Ubuntu, and Linux Mint
The following netboot products are currently available for Debian, Ubuntu, and Linux Mint: debian, debian12, debian11, debian10, ubuntu, ubuntu22-04, ubuntu20-04, mint21-2, mint21-1, mint21, mint20-3, mint20-2, and mint20-1 (see opsi Client: supported Linux Distributions).
These distributions generally use network-based installation sources. However, there are exceptions: the ubuntu22-04 and Linux Mint netboot products also require an ISO image in their respective iso subdirectory.
| With Ubuntu 22.04’s installer, not all the previously mentioned properties are available in the netboot product. |
For Debian-based distributions, the netboot products include some additional properties:
-
online_repository: This is the distribution’s repository for the installation. -
encrypt_password: (not underubuntu22-04) Enter a password for the hard disk encryption here; prerequisite:encrypt_logical_volumes=true. (Default:linux123) -
installation method: This is the installation method; it only works with the UEFI extension. (Default:kexec) Possible values:-
reboot: A small partition is created and the installer is started from this partition after a reboot. -
kexec: The opsi Linux boot image starts the installer directly viakexec; there is no reboot.
-
-
partition_disk: (not underubuntu22-04) Enter the hard disk to be used, eitherfirstor the complete device name, e.g./dev/sda,/dev/sdb, etc. (default:first). (Default:first) -
preseed: This is the auto-installation file to be used; it is located in the product directory in thecustomfolder. Onubuntu22-04, this isautoinstall; other possible values areauto,raid.cfg,raid.yml, etc. (Default:auto) -
partition_method: Select the method for partitioning the hard disk. (Default:lvm) Possible values are:-
regular: Standard partitioning (onubuntu22-04:direct) -
lvm: Set up LVM system (Logical Volume Manager) -
crypto: Create LVM in an encrypted partition (not underubuntu22-04)
-
-
partition_recipe: Selects a partitioning scheme (not underubuntu22-04). (Default:atomic) Possible values are:-
atomic: All data in a single partition -
home: Separate partition for the home directories (/home) -
multi: Divide disk into several partitions:/home,/usr,/var, and/tmp
-
-
desktop_package: Decide on a desktop environment (Debian/Ubuntu only). Possible values:standard,ubuntu-desktop,kubuntu-desktop,lubuntu-desktop,xubuntu-desktop,ubuntu-gnome-desktop(default:standard) -
language_packs: (not underubuntu22-04) Install additional languages. Possible values:ar,bg,bg,by,cf,de,dk,en,es,et,fa,fi,fr,gr,il,it,kg,kk,lt,mk,nl,no,pl,ro,ru,sg,sr,ua,uk,us,wo(Default:de)
Univention Corporate Server (UCS)
We also offer a netboot product ucs50 for Univention Corporate Server (UCS) 5.0 (see opsi Client: supported Linux Distributions).
The basic installation process retrieves packages from the official UCS repositories. Our netboot product allows for the installation of various UCS server variants:
-
Primary Directory (Domain Controller Master)
-
Replica Directory Node (Domain Controller Slave)
-
Backup Directory Node (Domain Controller Backup)
-
Managed Node (Member Server)
To transform a UCS system into an opsi server, consider installing the l-opsi-server product.
|
In addition to the server roles just mentioned, the ucs50 product also allows the installation of clients via a member server, with some unique aspects to consider. Beyond the properties outlined in the section Debian, Ubuntu, and Linux Mint, the ucs50 product includes these specific UCS-related properties:
-
dns_domain: This is the DNS domain name, e.g.example.com. (Default:ucs.test) -
ldap_base: Configuration of the LDAP base name, e.g.dc=example,dc=com. (Default:dc=ucs,dc=test) -
ucs_code_name: This is the code name of the UCS version that is provided in the online repository. (Default:ucs501) -
organization: This is the name of the organization as it is used in the UCS installation. (Default:uib gmbh) -
windomain: Enter the name of the Samba/Windows domain. (Default:MYDOMAIN) -
external_nameserver: Enter an external nameserver, either an IP address (e.g.10.11.12.13) orauto(DHCP server is responsible). (Default:auto) -
ucs_master_ip: This is the IP address of the primary directory (domain controller master); it is used by the other roles when joining. (Default:10.10.10.10) -
ucs_master_admin_password: Enter the administrator password of the UCS domain controller; it is used by the other roles when joining. (Default:linux123) -
ucs_role: Defines the role of the UCS server, uses the old names. (Default:domaincontroller_master) Possible values are:-
domaincontroller_master: Primary Directory (Domain Controller master) -
domaincontroller_backup: Backup Directory Node (Domain Controller Backup) -
domaincontroller_slave: Replica Directory Node (Domain Controller Slave) -
memberserver: Managed Node (Member Server)
-
SLES and openSUSE
The following netboot products are currently available for SUSE Linux Enterprise Server (SLES) and openSUSE Leap: sles15sp5, sles15sp4, sles15sp3, sles15sp2, sles15sp1, sles12sp5, sles12sp4, sles12sp3, opensusel15-5, and opensusel15-4 (see opsi Client: supported Linux Distributions).
The SLES and openSUSE Netboot products have the following additional properties:
name: productkey
multivalue: False
editable: True
description: email:regcode-sles for suse_register. Is only used if the  host parameter  `license-management.use` is set to  false . If it set to  True  the license key will be get from the license management module. / La clé de licence pour l'installation. Est utilisée uniquement si dans "Réseau et paramètres supplémentaires" `license-management.use` est défini à false (faux) . Si c'est réglé sur True (vrai) la clé de licence sera obtenue du module de gestion des licences.
values: ["", "myemail@example.com:xxxxxxxxxxxxxx"]
default: [""]

name: suse_register
description: set to false, if you don't want to register your system online, if you set this to false you have to give local repositories
default: True

name: local_repositories
multivalue: True
editable: True
description: list of local repositories to use. Syntax: "repository description", example entry: "http://sles.example.com/suse/repo NameForRepo"
values: [""]
default: [""]

name: install_unattended
description: If false then do interactive installation
default: True
For these systems, you have to store an ISO image on the depot share. Begin by downloading the installation media, then mount and copy its contents into the isocontent directory—for instance, /var/lib/opsi/depot/sles15-3/isocontent/ (as detailed in section Installation Media via WebDAV). After that, execute the command opsi-set-rights.
| To download SUSE Linux Enterprise Server (SLES), you must have an account with the manufacturer. |
RHEL, AlmaLinux, Rocky Linux, and Oracle Linux
Currently, the following netboot products are available for Red Hat Enterprise Linux (RHEL), AlmaLinux, Rocky Linux, and Oracle Linux: rhel9, rhel8, alma9, alma8, rocky9, rocky8, oraclelinux9, and oraclelinux8 (see opsi Client: supported Linux Distributions).
These netboot products have the following additional properties:
name: install_unattended
description: If false then do interactive installation
default: True

name: selinux_mode
multivalue: False
editable: False
description: In which mode should SELinux run ?
values: ["enforcing", "permissive", "disabled"]
default: ["permissive"]

name: partition_method
multivalue: False
editable: False
description: plain: Regular partitions with no LVM or Btrfs. / lvm: The LVM partitioning scheme. / btrfs: The Btrfs partitioning scheme. / thinp: The LVM Thin Provisioning partitioning scheme.
values: ["plain", "lvm", "btrfs", "thinp"]
default: ["lvm"]

name: productkey
multivalue: False
editable: True
description: email:regcode for subscription_register. Is only used if the  host parameter  `license-management.use` is set to  false . If it set to  True  the license key will be get from the license management module. / La clé de licence pour l'installation. Est utilisée uniquement si dans "Réseau et paramètres supplémentaires" `license-management.use` est défini à false (faux) . Si c'est réglé sur True (vrai) la clé de licence sera obtenue du module de gestion des licences.
values: ["", "myemail@example.com:xxxxxxxxxxxxxx"]
default: [""]

name: subscription_register
description: set to false, if you don't want to register your system online, if you set this to false you have to give local repositories
default: True
AlmaLinux
Download the required ISO image, e.g. from https://repo.almalinux.org/almalinux/. Next, mount the downloaded image and transfer its contents to the isocontent directory, e.g. to /var/lib/opsi/depot/alma8/isocontent/. Then execute the command opsi-set-rights.
Red Hat Linux Enterprise
Download the required ISO image, e.g. from https://developers.redhat.com/products/rhel/download. Next, mount the downloaded image and transfer its contents to the isocontent directory, e.g. to /var/lib/opsi/depot/redhat8/isocontent/. Then execute the command opsi-set-rights.
| You need an account with the manufacturer to download Red Hat Linux Enterprise (RHEL). |
Rocky Linux
Download the required ISO image, e.g. from https://rockylinux.org/download/. Next, mount the downloaded image and transfer its contents to the isocontent directory, e.g. to /var/lib/opsi/depot/rocky8/isocontent/. Then execute the command opsi-set-rights.
Oracle Linux
Download the required ISO image, e.g. from https://yum.oracle.com/oracle-linux-isos.html. Next, mount the downloaded image and transfer its contents to the isocontent directory, e.g. to /var/lib/opsi/depot/oraclelinux9. Then execute the command opsi-set-rights.
Netboot Products (Generic Installer)
The installation process diverges from the typical installation routines of the distributions themselves. Initially, the process starts with booting the opsi Linux boot image through netboot. This boot image is the same one used for installing Windows computers. Included in the boot image is a partitioning tool, which prepares the hard disk of the new client. It creates a root partition (/) and a swap partition (/swap), and then formats these partitions. Following this, the basic system gets installed, which includes network configuration and SSH, but excludes a graphical user interface.
| The installation of the basic system varies among different distributions. However, a common aspect across all of them is the use of original distribution packages for the installation. |
If you like, you can install the client agent after the OS installation. It then takes care of installing and configuring additional software.
After the first boot of the Linux computer, you may need to configure additional components depending on the distribution you are using. For instance, on Red Hat-based systems, you might configure the SELinux security architecture, while on Debian-based distributions, setting up the keyboard layout could be necessary. These specific configurations are handled by the localboot product l-os-postinst.
General Properties
The following properties control the Linux installations in all netboot products:
-
architecture: Which architecture do you want to install on the system? This also influences the boot image used. (Default:64bit) -
askbeforeinst: Should the start of the installation have to be confirmed on the client? (Default:true) -
system_partition_size: What’s the size of the system partition? You can specify the size as a percentage or as an absolute value (G= GByte). If you specify less than 100%, the remainder is used as a data partition (propertydata_partion_createmust betrue). (Default:100%) -
swap_partition_size: Specify the size of the swap partition. (Default:2000M) -
data_partition_create: Iftrue, any remaining free hard disk space is used to create a data partition. (Default:true) -
data_partition_preserve: Should an existing data partition be preserved? (Default:never) Possible values are:-
always: Abort installation if it is not possible to preserve an existing partition with the labeldatawith the specified partitioning data. -
if_possible: If a partition with the labeldatais found and it is not possible to obtain this partition with the specified partitioning data, the partition is deleted. -
never: The entire partition table is always rewritten.
-
-
language: Select the language to be installed (default:en) -
console_keymap: Select the keyboard layout. (Default:deor depending on distribution) -
timezone: What’s the time zone of the new Linux system? (Default:Europe/Berlin) -
root_password: Sets the password forroot. (Default:linux123) -
user_password: Sets the password for theuseraccount. (Default:linux123) -
online_repository: Which distribution repository should be used for the installation? (not for SLES) (Default: depending on the distribution) -
proxy: If required, enter the address of the proxy server here (http://<ip>:<port>). (Default: empty) -
additional_packages: Which additional packages should be installed? Enter the packages as a list separated by spaces. (Default: empty) -
wget_and_execute: Enter the URL of a file that is to be downloaded and executed after the installation is complete. (Default: empty) -
install_opsi-client-agent: Installs the Linux client agent at the same time. (Default:true) -
release: (only Debian and Ubuntu) Which release of the distribution should be installed? (Default: depending on the distribution) -
setup_after_install: Enter a list of opsi products that should be set tosetupafter the OS installation. (Default:l-os-postinst)
Debian and Ubuntu
The basic system for Debian-based distributions is installed directly from the Internet using debootstrap.
debootstrap is a tool for installing a Debian base system into a subdirectory of another system already in operation. This process doesn’t need any installation media or ISO images, but it does require access to a Debian repository.
|
-
The product is designated as having productive status.
-
It is compatible with UEFI/GPT.
-
There are corresponding opsi server packages available for this product. These can be installed by setting the property
install_opsi_server=true.
Proxy for Debian Packages
To optimize bandwidth usage, consider employing a proxy with caching capabilities, such as Apt-Cacher NG. This is particularly advantageous for caching Debian packages. It’s ideal in environments where numerous computers retrieve packages from the same sources, like Debian or Ubuntu. Once a package is fetched from the Internet, it gets cached locally. Should another computer require the same package, it can access it directly from this cache, negating the need for a repeated download from the Internet.
opsi-linux-client-agent
The opsi-client-agent for Linux is part of the cofunding project 'Linux Agent', which is liable to pay costs.
The opsi-client-agent for Windows is based on two components:
-
the service
opsiclientd -
the action processor
opsi-script / opsi-script-nogui
The opsi-client-agent for Linux is based on the Linux port of the Windows client agent.
The opsiclientd is not ported to all supported Linux distributions.
Tasks of the opsiclientd at startup are:
* connect to the opsi-server: check whether actions are to be performed
* mount the depot share
* update the action processor if necessary
* start the action processor
* unmount the depot share
* transfer the logfile to the server
The Linux action processor is named opsi-script and is built from the same sources as for Windows. So on Linux the same scripting syntax is available as on Windows. All common features, that are not Windows specific, are available, as there are e.g.:
-
file handling
-
string and stringlist functions
-
executing external scripts and programs
-
communication with the opsi-Server
-
patching config files
Of course Windows specific features (like patching the Windows registry) are not available on Linux, but there are some additional Linux specific functions like e.g.:
-
getLinuxDistroType
-
getLinuxVersionMap
Logging of the opsi-script ist available (like on Windows).
Linux opsi-script is available as a graphical version for working with X-Windows and a noGUI version for systems without graphical user interface.
opsi-linux-client-agent: Installation: service_setup.sh
This method is the first choice for installations on a single computer. service_setup.sh can also be used for maintenance or repair of a client. For mass roll-out, see the chapter below.
-
login to the Linux client with root privileges
-
mount the shared directory on the opsi server at //<opsiserver>/opsi_depot to any mount point
-
change to directory
opsi-linux-client-agentat the mountpoint -
start at this place the script
./service_setup.sh
The script connects to the opsi-Webservice in order to create the server side client information and to get the pckey. The connection requires the user/password combination which it tries to retrieve from various configuration files. If that fails, a login window pops up (or command line questions), where the user can fill in a URL, user, and password. The provided user has to be a member of the group 'opsiadmin'.
opsi-linux-client-agent: Installation: opsi-deploy-client-agent
The opsi-deploy-client-agent installs the opsi-client-agent directly from the opsi-Server to the clients.
Requirements for the clients are:
-
ssh access as root or as a user that has the possibility to run sudo
The program creates the client on the server, then copies the installation files and the configuration information including the pckey to the client. After copying the necessary information, opsi-deploy-client-agent starts the installation on the client.
With opsi-deploy-client-agent a whole list of clients can be processed.
These can include any number of clients that can be passed as the last parameter, or with the option '-f' by which the clients can be read from a file.
When using a file, on each line a client must be present.
The program can work with IP addresses, hostnames and FQDNs. It will automatically try to recognize what kind of Address was passed.
The program can be found at '/var/lib/opsi/depot/opsi-linux-client-agent'
Run the program with root privileges or as a user being part of the "opsifileadmins" group.
bonifax:/var/lib/opsi/depot/opsi-linux-client-agent# ./opsi-deploy-client-agent  --help
usage: opsi-deploy-client-agent [-h] [--version] [--verbose]
                                [--debug-file DEBUGFILE] [--username USERNAME]
                                [--password PASSWORD]
                                [--use-fqdn | --use-hostname | --use-ip-address]
                                [--ignore-failed-ping]
                                [--reboot | --shutdown | --start-opsiclientd | --no-start-opsiclientd]
                                [--hosts-from-file HOSTFILE]
                                [--skip-existing-clients]
                                [--threads MAXTHREADS] [--depot DEPOT]
                                [--group GROUP] [--smbclient | --mount]
                                [--keep-client-on-failure | --remove-client-on-failure]
                                [host [host ...]]

Deploy opsi client agent to the specified clients. The c$ and admin$ must be
accessible on every client. Simple File Sharing (Folder Options) should be
disabled on the Windows machine.

positional arguments:
  host                  The hosts to deploy the opsi-client-agent to.

optional arguments:
  -h, --help            show this help message and exit
  --version, -V         show program's version number and exit
  --verbose, -v         increase verbosity (can be used multiple times)
  --debug-file DEBUGFILE
                        Write debug output to given file.
  --username USERNAME, -u USERNAME
                        username for authentication (default:
                        Administrator).Example for a domain account: -u
                        <DOMAIN>\\<username>
  --password PASSWORD, -p PASSWORD
                        password for authentication
  --use-fqdn, -c        Use FQDN to connect to client.
  --use-hostname        Use hostname to connect to client.
  --use-ip-address      Use IP address to connect to client.
  --ignore-failed-ping, -x
                        try installation even if ping fails
  --reboot, -r          reboot computer after installation
  --shutdown, -s        shutdown computer after installation
  --start-opsiclientd, -o
                        Start opsiclientd service after installation
                        (default).
  --no-start-opsiclientd
                        Do not start opsiclientd service after installation.
  --hosts-from-file HOSTFILE, -f HOSTFILE
                        File containing addresses of hosts (one per line).If
                        there is a space followed by text after the address
                        this will be used as client description for new
                        clients.
  --skip-existing-clients, -S
                        skip known opsi clients
  --threads MAXTHREADS, -t MAXTHREADS
                        number of concurrent deployment threads
  --depot DEPOT         Assign new clients to the given depot.
  --group GROUP         Assign fresh clients to an already existing group.
  --smbclient           Mount the client's C$-share via smbclient.
  --mount               Mount the client's C$-share via normal mount on the
                        server for copying the files. This imitates the
                        behaviour of the 'old' script.
  --keep-client-on-failure
                        If the client was created in opsi through this script
                        it will not be removed in case of failure. (DEFAULT)
  --remove-client-on-failure
                        If the client was created in opsi through this script
                        it will be removed in case of failure.
opsi-linux-client-agent: Installation: Via opsi netboot product
If you install a Linux via opsi netboot product, you only have to switch the property install_opsi-client-agent to 'true' (which is the default) in order to install the opsi-linux-client-agent.
opsi-linux-client-agent: opsiclientd configuration
The opsiclientd for Linux is a port of the opsiclientd for Windows.
So it works withe similar configuration file which is located at:
/etc/opsi-client-agent/opsiclientd.conf.
A detailed description of this file you will find at the chapter for the opsi-client-agent for Windows: opsi-client configuration
At the moment there are not all of the features and events available on Linux.
Available are:
-
Start at boot time (or via explicit start of the service
opsiclientd). At Linux is the name of this eventopsiclientd_start(notgui_startup) -
event_on_demand -
The
event_timerbut only with the configuration:super = default
Not available are:
-
Everything that is related to local caching ('WAN-Extension').
-
The
event_net_connection -
The
event_on_shutdown -
The
event_silent_install
opsi-linux-client-agent: installation paths
As usual on Linux, the linux-opsi-client-agent is spread to several directories:
The binaries (or symlinks to binaries):
/usr/bin/opsi-script
/usr/bin/opsiclientd
Auxiliary files:
Skin files:
/opt/opsi-script/skin
custom : /usr/share/opsi-script/customskin
opsi-script Library:
/opt/opsi-script/lib
Translation files:
/opt/opsi-script/locale/opsi-script.po
Config files:
/etc/opsi-client-agent/opsiclientd.conf (configuration of the opsiclientd)
/etc/opsi-script/opsi-script.conf (configuration of opsi-script)
Logfiles / temporary files:
/var/log/opsi-client-agent
/var/log/opsi-client-agent/opsiclientd
/var/log/opsi-script/
opsi-linux-client-agent: Known Bugs
Copy a bundle of files via Files section from a smb share may fail according to the Samba version This problem was reported from some samba3 Versions but seems to be vanished in samba4.
Workaround: Instead of:
[Files_copy_netboot]
copy -s "%scriptPath%/installfiles/*" "$target$/installfiles/"
you may use:
[ShellScript_opsi_copy_netboot]
set -x
export PATH=/usr/local/bin:/usr/bin:/bin:/usr/local/sbin:/usr/sbin:/sbin
cd "%scriptPath%"
tar cf - installfiles | ( cd "$target$/installfiles/" ; tar xf - )
Script examples
For software deployment on Windows clients there can be said: the installation of software itself is as important as the subsequent configuring of the software.
On Linux most packets are available from the distribution repositories. So the installation part is less, but the configuration part stays the same. Also there are applications, that are not available from the standard repositories.
In this case special repositories or installation sources have to be added to the system. The important feature is, that all installation and configuration settings can be managed and logged on the opsi-server.
Here are some example snippets for an opsi-linux-client-agent opsi-script:
-
exit in case the script detects a non Linux system
-
detecting the distribution type (to use
apt,zypperoryum) -
detecting the Linux version
-
installing a packet
-
adding a repository
Example: exit in case the script detects a non Linux system:
[Actions]
requiredWinstVersion >= "4.11.4.1"
ScriptErrorMessages=off

DefVar $OS$

set $OS$ = GetOS

if not($OS$ = "Linux")
	LogError "Wrong OS: Product: " + $ProductId$ + "is only for Linux"
	isFatalError "Wrong OS"
endif
Example: detecting the distribution type:
[Actions]
requiredWinstVersion >= "4.11.4.1"
ScriptErrorMessages=off

DefVar $distrotype$

set $distrotype$ = getLinuxDistroType

if $distrotype$ = 'debian'
	Message "Try to get Package Lock..."
	if waitForPackageLock("60","false")
		comment "we got the package lock."
	else
		LogError "could not get Package Lock"
		isFatalError "package lock failed"
	endif
	ShellScript_Upgrade_deb
else
	LogError "Wrong Distro: This Product is for Debian/Ubuntu only"
	isFatalError "Wrong distro"
endif

if not("0" = getLastExitCode)
	Message "failed ShellScript_Upgrade"
	LogError "failed ShellScript_Upgrade"
	isFatalError "failed Upgrade"
endif


[ShellScript_Upgrade_deb]
set -x
export DEBIAN_FRONTEND=noninteractive
apt update
apt --yes dist-upgrade
exit $?
Example: detecting the Linux version and installing a packet:
[Actions]
requiredWinstVersion >= "4.11.4.1"
ScriptErrorMessages=off

DefVar $distCodeName$
DefVar $distroName$
DefVar $distRelease$
DefVar $desktop$

DefStringList $linuxInfo$

set $linuxInfo$ = getLinuxVersionMap
set $distCodeName$ = getValue("Codename", $linuxInfo$)
set $distRelease$ = getValue("Release", $linuxInfo$)
set $distroName$  = getValue("Distributor ID", $linuxInfo$)

set $desktop$ = GetProductProperty("desktop", "kde")


if $distrotype$ = 'suse'
	if $desktop$ = "unity"
		Message " No Unity on SUSE - fallback to KDE ..."
		set $desktop$ = "kde"
	endif ; unity

	Message "Try to get Package Lock..."
	if waitForPackageLock("60","false")
		comment "we got the package lock."
	else
		LogError "could not get Package Lock"
		isFatalError "package lock failed"
	endif

	if $desktop$ = "kde"
		if ($distroName$ = 'openSUSE project')
			ShellScript_kde_suse
		endif
		if ("SUSE LINUX" = $distroName$) and ($distRelease$ = "11")
			ShellScript_kde_sles11
		endif
		if not("0" = getLastExitCode)
			LogError "failed ShellScript"
			Message "failed kde"
			isFatalError "failed kde"
		endif
	endif ; kde
endif; suse type

[ShellScript_kde_suse]
set -x
zypper --no-gpg-checks --non-interactive install patterns-openSUSE-kde4 patterns-openSUSE-kde4_basis
zypper --no-gpg-checks --non-interactive install splashy-branding-openSUSE
exit $?

[ShellScript_kde_sles11]
set -x
zypper --no-gpg-checks --non-interactive install --auto-agree-with-licenses -t pattern kde
exit $?
Example: adding a repository:
[Actions]
requiredWinstVersion >= "4.11.4.1"
ScriptErrorMessages=off

DefVar $distCodeName$
DefVar $distroName$
DefVar $distRelease$
DefVar $desktop$

DefStringList $linuxInfo$

set $linuxInfo$ = getLinuxVersionMap
set $distCodeName$ = getValue("Codename", $linuxInfo$)
set $distRelease$ = getValue("Release", $linuxInfo$)
set $distroName$  = getValue("Distributor ID", $linuxInfo$)

set $desktop$ = GetProductProperty("desktop", "kde")


if $distroName$ = 'Ubuntu'

	if $desktop$ = "cinnamon"
		set $desktopPackage$ = $desktop$
		Message "Try to get Package Lock..."
		if waitForPackageLock("60","false")
			comment "we got the package lock."
		else
			LogError "could not get Package Lock"
			isFatalError "package lock failed"
		endif
		ShellScript_ubuntu_cinnamon
		if not("0" = getLastExitCode)
			Message "failed ShellScript_ubuntu_cinnamon"
			LogError "failed ShellScript_ubuntu_cinnamon"
			isFatalError "failed cinnamon"
		endif
	endif ; cinnamon
endif; ubuntu

[ShellScript_ubuntu_cinnamon]
set -x
export DEBIAN_FRONTEND=noninteractive
# we need to get the add-apt-repository command
apt --yes install python-software-properties
# the cinnamon repository
add-apt-repository ppa:gwendal-lebihan-dev/cinnamon-stable
apt update
apt --yes install ubuntu-desktop
exit $?
Many of these as well as some other functions are available in the opsi-script standard library uib_lin_install.opsiscript.
Linux localboot products
Here some localboot products that are part of the standard opsi Linux support.
The Product l-opsi-server
The product 'l-opsi-server' serves to install on a Linux computer an opsi-Server via opsi-linux-client-agent in an automated way. This can serve to install quickly a new opsi-depot-server or e.G. an opsi Test system.
|
Currently for a opsi-config server an other maschine can’t be a opsi-linux-client and a opsi-depot-server at the same time. To work around this limitation, you have two possibilities: 1. Using one opsi-config-server: After the installation of opsi via 'l-opsi-server' and before you register this maschine as opsi-depot-server, you have to delete it as client in the configed. 2. Using two opsi-config-servers: Setup a second independent opsi-config-server, which is only used to administrate (install and mantain) your opsi-servers. So this second opsi-config-server knows the other opsi-servers only as linux-clients. Your other (first) opsi-config-server know theses other opsi-servers as depots. In a UCS environment method 2 is recommended and the second opsi-config server must not be a UCS Server. |
The product 'l-opsi-server' has the following Properties:
-
opsi_online_repository:
(Base-) Repository for opsi-Server installation.
(Default="https://download.opensuse.org/repositories/home:/uibmz:/opsi:/4.2:/")
see also 'repo_kind' -
opsi_noproxy_online_repository:
(Base-) Repository for opsi-Server installation (without any cache proxy).
(Default="https://download.opensuse.org/repositories/home:/uibmz:/opsi:/4.2:/")
Should you require onopsi_online_repositoryto introduce a Proxy or deb-cacher (e.G. 'http://mydeb-cacher:9999/download.opensuse.org/repositories/home:/uibmz:/opsi:/4.2:/"), than introduce the URL without Proxy. Otherwise introduce the same asopsi_noproxy_online_repository. -
repo_kind:
Which kind of repository ["experimental", "stable", "testing"] should be installed ?. (Default='stable')
With the Client OS, 'opsi_online_repository' and 'repo_kind' the URL will be built and the client will be added to an opsi repository. -
backend:
Which backend should be installed ? (mysql needs a valid activation file). (Default='file')
A modules file with the require Activations can be stored in the custom directory of the product. If a modules file is found there, then will this one used. -
opsi_admin_user_name:
The name of the opsi_admin_user to create (empty= nothing created). (Default='adminuser')
If a user is introduced here, it will applied, also it will be added to the group 'opsiadmin', 'pcpatch'/'opsifileadmin' and become as unix and samba password the valueopsi_admin_user_password -
opsi_admin_user_password:
What is the password of the opsi_admin_user to create (empty= not allowed). (Default='linux123')
seeopsi_admin_user_name -
setup_after_install:
Which opsi product(s) should we switch to setup after l-opsi-server installation is done ?. (Default="") -
allow_reboot:
May the server reboot if script is finished ?. (Default='true') -
install_and_configure_dhcp:
Should we run the dhcp server on this machine ?. (Default='False')
If this property is 'false' then the following properties: 'netmask', 'network', 'dnsdomain','nameserver' and 'gateway' are meaningless because they are only used for dhcp configuration. -
myipname:
Set a different IP name (FQDN) ('auto'= use standard) (Default='auto')
Meaningless if 'install_and_configure_dhcp=false' -
myipnumber:
Set a different IP number ('auto'= use standard) (Default='auto')
Meaningless if 'install_and_configure_dhcp=false' -
netmask:
Netmask (for dhcp). (Default="255.255.0.0")
Meaningless if 'install_and_configure_dhcp=false' -
network:
network address (for dhcp). (Default="192.168.0.0")
Meaningless if 'install_and_configure_dhcp=false' -
dnsdomain:
DNS domain (for dhcp). (Default="uib.local")
Meaningless if 'install_and_configure_dhcp=false' -
nameserver:
Primary nameserver (for dhcp). (Default="192.168.1.245")
Meaningless if 'install_and_configure_dhcp=false' -
gateway:
gateway (option routers for dhcp). (Default="192.168.1.245")
Meaningless if 'install_and_configure_dhcp=false' -
ucs_master_admin_password:
Only needed for opsi installation on UCS Server with other Roles than Role 'Master'. (Default='linux123') -
update_test:
Do not use: Internal Debugging. (Default='False') -
ucs_master_admin_password:
On a UCS machine the roles Slave, Backup and Member have to be joined correctly with the Mas ter. This property takes the password to perform the join.
The product has 'setup required before' dependency to the product 'l-system-update'. That means when you set 'l-opsi-server' on 'setup' it will also automatically set 'l-system-update' also on setup and installed before.
In the directory custom of the product l-opsi-server the activated file (modules) is stored, which is used in the Installation of the product l-opsi-server and will be preserved in the case of a new version of the product.
l-os-postinst
This product installs and configures those parts of the base installation, that cannot be done from the boot image in a proper way.
This is for the different distributions:
-
CentOS:
-
installation of SELinux
-
This product has a dependency to the product 'l-system-update' which is executed before running 'l-os-postinst'.
This product has a high priority, so it is executed before common products.
l-desktop
The product l-desktop installs a desktop packet on the computer.
The property desktop selects the desktop to be installed. Not all of the desktops are available for every distribution. For instance 'Unity' is available for Ubuntu only. If the selected desktop is not available, the distribution specific default desktop will be installed. Furthermore the scope of the desktop packets differs according to the distribution and the selected desktop. It can be just the actual desktop software, or might also contain some base products like libreoffice, firefox, PDF Reader etc.
The property desktop can have the following values:
-
Gnome
Default for Debian, CentOS, RHEL.
Available for all distributions. -
KDE
Default für SLES, OpenSuse. Available for all distributions. -
Unity
Available for Ubuntu only. -
Cinnamon
Available for Ubuntu only. -
xfce4
Available for Ubuntu, Debian. -
lxde
Available for Ubuntu, Debian.
Inventory
To create an inventory, the data are collected on the client and sent to the server. The hardware inventory is based on the methods implemented in the boot image.
The software inventory is based on the data from the packet management of the deployed Linux distribution.