opsi License Management
Conditions for using the opsi License Management extension
This module currently is a co-funded extension and therefore not free. For more details see opsi Extensions.
Overview
Main features
The opsi license management module is designed for managing the software licenses for proprietary software installed on opsi clients.
The main features are:
-
Providing license management functions from within the opsi-configed management interface.
-
Easy generation of reports about installed license-bound software, for non-opsi-managed software, based on the software inventory
-
Reconciliation of software installations and license contracts
-
Optionally automated supplying, assigning, and reserving licenses and license keys.
-
The following license models can be used:
-
standard single license - one installation, possibly identified by a license key, on one computer
-
volume (or campus) license - a certain or unlimited number of installations for which one license key is provided
-
computer bound license - a single license for use on a fixed hardware
-
concurrent license - the installations are not limited, the real usage is managed by a license server
-
-
When uninstalling an opsi managed software the assignment of a license (key) is released as well.
-
In addition, license assignments can be edited manually or even by a script, for example, if licenses for software that is not opsi-managed should be integrated.
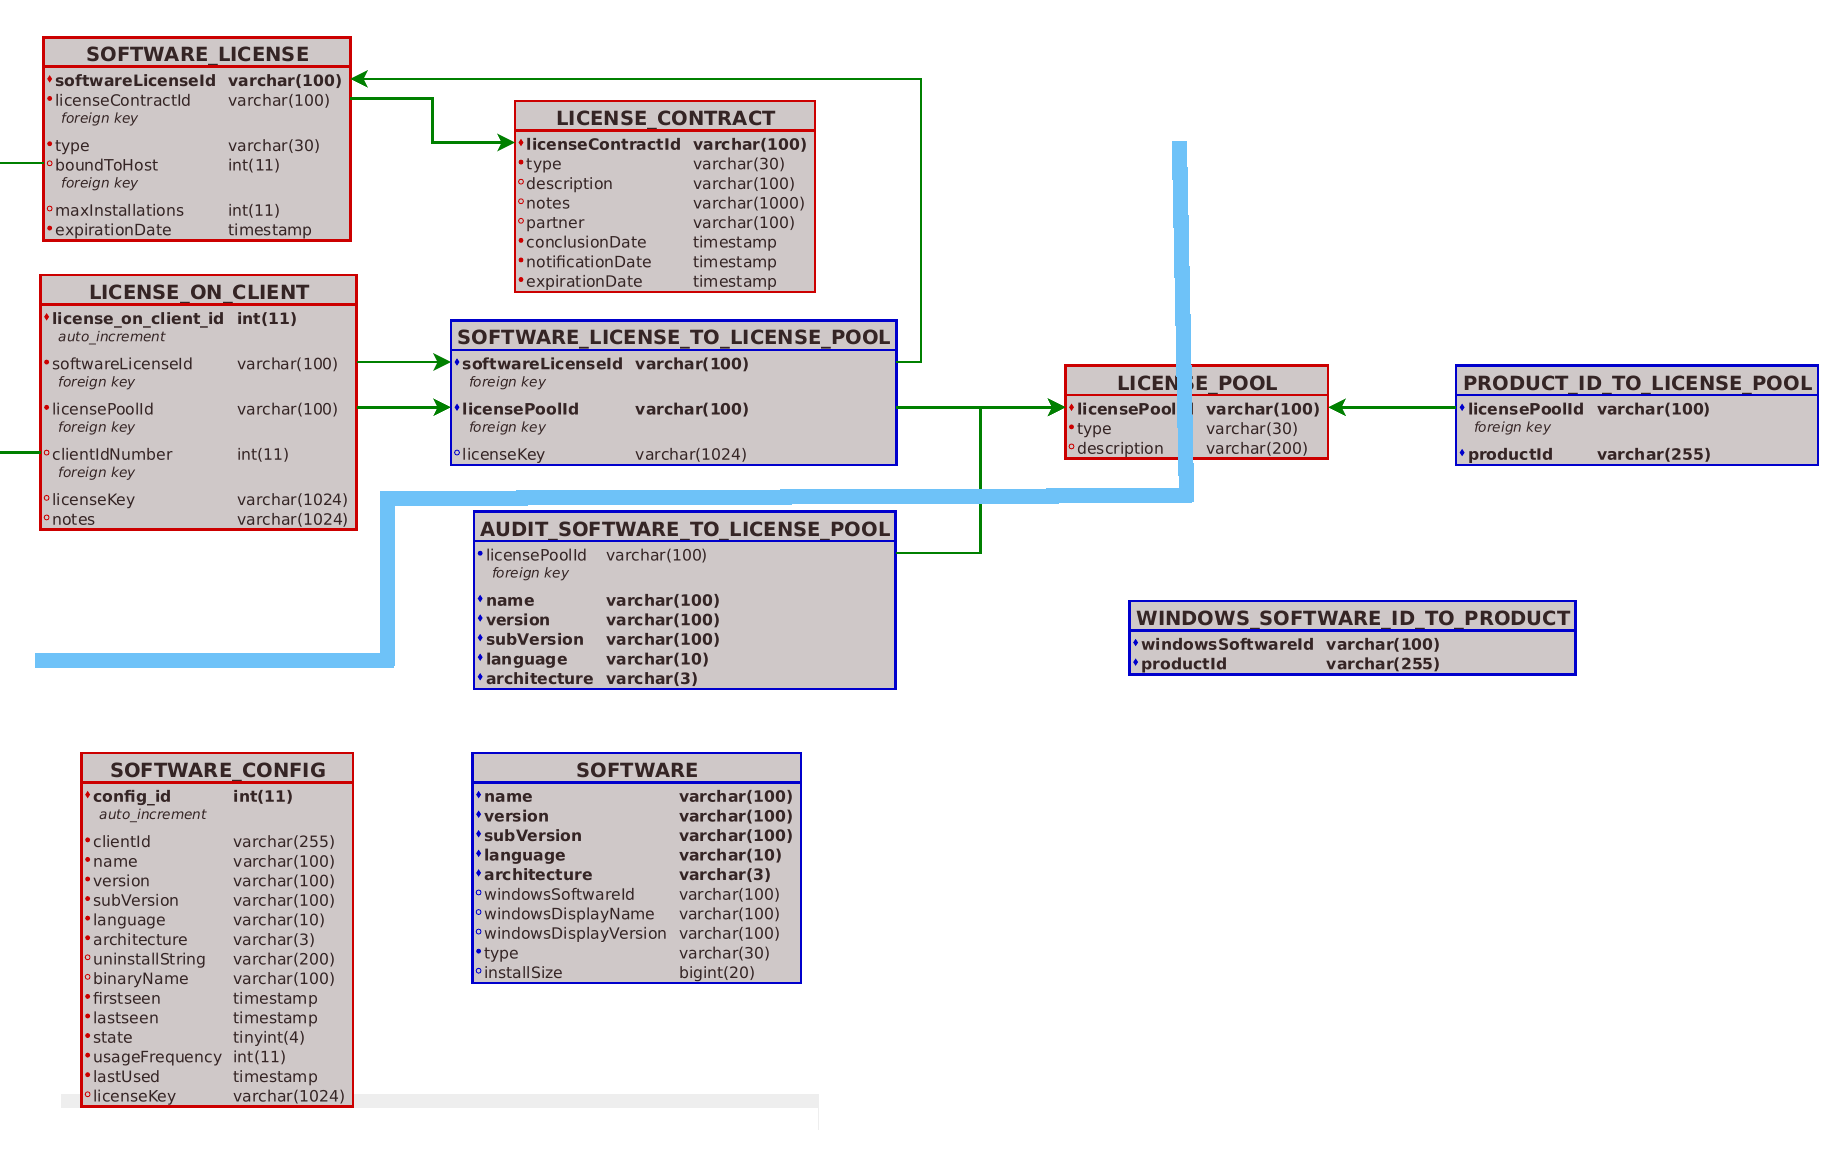
Overview database model
In the world of non-free software, license management is a complex subject. To represent it, opsi has to implement a relatively complex database model.
The involved tables in the opsi database are sketched in the following diagram. The meaning of the different relations should peu à peu become clear by the following explanations of the opsi LICENSE management concepts and usages.
The blue line in the diagram marks the border of the tables which are automatically generated by the software audit functions and the data which is constructed especially for license management. Only the license pool table has connections to both spheres. This fact hints at the importance of this construct.
Invoking the license management from the opsi-configed
A separate window in the opsi-configed management GUI is used for the license management. It is available by pressing the button "licenses" at the top right corner of the opsi-configed management GUI. If the license management module is disabled, then a note will be displayed. (See the entry for "license management" in the main menu under /Help/Modules).

The opsi license management module is an opsi extension module.
license-pools
The license management frame is constructed similarly to the mainframe, showing a line of tabs that lead to subframes, each subframe handling a specific task.
The first subframe introduces the topic "license pools", and defines their relationship to the data on installed software and opsi packages.
What is a license-pool?
A license-pool has to be defined if licensing is needed to be managed for some kind of software.
The license-pool is a construction that denotes the collection of all allowances for installing some kind of software.
The license-pool is the central element of the opsi license management since it encloses two sides, on one hand, references to installed software items and opsi installation packages, on the other hand, references to the legal and technical constructions of the installation permissions.

Administration of license-pools
At the top of the license-pools window is a table of available license-pools.
The field description can be edited here. More editing functions are available from the context menu (right mouse button). The most important is: creating a New license-pool by adding a new row to the table.
When inserting a row, a (unique) licensePoolId must be entered, e.g. following the scheme softprod_pool.
Please do not use special characters. When saving the new entry, any capital letter will be converted to lowercase, therefore avoiding capitals from the beginning is recommended.
The new licensePoolId cannot be changed after it is saved because it is used as the primary key.
After any changes to the data in the window, the green checkmark changes to red, and the cancel option is enabled. The changes can be saved by clicking the red checkmark, or changes can be canceled by clicking the cancel button (also available from the context menu).
license-pools and opsi-products
The standard method to manage licenses is to include the license, from a single license-pool, when installing the software (i.e. using the opsi-product installation software to install Acrobat Writer).
Not unusual is the case that multiple products share the same license pool. This is normal if these products are variants of the same software. For example: the products win10-x64 and opsi-local-image-win10-x64 using the license pool p_win10-x64).
A more complicated situation (which you should avoid) might occur while installing software that requires licenses from several license-pools (i.e. "Designer tools" which installs Adobe Photoshop as well as Acrobat Writer). In this case, the opsi-product requests licenses from several license-pools. At the same time, there might be other opsi-products requesting licenses from the same license-pools (e.g. the Acrobat Writer license-pool). So the relation between opsi-products and license-pools can be ambiguous. This can be avoided by using unambiguous policies when building opsi-products.
| Do not integrate more than one license needing software in one opsi product. Assign this product to the license pool which holds the licenses for this product. (Without this assignment the license management will not work together with the opsi WAN extension. See also chapter WAN Support ) |
The second part of the license-pool tab manages the relationship between license-pools and productIds (from opsi-products).
All tables in the license management module can have their columns sorted by clicking on the column header. Clicking again inverts the order (ascending or descending).
Sorting can be used to display the connections between opsi-products and license-pools. Sorting by opsi-product displays all license-pools connected to a certain opsi-product, whereas sorting by license-pool shows which opsi-products are connected to a license-pool.
The context menu provides an option for inserting a new relationship between opsi-product and license-pool. An empty row is inserted on top of the table. Clicking into the field licensePoolId or productId displays a dropdown with the available options.
license-pools and installed software
The third section of the license-pools tab deals with the correlation between license-pools and installed software found on computers in the opsi network, either installed via opsi or otherwise.
By default, the table in this section contains the identifying attributes of all captured software items. The ID, which is constructed from combining all attributes, acts as a unique key for every software item installed on any computer. The values are determined and transferred to the server via opsi software audit. They are saved in the SOFTWARE_CONFIG table of the opsi database and added to the collective SOFTWARE table, provided they are not yet present. This database table is the base for the table shown in the license management and is of importance outside of the license management as well.
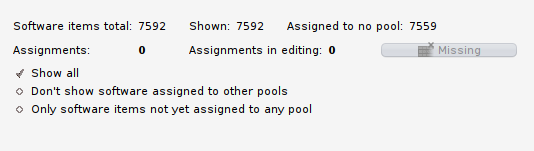
The display of the software table is configured by two lists of options. The first one enables the possibility to restrict the display on certain data:
-
Show all software names
-
Show software names without uniform assignments
-
Show software names without any assignments
The other defines what the selection of a row entails:
-
Selection = Complete list of SW items assigned/to assign
-
Selection = SW items to assign (additionally)

The first option in both lists is always set by default.
The software items (from the SOFTWARE database table ) that are assigned to the selected license-pool (from the LICENSE_POOL table) are shown by highlighting the respective rows in the tables. This allocation is precisely the data from the AUDIT_SOFTWARE_TO_LICENSE_POOL table.
The assignment of software items to the license-pool can be edited by changing the highlighted rows:
| The assignment of software items to license-pools is edited by changing the various selections, either with Ctrl + click or Shift + click. A single mouse click resets the selection. |
If there is an entry for an allocation of a software item to a license-pool in the database but the software does not seem to exist anymore, then the Missing button is set to active. By clicking the button a new window opens and lists the referred software that seems to be missing. It offers the possibility to tidy up and delete the allocation (from the 'AUDIT_SOFTWARE_TO_LICENSE_POOL' table).
Navigating the Software Table
The navigation of the software table deviates from the usual since selecting an item in the software table entails a change in item allocation. Therefore the location of the cursor in the table is not illustrated by a highlighted row but as a red star at the beginning of the row.

The star, meaning the row cursor, changes position by
-
an implicit search of a table entry (e.g. automatically when showing the assigned software items when the license-pool entry in the license-pools table above is changed),
-
a manual search using the search bar,
-
using the red arrow buttons located directly above the table,
-
clicking directly into the assigned column for the star (the very first column) of the desired row (while clicking any other column of that row resets the entire selection).
The allocation of software items to license-pools as a basis for a compliance check
The main principle is simple: When a software pool is established, the utilized software items for this pool are selected with a few mouse clicks. This forms the data basis (for example for the compliance check from Microsoft) to determine the number of installations linked to a pool. The result of this evaluation can be found in the Statistics tab (License usages overview).
The allocation of software items to license-pools has to be maintained meticulously to receive correct results. Especially when software from a license-pool is installed, the specific software item has to be registered to the respective pool.
The different possible configurations of the displays are used to provide functions to support various policies and best practice in data maintenance.
Function: Filtering the assigned software items
The context menu of the table provides the option to switch between viewing all entries (including the highlighted rows) or exclusively the marked ones. Thereby one obtains a list of all assigned software items in the default configuration. This can be helpful since the rows of assigned software items do not necessarily follow each other directly in the overall software list.
After switching to viewing only the marked items:
Instead of using the context menu, one can also click on the filter icon next to the search bar which gives the same result. When all rows are shown this icon appears as an open filter, and when only the highlighted rows are shown the icon appears as a closed filter.
In the filtered view the allocations can be edited as well. In this case, allocated items can only be removed.
Function: Completing the allocations to a software name
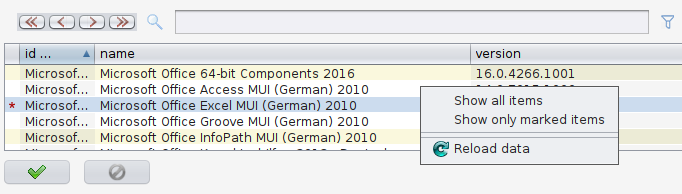
When a manufacturer of a software releases a new version or patch, the new version receives a new windowsSoftwareId and therefore shows up as a new entry in the software table (with a new ID). In most cases, the new software can be treated the same way for licensing as the previous version. If a license agreement was required for the old version, the same likely holds for the new one. This means the demand for a license has to be registered via the same license-pool for both versions. Covering the demand can then be organized via the shared license-pool.
It is important to make sure when rolling out a new version that an allocation is added to the respective license-pool. Besides, some software updates itself without active involvement. Then after the update, the correct allocation might be missing maybe even unnoticed. That is why (since version 4.1.9.8) the opsi-configed includes an auxiliary function to simplify the completion of allocations.
As a basis for this we assume that the data field name is often sufficient to identify the license-pool, and differences in components of the software ID can (often) be ignored in this regard. The functions and options in the gray box with the label Alternative view serve for working with this hypothesis. The button Name → Pool opens an additional window.
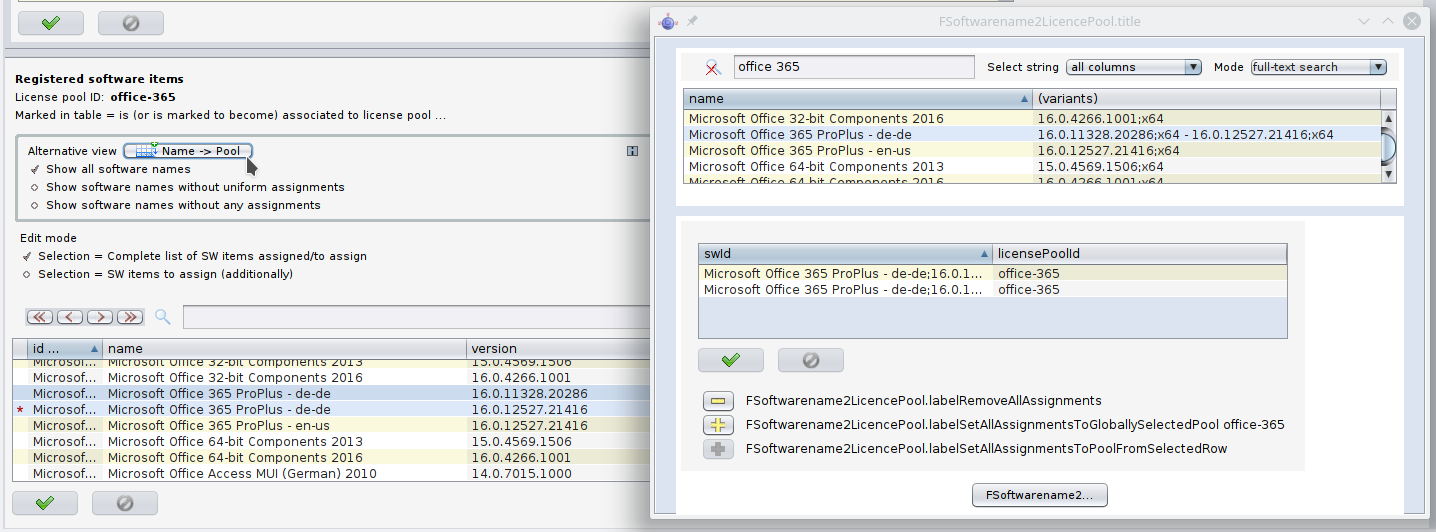
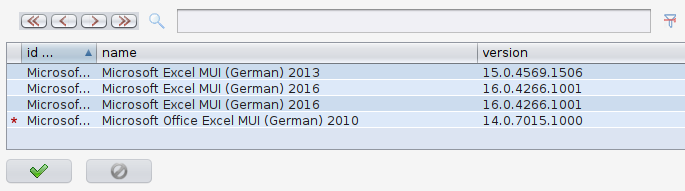
The additional window contains two auxiliary tables. When prior to calling the window the default setting was left at Show all software names, the first column of the first table now displays the software names in alphabetical order. The second column lists all IDs that are associated with the respective name (although the first part of the ID, being the exact software name, is not repeated for simplicity reasons).
When selecting a name in the first table, the dependent second table displays the corresponding IDs individually and specifies if an allocation to a pool exists, and if so to which pool. The license-pool allocations can be unified across all rows of the table in three ways:
-
Remove all allocations,
-
Allocate the currently (in the main window of the license management) selected pool to all ID variations (this is presumably the standard case),
-
When the different variations are currently assigned to different pools, assign all of them to the pool belonging to the selected row.
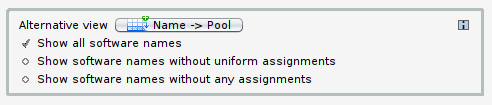
Since one would like to systematically check the license-pool allocations, it is recommended to click the option to show software names without uniform assignments prior to calling the window. When this option is set, the upper table is reduced to the software names that correspond to multiple IDs where those IDs are also assigned to different license-pools.
If such allocation differences exist, an "i" in a small Box within the gray Box of the license management appears as an indicator. This information is designed discreetly, since, depending on the licensing case, it can be correct or even needed to have different software variations licensed differently.
To search for possible forgotten license allocations, the additional window can be opened with the third and final option show software names without any assignment.
Function: Recognizing non allocated Software
Instead of relying on the previously depicted process, thorough license management can also be achieved by assigning every registered software to a license-pool.
For this to work in practice, pseudo license-pools like "free Software" or "Operating System components" are needed to which software items that do not have or require any separate licensing can be assigned to.
To simplify the implementation of this strategy, the opsi-configed offers this additional display option (cf. Software table configuration):
Assuming the initial situation is that the previously registered software has universally been assigned to license-pools, then the following sequence of steps are expedient:
-
Installing a (new) software on a computer.
-
Running swaudit on the computer.
-
If the software is indeed new, the software table receives a new entry; there can also be multiple entries (for example when libraries are installed).
-
When preselecting a suitable license-pool and activating the option Show software names without uniform assignments, then the new table entries are the only highlighted ones.
-
If the preselected license-pool is suitable, a new entry for this license-pool can be added to the previously registered with "Ctrl + click".
For the distribution of arbitrary, initially not determined software items to license-pools, the following procedure can be used:
-
Activate the option Show software names without any assignments
-
Change to edit mode Selection = SW items to assign (additionally)
-
Select and highlight rows using "Ctrl + click"
-
Select the license-pool that the highlighted software items should be assigned to. The save button is now active.
-
Save the changes
-
Reset the edit mode to Selection = Complete list of SW items assigned/to assign
| Please note that when the table filter is active, the functions described here act differently. |
Setting up licenses
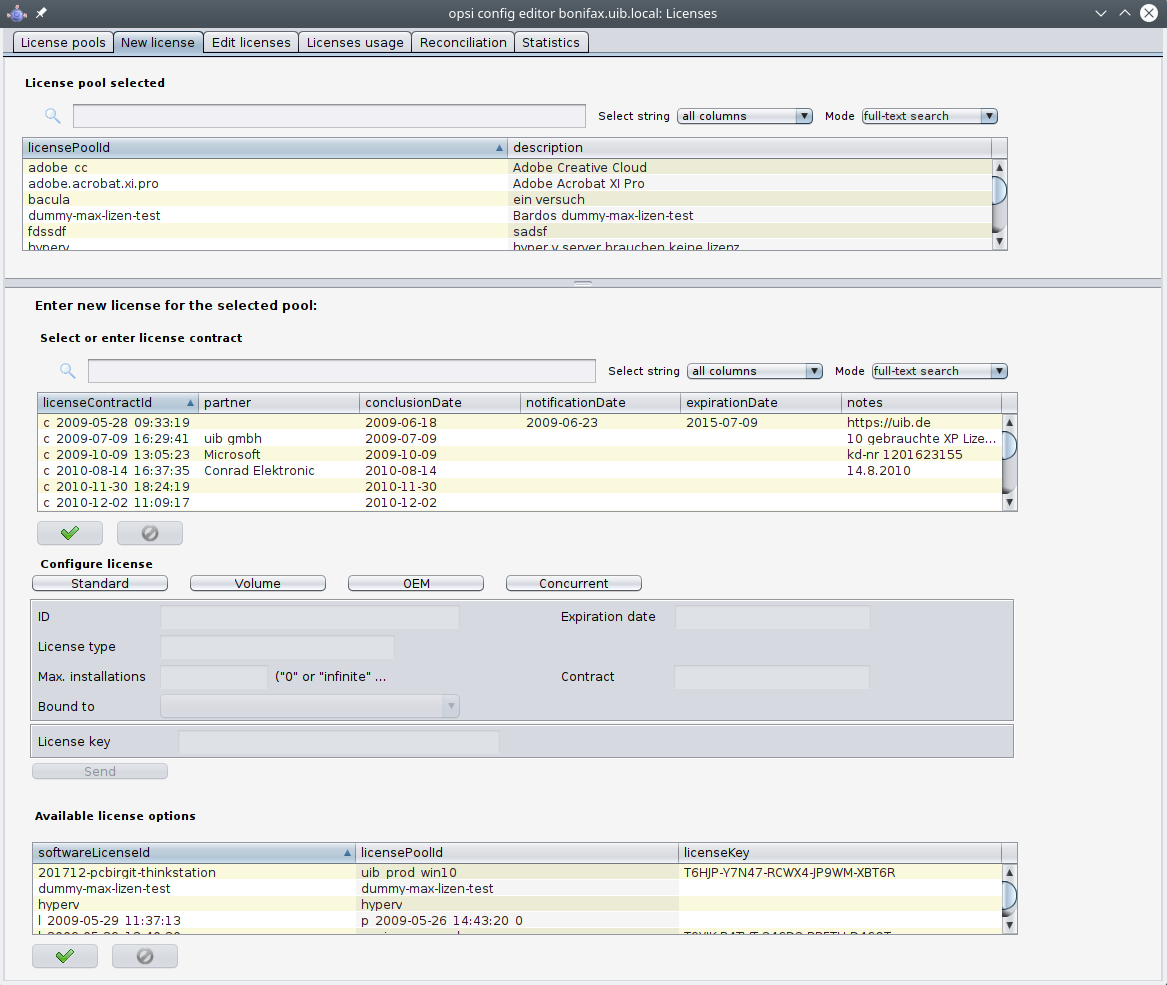
Setting up a license or supplying a license to a license-pool requires several steps. These can be performed in the 'New license' tab, the second tab in the license management window.
At the top there is a table of available license-pools to select the license-pool that the new license is to be assigned to.
Before continuing with the next steps, some basic concepts and terms of license management have to be introduced:
Some aspects and terms of the license concept
Licensing means the actual deployment of a permission to use software by installing the software on a client. This might (but does not have to) include the use of a special license key (license key).
The software license is the permission to install and use a software as defined by the license contract. Within the opsi database, a software license is identified by a softwareLicenseId.
There are several types of software licenses (volume license, OEM license, time-limited license, etc.) which are the different license models. A software license is based on a license contract, which defines and documents the juristic aspects of the license.
A license option defines the option to use a software license for a selected license-pool. Within opsi, the license option is defined by a combination of softwareLicenseId and licensePoolId. This includes the actual licenseKey (if required).
Finally, the license usage documents the use of a license by assigning the license option to a client. This is the legal and implemented licensing of software, defined by the combination of softwareLicenseId, licensePoolId, the unique client name hostId, and (if required) the licenseKey.
Registering the license contract
The next step after selecting the license-pool for the new license option is to register the license contract that the license should be based on. Under "Select or enter license contract" (in the "New license" tab) an existing contract can be selected or a new one can be created.
The license contract dataset comes with the data fields partner, conclusion date, notification date, and expiration date. The entry field notes can hold some additional information like the location where the contract document is kept. The unique contract ID (licenseContractId) is for identifying the license contract in the license management database. When entering a new license contract, a new unique ID is automatically constructed based on the current date and time stamp. The default setting can be used if the license contract is implied by purchasing the software or the contract is documented and traceable some other way. Otherwise, the data can and should be edited to ensure orderly tracking of the underlying contract which can be for example through reference to a file number in the notes field.
The contract ID can only be changed before saving the new data set. When saving the data, the opsi service checks whether the ID is unique. In case it is not, a new ID is generated and cannot be changed anymore.
Configuring the license model
The third part of the "New license" tab, "Configure license", is for registering the license model and license data.
Several types of license models are available:
-
Standard license
-
Volume license
-
OEM license
-
Concurrent license
Each option is represented by a button. By clicking one of the buttons the form is filled with data for that type of license model.
The license model Standard license means, that this license is valid for a single installation on an arbitrary client. So the license key (if any) is valid for a single installation only.
A Volume license is valid for a certain number n of installations. In this case, the optional license key is used for that number of installations. Setting n = 0 means, that the number of installations is unlimited within the same network (campus license).
In the case of an OEM license, the license is valid for a dedicated client only. Clients that come with a vendor pre-installed operating system often have this type of license for the pre-installed OS and software packages.
The Concurrent license means that a certain number of licenses is available for a variable set of clients. Within opsi, this situation is handled like an unlimited Volume license. The number of actual installations in use has to be managed by some external license server.
After clicking a button, the automatically generated data include a unique generated ID (derived from date and time stamp). This ID can be changed as desired.
It depends on the type of license model, which of the other fields can or cannot be changed.
The field "Expiration date" defines the expiration date of the license in a technical sense. (This column of the license is for future use).
Saving the data
The "Send" button sends the data to the opsi service to save them permanently to the opsi database (if they are consistent and no errors occur).
While proceeding with this, data records will be generated for the new software license based on the selected software contract and the new license option assigned to that.
The list of available license options at the bottom of the window will be refreshed with the new license option selected. If necessary, the license key can be changed then.
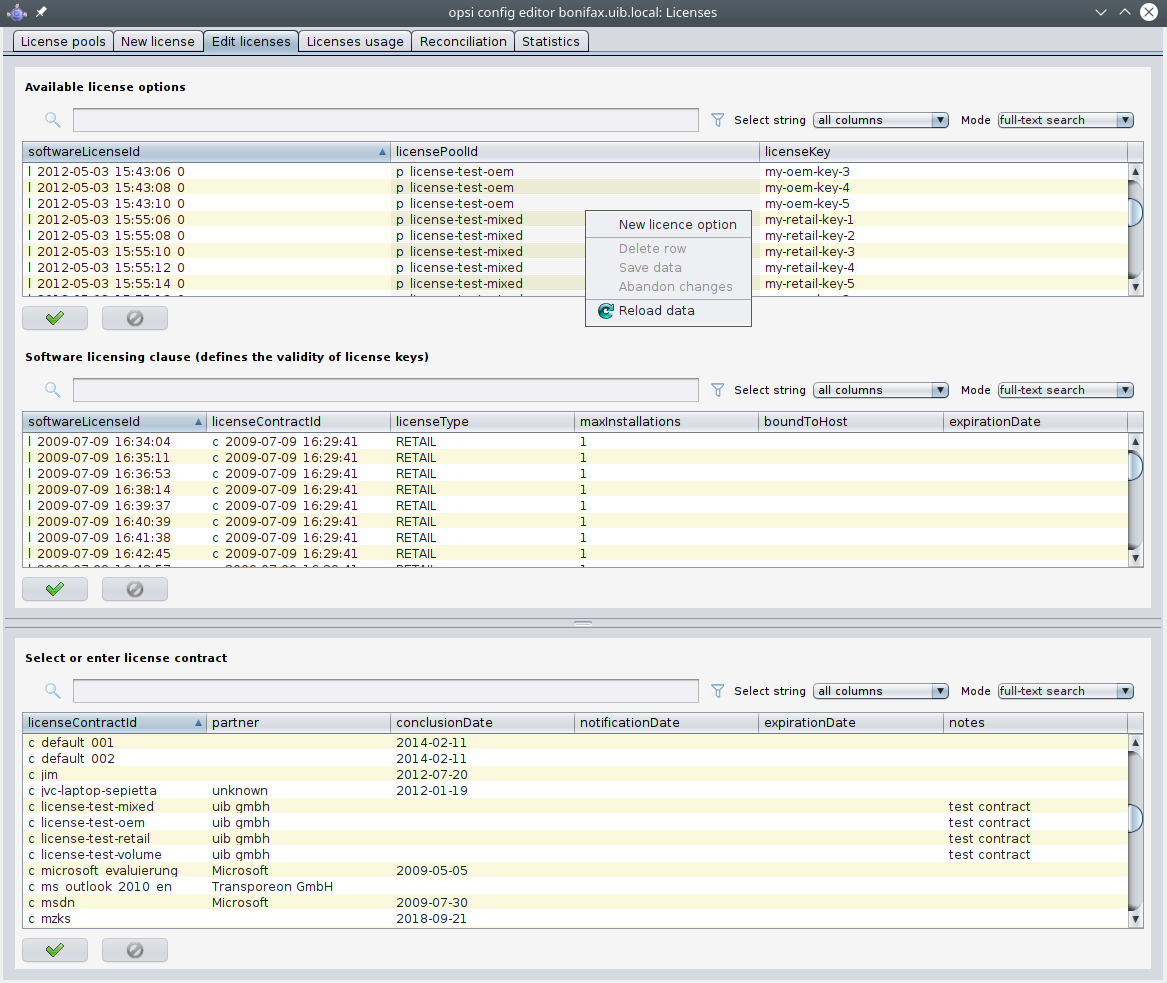
Editing licenses
In ninety percent of the use cases editing the license data with help of the tabs "License pools" and "New license" will do. But there might be some special cases where more specific and explicit editing of the license data is needed. For this, the "Edit licenses" tab presents the license data in three tables, representing the internal data structure and allowing to adapt the data for some special cases.
Based on this direct data access, the following chapter shows how to configure a special license, like the Microsoft Vista or Windows 7 Professional downgrade option for installing Windows XP.
Example downgrade option
The downgrade option means, that instead of the purchased software, the preceding version can also be installed. For instance, installing Windows XP based on a Windows Vista license. In this case, the license key can also be used for an installation, which it was not meant for originally.
In the opsi license model this case can be configured like this:
From the "New license" tab the Vista license is to be registered, as usual, resulting in a new license option, which is displayed in the list of license options at the bottom of the window. This new license option is based on a new software license identified by softwareLicenseId.
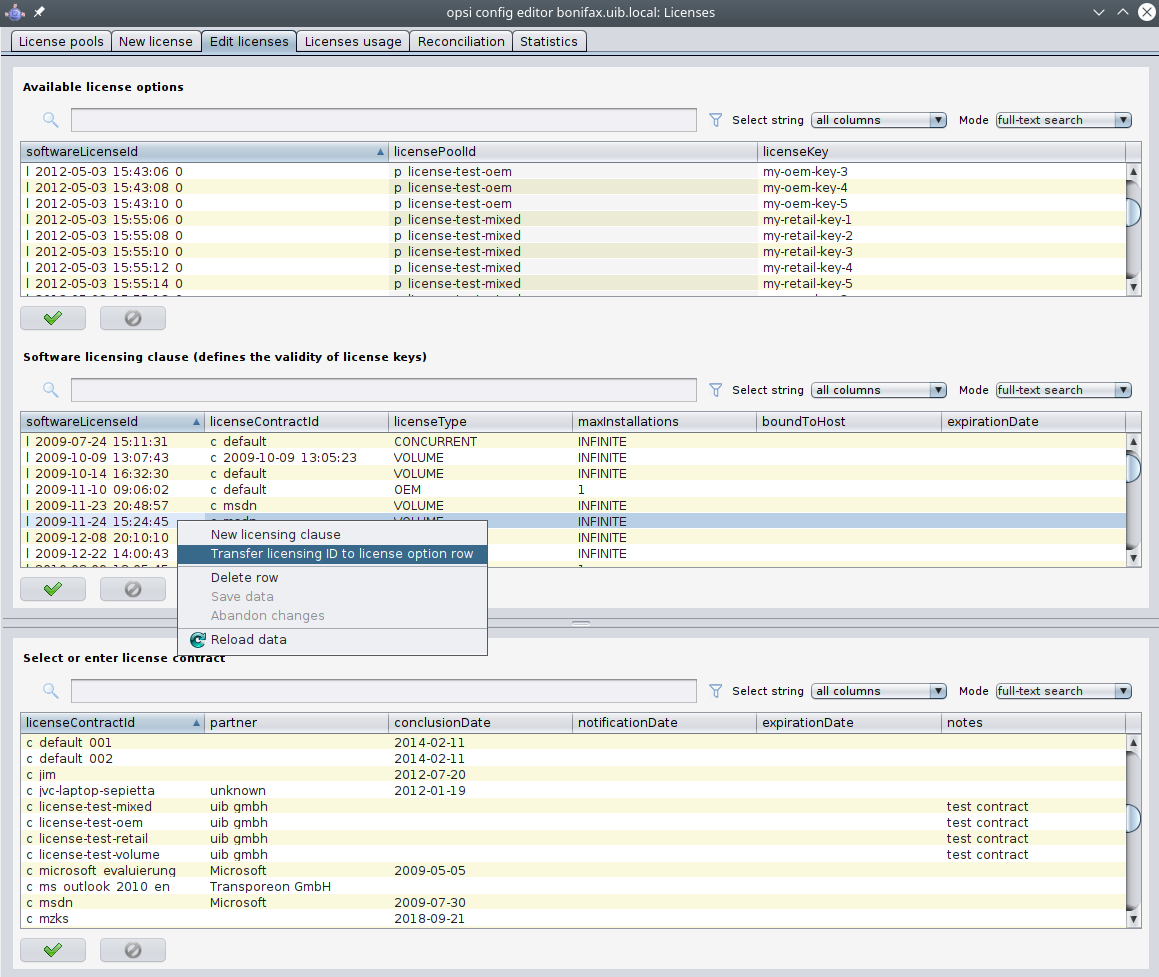
This softwareLicenseId is needed for further configuration steps. You can keep it in mind or copy it with drag&drop. You can look for the ID in the "Available license options" list of the "Edit licenses" tab as well. The context menu also supports copying the ID.
The important step now is to connect this softwareLicenseId to an additional license-pool.
For this, a new record has to be registered from the "Available license options" table of the "Edit licenses" tab. The fields of the new record have to be filled with the softwareLicenseId and the ID of the additional license-pool (in this case the pool for Windows XP licenses). To install Windows XP based on this license, an applicable Windows XP license key that is already in use by another client has to be added.
After saving the new record, there are two different license options based on the same software license! The opsi service counts the use of both of them as an installation deducting from the maximum installation count. So in case of a downgrade license (with maxInstallations = 1), the opsi service delivers a license key for a Vista installation or for an XP installation, but not for both of them.
Assignment and release of licenses
Using a license option by installing the software on a client results in the actual licensing.
In the opsi context, installations are done script-based and automatically. The client running the Winst script then invokes calls to the central opsi service.
The following chapters introduce some of these service calls, which are relevant for license management. For further information about Winst and opsi commands see the documentation on Winst and opsi.
opsi service calls for requesting and releasing a license
The opsi service call for requesting a license option and retrieving the license key for doing the installation (as transmitted by a Winst script) is
getAndAssignSoftwareLicenseKey.
The parameters to be passed are the client hostId (hostID of the client where the software is to be installed) and the ID of the license-pool that the license is requested from. Instead of the licensePoolId, an opsi-product ID or a Windows Software ID can also be passed if they are connected to a license-pool within the opsi license management.
The use of a license option can be released by calling deleteSoftwareLicenseUsage.
Again the parameters to be passed are the hostId and alternatively the licensePoolId, productId or Windows Software ID. Calling this method releases the license option and returns it to the pool of available license options.
For the complete documentation of opsi service calls see below.
opsi-winst script calls for requesting and releasing of licenses
The opsi-winst provides the client-related calls as opsi-winst commands.
An opsi-winst script can make a call to the function DemandLicenseKey
to get a license key for installing. The parameters to be passed are:
DemandLicenseKey (poolId [, productId [, windowsSoftwareId]])
The return value is the license key (which can be empty) as a string:
set $mykey$ = DemandLicenseKey ("pool_office2007")The returned license key can be used by other script commands for installing the software.
For releasing a license option and license key (as to be used in an opsi-winst
deinstallation script) the command FreeLicense is available with the following syntax:
FreeLicense (poolId [, productId [, windowsSoftwareId]])
The boolean function opsiLicenseManagementEnabled can be used to check
whether the opsi license management is enabled and can be used for scripting:
if opsiLicenseManagementEnabled
	set $mykey$ = DemandLicenseKey ("pool_office2007")
else
	set $mykey$ = IniVar("productkey")
The service calls can be invoked from the command-line tool opsi-admin.
Parameters marked with '*' are optional.
License contracts
method createLicenseContract(*licenseContractId, *partner, *conclusionDate, *notificationDate, *expirationDate, *notes)This method registers a new license contract record with the ID 'licenseContractId'. If no 'licenseContractId' is passed, it will be generated automatically. Using the 'licenseContractId' of an existing contract, this contract can be edited.
The parameters partner (co-contractor) and notes are strings and can be filled with any information desired.
The parameters 'conclusionDate' (date of conclusion of the contract), 'notificationDate' (date for a reminder) and 'expirationDate' (expiration date of the contract) are passed in the format YYYY-MM-DD (e.g. 2009-05-18).
The method returns the 'licenseContractId' of the contract.
	set $mykey$ = DemandLicenseKey ("pool_office2007")
else
	set $mykey$ = IniVar("productkey")
With the string returning functions getLastServiceErrorClass and getLastServiceErrorMessage error states can be detected and handled, e.g. if there is no license available:
if getLastServiceErrorClass = "None"
	comment "no error"
endif
The error class LicenseMissingError is returned if a license has been demanded but there is no license available.
The error class LicenseConfigurationError is returned if the current configuration does not allow assignment of a license pool to a software.
This could be the case if either no assignment exists or no distinct assignment is possible.
Manual administration of license usage
Within the opsi config editor, the licenses registered by the opsi service are listed on the tab "License usages":
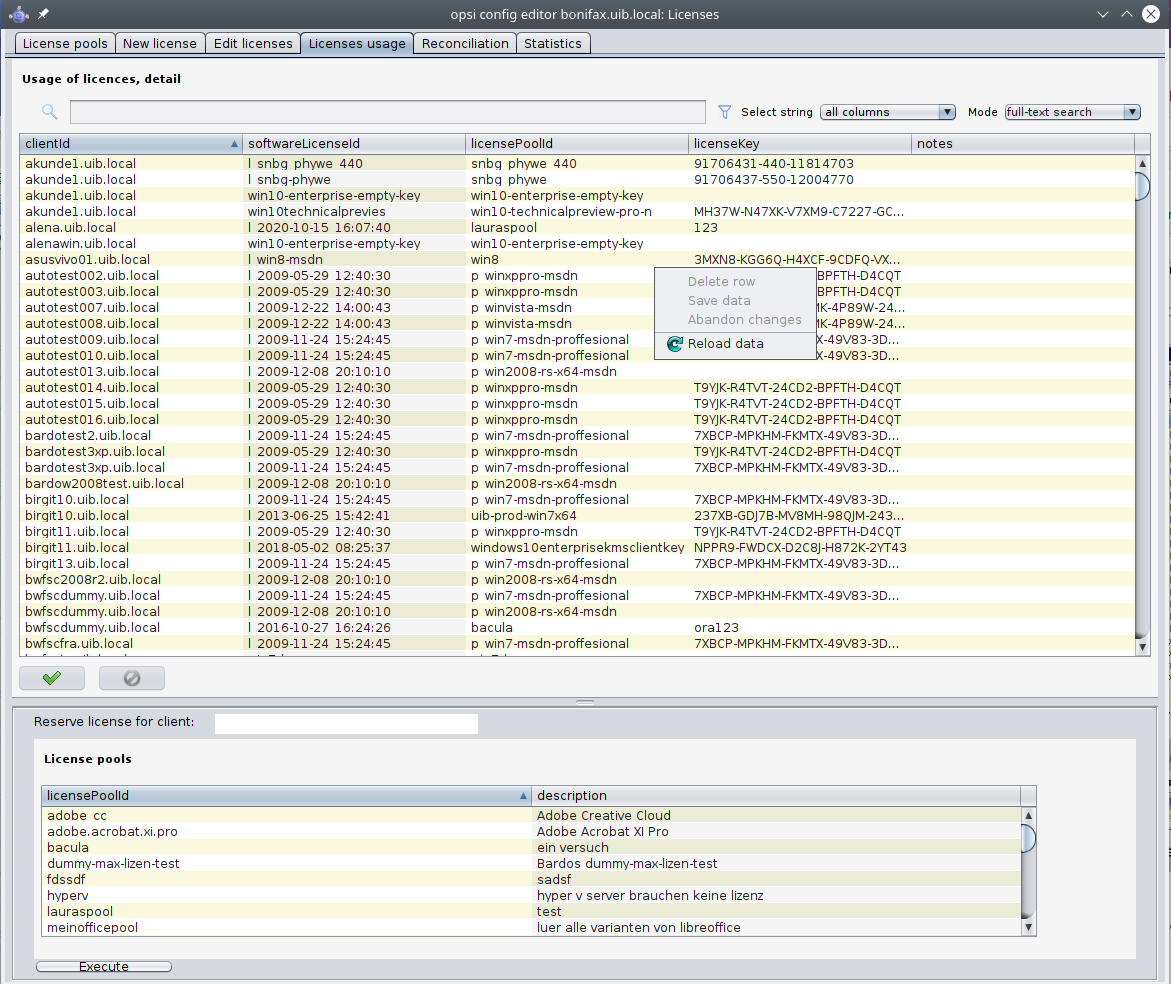
From this tab, licenses can also be managed manually. This can be useful, if a licensed software is not integrated into the opsi deployment, but installed manually on just a few clients.
These are the functions for manual license management in detail:
-
"Delete row" (available from the context menu) releases a license option.
-
"Reserve license for client" at the bottom of the window to create a license reservation for a dedicated client.
-
By editing the field "licenseKey" from the "Usage of licenses" table, the license key can be changed.
Preservation and deletion of license usages
If a software packet is reinstalled, the call to the opsi-winst function DemandLicenseKey will return the same license option and license key as used before.
In case this is not favored, the former license option has to be released by calling the opsi-winst command FreeLicense, or by calling the opsi service call deleteSoftwareLicenseUsage, or deleting the license use manually.
So, if not explicitly deleted, the license usages are preserved when reinstalling a client.
To release the licenses, they can be deleted from the "License usage" tab or deleted by the service call deleteAllSoftwareLicenseUsages by passing the client hostname as a parameter.
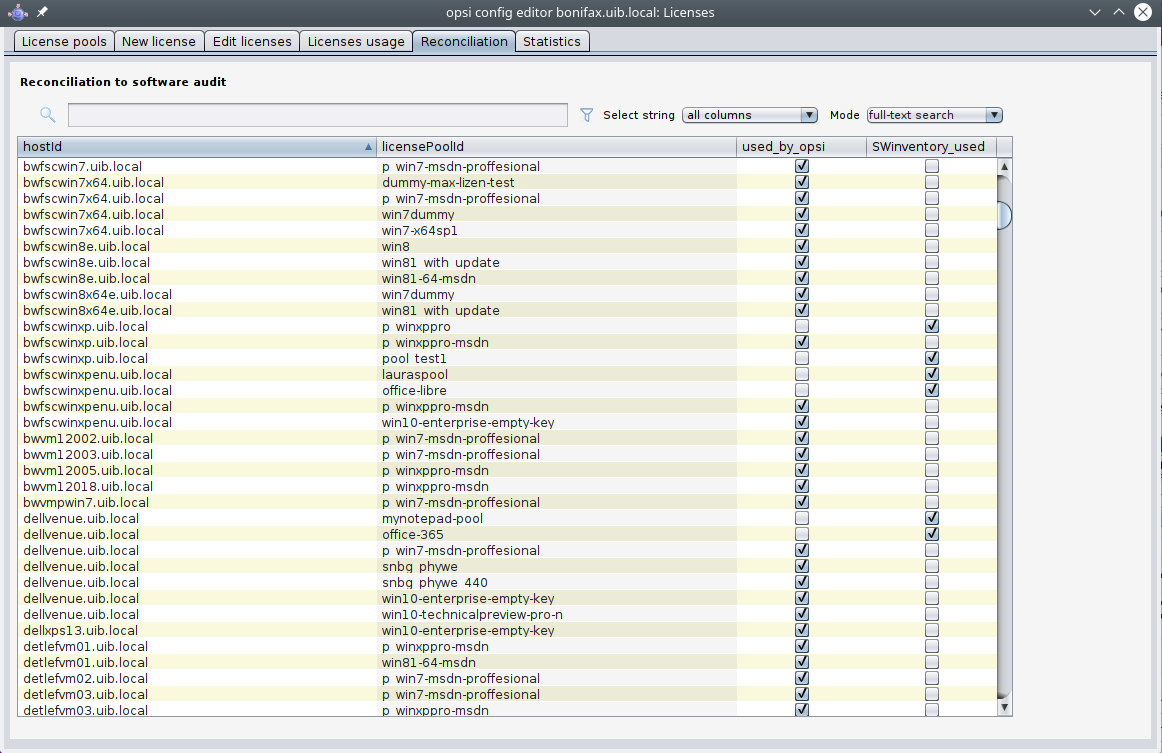
Reconciliation with the software inventory
The tab "Reconciliation" lists for each client and each license-pool whether the use of this license-pool is registered by opsi ("used_by_opsi") and if the software inventory (swaudit) on that client reported a software that requires a license option from that pool ('Swinventory_used').
To evaluate the results from swaudit, the relevant software IDs (as found in the client registry) have to be associated with the appropriate license-pool (tab "License pools").
When matching the data with the software inventory, the license management counts not more than one license per client and license-pool. So for example if the license-pool office2010 is connected with ten different patterns from software inventory, indicating that office2010 is installed on this client, this is (regarding the license usages count) counted as a single installation, although all of the detection patterns might be found on the client.
As usual, this table can be copied using Drag & Drop and for instance pasted to a spreadsheet program. If the opsi-configed process has the required access rights (running standalone and not from the applet), the table can also be printed from the context menu.
By virtue of the config 'configed.license_inventory_extradisplayfields' which can be edited in the host parameter page of the server, you may add extra data fields for each client to the table.
License usages overview
The tab "Statistics" displays a summary of the different license-pools, showing the total number of license options ('license_options') and how many of them are in use ('used_by_opsi') or still available ('remaining opsi').
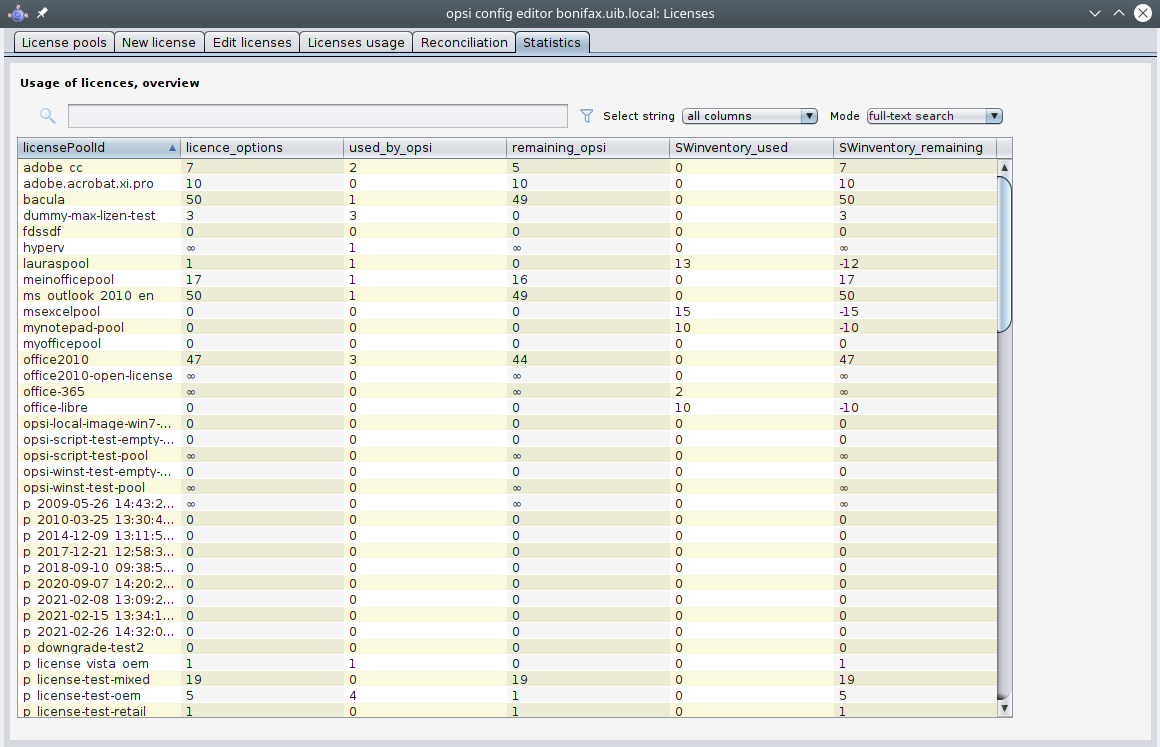
In addition to the number of license-uses registered by opsi ('used by opsi') and the currently available licenses ('remaining…'), the overview also shows the total number of detected installations, that require a license ('SWinventory_used').
The data from the column 'SWinventory_used' is based on the registry scans from the opsi-product swaudit and the assignment of the Windows software IDs (as they are found in the registry) to the license-pools (as registered with the opsi license management (tab "License pools", see license-pools).
From the context menu, the table can be printed (because of restricted access rights not available from the applet), and using drag&drop data can be copied to e.g. a spreadsheet.
In case of downgrade option
If a downgrade option has been configured (see Example downgrade option), it appears in the overview and statistics like this:
A single downgrade license results in a license option for at least two different license-pools but only one of them can be requested for an installation. So using a downgrade license option decreases the number of available license options ('remaining_opsi') in each of the license-pools concerned by that downgrade option by 1. So it looks like a single installation reduces the number of available license options by 2, which, in this case, actually is the fact.
Service methods for license management
The service methods for license management can be called from the command-line tool 'opsi-admin', so they are accessible for scripting, e.g. to read license keys from a file.
Examples can be found in the products 'license-test-….opsi' from https://download.uib.de/opsi4.1/misc/license-management/. After installing the packages with opsi-package-manager -i *.opsi, in the directory /var/lib/opsi/depot/<product name> the corresponding scripts: create_license-*.sh can be found.
As an example here the script create_license-mixed.sh
(the current version comes with the download packet).
#!/bin/bash
# This is a test and example script
# (c) uib gmbh licensed under GPL

PRODUCT_ID=license-test-mixed
# read the license key from a file
# myretailkeys.txt has one licensekey per line
MYRETAILKEYS=`cat myretailkeys.txt`
# myoemkeys.txt has one pair: <licensekey> <hostid.domain.tld> per line
MYOEMKEYS=`cat myoemkeys.txt`
# some output
echo "$PRODUCT_ID"

# this is the function to create the oem licenses
#############
createlic ()
{
while [ -n "$1" ]
do
	#echo $1
	AKTKEY=$1
	shift
	#echo $1
	AKTHOST=$1
	shift
	echo "createSoftwareLicense with oem key: ${PRODUCT_ID}-oem-${AKTKEY} for host ${AKTHOST}"
	MYLIC=`opsi-admin -dS method createSoftwareLicense "" "c_$PRODUCT_ID" "OEM" "1" "${AKTHOST}" ""`
	opsi-admin -d method addSoftwareLicenseToLicensePool "$MYLIC" "p_$PRODUCT_ID" "${PRODUCT_ID}-oem-${AKTKEY}"
done
}
#############

# here the script starts

# delete the existing license pool and all connected licenses
# ATTENTION: never (!) do this on a productive system
echo "deleteLicensePool p_$PRODUCT_ID"
opsi-admin -d method deleteLicensePool "p_$PRODUCT_ID" true

# delete the existing license contract
echo "deleteLicenseContract c_$PRODUCT_ID"
opsi-admin -d method deleteLicenseContract "c_$PRODUCT_ID"

# create the new license pool
# the used method has the following syntax:
# createLicensePool(*licensePoolId, *description, *productIds, *windowsSoftwareIds)
echo "createLicensePool p_$PRODUCT_ID"
opsi-admin -d method createLicensePool "p_$PRODUCT_ID" "opsi license test" \'['"'$PRODUCT_ID'"']\' \'['"'$PRODUCT_ID'"']\'

# create the new license contract
# the used method has the following syntax:
# createLicenseContract(*licenseContractId, *partner, *conclusionDate, *notificationDate, *expirationDate, *notes)
echo "createLicenseContract c_$PRODUCT_ID"
opsi-admin -d method createLicenseContract "c_$PRODUCT_ID" "uib gmbh" "" "" "" "test contract"

# create the new license and add the key(s)
# the used methods have the following syntax:
# createSoftwareLicense(*softwareLicenseId, *licenseContractId, *licenseType, *maxInstallations, *boundToHost, *expirationDate)
# addSoftwareLicenseToLicensePool(softwareLicenseId, licensePoolId, *licenseKey)

# create the retail licenses:
for AKTKEY in $MYRETAILKEYS
do
	echo "createSoftwareLicense with retail key: ${PRODUCT_ID}-retail-${AKTKEY}"
	MYLIC=`opsi-admin -dS method createSoftwareLicense "" "c_$PRODUCT_ID" "RETAIL" "1" "" ""`
	opsi-admin -d method addSoftwareLicenseToLicensePool "$MYLIC" "p_$PRODUCT_ID" "${PRODUCT_ID}-retail-${AKTKEY}"
done

# create the oem licenses
createlic $MYOEMKEYS

# create the volume licenses
echo "createSoftwareLicense with volume key: ${PRODUCT_ID}-vol-key"
MYLIC=`opsi-admin -dS method createSoftwareLicense "" "c_$PRODUCT_ID" "VOLUME" "10" "" ""`
opsi-admin -d method addSoftwareLicenseToLicensePool "$MYLIC" "p_$PRODUCT_ID" "${PRODUCT_ID}-vol-key"#
Example products and templates
In the uib download section at https://download.uib.de/opsi4.1/misc/license-management/ are four example products available. One for each type of license model, as there are Retail, OEM and Volume license type, as well as a product combining all of them.
These example products use as an example some licenses and release them again. So using them leaves some marks in the software inventory, that might be of influence to reconciliation and statistics.
All of these products contain a shell script to automatically generate license-pools, license contracts and license options.
The standard template for opsi-winst scripts 'opsi-template' also contains some examples for using the opsi license management.