Backup of the opsi server
Creating regular backups of the opsi server essentially follows the standard backup strategies used for other Linux systems. However, this chapter specifically outlines the opsi-specific components for backup.
The opsi backup process typically includes these key components:
-
Backup the files of a depot
-
Backup of the Redis database
-
Backup of the opsi database
Backup the Files
For backing up opsi depot servers, it’s important to include the following directories:
-
/etc/opsi -
/var/lib/opsi -
/tftpboot/opsior/var/lib/tftpboot/opsi
The opsiconfd backup command (refer to section opsiconfd backup/restore) only backs up configuration files from /etc/opsi. You must manually handle backups for the other directories.
|
Regarding the data in /var/lib/opsi, here are some specific points:
-
/var/lib/opsi/tmp: This directory holds temporary files which are not necessary to back up. -
/var/lib/opsi/depot: Often, the contents of this folder cannot be fully restored just from the opsi packages, as it may contain additional files such as custom files, Windows installation files, WinPE, and drivers not included in the opsi packages. -
/var/lib/opsi/repository: This directory acts as a cache for opsi packages. You might choose to exclude it from backups, although this means potentially retransferring substantial data volumes during restoration.
Backup the Redis Database
Redis, as an in-memory database, stores its data in the main memory, which contributes to its exceptional speed. However, this storage method also renders it vulnerable to data loss in scenarios such as power failures or abrupt termination of the Redis server process.
To mitigate this risk, the Redis server is typically configured to periodically write data to the hard disk, ensuring data persistence. This is achieved through the creation of RDB (Redis Database) snapshots, where data is saved to the hard disk at predefined intervals. This process guarantees that data remains intact even in cases of server failure or restart.
Additionally, when the Redis server is shut down, it automatically writes the data to the hard disk. Upon restart, the server can reload this data, ensuring no loss of information and allowing for a seamless continuation of operations.
An alternative or complementary approach to RDB snapshots is the use of AOF (Append Only File). In this method, all write operations are continuously recorded in a file, rather than just generating periodic snapshots. In the event of a restart, the Redis server can reconstruct the database using the AOF file.
| For more detailed information, consult the Redis documentation, particularly the chapter on Redis persistence. |
To instruct Redis to create a database dump, use the following command:
redis-cli saveOn opsi servers, the saved database dump is located in the file /var/lib/redis/dump.rdb. This file path is specified in the configuration file /etc/redis/redis.conf, as detailed in the chapter Redis.
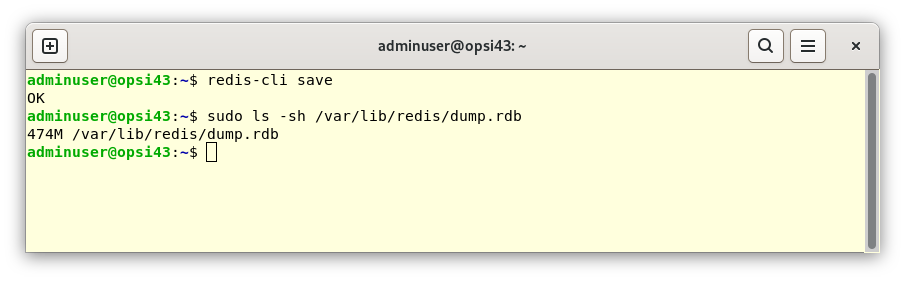
It is important to note that saving the Redis database is not strictly necessary if you use the opsiconfd backup command (as described in the following section). However, creating such a database dump provides an additional layer of security.
|
Backup the opsi Database
opsi also uses a MySQL/MariaDB database (details in the chapter MySQL Server). To back up this database, you can use the standard tool mysqldump. This command generates a database dump for MySQL and MariaDB databases. It exports either an entire database or specific tables to a file, which can then be used to restore or import data.
To create a dump of the database named opsi, compress it, and save it in the file /var/backups/opsi.sql.bz2, use the following command:
mysqldump --single-transaction opsi | bzip2 > /var/backups/opsi.sql.bz2You can manually back up the file /var/backups/opsi.sql.bz2 or include it into your existing backup strategy.
Backing up the MySQL database is not essential if you use the opsiconfd backup command (as explained in the following section). However, creating such a database dump provides an additional layer of security.
|
opsiconfd backup/restore
The opsiconfd Service serves as the central service on every opsi server. Its command line interface offers various commands, including backup and restore. These commands facilitate the backup and restore of the opsi database and configuration files.
When using the backup command, the opsi database is backed up in an object-based manner, rather than creating a database dump. This approach simplifies the process of restoring the backup in different environments, even when using other versions of MySQL.
|
To view a list of all available parameters and their descriptions, you can use the --help option:
opsiconfd backup --help
opsiconfd restore --help
When creating and restoring the backup, the opsi config server is automatically put into maintenance mode by default, as detailed in the section Maintenance. This step is crucial as it guarantees that there is no client activity during the backup and restore processes.
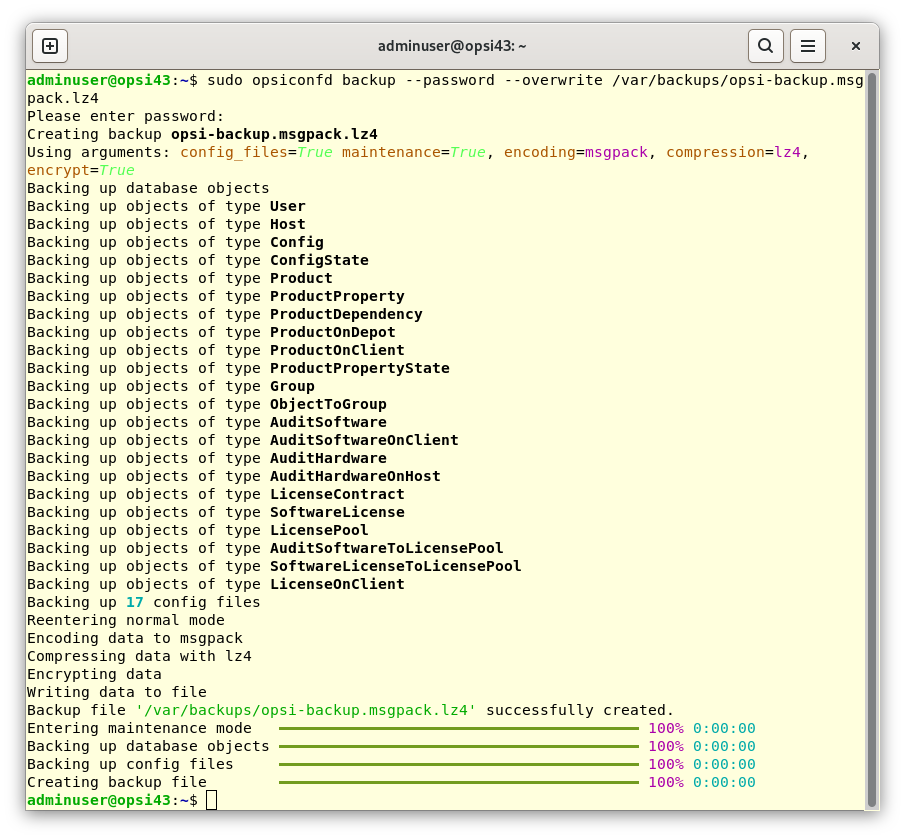
To create a backup in MessagePack format (msgpack) with LZ4 compression, you can use the following command:
opsiconfd backup --quiet --overwrite /var/backups/opsi-backup.msgpack.lz4You have the option to encrypt the backup file using AES (Advanced Encryption Standard). To do this, use the parameter --password in your command. You can either include the password immediately following this parameter, or if you prefer, omit it and enter the password when prompted. This latter method ensures that the password does not appear in your bash history for added security.
To restore the backup you have just created, enter this command:
opsiconfd restore /var/backups/opsi-backup.msgpack.lz4If your backup copy is encrypted, remember to include the --password parameter and enter the previously set password when prompted.
By default, restoring a backup does not include configuration files or Redis data. To restore this data, you need to use the parameters --redis-data or --config-files.
|
Use the --server-id parameter if you need to change the ID of the opsi config server during the restore process.
|
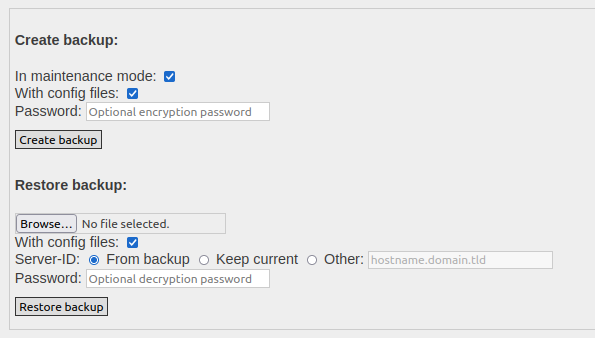
Backup via Admin Page
Alternatively to the command-line methods, backups can also be created through the opsiconfd admin page accessed via a web browser (refer to section Maintenance). On this page, use the checkboxes in the Create backup area to decide whether to include configuration files in the backup and whether to activate maintenance mode during the backup process. Entering a password in the Password field enables AES encryption. After clicking the Create backup button, the backup file is automatically saved in the web browser’s download directory. The file is named using the format opsiconfd-backup, followed by the date and time, for example, opsiconfd-backup-20230628-162048.msgpack.lz4.
To restore, select the desired backup file in the Restore Backup area, and use the Browse button to open a file selection dialog. There are checkboxes available to exclude configuration files and to change the server ID. To restore the backup on a different opsi config server, activate Other and enter the FQDN (Fully Qualified Domain Name) of the server in the provided field. If the backup is encrypted, enter the password in the Password field. Finally, click on Restore backup to initiate the process.