Authorizations
This chapter focuses on user and group administration for the opsi server. You will learn about the default accounts and groups with administrative privileges and the process of creating custom accounts to manage the opsi server. Additionally, the chapter provides guidance on integrating an opsi server into a Windows domain, utilizing a directory service for authentication, and implementing two-factor authentication for enhanced server security.
Users and Groups
opsi uses the following user and group accounts:
-
opsiconfd: This account is for the system serviceopsiconfd(detailed in chapter opsiconfd Service). The account must be a member of theopsiadminandopsifileadminsgroups. -
pcpatch: An account used by opsi clients for CIFS (Samba) access to the opsi depot. It must be a member of theopsifileadminsgroup (refer to section Password for User pcpatch).
To manage local users and groups on the opsi server, employ standard Linux tools such as useradd, usermod, groupadd, groupmod, etc. (see section Creating an Admin Account). Alternatively, you can connect the opsi config server to an existing Windows domain (see section Including opsi Server in Windows Domain) or to LDAP/Active Directory (see section Authentication against Directory Service).
|
opsi uses specific groups to manage authorizations:
-
opsiadmin: Members of this group have administrative access to the opsi service. This means they are granted full access via various interfaces, including the management interfaceopsi-configed, the opsi WebGUI, and theopsiconfdadmin page. -
opsifileadmins: Members of this group have administrative access to opsi files (i.e. the depot, repository, and workbench). -
opsireadonly: Members of this group are provided with read-only access to the opsi service.
The names of these groups can be modified in the configuration file /etc/opsi/opsi.conf, specifically within the groups section:
[groups]
fileadmingroup = "opsifileadmins"
admingroup = "opsiadmin"
readonly = "opsireadonlys"
Creating an Admin Account
To create local users and groups on the opsi config server, you should use the standard Linux tools. For instance, to set up a new user named adminuser and grant them full administrative access to the opsi server, you would add them to the opsiadmin and opsifileadmins groups.
The adminuser account already exists in the preconfigured virtual machine and in our Docker container. However, you can follow these steps to add more accounts.
|
Begin by creating the new account with the useradd command:
sudo useradd -m -s /bin/bash adminuserThen set a Unix password (system) for the new account:
sudo passwd adminuserIf the user is also to have file access via CIFS (Samba), set a password for this as well:
sudo smbpasswd -a adminuser| Do not use the § character in passwords! |
Next, add the new user to the opsiadmin and opsifileadmins groups:
usermod -aG opsiadmin adminuser opsifileadminsEnter the command id to check that the account adminuser exists and belongs to both groups:
id adminuser
# uid=1000(adminuser) gid=1000(opsiadmin) groups=1000(opsiadmin),999(opsifileadmins)
Password for User pcpatch
Since opsi clients use this account for authentication, the opsi config server needs to be aware of the password. To ensure security, the password is stored in an encrypted format in the file /etc/opsi/passwd. Upon the installation of an opsi config server, a random password is automatically generated, which typically does not require modification.
However, if you need to change the password, you can do so using the command line tool opsi-admin. For more information on how to use this tool, refer to the section opsi-admin:
opsiconfd setup --set-depot-user-passwordAfter pressing the [Enter] button, you will be prompted to enter the new password.
| This action will change the password for both the local Unix and Samba account. If it concerns a domain account, you will also need to manually reset the new password within the domain settings. |
Including opsi Server in Windows Domain
For an opsi server to work within a Windows or Samba 4 domain environment, as opposed to using local Unix and Samba accounts, the opsiadmin and opsifileadmins groups should be created within the domain.
If you wish to use different names for these groups or use existing domain groups, modify the group names in the /etc/opsi/opsi.conf configuration file accordingly.
|
Additionally, create a domain user pcpatch as a member of the opsifileadmins group, and opsiconfd as a member of both opsiadmin and opsifileadmins groups.
Next, remove the opsiadmin and opsifileadmins groups from the local Unix system using the groupdel command. Also, delete the local Unix accounts opsiconfd and pcpatch using the userdel command.
Proceed to add the opsi server to the Windows domain. The specific steps for this process vary and should be referenced from the documentation of the Linux distribution in use.
Once the server is joined to the domain, execute the following two commands:
opsiconfd setup
opsi-set-rights| For more information on the two commands, see the two sections opsiconfd setup Command and opsi-set-rights. |
Finally, reset the password for the user pcpatch (see section Password for User pcpatch).
Authentication against Directory Service
By default, opsi employs PAM (Pluggable Authentication Modules) for authentication across various services and applications. This method is compatible with both local users and groups, as well as with opsi servers integrated into a domain. Alternatively, directory services such as LDAP (Lightweight Directory Access Protocol) or AD (Active Directory) can be used. These directory services centralize user accounts, groups, and other identity information, facilitating authentication and authorization across different services and applications.
| Samba authentication operates separately from this system. Therefore, the approach detailed in this section is particularly relevant for opsi environments where administrators access opsi shares via WebDAV instead of Samba, which is commonly the case with opsi servers running in Docker. |
| To use an LDAP server or an Active Directory for authentication instead of PAM, the opsi extension opsi directory connector is required. |
Configuration
Configuration for connecting opsi to AD/Samba 4 or LDAP is done through the /etc/opsi/opsi.conf file, specifically in the [ldap_auth] section. In both scenarios—whether integrating with AD/Samba 4 or LDAP—you need to specify the address of the directory service using the ldap_url parameter. The URL should be structured as follows:
ldap[s]://<Adresse-des-LDAP-Servers>[:port]/<base-dn>In addition to specifying the LDAP/AD address, you can set the username for authentication using the username option in the configuration file. This option allows the use of placeholders such as {username} and {base}. Generally, providing the ldap_url is sufficient for most setups.
Here’s an example for connecting to an Active Directory or Samba 4:
[ldap_auth]
ldap_url = "ldaps://ad.company.de/dc=ad,dc=company,dc=de"
Example for connecting to an OpenLDAP service:
[ldap_auth]
ldap_url = "ldaps://ldap.company.org:636/dc=company,dc=org"
username = "uid={username},dc=Users,{base}"
Once you have made and saved the necessary changes in the configuration file, you should restart the opsiconfd service to apply these changes.
It’s important to ensure that the group specified after admingroup in the /etc/opsi/opsi.conf file also exists in the directory service.
|
Two-Factor Authentication
The opsi server supports two-factor authentication (2FA) using the TOTP (Time-based One-Time Password) algorithm. This standard method for 2FA generates a one-time password comprising six digits, which is required in addition to the usual credentials for logging into the opsi server.
| To implement two-factor authentication, the opsi extension WAN/VPN is required. i |
General Setup
i
To enable two-factor authentication, adjust the configuration of the opsiconfd service (refer to section Configuration). Modify the /etc/opsi/opsiconfd.conf file and specify one of the following values for the multi-factor-auth option:
-
inactive: Disables two-factor authentication (the default setting). This is also applicable to users with TOTP configured. -
totp_optional: Makes TOTP-based two-factor authentication optional. Users who have TOTP enabled must use it. -
totp_mandatory: Enforces TOTP as a mandatory requirement. Users who haven’t enabled TOTP will not be able to log in.
Remember to execute the command opsiconfd reload after making your changes.
|
User-specific Setup
The configuration is managed through the Users tab on the Admin Page. To initiate two-factor authentication for a specific user, click on Generate new secret and activate TOTP. This action generates a server-side secret and activates two-factor authentication for that user.
Following this, the displayed QR code can be scanned using an app like 2FA Authenticator (2FAS), available for both Android and iOS. The app then produces a new one-time password every 30 seconds, which the user needs to append to their regular password during authentication.
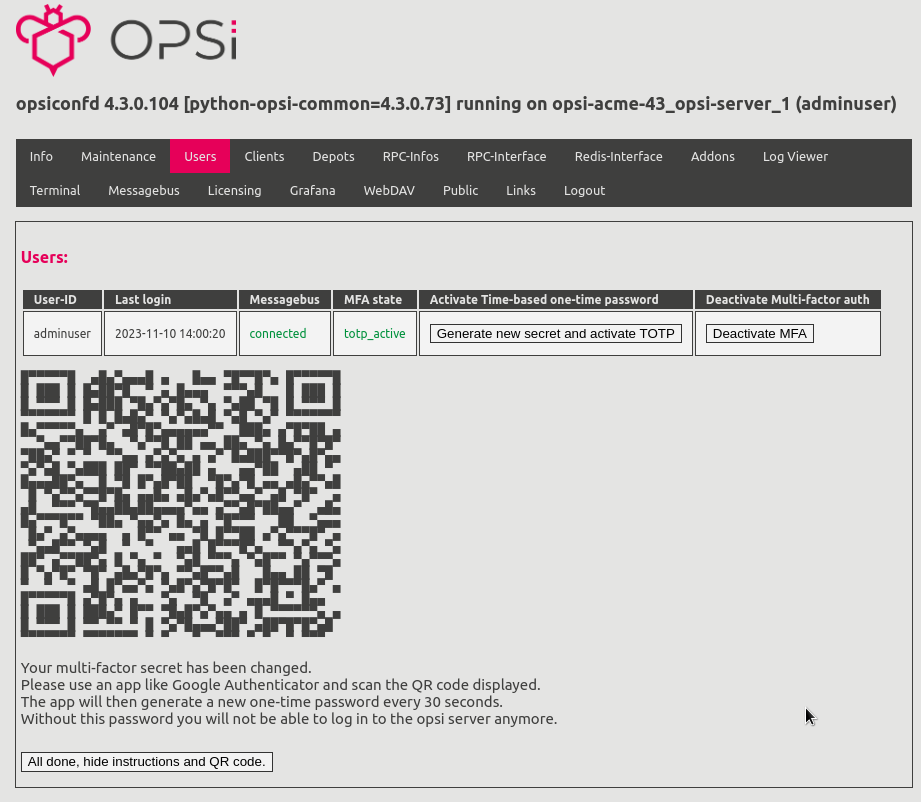
| Generating a new secret by clicking on Generate new secret and activate TOTP again will invalidate the user’s previous QR code. |
To turn off two-factor authentication for an account, select Deactivate MFA.