Manual
The following chapters provide an in-depth look at the user interface, focusing on managing clients with opsi-configed and working with depots. Additionally, these chapters will offer insights into various configuration options available for the OPSI server, including managing client groups and handling products/packages.
User Interface
After successfully logging in, you will see the main window of opsi-configed. On the left-hand side, you will find a group of icons that you can use to select the various main displays. The Client configuration is selected by default. The following displays exist:
-
Dashboard
-
Health Check

In the top bar, the title of the currently selected view is displayed in the middle. On the left-hand side there is an icon for a complete reload of all data and an icon for saving. On the right-hand side, there are view-specific icons that have different functions depending on the selected view. In the client configuration, there is an icon for creating a new client and one for a free client search.

From almost all sections, you can copy data to the clipboard and paste it into other applications. Additionally, most opsi-configed tables support drag and drop, allowing you to conveniently transfer table data to a spreadsheet application.
|
Light and Dark Theme
Starting with OPSI 4.3, opsi-configed supports a dark mode. To activate it, open the File menu and select Theme / Dark.
To switch back to the light theme, select Theme / Light from the File menu.
opsi-configed stores several settings on the local computer (where you launched the program), including the chosen theme, the last selected clients/groups, and depots. Thus, you will find the same settings upon restarting the program.
|
Clients
This chapter introduces client management with opsi-configed and the features available after clicking the Client Configuration button in the top right overview. You will learn, among other things, how to search for specific clients and retrieve additional information like session data, how to create and manage clients and client groups, execute remote control commands, send pop-up messages, and more.
Searching Clients
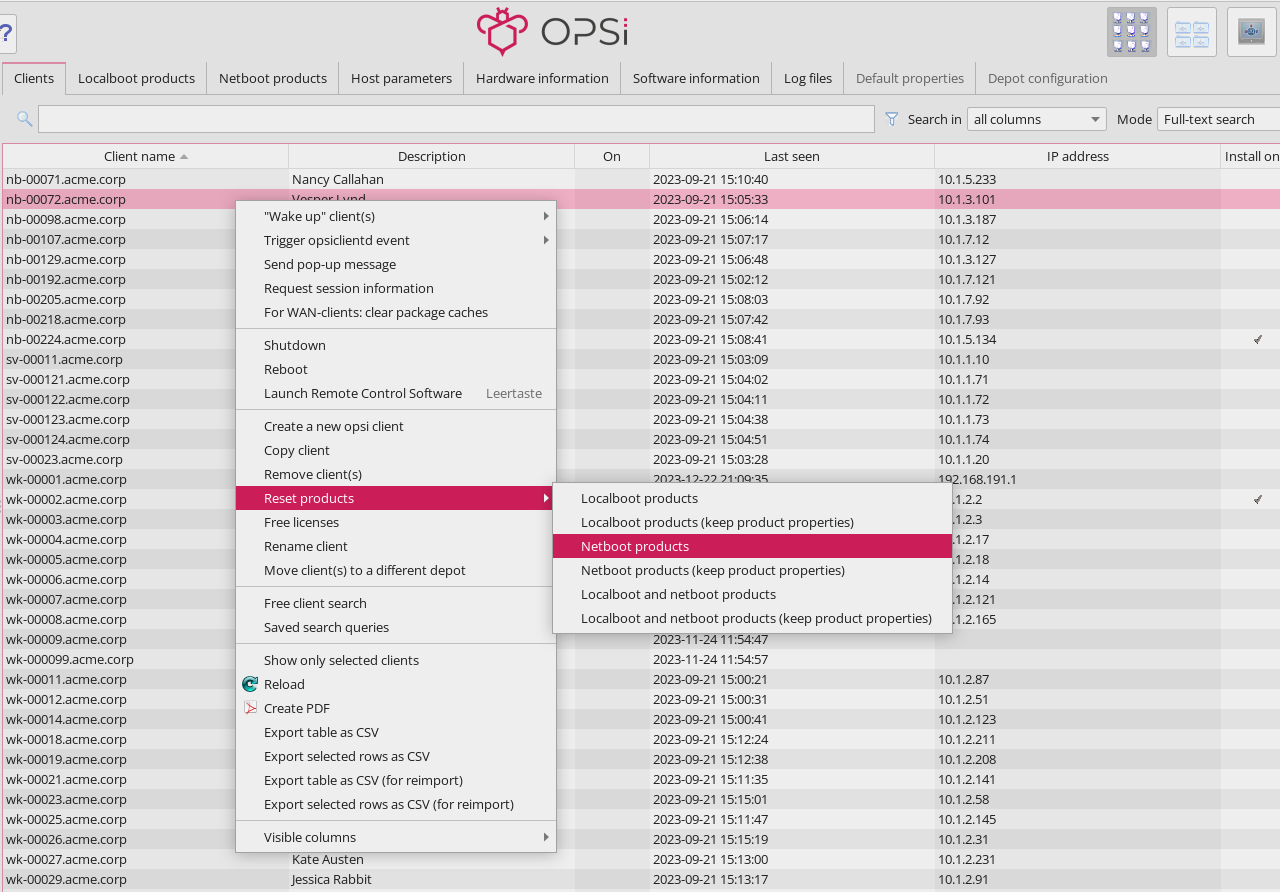
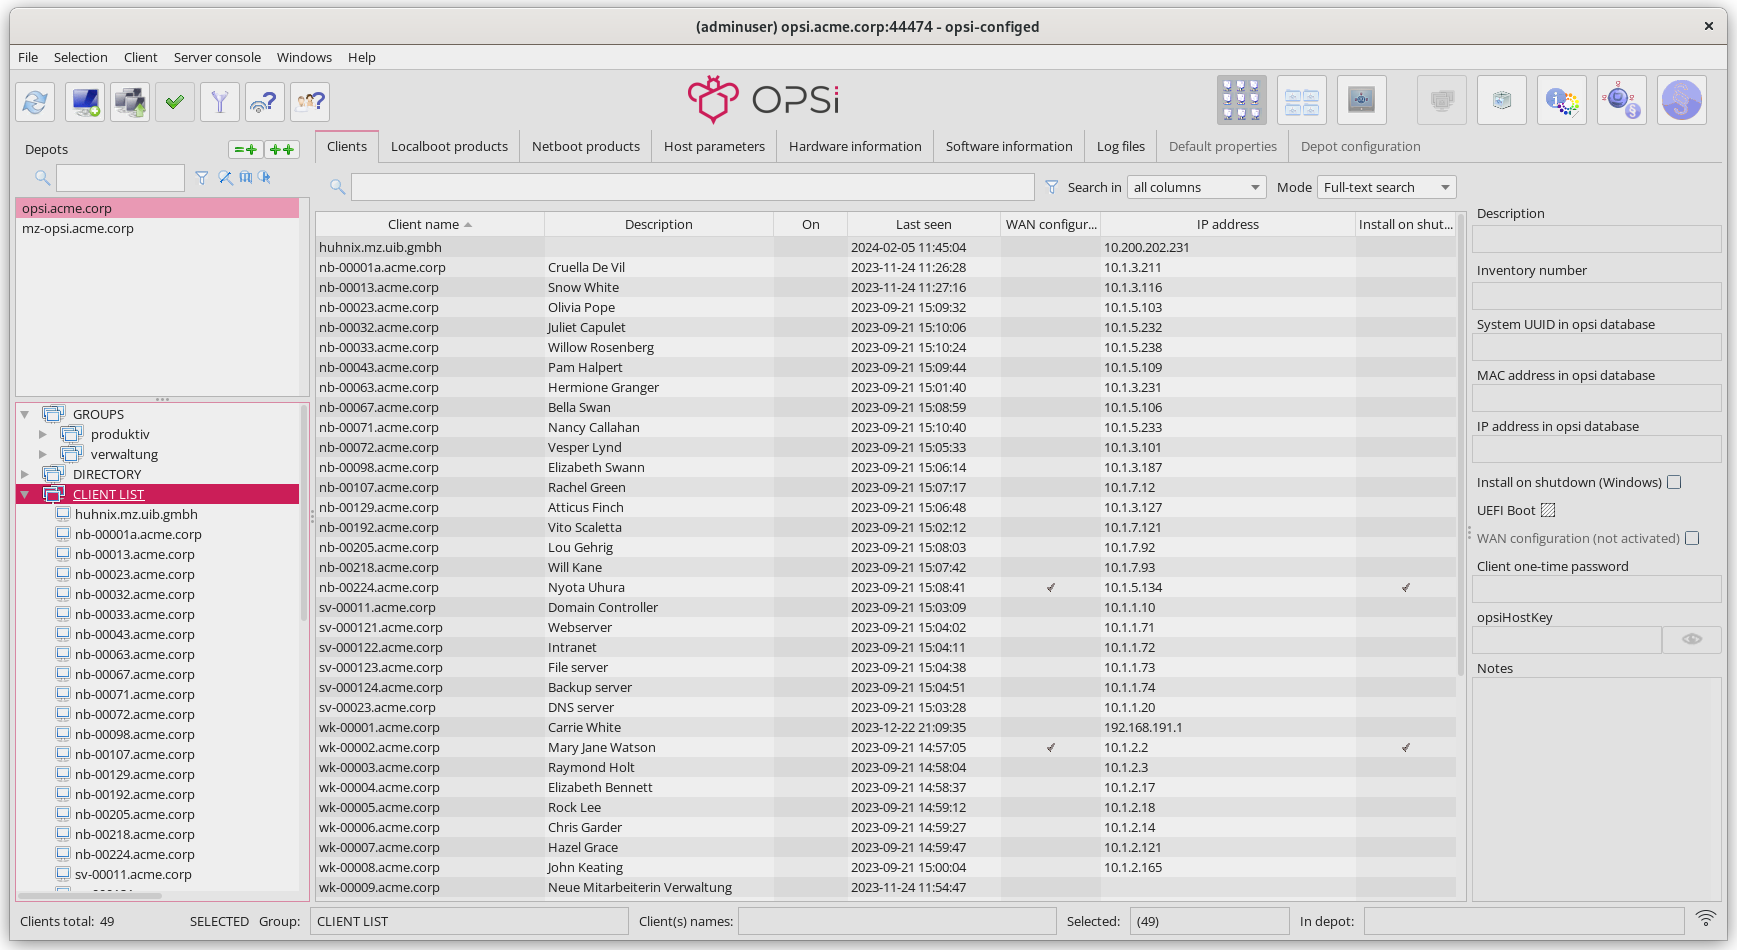
After you have successfully logged in, the Clients tab in the center of the main window is activated. Here you see a list of clients that belong to the currently selected depot or the selection in the left sidebar (see section Grouping Clients). Right-clicking on the selected clients opens a context menu through which you can perform various actions, such as triggering events, sending messages, shutting down, and restarting, etc.
At the top, there’s a search field where you can enter a string. Right next to it, you decide through a drop-down menu where opsi-configed should search: in all columns (meaning all columns that are displayed in the current configuration), by client name, description, status (on/off), date (last seen), and by all other active columns. There are two further options within the search field that influence the search:
-
Case sensitivity (Cc): If this button is active, the upper and lower case of the results must match the search string. Otherwise it does not matter.
-
Regular expression (.*): If this button is active, the search term is interpreted as a regular expression. A regular expression consists of patterns that are searched for. For details on these patterns, please refer to the Java documentation for
java.util.regex.Pattern.
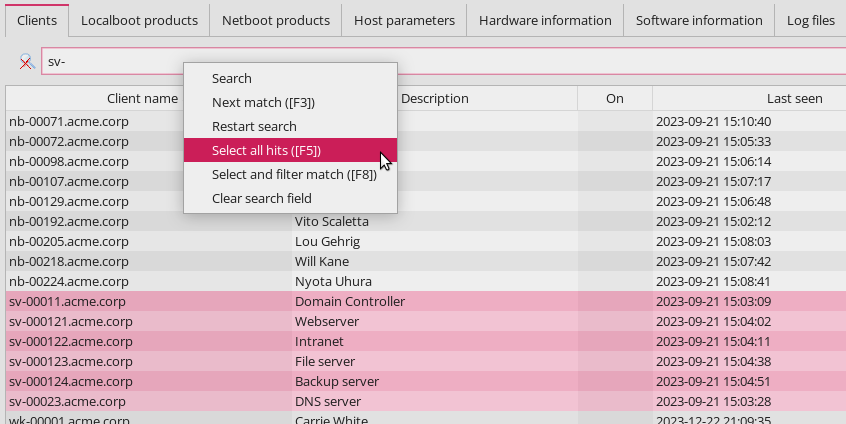
When you press the [Enter] key after entering your search expression, opsi-configed jumps to the next match (without match there is no selection). Right-click in the search box to display additional options.
Examples of Search Patterns
| Below are a few examples of simple and complex search patterns. |
If you want to search for the string "Meyer" in the names or descriptions of PCs, you can use the pattern .eyer.. Here, the dot (.) represents any character, and the asterisk () represents any number of occurrences (of the preceding element). .*eyer. means the search pattern matches as long as there is something before eyer and something follows it. As any number of occurrences also includes no occurrence, the string "PC Meyer" would match, for example.
To ensure that strings like "Beyer" aren’t also found, the search pattern should be better specified as .[Mm]eyer.. The square brackets mean that exactly one of the listed characters (either an M or an m) must be present.
|
The second example demonstrates search patterns for products. 0.-opsi.*standard looks for all product names starting with 0, followed by any character, followed by -opsi, followed by any characters (in any number); ending with standard. If you want to ensure that the second character is a digit between 0 and 9, then use this expression: 0[0123456789]-opsi.*standard. As a shortcut for [0123456789], you can also write [0-9], as it represents a continuous subsequence of the sequence of all digits. This search pattern would match products such as 03-opsi-abo-standard and 05_opsi-linux_standard, for example.
Listing Clients
The table on the Clients tab shows the following columns by default:
-
Client name: Displays the FQDN, i.e. the client’s hostname and the domain name.
-
Description: This column may contain an optional description.
-
On: The column shows which clients are currently connected. The values are updated automatically via the messagebus.
-
Last seen: Here you can see the date and time at which the client last reported to the software distribution via the
opsiconfdservice. -
IP address: Displays the client’s IP address.
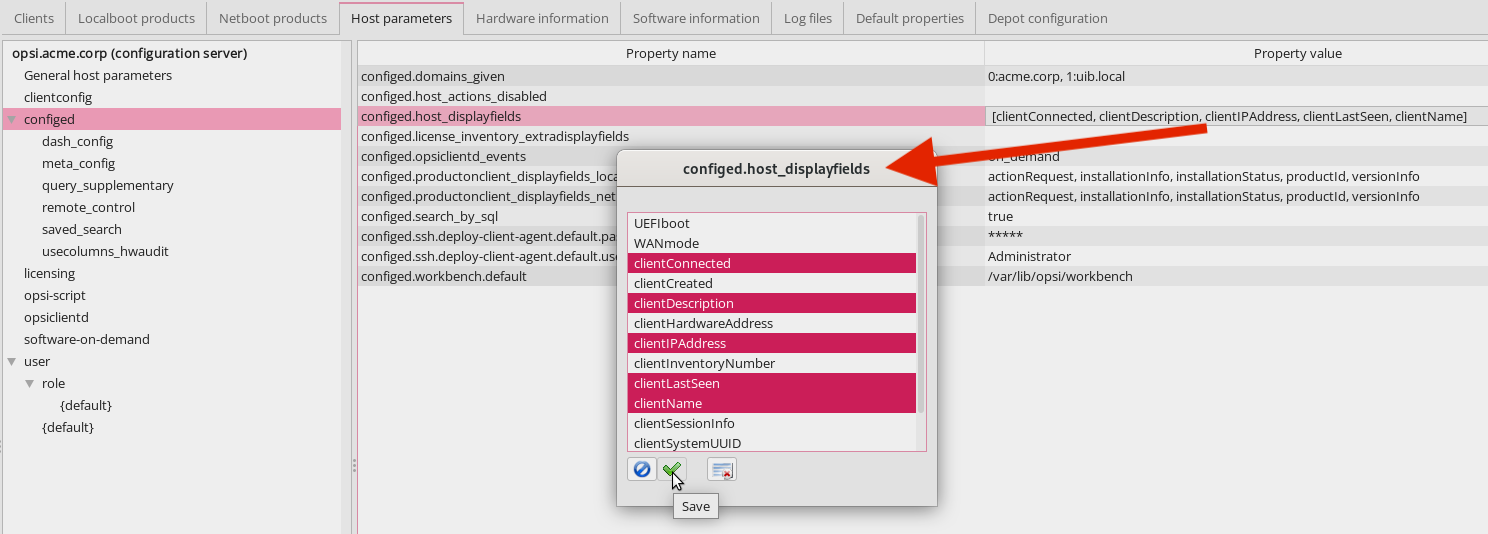
Click on a column title to reverse the order. Optionally, you can show additional columns by right-clicking on the table and opening the Visible columns entry in the context menu. Now select the columns that you would also like to show: WAN Configuration, System UUID, MAC address, Session information, Inventory number, Creation date, Install on shutdown, Depot and Health Check active.
To permanently display the additional columns in opsi-configed, use the top right icon to change to the server configuration (see the chapter Server) and open the Host parameters tab. Edit the configed / configed.host_displayfields option accordingly.
|
In the column Session information, the account name of the currently active user session is displayed. This information can be retrieved for the selected clients via the context menu or via the Client menu item by clicking on Request session information. The opsiconfd attempts to establish a connection to these clients and collect this information. If no client is selected, the information is retrieved for all clients. By selecting specific clients, you avoid unnecessary waiting for network timeouts if an attempt is made to establish a connection to computers that are switched off.
| Since the search function for the client list includes all columns, you can also use it to search for clients where a specific user is logged in. |
Selecting Clients
You can select one or several clients in the client list to edit them together. Use the funnel icon to limit the list to your selected clients.
| You can add the selected clients to an existing group by dragging and dropping them onto a group name in the left sidebar. |
Using the third icon from the left or through the Selection menu, you can start the free client search dialog, where you can search based on client and/or product properties.
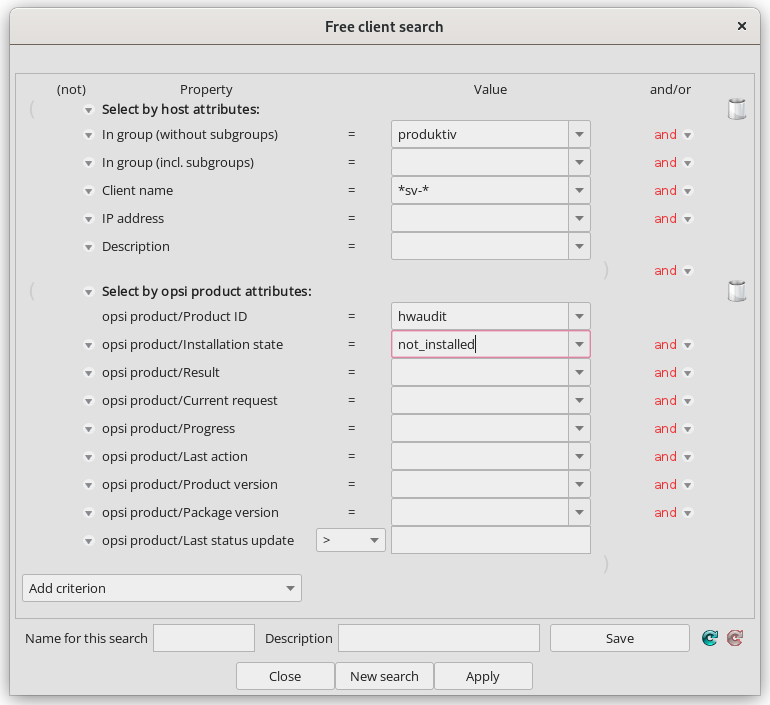
You can conduct your search for clients not only based on general host properties but also using hardware and software components as search criteria, regardless of whether they were installed via OPSI or another method. Use the asterisk (*) as a wildcard for any text input. Link your search criteria with logical AND or OR. Exclude certain results by prefixing a criterion with NOT.
To add more criteria to your search, use the Add criterion dropdown menu. Remove an unwanted criterion by clicking the trash bin icon on the right edge. To reset the search form to its initial state, simply click New search.
You can save your queries under any name and later retrieve them via Selection / Saved search queries. Adding a description when saving will display it as a tooltip in the dropdown list, helping you recall the contents of the saved search.
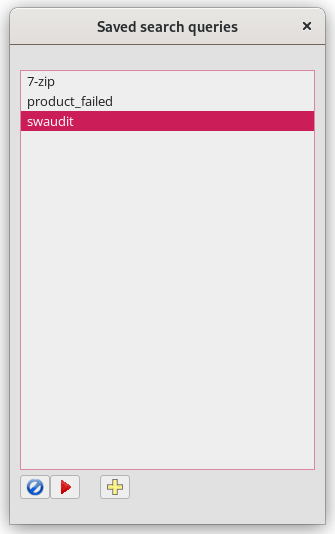
If new clients have been added to the environment between searches that match the saved search criteria, opsi-configed will also find them.
|
You can pass a saved search to opsi-configed at startup using the command line option -qs (see section Start Parameters). If you omit the name, the command will output a list of the saved queries.
|
Through the Selection menu, you can also specifically search for clients with failed actions, either related to a product or within a specific timeframe.

Grouping Clients
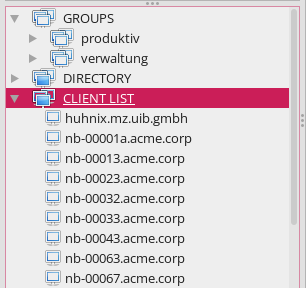
Using the tree view on the left panel, you can manage your clients in groups. The view is divided into three categories: GROUPS, DIRECTORY, and CLIENT LIST. The latter automatically displays all clients from the selected depots. The first two sections differ in how often a client can appear in them. A group is uniquely defined by its name and cannot be duplicated, whereas a client can be assigned to multiple groups. In the DIRECTORY branch, each client has a unique place: unless explicitly assigned to a subgroup, the client is automatically listed in the UNASSIGNED group.
| When a client is selected, all groups to which it belongs are highlighted. |
The tree view offers the following features:
-
Click on a tree node, such as a group, to display all clients under this node in the middle on the Clients tab. No client is selected for editing.
-
If you want to mark individual clients for editing, click them directly in the tree view or select them with the mouse ([Ctrl]+Click or [Shift]+Click).
-
Double-clicking on a group not only displays the associated clients in the table but also selects them for editing at the same time.
| This is especially useful when you are working on various tabs, for instance, if you have the Log files tab open and want to view logs for specific clients only. |
Creating New Groups
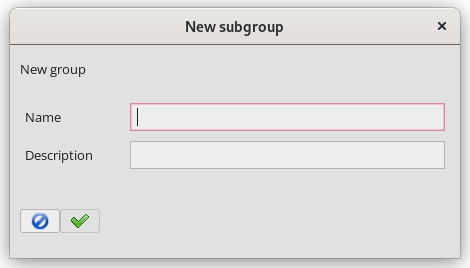
You can easily create additional groups. Simply right-click on the parent group or node, such as GROUPS, and select Create subgroup.
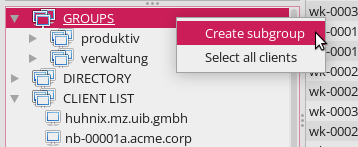
A dialog box then opens where you can enter a name and description for the new group.
Adding Clients to Groups
There are several ways to add or move clients to groups via drag and drop (see the section Selecting Clients):
-
Drag clients directly from the client list (tab Clients) to a group to add them.
-
Drag clients from one group in the client tree, e.g., from the CLIENT LIST node, to another group.
Editing Clients
Right-click on the client list (tab Clients) or open the Client menu to display possible operations for OPSI clients. In the main window, you also see a dialog on the right where you can configure a few properties and extensions for the client.
Install on Shutdown, UEFI, and WAN
You can make some settings in the field next to the client list. These include options like Install on shutdown (Windows), UEFI Boot, and WAN configuration.
The Linux client agent is a paid extension. This means that you need a license file to unlock it. You will receive this file after you have purchased the extension. For evaluation purposes, we’re happy to provide you with a temporary license free of charge. Please contact us via email.
| The WAN/VPN extension is a paid extension. This means that you need a license file to unlock it. You will receive this file after you have purchased the extension. For evaluation purposes, we’re happy to provide you with a temporary license free of charge. Please contact us via email. |
-
Install on shutdown (Windows): There’s a well-established process to configure installations upon the shutdown of a client (see the chapter OPSI Installation on Shutdown (free)).
-
UEFI Boot: UEFI boot yes/no
-
WAN configuration: Enables the WAN/VPN extension; if the module is not available, the checkbox appears grayed out.
The WAN configuration is read from the server host parameters configed.meta_config.wan_mode_off.*. If you have adopted the default settings of the parameters, the recommended configuration described in the chapter WAN/VPN Extension applies.
| You can display information about the options Install on shutdown (Windows) and WAN configuration as a column in the client list, either via the right-click context menu or through the Client / Visible columns menu. This way, you can directly see in the overview which clients have these properties set, and you can filter and sort accordingly. |
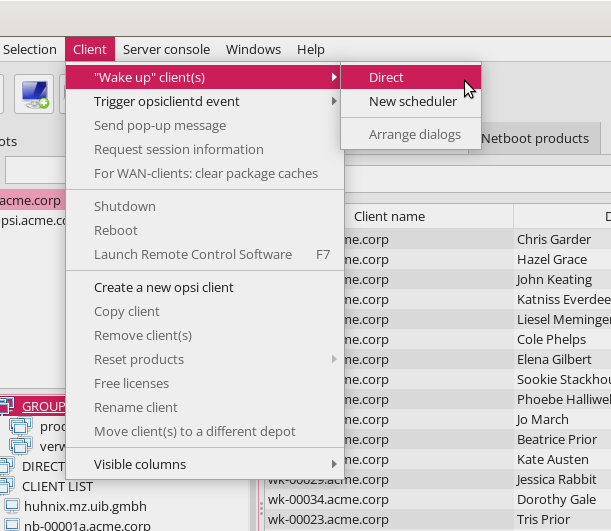
Triggering Events (Push Installation)
Under Client / Trigger opsiclientd event / on_demand, you can send a call to the client agent of all selected clients to trigger an event. If a client is unreachable or is currently processing another non-interruptible event, opsi-configed will display an error message.
The default event is on_demand. This ensures that action requests for the client are executed immediately.
| If a product script includes a reboot request, the client will be restarted without warning. |
It is also possible to trigger other events configured in the opsiclientd.conf file. The available options are determined by the server host parameter configed.opsiclientd_events.
WAN Clients: Deleting Package Cache
For clients connected over a Wide Area Network (WAN), issues with the package cache can occasionally arise. To address these difficulties, a special function is available for these clients: Menu Client / For WAN clients: clear package caches completely resets the cache.
Sending Messages
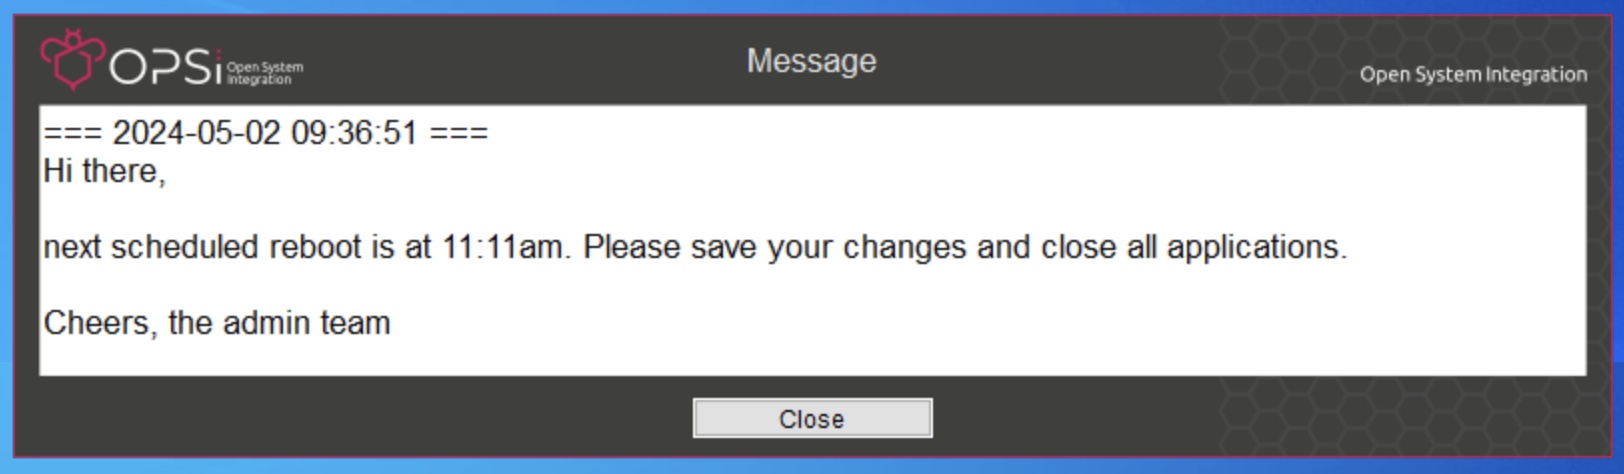
You can send messages to one or several clients. Select them and then open Client from the menu and choose Send pop-up message. In the dialog box that opens, type your message. In the top right field, you can enter the desired display duration; leave the field empty to display the message indefinitely.
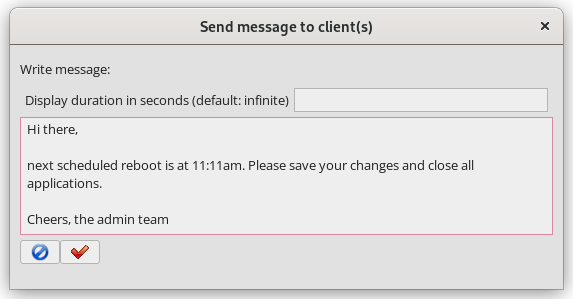
Click on the "OK" button to send the message. The client will receive a pop-up window with the message you entered.
Requesting Session Information
Through the Client menu, you can send a signal to selected clients prompting them to submit their session information to opsi-configed. This information will be displayed in the designated column on the Clients tab, provided that this column is enabled and visible.
Shutdown/Reboot
You have the option to send a signal to selected clients instructing them to shut down or reboot.
| Please be aware that clients may shut down without further inquiry, which can lead to data loss if there are unsaved data or active processes on the client. |
Starting Remote Control Software
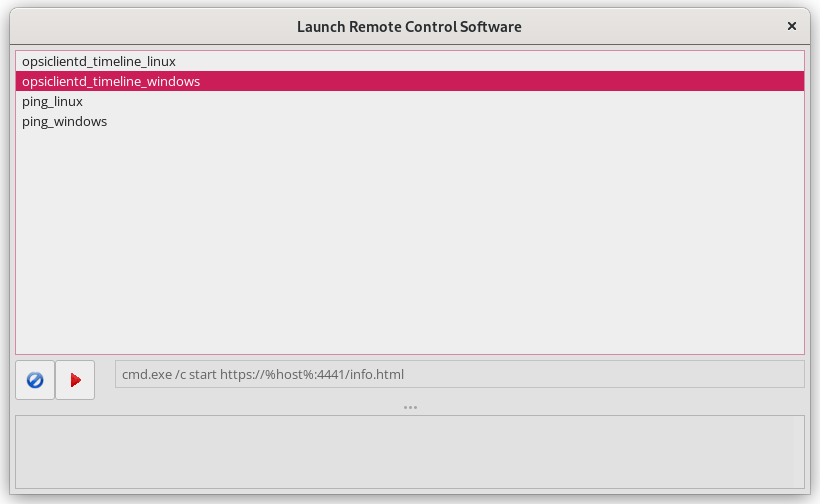
Using the Client menu / Launch Remote Control Software (key [F7]) or the right-click context menu, you can execute any operating system commands on the selected clients. By default, there are four entries that serve as templates for your own commands: sending a ping command to Linux and Windows clients, as well as displaying the info page on Windows and Linux (see the section opsiclientd Info Page).
Please note that opsi-configed executes these commands from its own system environment. This means that the type of command required depends on whether you are running opsi-configed on Windows or Linux.
|
The dialog is divided into three areas:
-
In the top area, you will find a list of the names of the available commands.
-
Below that is a line showing the selected command. Here, you can edit the command if allowed. This line also includes buttons to start and abort the action.
-
In the third text area of the window, any system feedback from the command execution is displayed.
The applications of this feature are extremely diverse. For example, you can configure a command to establish a remote desktop connection to the selected client, provided that the client supports it. On Windows, you could use the following command for this purpose:
cmd.exe /c start mstsc /v:%host%A corresponding Linux command is like this:
rdesktop -a 16 %host%opsi-configed automatically replaces %host% with the corresponding value for the host name. In addition to %host%, there are other variables available that you can use in the commands:
-
%ipaddress%: IP address -
%hardwareaddress%: MAC address -
%opsihostkey%: OPSI host key -
%inventorynumber%: Inventory number -
%depotid%: Depot ID -
%configserverid%: Config server ID
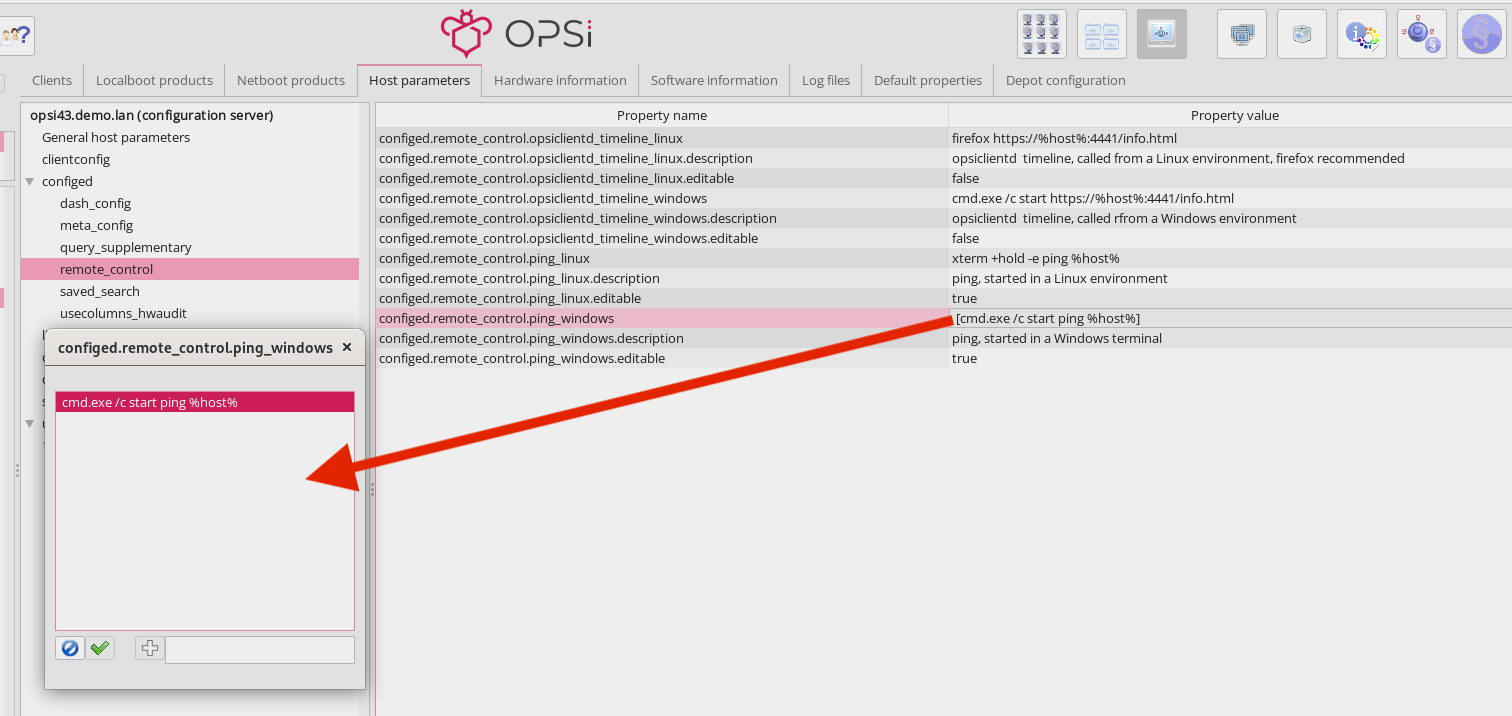
You can edit the commands in the server configuration in configed / remote_control:
If a command has the .editable attribute is active, you can enter variations of the command in the displayed command line, including options or passwords.
|
This gives the opsi-configed user the ability to freely extend a command and execute all possible commands on the client.
|
Defining your own Remote Control Command
To define your own command, go to the server configuration under the Host parameters tab, section configed / remote_control. As an example, we will set up a command named example. You will need at least the entry configed.remote_control.example (or alternatively configed.remote_control.example.command). In this entry, you define the command to be executed using the variables shown in the last section, such as %host%, %ipaddress%, etc.
Additionally, you can create an entry configed.remote_control.example.description to explain the new command. The value of this entry will then be displayed as a tooltip to provide users with more information about the command.
Furthermore, you can determine whether the command should be editable or not with a boolean entry configed.remote_control.example.editable. Setting this value to false specifies that users cannot modify the command when invoking it.
Adding Clients
Navigate to Client / Create new OPSI client to open a dialog window where you can enter all the information required to create a new client.
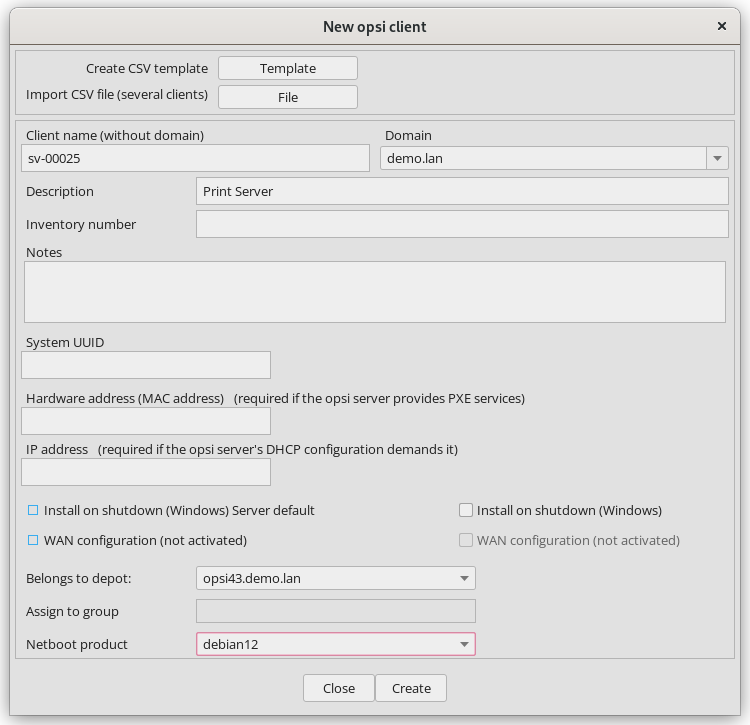
The dialog also provides fields for entering the IP address and the hardware address (MAC address). If the backend is enabled to configure a local DHCP server (which is not the default setting), this information is used to register the new client with the DHCP server. Otherwise, the MAC address is stored in the backend and the IP address is discarded.
You can also directly specify these options:
-
Activation of Install on Shutdown and WAN configuration
-
Assignment of the new client to specific groups
-
Specification of a netboot product that may be directly set to
setup
These settings can also be conveniently made in the hosts list.
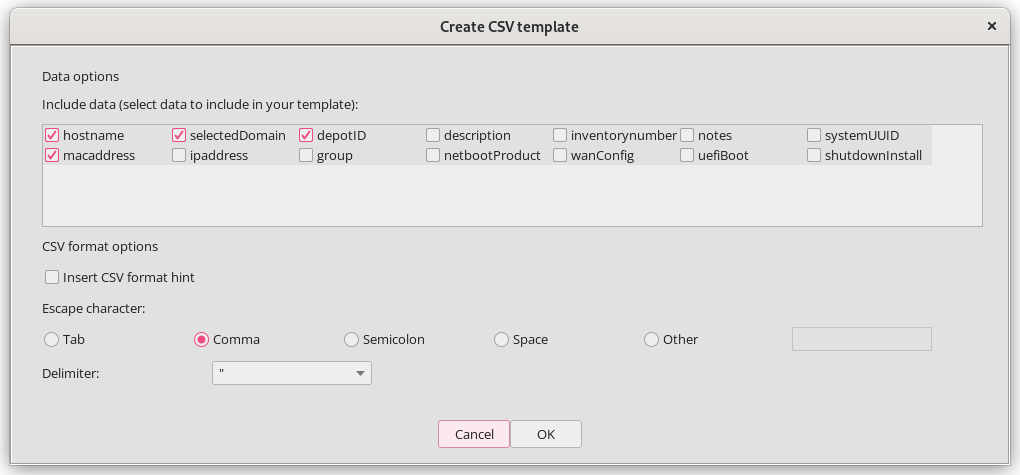
Creating multiple Clients
Click the Template button at the top of the client creation dialog to generate a CSV template. Select the desired data you want to include by clicking the checkboxes. You can also define the escape and delimiter characters in this dialog window. Finally, click OK to generate the CSV file.
You can then edit this file with a text editor or spreadsheet to create a list of clients with their respective properties. You can import the list via the File button next to Import CSV File in the client creation dialog.
Deactivate Creation/Deletion
It is also possible to disable the options for creating and deleting clients. This is useful when a service, such as a UCS service, is responsible for creating clients. To set up this feature, edit the server configuration’s host parameter configed.host_actions_disabled. Click in the column; the next dialog offers these three options:
-
add client -
free licenses for client -
remove client
Multiple selections are possible.
You can change the settings not only in opsi-configed but also on the command line. Enter the following command to disable the creation and deletion of clients via opsi-configed:
|
opsi-cli jsonrpc execute config_updateObjects '{"defaultValues": ["add client", "remove client"], "editable": false, "multiValue": true, "possibleValues": ["add client", "remove client"], "type": "UnicodeConfig", "id": "configed.host_actions_disabled"}'Renaming and moving Clients
You can also access entries for renaming and moving to another depot via the Client menu. The latter allows multiple selection of clients. In the following dialogue window, select the desired depot from the drop-down menu and then confirm your choices by clicking OK.

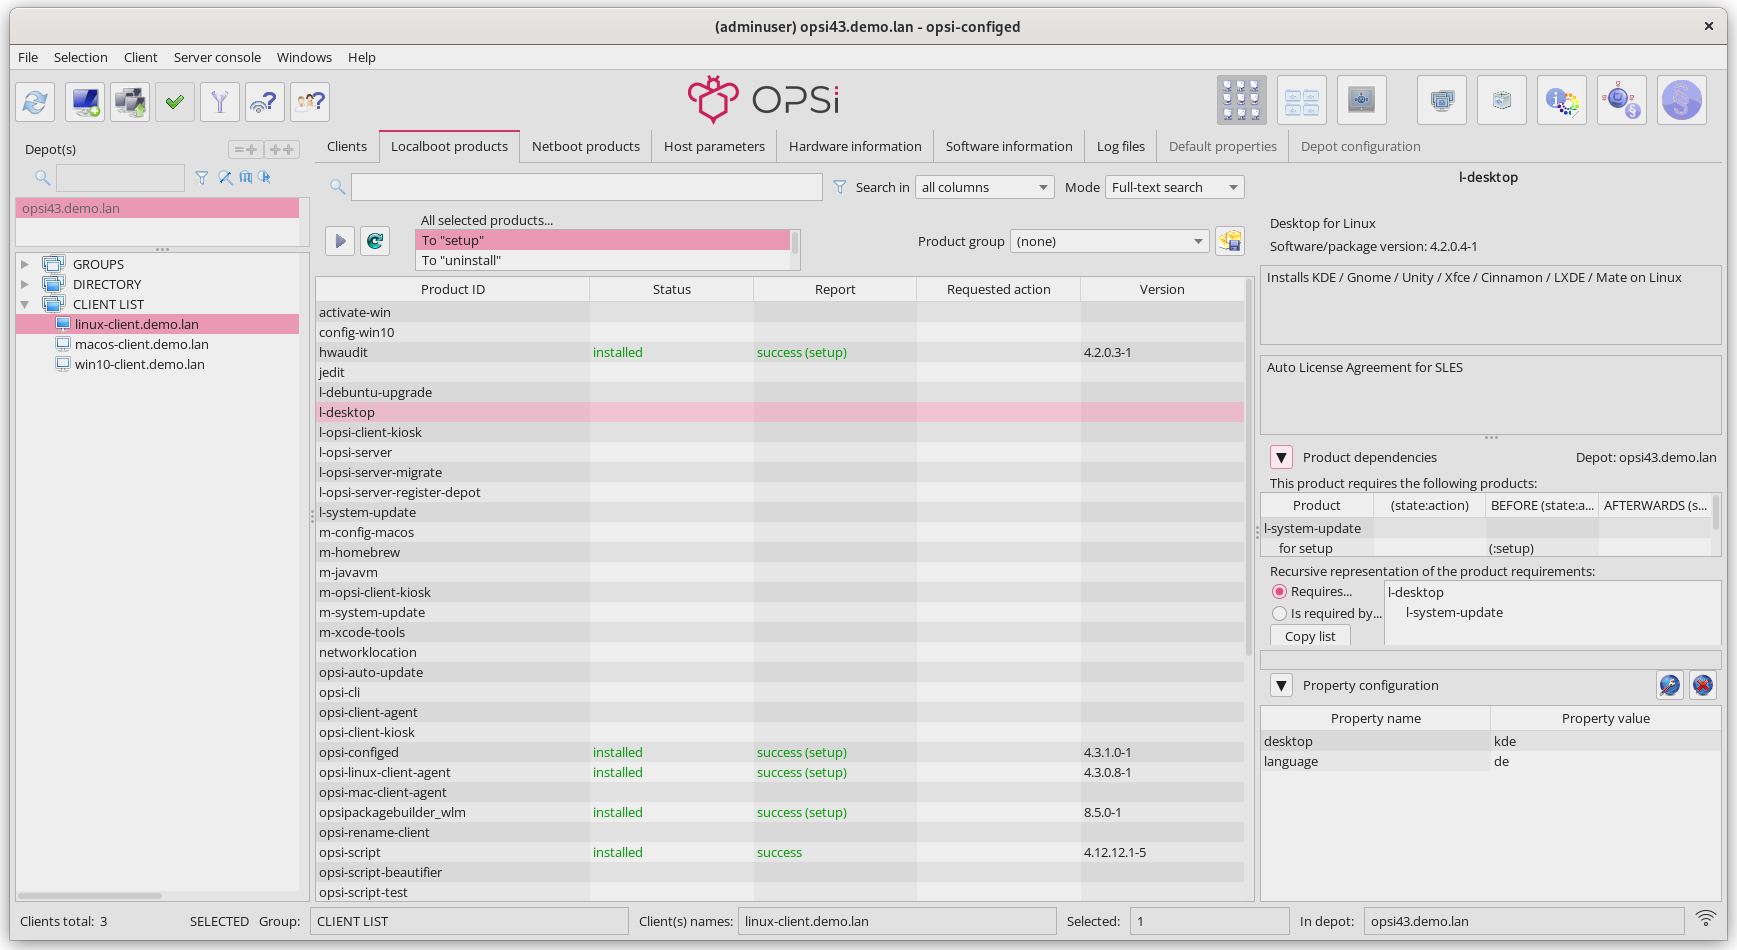
Localboot Products
When you switch to the Localboot products tab, you’ll see a detailed list of products available for software distribution along with their installation and action status relative to the selected clients.
In the right sidebar, additional useful information about the selected product is displayed, including the product name and version. The fields for product information and description support Markdown, which is particularly beneficial if you have used the control.toml file when creating the product (see the section Example: control File)
Additionally, a table lists potential product dependencies, displaying detailed properties and a tree structure that visualizes the dependencies recursively. This helps you not only identify which other products are required by the selected product but also which products depend on it. This feature is particularly useful if you want to check whether a product is still needed by other products before removing it.
| Just like in the client list, you can use the search field above the table to search for names and other values in the table. To the right of the search field, you’ll find filters. For more information, refer to section Searching Clients. |
Sorting the List
Like in the client list, you can adjust the view by clicking on the column title. The following columns are available:
-
Product ID: Displays the name of the product.
-
Status: Shows the last reported status of this product to the software distribution (installed, not_installed, or undefined). For clarity, not_installed is not displayed. undefined is typically the status during an installation or uninstallation, or if the last script failed.
-
Report: Here you see a summary of the values of the internal status information
actionProgress(installation progress),actionResult(result of the last action), andlastAction(last requested action). During an installation, for example, it may displayinstalling. After an action is completed, the field shows the outcome, such assuccess (setup)orfailed (setup). -
Requested action: Displays the action that is supposed to be executed. Possible values are
none(visually the field is empty),setup,uninstall,update,once,always, andcustom. -
Version: The version number is a combination of the product version and the package version of the OPSI software product installed on the client.
Use the right-click context menu and Visible columns to display additional columns for localboot products:
-
Product name: Displays the name of the application.
-
Target configuration: The desired state, possible values:
undefined,installed,always, andforbidden. -
Priority: Indicates the priority assigned to the product; possible values range from
100to-100. -
Position: Displays the order in which the products are to be installed.
-
Last status update: The time of the last update.
Displaying Detailed Information
When you select a product, additional information appears on the right side of the window:
-
Software/package version: Displays a combination of product and package version as specified by the packager.
-
Product description: Free text about the software included in the package.
-
Notes: Free text with details on how to handle this package.
-
Product dependencies: A list of products that the selected product depends on, including the type of dependency:
required(the selected product needs the displayed product, installation order does not matter),pre-required(the displayed product must be installed before the selected one), andpost-required(the displayed product must be installed after the selected one). -
Property configuration: For client-specific customization of the installation, additional properties may be defined for a product; the next section describes these property tables.
Property Configuration
A property table consists of two columns. The left column lists the names of the properties, and the right column shows the associated value.
| Rows that deviate from the standard values (server defaults) are highlighted in bold. This allows you to see at a glance where settings have been adjusted. |
Above the table on the right, there are two buttons:
-
Set client values to server defaults (left): This button copies the server defaults as client-specific settings. These settings remain with the client even if the default values are changed later.
-
Remove client-specific values (right): This button deletes all settings on the client; thereafter, the server defaults apply again. Any changes to these default values will directly affect the client.
If you hover over a row with your mouse pointer, a tooltip appears (if configured), showing useful information about the meaning of the value as well as the server default.
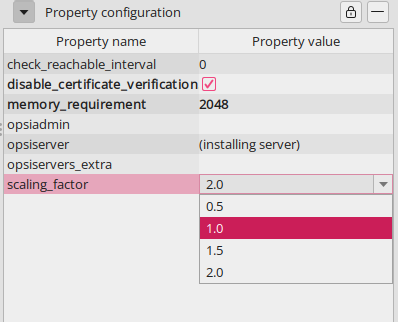
You can edit the values directly in the table. In this case, for example, you can select from a list of preconfigured values. Depending on the property (if it is editable), you can also enter new values.
Only if a list with multiple values is allowed an extra dialog will open. You can easily select multiple entries by holding down the [Ctrl] key while clicking.
Secret Property Values
For cases where passwords or other "secrets" are included as property values, the following provision is in place:
-
If 'password' appears anywhere in the name of the property,
-
or if the property name starts with 'secret',
the property value is replaced with five * in the display. It is only made visible (after a warning) when clicked for editing.
Editing is done as usual in the standard case.
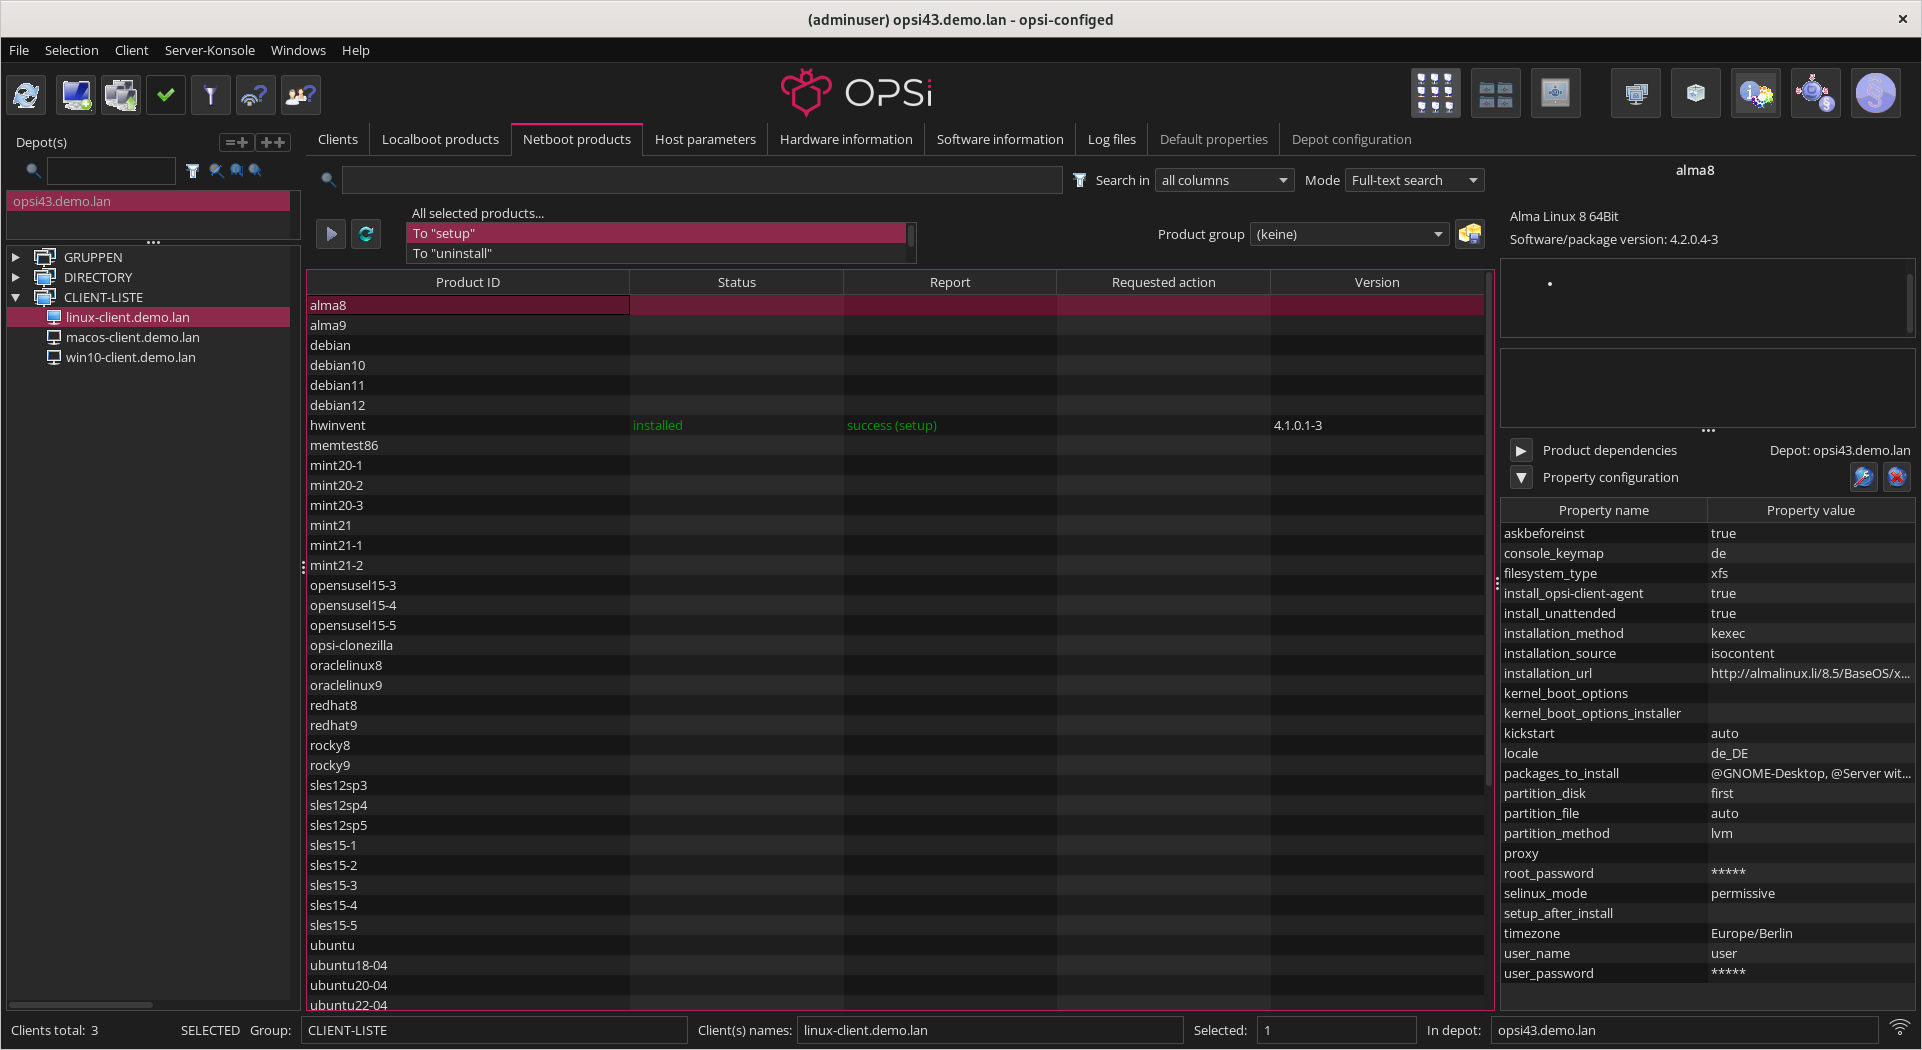
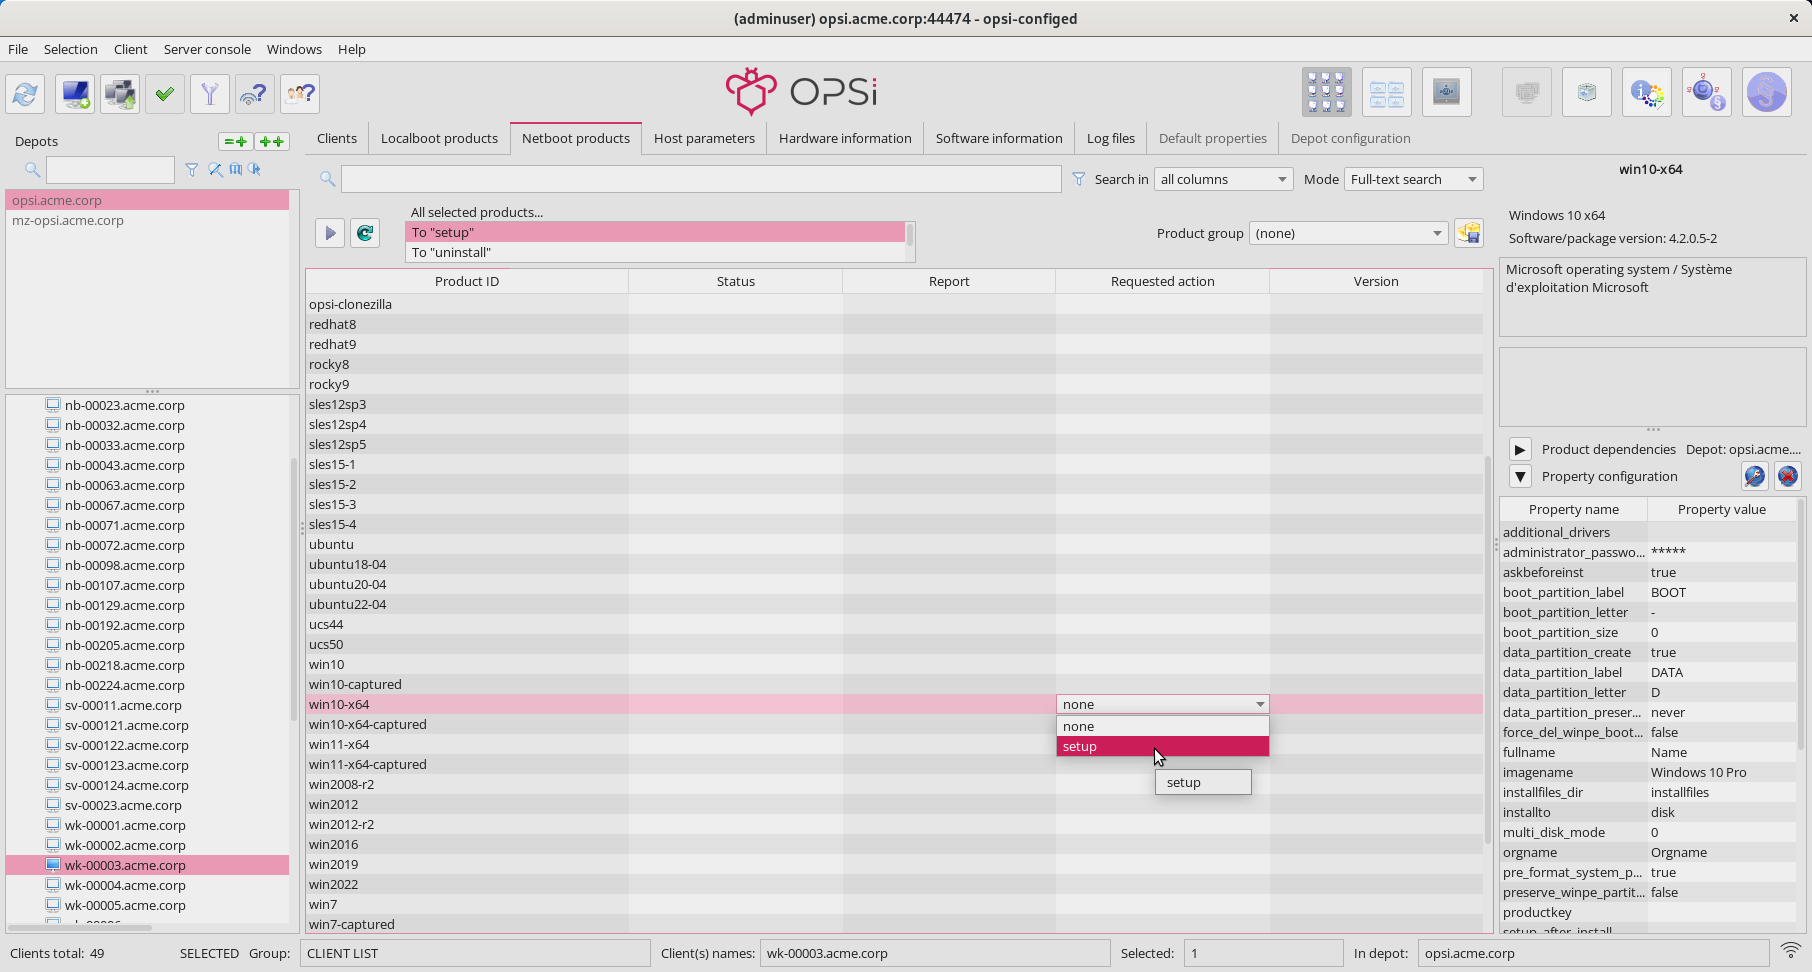
Netboot Products
Products on the Netboot products tab are displayed and configured similarly to the Localboot products tab.
The listed products attempt to set boot images to start on the selected clients upon their next reboot when set to setup. This is typically used for OS installation.
Hardware Informationen
This tab shows information about the client’s hardware, either detected by the boot image or by the localboot product hwaudit.
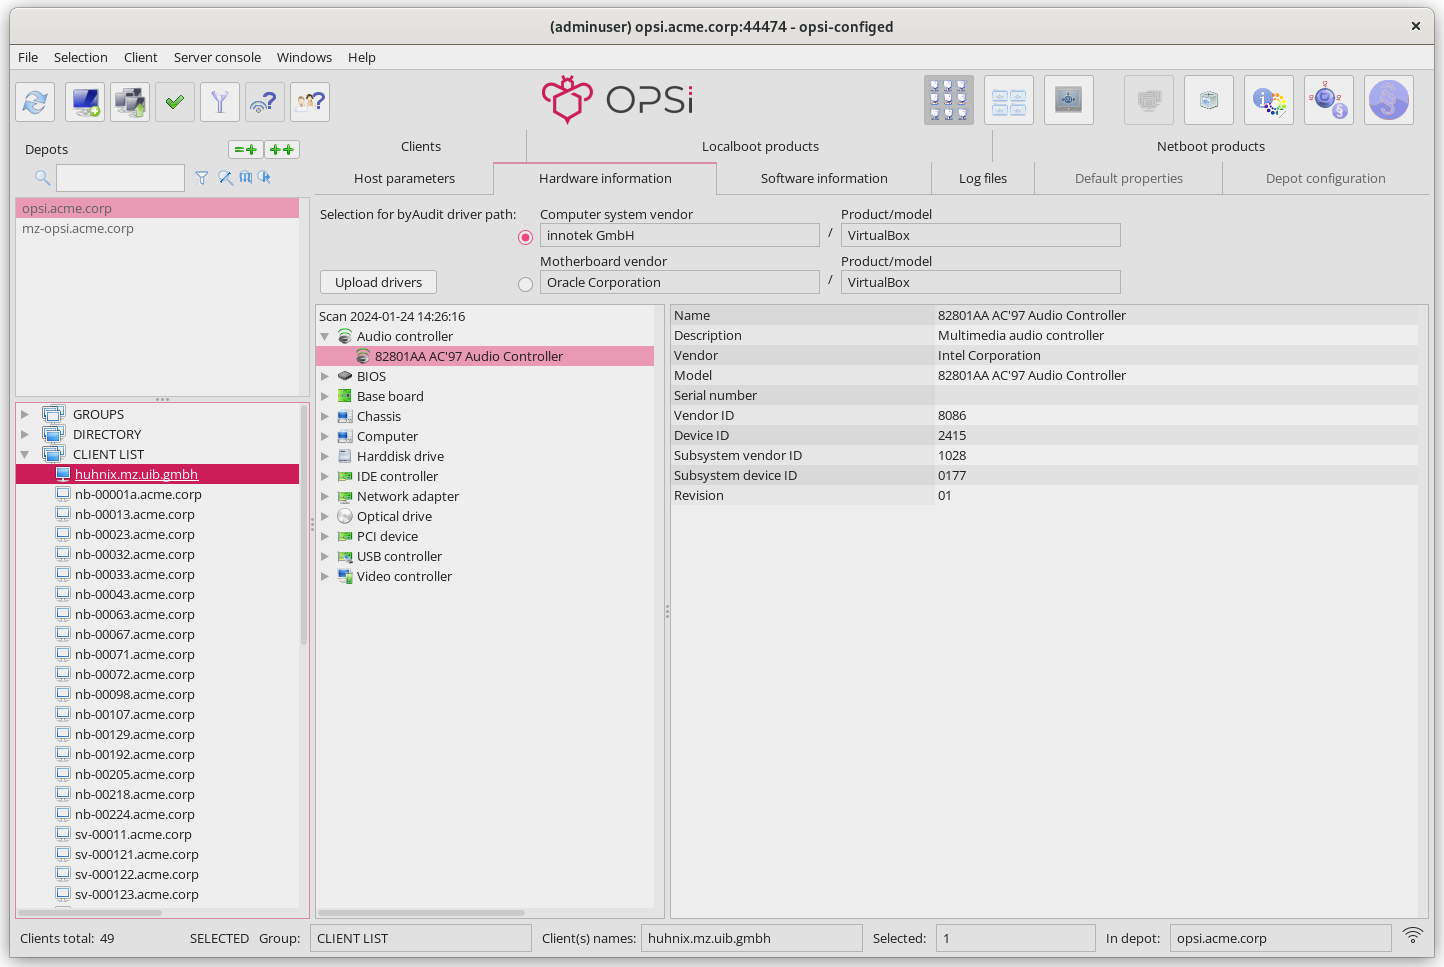
Integrating Drivers Automatically
Opsi offers the option to automatically upload client drivers to the OPSI depot server from selected paths derived from hardware information. These paths, known as ByAudit paths, include the manufacturer’s name and the product or model name extracted directly from the motherboard. Click on Upload drivers and configure further settings in the dialog that opens.
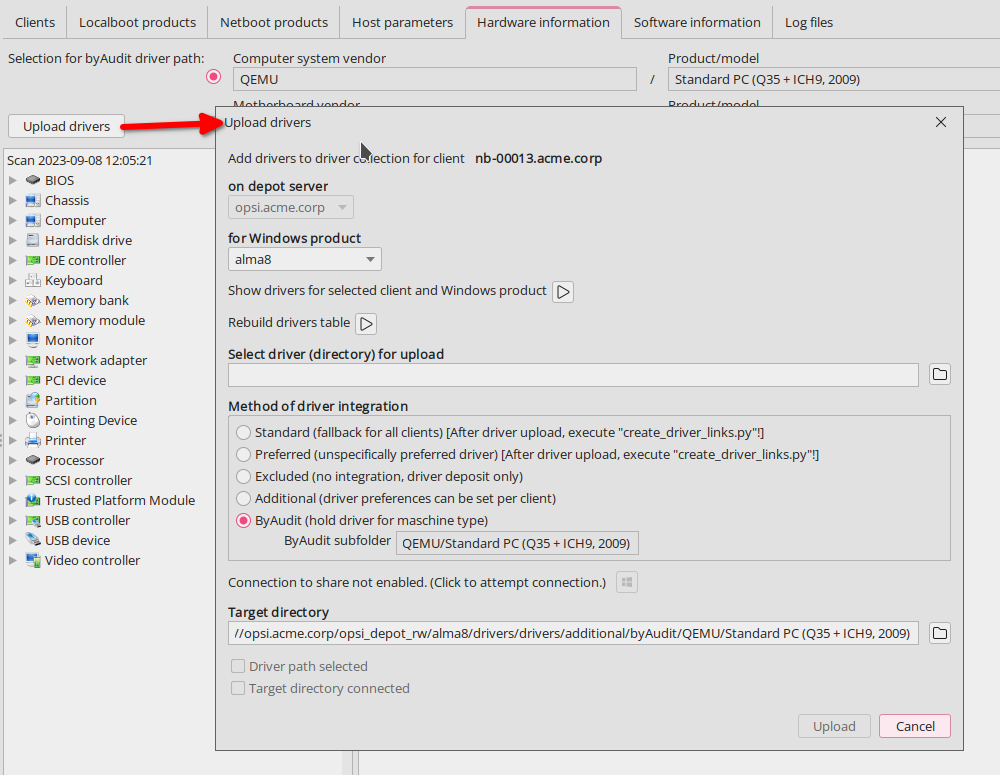
| On Linux systems, direct driver upload is initially not possible due to the connection via a share and must be performed manually. However, on a Windows system, driver upload works seamlessly once the connection to the share is active. |
In the dialog window, specify details including the Windows product for which the driver is intended, the driver to be uploaded, the method, and the target directory for driver integration. Choosing a different method changes the target directory accordingly. Here is a list of methods and directory structures for driver integration:
-
Standard:
-
Directory:
./drivers/drivers -
Function: Drivers in this directory are identified by their PCI, USB, or HD_Audio identifiers and integrated into the Windows setup.
-
Disadvantage: May contain drivers that are not compatible with the available hardware. Nonetheless, you can store drivers here as a fallback for all clients.
-
-
Preferred:
-
Directory:
./drivers/drivers/preferred -
Function: Drivers in this directory are given priority. The mapping is also based on identifiers in the description file. Direct assignment is required for multiple drivers for one PCI-ID.
-
Caution: If different drivers for one PCI-ID exist under
preferred, it can lead to problems with driver assignment; assign the drivers directly to the devices.
-
-
Excluded:
-
Directory:
drivers/exclude -
Function: Contains drivers that should be excluded, e.g., due to operating system incompatibilities or incorrect configurations. If you suspect that a linked driver is incorrect, move it to
drivers/excludeand runcreate_driver_links.pyagain.
-
-
Additional:
-
Directory:
./drivers/drivers/additional -
Function: Contains additional drivers that should be installed regardless of hardware identifiers. Paths to these directories are assigned to a client through the product property
additional_drivers. Specified directories are recursively searched; symbolic links are considered, and all contained drivers are included.
-
-
byAudit:
-
Directory:
./drivers/drivers/additional/byAudit/<Vendor>/<Model> -
Function: Drivers are categorized by specific hardware vendor and model designations and considered during the Windows installation if they match. Such directories are treated as if they were manually assigned through the
additional_driversproperty.
-
Some manufacturers use names with special characters, such as 5000/6000/7000. The following special characters are internally replaced by an underscore (_): < > ? " : | \ / *
|
After uploading drivers to ./drivers/drivers or ./drivers/drivers/preferred, make sure to run the script create_driver_links.py on the depot server!
|
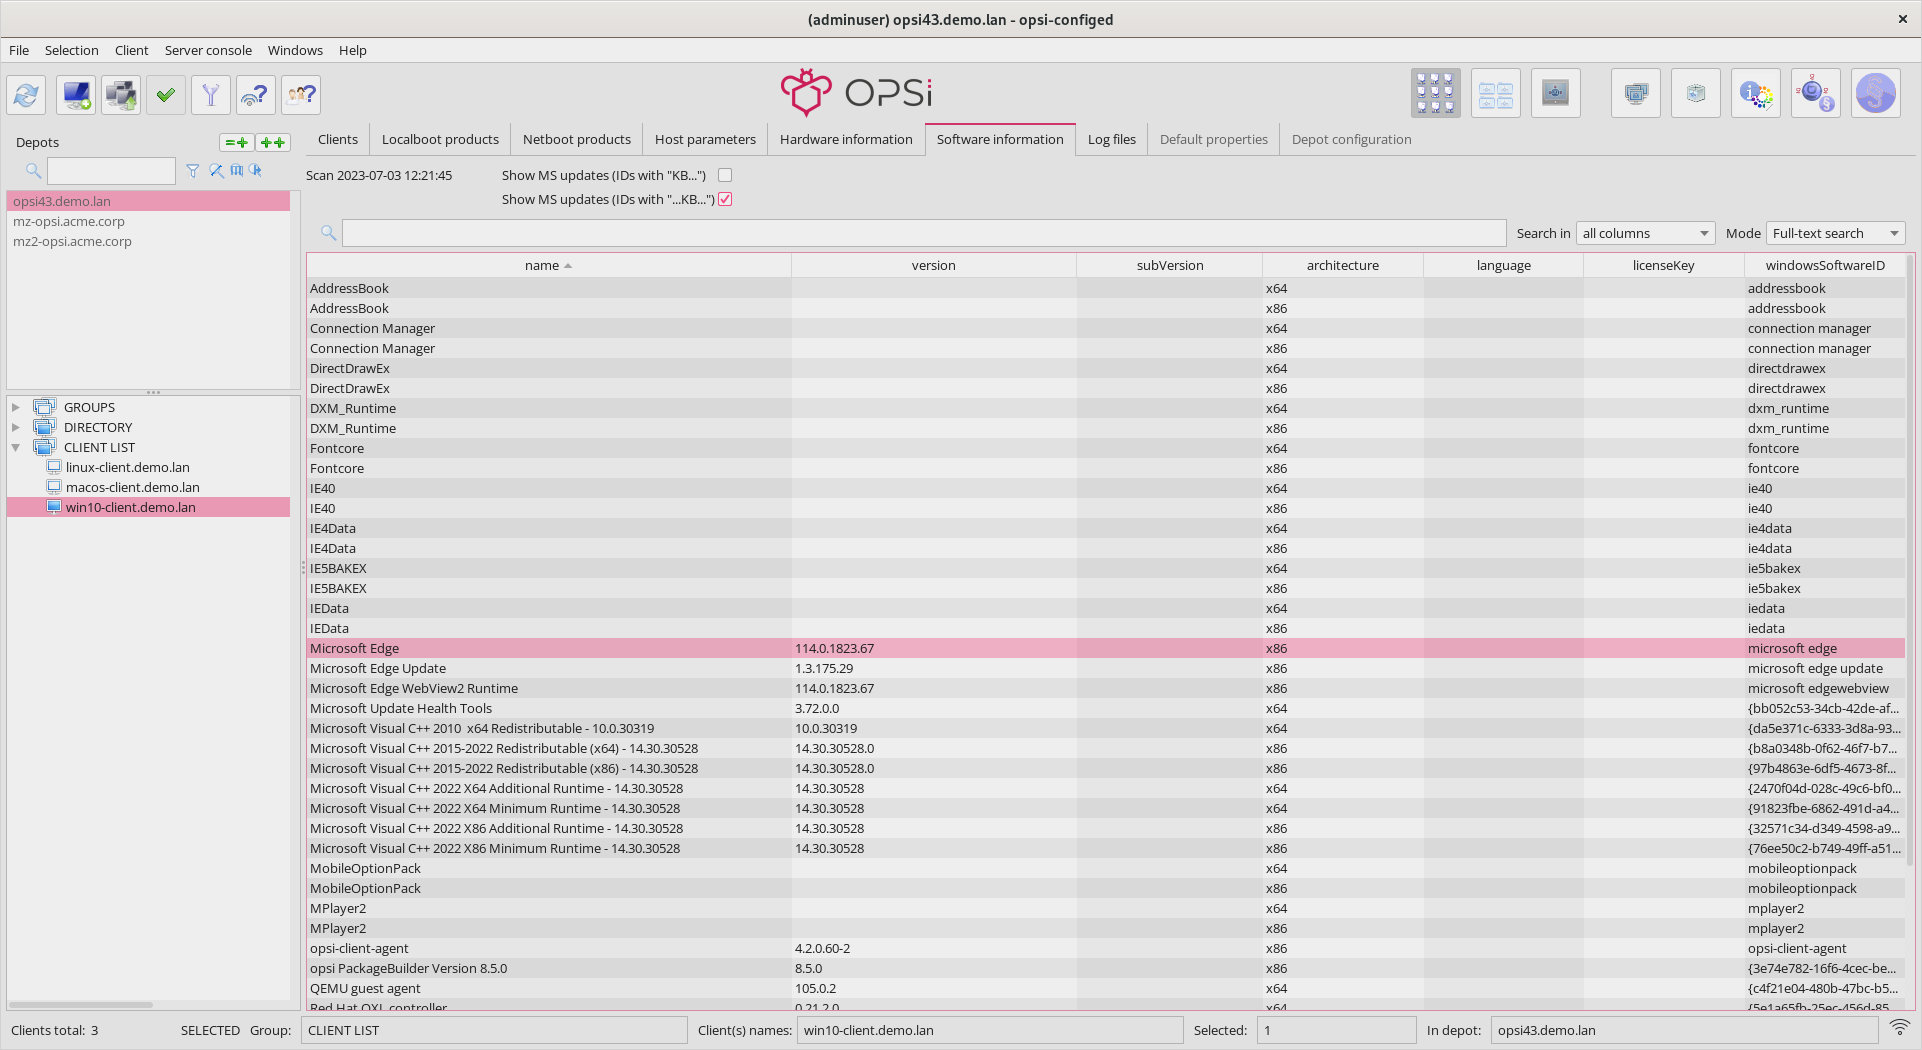
Software Informationen
This tab contains the latest information retrieved with swaudit about installed software on the client.
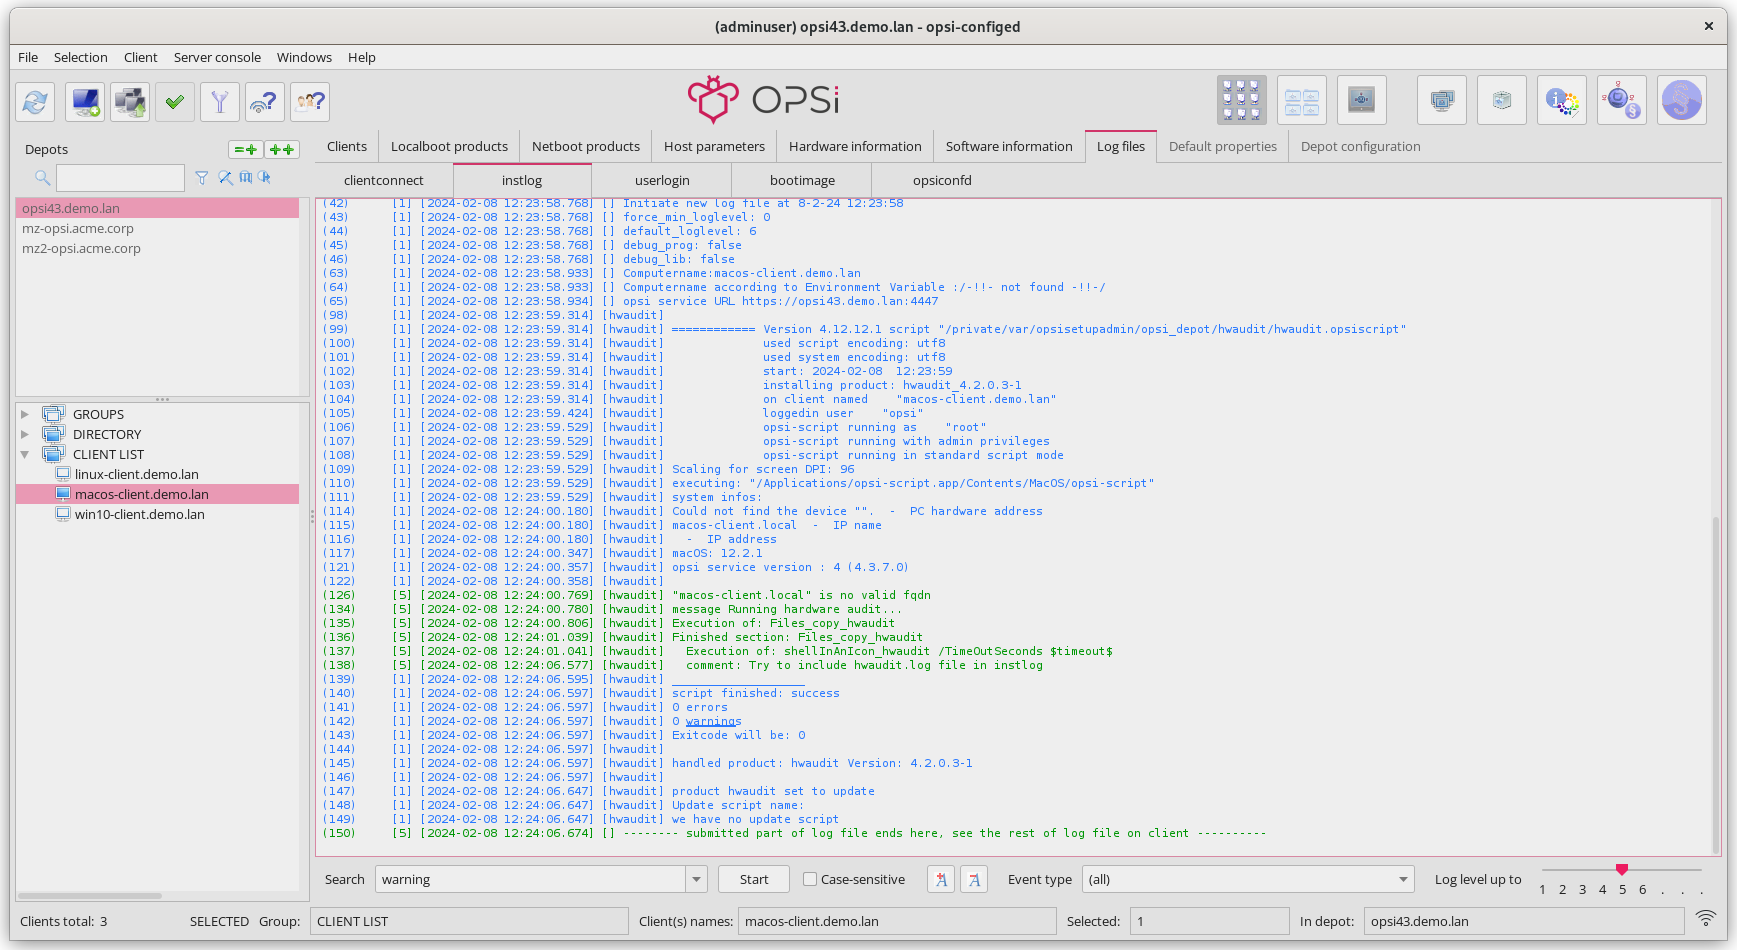
Log Files
You can view the clients' log files on the Log files tab. Use the slider at the bottom right to change the loglevel (see section Setting the Loglevel). You can also use the mouse wheel to operate the slider. The different loglevels are displayed in different colours.
You can search in the log files using the search field at the bottom (continue the search with [F3] or [Ctrl]+[L]).
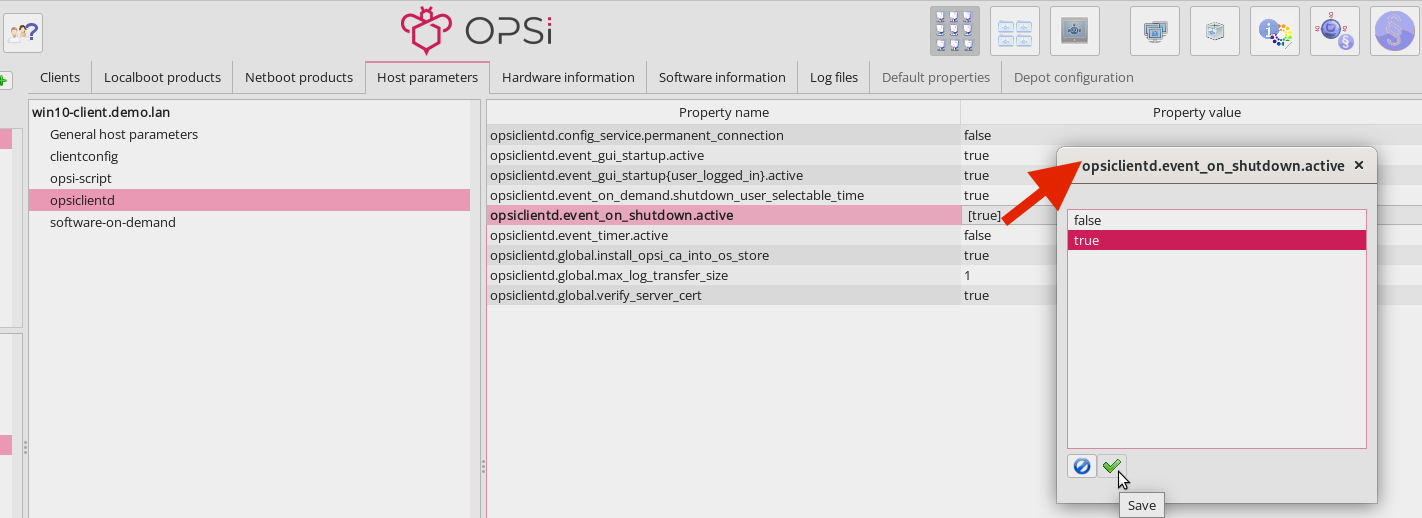
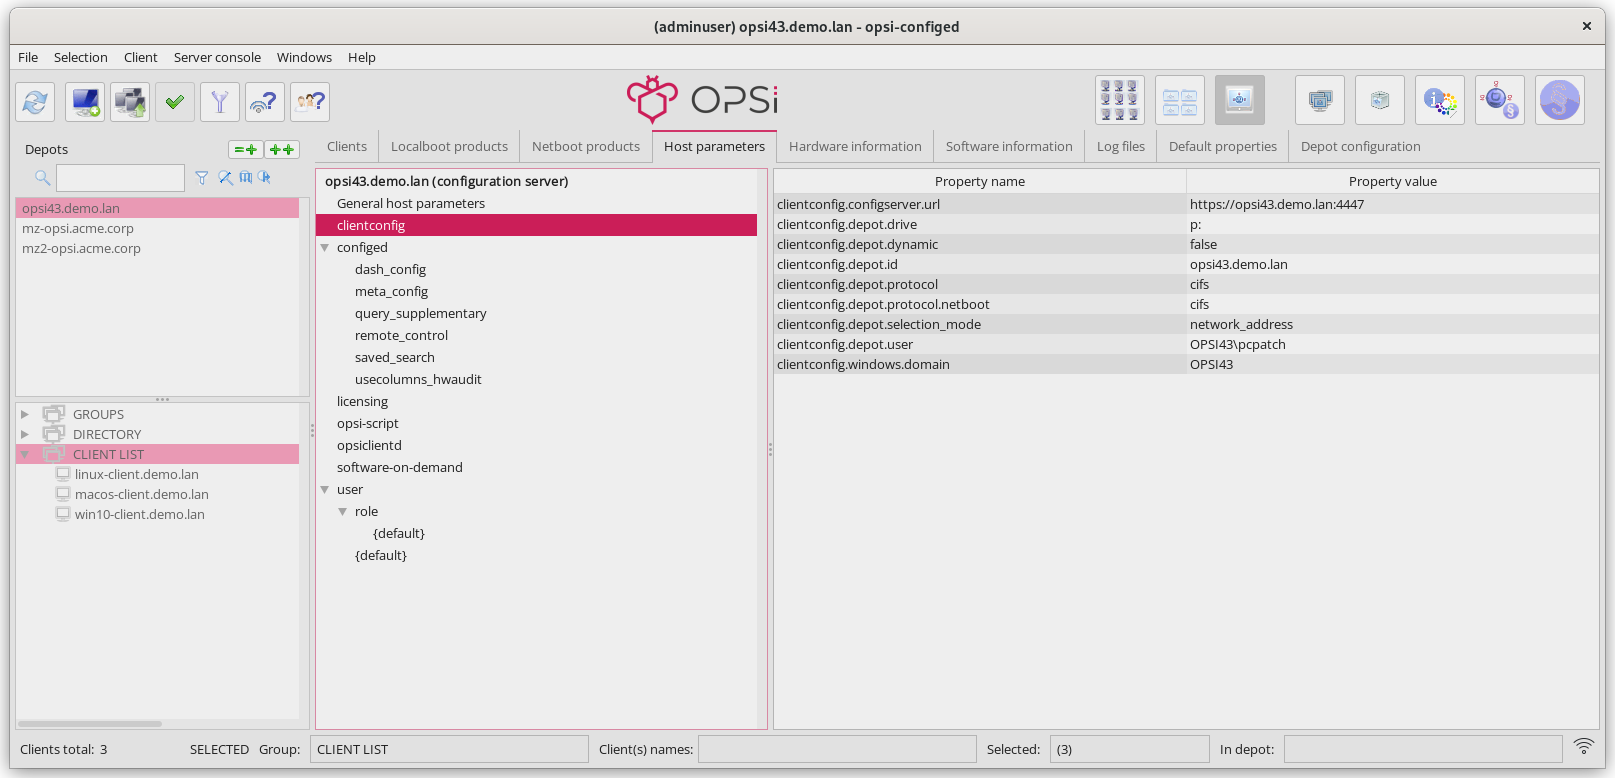
Host Parameters: Client and Server Configuration
You can make a variety of configuration settings via the Host parameters tab. When you are in the Client Configuration mode, this tab displays client-specific settings. When the Server Configuration is active, you see the corresponding server defaults.
Configuration entries (config objects of the OPSI server) are essentially lists of values. The list editor is used to edit these values (see section Property Configuration).
Depending on the type of the configuration object:
-
The elements of the list can be either Unicode text values or boolean values (
true/false). -
The set of allowable list elements can be fixed or expandable.
-
The DefaultValues entry of the object includes exactly one list element in the case of singleValue, and a random selection from the allowable list elements for multiValue objects.
You can create new configuration entries via the right-click context menu on the server’s Host parameter page. Likewise, you can delete existing objects there.
The relationship between server and client host parameters is complex:
-
Server entries provide the default values for the client entries.
-
To create a client entry, you must first create a server configuration object.
-
If you delete a server entry (the
configobject), the associated client entries, which are based onConfigStateobjects, also disappear. -
There can be a distinct entry for the client in the database if the client value differs from the server default, but also when they are identical. If this distinct entry exists, it remains even if the server default changes.
-
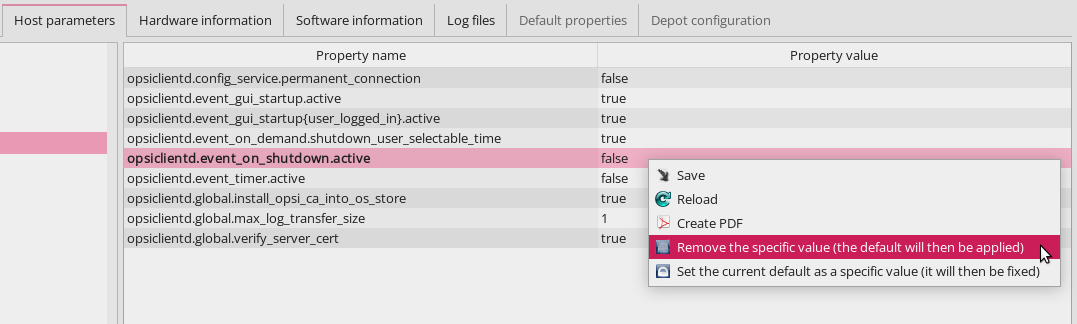
There is a context menu for client properties with options to Set the current default as specific value and Remove the specific value (client value is always the current server default).
-
If the client value differs from the current server default, it is displayed in bold.
-
There are configuration objects for which client values can theoretically be created and edited, but which have no meaning because they only store server-related information. These properties are usually hidden in current versions of
opsi-configed.
The host parameters are organized into functional groups for clarity. These groups are displayed on the left in a tree-like structure, while the corresponding parameters and their values are shown on the right.
Depots
If you operate multiple depot servers in your environment, opsi-configed includes all the tools needed to flexibly select and use them. This chapter explains how to manage OPSI depot servers with opsi-configed. It shows how to work with multiple selections, get an overview of the associated clients, and introduces the features of the depot configuration. Additionally, you will learn how to manage and customize standard properties for products across various depots.
Depot Selection
If you operate multiple OPSI depot servers, they appear in the list on the left side. Select for that the tab Depots. By default, the depot on the OPSI config server is highlighted, and opsi-configed displays the clients belonging to this depot.
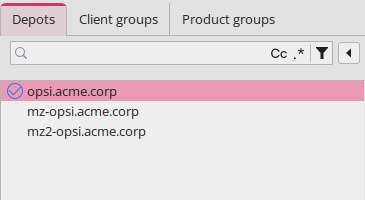
The list of depot servers supports multiple selections, meaning you can select several depots and display all associated clients. (More precisely: you then see all clients that belong to any of the selected depots for the selected group.)
| You can only edit a group of clients if they have depots with identical package configurations. This means the depots must be synchronized. If you try to edit clients from asynchronous depots together, you will receive an appropriate warning or error message. |
You can use the context menu (right-click) to select all depots or depots with an identical product stock.
| Note that the group selection remains when switching depots. This is not always the desired behavior. If necessary, activate a different group or the entire client list for the newly selected depot. |
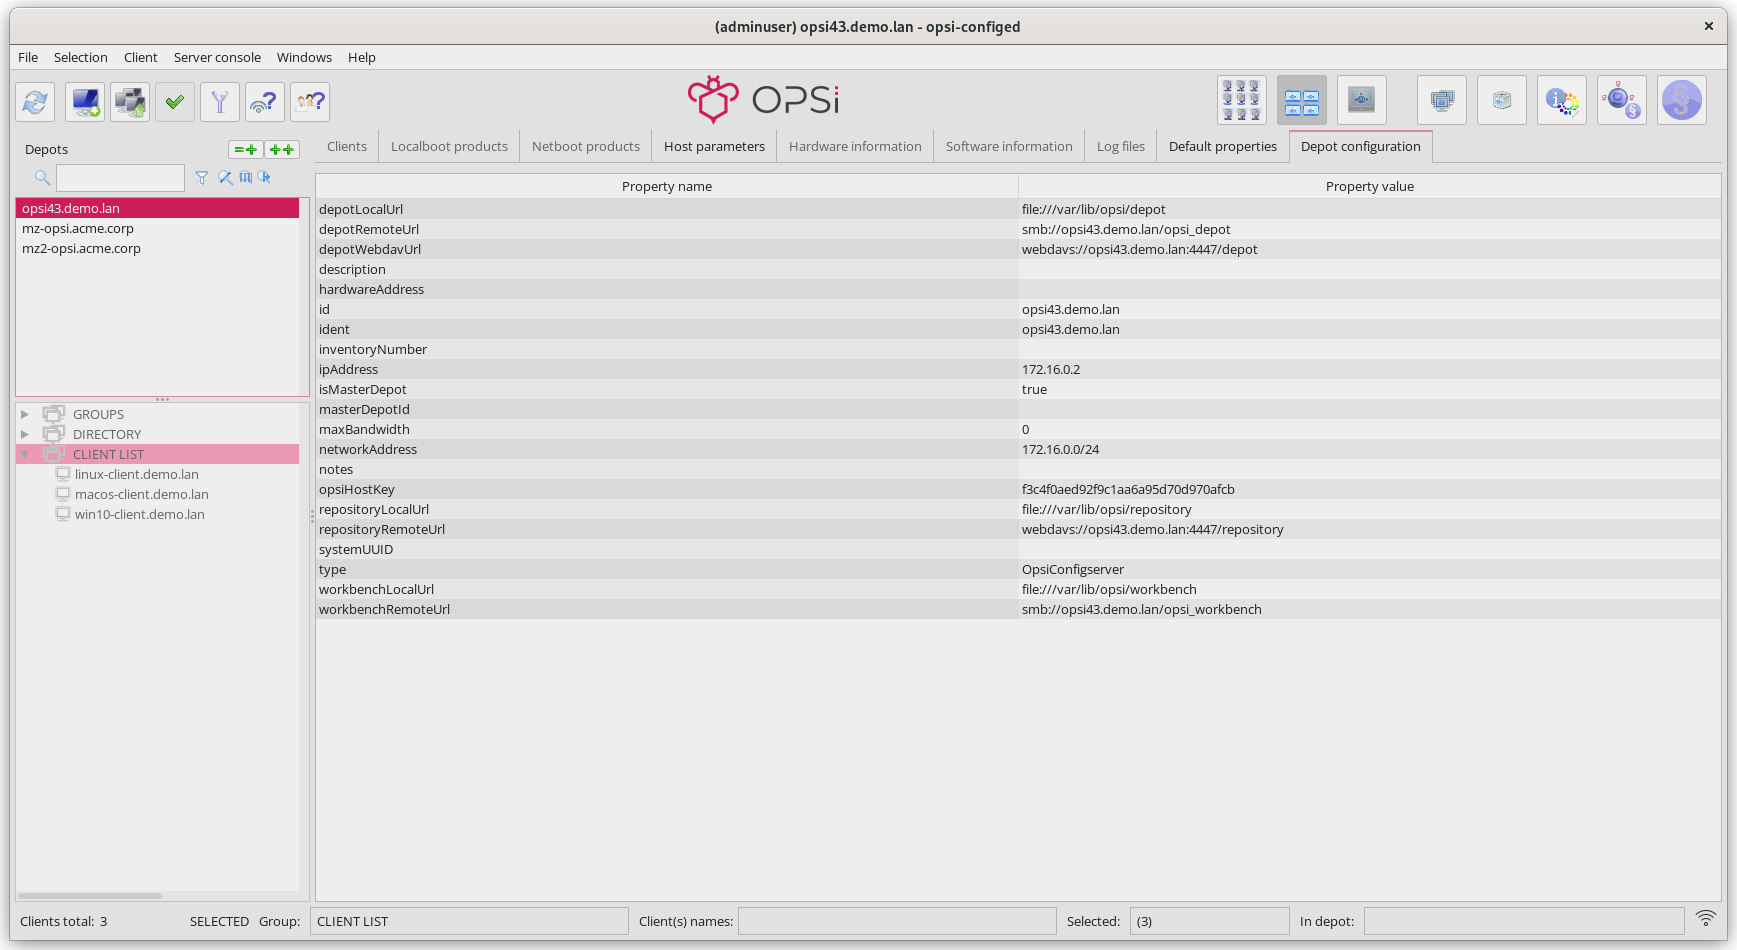
Select the Depot configuration mode (see the section Selecting the Mode) to access the tabs Depot configuration and Default properties in the main window. Select a depot from the list on the left to adjust the settings via the two tabs.
Depot Configuration
On this tab, you can view and modify the current configuration of the selected depot. This includes parameters such as the URL, the network address of the share, the IP address, etc. Click on a property value in the right column to open a dialog for editing. Finally, click on the red checkmark in the upper left corner to save the configuration.
Default Properties
To change the default values of localboot and netboot products for one or several OPSI depots, open the Default Properties tab. The table displays all products, their names, type, product, and package version. Select a product to open the detail view on the right side (see section Displaying Detailed Information). Below, a field shows all depots that contain the selected product.
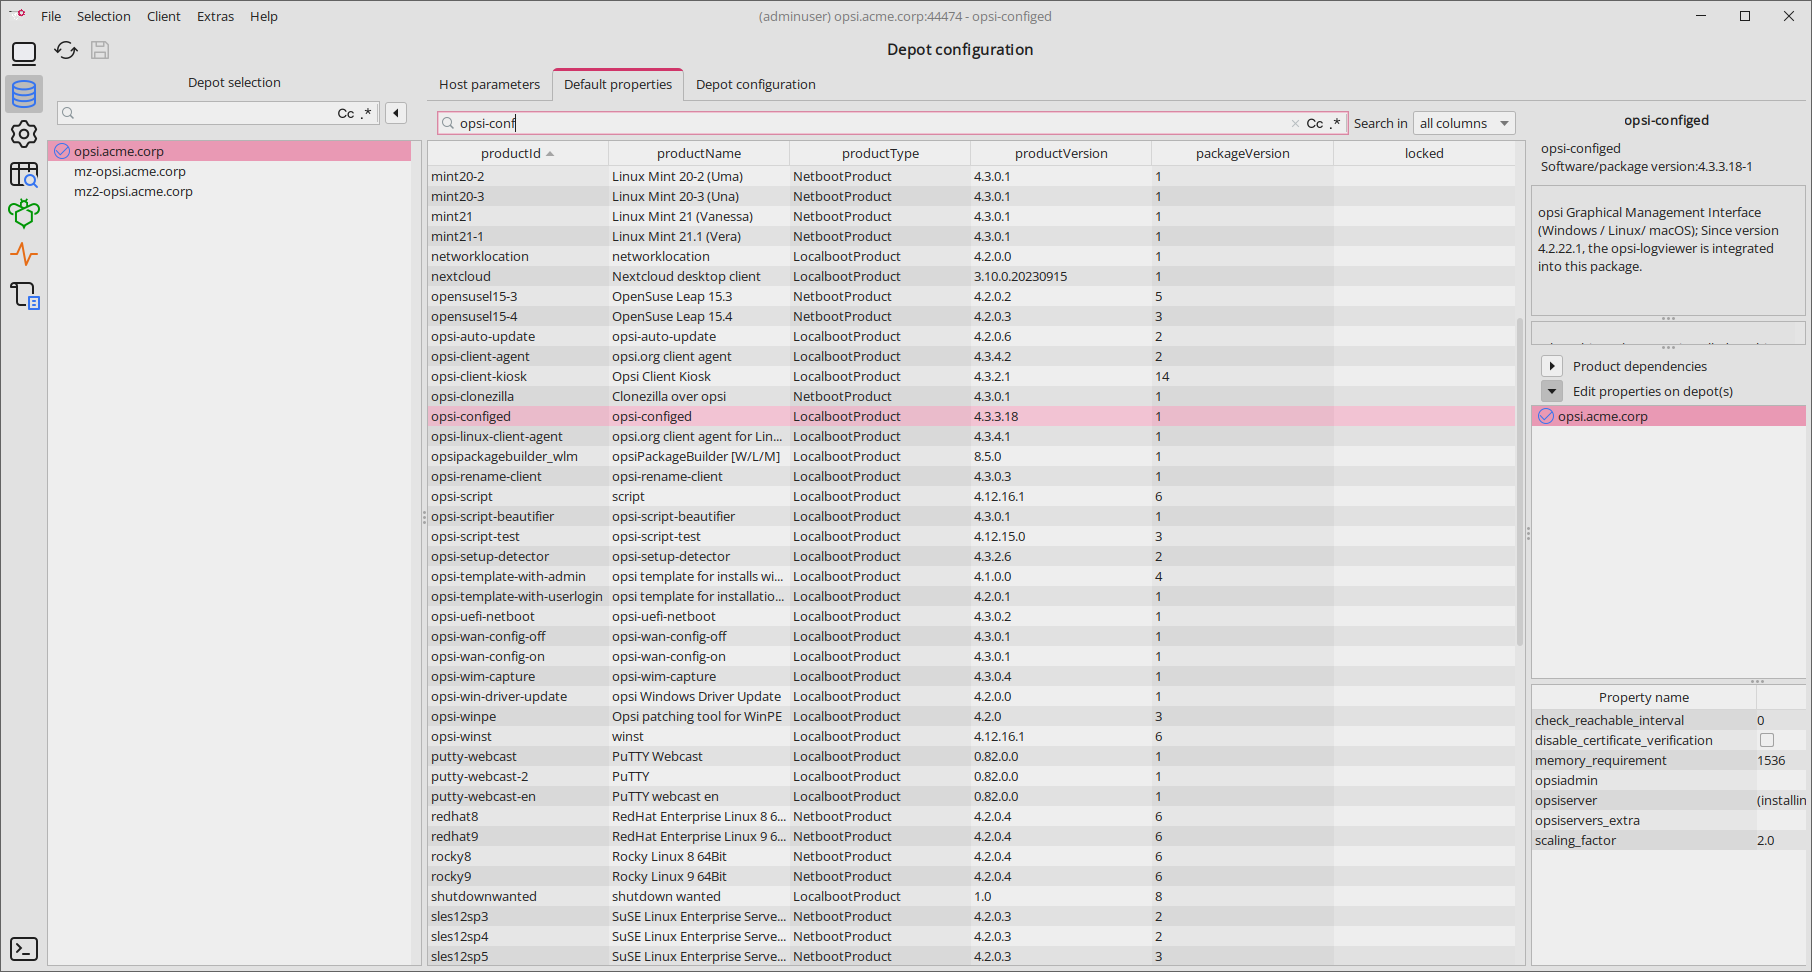
You can select one or more depots to change the default values (i.e., the depot values) of the product. By default, all available depots are selected. Use the usual keyboard shortcuts ([Ctrl]+[A], [Ctrl]+Click or [Shift]+Click) to select multiple or all depots.
If the property value is grayed out, it means this property has different values on the selected depots.
You can use the context menu (right-click) to select all depots or depots with an identical product stock.
Server
Click on the icon Server configuration in the top to open the Host parameters tab in the mein window. It displays the server defaults of the host parameters.
Server Host Parameters
Displaying and editing host parameters for the server works the same as for clients (Host Parameters: Client and Server Configuration).
Managing User Rights and Roles
If the OPSI extension User Roles is active, you can edit it in the server’s host parameters with opsi-configed.
| This is a paid extension. This means that you need a license file to unlock it. You will receive this file after you have purchased the extension. For evaluation purposes, we’re happy to provide you with a temporary license free of charge. Please contact us via email. |
In the tree view, you might see the entry user, but this does not mean the function is active. The default value for user.{}.register is false. Set this to true and import your license file to activate the feature (temporarily or permanently). Afterwards, an entry for the logged-in user is created in the tree structure. The default settings used for rights management correspond to the "classic" specifications for an administrator. There are no restrictions for this role. For example, if the account is named admindepot1, it would appear like this:
user.{admindepot1}.privilege.host.all.registered_readonly       [false]
user.{admindepot1}.privilege.host.depotaccess.configured        [false]
user.{admindepot1}.privilege.host.depotaccess.depots            []
user.{admindepot1}.privilege.host.opsiserver.write              [true]
These four entries mean:
-
The user does not have read-only access; read-only access might be suitable for a helpdesk employee.
-
There are no restrictions regarding the depot (or these are not considered).
-
Consequently, the list of depots accessible to the user can remain empty. Even if something were entered here, it would have no effect as long as
depotaccess.configuredis set tofalse. -
The user is allowed to edit settings of all kinds.
If you want the user admindepot1 to only have access to the computers of the depot server named depot1, you can configure it like this:
-
Set
user.{admindepot1}.privilege.host.depotaccess.configuredtotrue. -
In the list for the value
user.{admindepot1}.privilege.host.depotaccess.depots, enterdepot1.
After reloading all data, admindepot1 will no longer see clients from other depots. Additionally, they can only change settings for depot1.
Users can lift all restrictions themselves as long as the setting host.opsiserver.write is set to true. Change the value to false to completely secure the settings.
|
The privileges set up in this way apply exclusively to the functionality of opsi-configed. They currently have no impact on the JSON-RPC interface of the OPSI server.
|
The remaining entries that appear in the tree view pertain to the configuration of the server console (see chapter Server Console).
Groups and Products
This chapter introduces the two dialogs that you can use to perform actions for client groups and products/packages in opsi-configed.
Actions for Client Groups
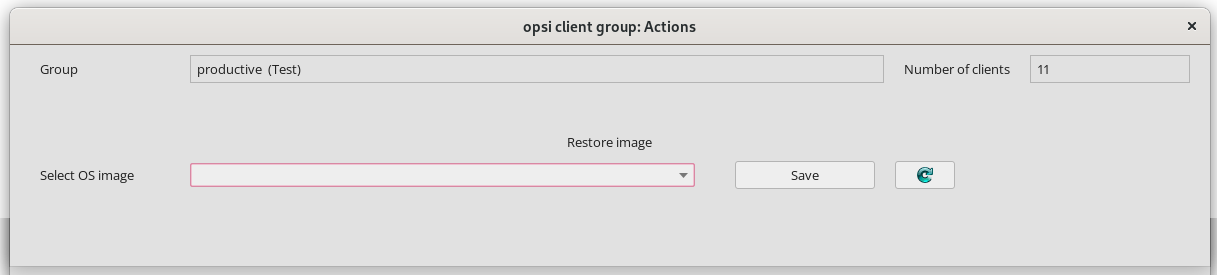
Click the Groups (special functions) button in the menu Extras to open a new dialog where you can define actions for client groups (see section Grouping Clients). Currently, there is only one available function: searching for an operating system previously installed on all PCs in the selected group, which can then be restored.
Actions for Products/Packages
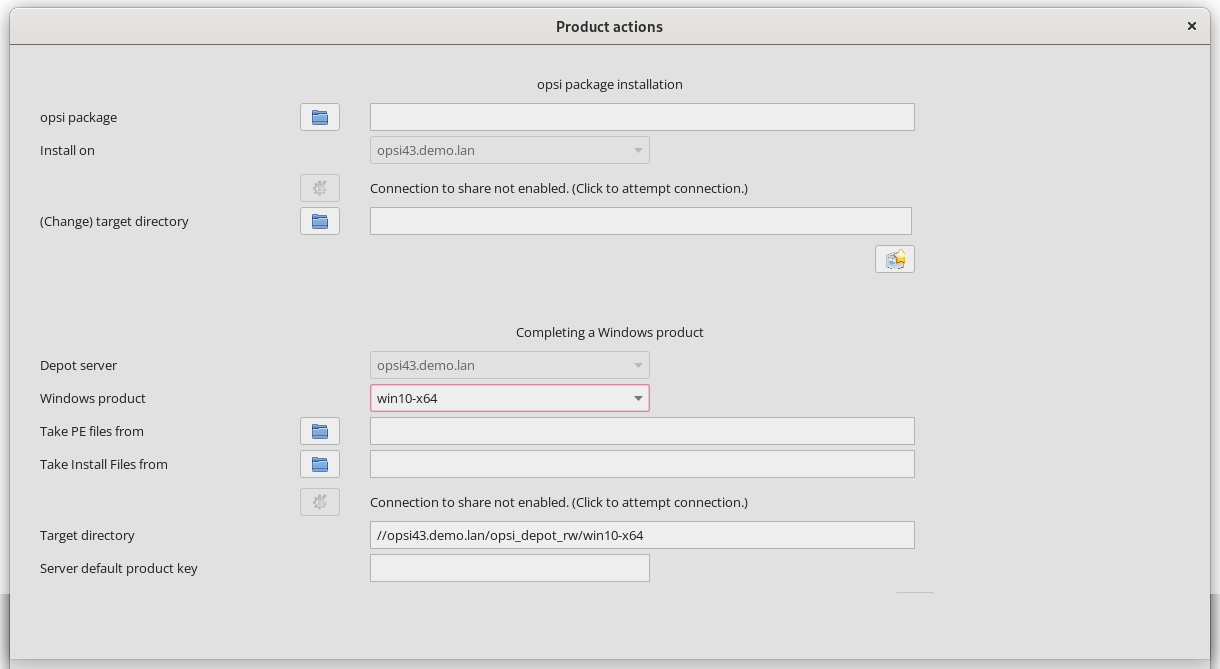
In addition to group actions, you will find Products (special functions), which also opens a separate dialog window. There are two functions available here:
-
You can select an
.opsifile (an OPSI package) or manually enter the path to the file. You can then upload the package to the OPSI server. The standard workbench (network share) is pre-selected as the destination directory. The icon below the input field initiates the package installation command. -
In the bottom half of the window, you can upload WinPE files or installation files for a Windows product to the server. The default directory for the OPSI depot is the standard share.
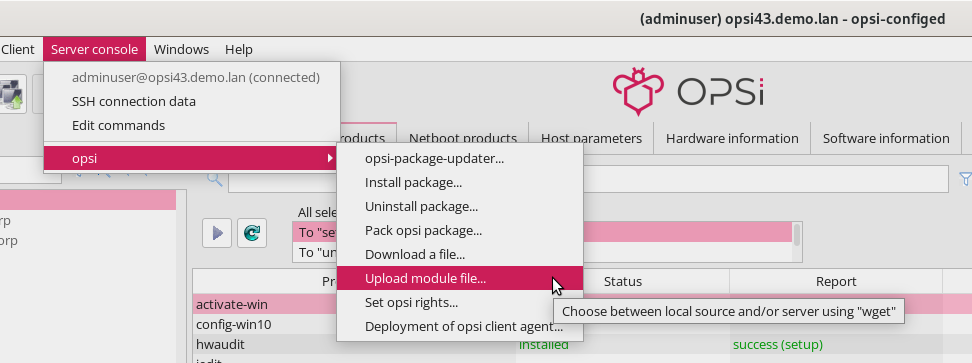
Server Console
The terminal icon at the bottom left of the main window of the opsi-configed takes you to the server console. The opsi menu item contains predefined command line commands that you can execute on the OPSI server. Move the mouse pointer over an entry to display a tooltip.
Authorizations
You can manage visibility of menu items and user permissions through server host parameters (see section Server Host Parameters). If the OPSI extension User Roles is activated, you can specify authorizations for various user accounts, with default values set for new accounts.
Available entries include:
user.{}.ssh.commandmanagement.active
user.{}.ssh.menu_serverconsole.active
user.{}.ssh.commands.active
They mean:
-
Enables editing of command line command menu entries (default:
false). -
Enables the main menu entry Server console (default:
true). -
Enables all menu entries representing stored commands (default:
true).
Pre-defined Commands
The menu Server console / opsi contains pre-defined command line commands that perform the following actions:
-
opsi-package-updater: Install or update packages with the opsi-package-updater. In the dialog that opens, select either Update packages , List all repositories or Install packages from the Action drop-down menu. You can select the package repository in the drop-down menu below.
-
Install package: Install OPSI packages with the opsi-package-manager on one or more depots. You can either enter the local path to a package or download one from the internet.
-
Uninstall package: Select one or more packages you want to uninstall with the
opsi-package-manager. -
Pack OPSI package: Specify a directory on the server that contains files for an OPSI package. You can use a button to display the versions found in the
controlfile (package and product version) and overwrite them if necessary. Click on Advanced settings to display checkboxes that you can use to create Zsync or Md5 files and set the subsequent permissions. The button Install the built package invokes theopsi-package-manager. -
Download a file: Download any file from the Internet using
wgetand place it on the server in the directory of your choice. -
Set OPSI rights: Corrects the access rights of files and directories on an OPSI server by invoking the opsi-set-rights command.
-
Deployment of opsi-client-agent: To include existing computers as clients in the OPSI environment, the client agent must be installed on them. Here you can select the machines. To execute the command on several clients simultaneously, the login data on these machines must be the same.
The script for deploying the clients must be located in the /var/lib/opsi/depot/opsi-client-agent directory and be called opsi-deploy-client-agent (see chapter Adding Clients).
|
Some of the dialogs (e.g. Set OPSI rights or Install package) contain buttons to select local files. Press the Find subfolders button to list all files and directories from the specified path. To include more layers, press the button multiple times.
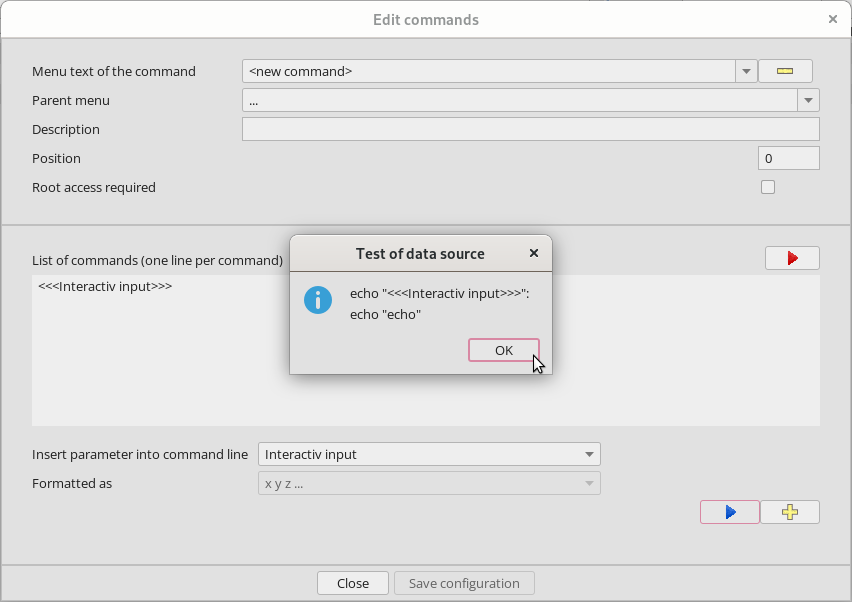
Defining Commands
You can open the Edit commands dialog to set up your own commands which will then be available in the Server console menu.
| Please be aware that not all Linux distributions use the same commands or parameters. As an administrator, ensure that the Linux distribution for your OPSI server supports the specific commands you plan to use. |

In the Edit commands dialog, you can configure the following:
-
Menu text of the command: Ensure the text for the menu entry is unique and not used elsewhere. If you need to modify an existing command, delete it using the minus sign icon and create a new one. (mandatory setting)
-
Parent menu: This field specifies under which menu the new command should appear. Leaving this field empty will default the command to appear under the Server console menu. (optional setting)
-
Description: Any description entered here will be displayed as a tooltip for the command. (optional setting)
-
Position: Determines the order of the menu items. Items are sorted with smaller numbers appearing first. This setting helps organize commands within their respective menus. (optional setting)
-
List of commands: Here, input the Linux commands, each on a new line. These commands will be executed sequentially. (mandatory setting)
There are various optional data sources available for enhancing the command list, accessible through the Insert parameter into command line dropdown menu:
-
Interactive input: No fixed parameters; instead, allow for interactive inputs formatted as
<<<"Interactive Input">>>. It’s recommended to include an example of the input expected. -
Config server
-
IP addresses of the selected clients
-
IP addresses of the selected depots
-
Names of the selected clients
-
Names of the selected depots
| Except for interactive inputs, the returns from these methods can be formatted, such as in a comma-separated list. |
You can use operators such as AND (&&), OR (||), the pipe character (|), and redirection (>, <, >>) with the Linux commands. Remember that no user input is possible during execution. If you’re combining commands and the first requires root privileges, ensure the root rights required checkbox is checked. If the subsequent command also needs root privileges, include sudo in the command syntax.
|
apt-get update --yes && sudo apt-get upgrade --yesValidation status of OPSI modules
Open the Validation status of OPSI modules by clicking on the OPSI icon in the toolbar on the left to take a look at the current license status of the OPSI extensions.
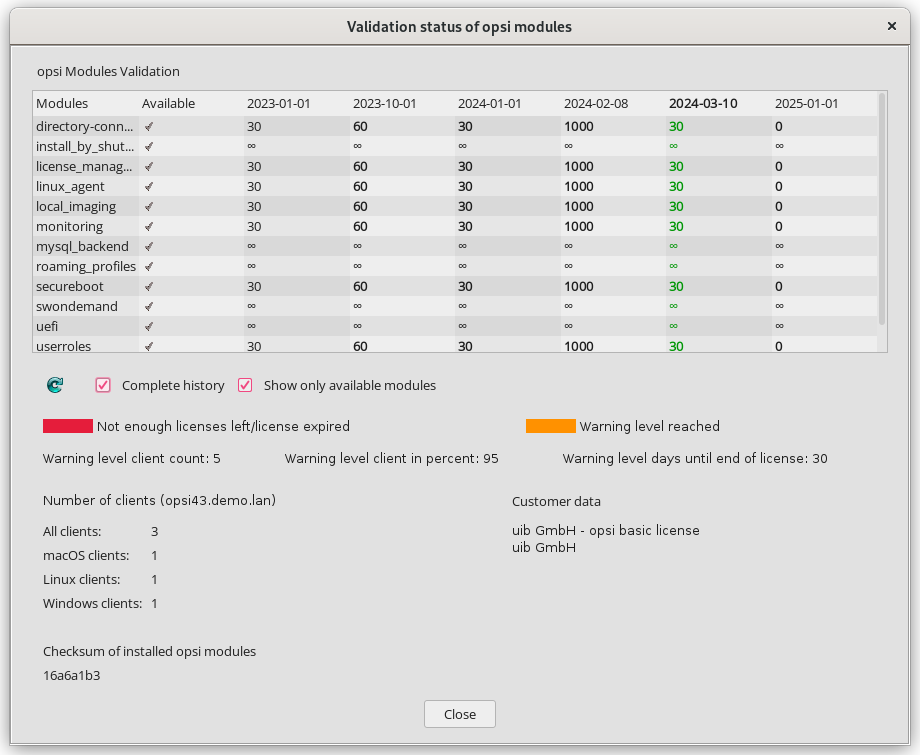
The table displays for each module whether it has been purchased or is available. Using checkboxes at the bottom, you can choose whether to show the complete timeline and whether to display only available extensions or all extensions. The table also indicates how long the license is valid and for how many clients it applies. The column with a future date represents upcoming changes, such as when a license will expire or a new license becomes effective.
The dialog also displays a legend for warnings and warning limits:
-
Warning level client count: the absolute difference in client count from the licensed number at which a warning should be issued
-
Warning level client in percent: the percentage of the client count relative to the licensed amount at which a warning should be issued
-
Warning level days until end of license: the number of remaining days until license expiration at which a warning should be issued
All warning thresholds are configured in the server settings via the host parameters licensing.client_limit_warning_absolute, licensing.client_limit_warning_percent, and licensing.client_limit_warning_days.
|
If a warning threshold for a module is exceeded, the number appears in orange in the table. If there are not enough licenses available for a module or the license has expired, the number appears in red.
The lower part contains information about the clients and customer data for which the licenses were issued. The checksum value is used to verify that the data in the environment matches the data at uib.