OPSI-Server with multiple depots (free)
Concept
Supporting multiple depot shares in OPSI aims at the following targets:
-
central configuration data storage and configuration management
-
providing the software depots on local servers
-
automated deployment of software packages from the central server to the local depots
Accordingly, it is implemented:
-
All configuration data is stored on the central 'OPSI-Configserver'.
-
All clients connect to this 'OPSI-Configserver' in order to request their configuration data. The configuration data comprise the information on method and target of the 'OPSI-Depotserver' connection.
-
All installable software is stored on 'OPSI-Depotservers'.
-
The 'OPSI-Depotservers' have as well an
opsipxeconfdrunning by which they provide boot-images to clients via PXE/tftp. -
opsi-package-manager
A program to (de-)install OPSI packages on one ore more 'OPSI-Depotservers'. -
The OPSI packages are copied via webdav protocol to the 'OPSI-Depotservers' and are installed from the opsiconfd via a web service call.
-
'opsi-configed' supports the management of multiple depots.
-
Clients connected to different depots can be managed in one bundle if the involved depots are synchronized (have all product packages in identical versions).
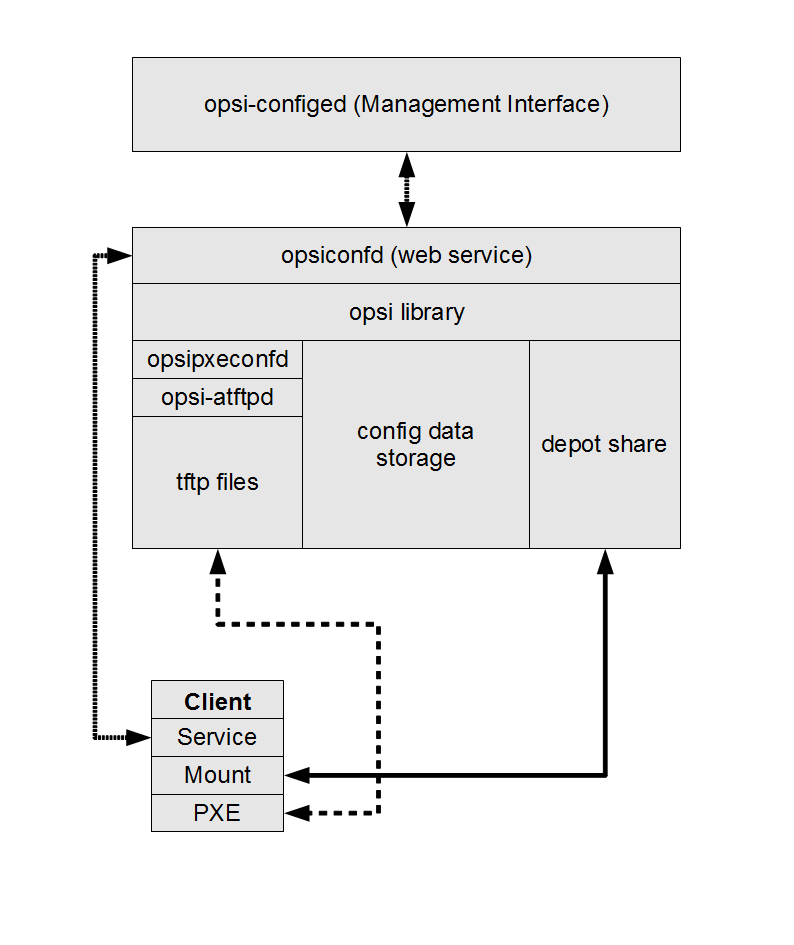
The following schema gives a more detailed view on the communication between the components of a OPSI multi depot share environment.

Creating an depot server
In order to create an 'OPSI-Depotserver' you have to install a standard 'OPSI-Server'. This 'OPSI-Server' can be configured to act as 'OPSI-Depotserver' by calling the script opsiconfd setup --register-depot as user root on the server which should become the 'OPSI-Depotserver'. Because this script does not only reconfigure the local server, but also registers this server as 'OPSI-Depotserver' with the central 'OPSI-Configserver', username and password of a member of the 'opsiadmin' group have to be supplied here.
On Univention Corporate Server the registration of a 'OPSI-Depotserver' happens automatically. The first server with an OPSI installation is used as 'OPSI-Configserver' and all following in a UCS domain installed systems will register there as an 'OPSI-Depotserver'.
Example:
'opsidepot.your.domain' will be reconfigured as OPSI-Depotserver and registered at the OPSI-Configserver 'opsiserver.your.domain':
root@opsidepot.your.domain:~# opsiconfd setup --register-depotNow you will be prompted for the OPSI-Configserver you want to connect to . The registration needs to be authorised by supplying the username and password of a member of the group 'opsiadmin' at the OPSI-Configserver.
The setup will ask you questions about the server, the user, the password and the description of the depot. In the end the output should look like this:
root@opsidepot:~$ opsiconfd setup --register-depot
Do you want to register this server as a depotserver? [y/n]: y
Enter OPSI server address or service url (opsiserver.your.domain):
Enter username for service connection: adminuser
Enter password for 'adminuser':
Connecting to service 'https://opsiserver.your.domain:4447'
Connected to service as 'adminuser'
Enter ID of the depot (opsidepot.your.domain):
Enter a description for the depot (opsidepot): opsidepot
Registering depot
Depot succesfully registered
Usually the configuration files in /etc/opsi/package-updater.repos.d/ on the new depot should be checked.
If the new depot should only update its packages from the main server, only the repository in /etc/opsi/package-updater.repos.d/opsi-server.repo should remain active.
A possible configuration can look like this:
[repository_opsi_server]
active = true
opsiDepotId = opsiserver.your.domain
autoInstall = true
autoUpdate = true
autoSetup = false
; Inherit ProductProperty defaults from master repository
inheritProductProperties = false
Non-interactive registration of a OPSI-Depotserver
It is possible to register a depot without interaction.
To do this the data for the connection to the OPSI-Configserver has to be passed as JSON object alongside the parameter --unattended.
opsiconfd setup --register-depot --unattended '{"configserver": "https://opsi.acme.corp:4447", "username": "some-opsi-admin", "password": "secret", "depot_id": "depot1.acme.corp", "description": "Depot 1"}'package management with multiple depots
see also:
opsi-package-manager
opsi-package-updater
In or to manage opsi-packages with different 'OPSI-Depotserver' the opsi-package-manager got the option -d ( or --depot). With this option you can give the target 'OPSI-Depotserver' for the installation. Using the keyword 'ALL' the OPSI package will be copied to /var/lib/opsi/repository on all known 'OPSI-Depotservers' and then installed via a web service call.
If you don’t give the option -d, the OPSI package will be only installed on the local server (without upload to /var/lib/opsi/repository).
Example:
Install the package softprod_1.0-5.opsi on all known 'OPSI-Depotservers':
opsi-package-manager -d ALL -i softprod_1.0-5.opsiIn order to get information’s about what are the differences between depots you may call opsi-package-manager with the option -D (or --differences).
Example:
Show the differences between all known depots regarding the product mshotfix
opsi-package-manager -D -d ALL mshotfix
mshotfix
    vmix12.uib.local :  200804-1
    vmix13.uib.local :  200804-1
    bonifax.uib.local:  200805-2