Adding Clients
This chapter explains how to integrate Windows clients into the OPSI environment. For detailed instructions, please refer to the chapter OPSI Clients.
| OPSI also supports the management of Linux and macOS clients. For more information, see the chapters Linux Clients and macOS Clients. |
Integrating existing Clients
To add existing clients with an already installed operating system to opsi, you need to install the client agent on each respective computer. Once installed, the client will also appear in the opsi-configed management interface’s client list, even if you haven’t manually added it there:
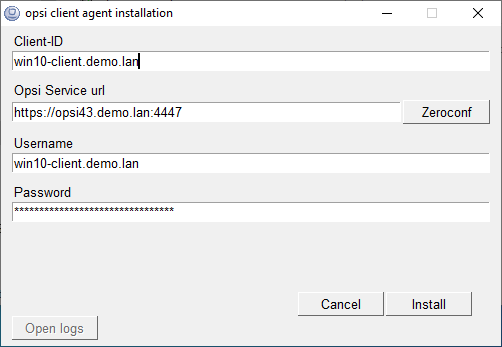
Using the Installer on the Client
This variant is particularly suitable for integrating individual computers as clients in an OPSI environment. Here’s how to proceed:
-
Log in to the client.
-
Download the installer from your OPSI config server. You can find it at
https://<fqdn_or_ip_of_the_config_server>:4447/public/opsi-client-agent/; the Windows program is namedopsi-client-agent-installer.exe. -
Run the installer; it unpacks itself into a temporary local directory and starts the contained
oca-installation-helper. In the dialog window, enter the values for the client ID, the OPSI service URL, the username, and the password. The fields are pre-filled as much as possible; adjust the values to your environment if necessary:-
The client ID usually corresponds to the FQDN of the client.
-
The OPSI service URL must be in the format
https://<fqdn_or_ip_of_config_server>:4447. -
When installing the client for the first time, the username and password should be from an account that is a member of the
opsiadmingroup (see chapter Authorizations). When reinstalling, you can also use the client ID and the host key.
-
-
The installer contacts the server via the OPSI web service to register the client with the server. It then calls the included
opsi-scriptto execute thesetup.opsiscriptof the client agent.
| When executing the installer, you can specify parameters to automate processes, among other things. Further details are available in chapter Client Agent (Windows). |
You should now see the new client(s) in opsi-configed. The next step involves deploying the hwaudit product to the clients.