Server Console
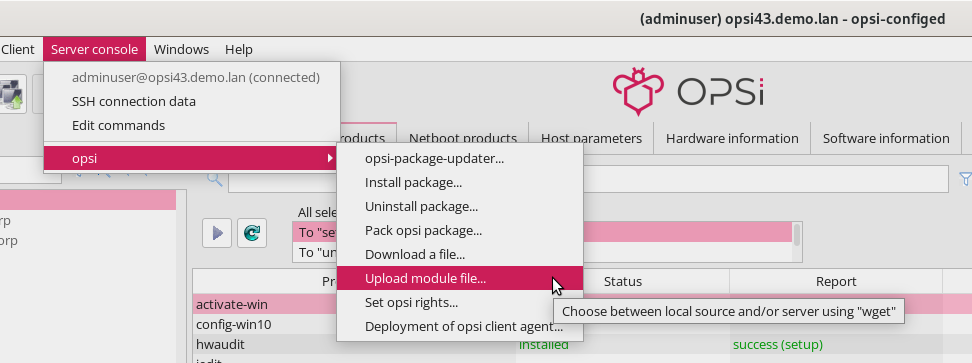
The terminal icon at the bottom left of the main window of the opsi-configed takes you to the server console. The opsi menu item contains predefined command line commands that you can execute on the OPSI server. Move the mouse pointer over an entry to display a tooltip.
Authorizations
You can manage visibility of menu items and user permissions through server host parameters (see section Server Host Parameters). If the OPSI extension User Roles is activated, you can specify authorizations for various user accounts, with default values set for new accounts.
Available entries include:
user.{}.ssh.commandmanagement.active
user.{}.ssh.menu_serverconsole.active
user.{}.ssh.commands.active
They mean:
-
Enables editing of command line command menu entries (default:
false). -
Enables the main menu entry Server console (default:
true). -
Enables all menu entries representing stored commands (default:
true).
Pre-defined Commands
The menu Server console / opsi contains pre-defined command line commands that perform the following actions:
-
opsi-package-updater: Install or update packages with the opsi-package-updater. In the dialog that opens, select either Update packages , List all repositories or Install packages from the Action drop-down menu. You can select the package repository in the drop-down menu below.
-
Install package: Install OPSI packages with the opsi-package-manager on one or more depots. You can either enter the local path to a package or download one from the internet.
-
Uninstall package: Select one or more packages you want to uninstall with the
opsi-package-manager. -
Pack OPSI package: Specify a directory on the server that contains files for an OPSI package. You can use a button to display the versions found in the
controlfile (package and product version) and overwrite them if necessary. Click on Advanced settings to display checkboxes that you can use to create Zsync or Md5 files and set the subsequent permissions. The button Install the built package invokes theopsi-package-manager. -
Download a file: Download any file from the Internet using
wgetand place it on the server in the directory of your choice. -
Set OPSI rights: Corrects the access rights of files and directories on an OPSI server by invoking the opsi-set-rights command.
-
Deployment of opsi-client-agent: To include existing computers as clients in the OPSI environment, the client agent must be installed on them. Here you can select the machines. To execute the command on several clients simultaneously, the login data on these machines must be the same.
The script for deploying the clients must be located in the /var/lib/opsi/depot/opsi-client-agent directory and be called opsi-deploy-client-agent (see chapter Adding Clients).
|
Some of the dialogs (e.g. Set OPSI rights or Install package) contain buttons to select local files. Press the Find subfolders button to list all files and directories from the specified path. To include more layers, press the button multiple times.
Defining Commands
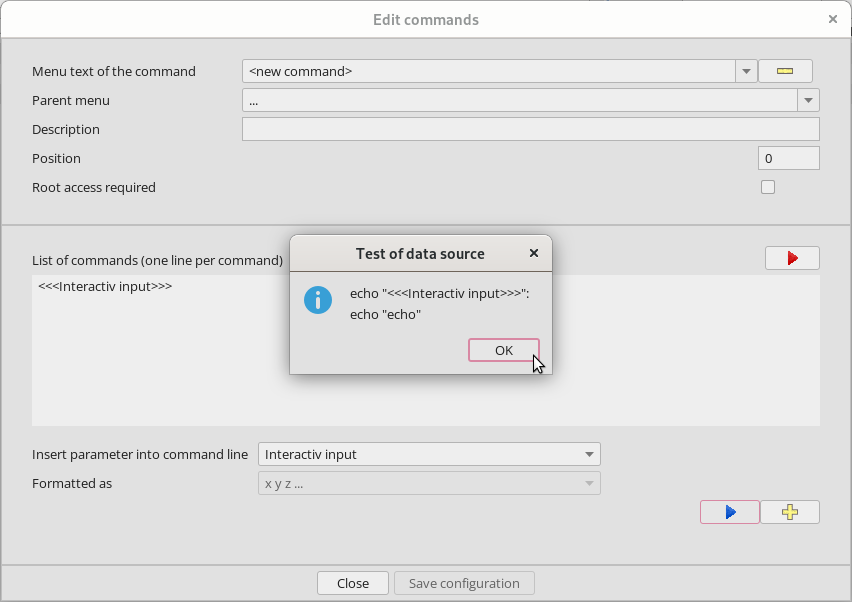
You can open the Edit commands dialog to set up your own commands which will then be available in the Server console menu.
| Please be aware that not all Linux distributions use the same commands or parameters. As an administrator, ensure that the Linux distribution for your OPSI server supports the specific commands you plan to use. |

In the Edit commands dialog, you can configure the following:
-
Menu text of the command: Ensure the text for the menu entry is unique and not used elsewhere. If you need to modify an existing command, delete it using the minus sign icon and create a new one. (mandatory setting)
-
Parent menu: This field specifies under which menu the new command should appear. Leaving this field empty will default the command to appear under the Server console menu. (optional setting)
-
Description: Any description entered here will be displayed as a tooltip for the command. (optional setting)
-
Position: Determines the order of the menu items. Items are sorted with smaller numbers appearing first. This setting helps organize commands within their respective menus. (optional setting)
-
List of commands: Here, input the Linux commands, each on a new line. These commands will be executed sequentially. (mandatory setting)
There are various optional data sources available for enhancing the command list, accessible through the Insert parameter into command line dropdown menu:
-
Interactive input: No fixed parameters; instead, allow for interactive inputs formatted as
<<<"Interactive Input">>>. It’s recommended to include an example of the input expected. -
Config server
-
IP addresses of the selected clients
-
IP addresses of the selected depots
-
Names of the selected clients
-
Names of the selected depots
| Except for interactive inputs, the returns from these methods can be formatted, such as in a comma-separated list. |
You can use operators such as AND (&&), OR (||), the pipe character (|), and redirection (>, <, >>) with the Linux commands. Remember that no user input is possible during execution. If you’re combining commands and the first requires root privileges, ensure the root rights required checkbox is checked. If the subsequent command also needs root privileges, include sudo in the command syntax.
|
apt-get update --yes && sudo apt-get upgrade --yes