Using OPSI to install Windows
This chapter describes the process of installing Windows on a computer without an existing operating system using opsi. Suitable client computers, whether physical or virtual, should meet the following requirements:
-
At least 2 GB of RAM.
-
A network card that supports network booting (PXE protocol capability for boot media loading via the network).
| Ensure to review and adjust the BIOS settings. Netboot must be enabled and prioritized at the top of the boot options to facilitate Windows installation via opsi. |
While standard Windows drivers typically work well with virtual hardware, installing Windows on newer physical computers might necessitate the integration of additional drivers in advance (refer to section Simplified Driver Integration for more details).
To successfully execute the steps in this chapter, you should have previously incorporated a Windows client into the OPSI environment (as detailed in chapter Adding new Clients).
Completing OPSI Products
The netboot products provided by OPSI for installing Windows act as wrappers and are missing a critical component: the content of the installation media. You need to manually copy these contents into the installfiles directory on the OPSI depot server, which is initially empty by default (for more details, refer to section Directory Tree (Overview)).
Additionally, the Windows product key is essential. You have the option to store this key prior to the installation process (as outlined in section Entering the Windows Product Key), or you can alternatively enter it post-installation during the Windows system activation.
Preparations
To install Windows, you require a Windows Preinstallation Environment (WinPE) to function as a live system. You have the option to download either the Creating WinPE automatically with opsi or the Creating WinPE manually (Windows ADK).
| Generally, the version of Windows used in WinPE does not have to match the version of Windows you intend to install. What’s crucial at this stage is ensuring that all necessary drivers for hard disks, network cards, etc., are available. Use a 32 bit PE for 32 bit Windows installations and a 64 bit PE for 64 bit installations. You can find more information in this article on Microsoft Learn. |
You will also need the Windows Assessment and Deployment Kit (Windows ADK) along with the WinPE addon. These should be installed on a Windows machine (preferably 64 bit) in the suggested path under Program Files (x86). During installation, select only the Windows Preinstallation Environment (Windows PE) option; any dependencies will be automatically resolved.
For Windows 11 installations, if you have set the property win11_hardware_check to [true], it’s essential that the WinPE includes the optional components WinPE-WMI and WinPE-SecureStartup (Notes on running Windows Setup in Windows PE:, For Windows 11:) Please note that as of the ADK for Windows 11, the 32 bit versions of Windows PE are no longer included in the WinPE add-ons. The last version that supports 32 bit is the WinPE add-on for Windows 10 (version 2004). More information: Download and install the Windows ADK
|
Creating a WinPE
In the simplest scenario, if you already have a Windows computer with the opsi-client-agent and the Windows ADK installed, you can opt for the Creating WinPE automatically with opsi method. Alternatively, if you prefer a hands-on approach, the section Creating WinPE manually (Windows ADK) provides instructions for manual creation.
Creating WinPE automatically with opsi
To create the WinPE automatically using opsi, follow these steps:
-
Install the
opsi-winpepackage on the opsi-server:
opsi-package-updater -v install opsi-winpe. -
Set the localboot product
opsi-winpefor the Windows client toonce. If required, choosex86instead ofx64in the product properties at the bottom right. Save the changes by right-clicking and selecting Save. -
If you need to integrate drivers for mass storage devices such as hard disks, refer to the section Extending the WinPE with opsi.
-
Trigger the installation event for the client. This can be done either by right-clicking and selecting on-demand or by rebooting the client.
-
Next, move or copy the contents of the newly created directory
C:\winpe_<ARCH>\media\on the client to the existing directory of the operating system to be installed, which is located at\\opsiserver\opsi_depot_rw\<operating system>\winpe\. Replace<ARCH>with eitherx86for 32 bit oramd64for 64 bit architecture. -
To finalize the process, run the command opsi-set-rights on the OPSI server:
opsi-set-rightsCreating WinPE manually (Windows ADK)
To manually create a WinPE for Windows 10 or 11, begin by launching Start / Programs / Windows Kits / Windows ADK / Environment for Deployment and Image Creation Tools. This will open a prompt with the necessary environment variables already set. In this prompt, you’ll need to input several commands.
The commands for 32 bit and 64 bit systems are nearly identical. In the first command, replace <ARCH> with either x86 or amd64, depending on the architecture you’re working with.
|
-
Use the CopyPE tool to create a working directory that includes the standard files for WinPE:
copype.cmd <ARCH> C:\winpe -
Mount the image::common:
dism /Mount-Wim /WimFile:C:\winpe\media\sources\boot.wim /index:1 /MountDir:c:\winpe\mount -
Replace the
startnet.cmdscript. The filec:\opsi\startnet.cmdis generated by the OPSI-Linux boot image, along with thewpeinitcall insetup.py:
echo c:\opsi\startnet.cmd > "C:\winpe\mount\Windows\System32\startnet.cmd" -
Unmount the image::common:
dism /Unmount-Wim /MountDir:c:\winpe\mount /Commit -
Copy the contents of
C:\winpe\ISOto/var/lib/opsi/depot/<productid>/winpe. After that, adjust the permissions:
opsi-setup --set-rights /var/lib/opsi/depot/<productid>/winpe
Extending the WinPE
By default, WinPE includes a broad range of drivers. The more recent the Windows version used to create the WinPE, the higher the likelihood that WinPE contains all necessary drivers. However, there are instances where certain drivers might be missing, or a standard driver for a particular hardware component may not be compatible with WinPE due to significant differences from the standard Windows drivers. In such cases, you need to extend the WinPE before proceeding with the OS installation. There are two methods to do this:
Extending the WinPE with opsi
To integrate specific drivers during the automatic generation of WinPE, you can utilize the opsi-winpe product.
| It’s important to only integrate drivers that are absolutely essential for the Windows installation process. Typically, this includes network or mass storage drivers necessary for installation. |
To add the drivers, copy them to the directory \\opsiserver\opsi_depot_rw\opsi-winpe\drivers\. After copying, ensure you set the appropriate access rights:
opsi-set-rights /var/lib/opsi/depot/opsi-winpeAfter copying the drivers and setting the access rights, proceed as outlined in the section Creating WinPE automatically with opsi.
| To verify that the process has been successful, you can check the logfile. For instance, if you have integrated a VirtIO mass storage driver, the corresponding entry in the logfile should appear as follows: |
comment: Driver           : oem0.inf
comment: OriginalFileName : C:\winpe_amd64\mount\Windows\System32\DriverStore\FileRepository\viostor.inf_amd64_aa6c91b5db55ab62\
comment:                    viostor.inf
comment: Inbox            : False
comment: ClassName        : SCSIAdapter
comment: BootCritical     : True
comment: ProviderName     : Red Hat, Inc.
comment: Date             : 15-11-2022 00:00:00
comment: Version          : 100.92.104.22900
Extending the WinPE manually
For Dell hardware, Dell provides specific network and storage drivers recommended for WinPE use. The following steps describe how to manually integrate such drivers into a WinPE. Ensure you have completed all the steps for creating the WinPE as per section Creating WinPE automatically with opsi.
-
Download the WinPE10 driver package from Dell and extract it, using tools like 7-Zip or the
expandcommand. Create a new directory, for instance,dell-drivers, and extract the.cabfile into this directory. -
Inspect the image by opening the command prompt as an administrator and executing the command:
dism /Get-WimInfo /WimFile:C:\winpe\ISO\sources\boot.wim -
For the next step, note the index number from the output of the previous command. Typically, as WinPE usually comprises a single image, index 1 is the correct choice. Mount the image using the command:
dism /Mount-Wim /WimFile:C:\winpe\ISO\sources\boot.wim /index:1 /MountDir:c:\winpe\mount -
Incorporate the unpacked drivers into the WinPE:
dism /Image:C:\winpe\mount /Add-Driver /Driver:c:\dell-driver\winpe\x64 /Recurse
For 32 bit systems, replacex64withx86. The Dell driver package includes drivers for both architectures. -
Unmount the image and save the changes:
dism /Unmount-Wim /MountDir:c:\winpe\mount /Commit -
Copy the
C:\winpe\ISOdirectory to/var/lib/opsi/depot/<productid>/as a directory namedwinpe, and then adjust the permissions:
opsi-set-rights /var/lib/opsi/depot/<productid>/winpe
If you need to integrate only a specific driver, you can exclude the /Recurse option in step 4 and directly specify the driver’s .inf file instead of the entire directory. Additionally, you can use the /ForceUnsigned parameter to integrate non-signed drivers into a WinPE.
|
The unattend.xml File
For unattended installations, a control file named unattend.xml is used, which can typically be found in the custom directory, for example, at /var/lib/opsi/depot/<productid>/custom (as detailed in section Structure of Netboot Products). This file includes references to the properties of the Netboot products and contains placeholders for the administrator account name and password (the default being nt123).
Additionally, a template file named unattend.xml.template is located in the opsi directory of the respective Netboot product. This template is regularly updated and has been thoroughly tested by us.
If you need to make modifications to the unattend.xml file, ensure to edit the version in the custom directory, as this version takes precedence (refer to section opsi and custom Directories for more details).
|
The unattend.xml file also includes a directive to execute a file named postinst.cmd located in the opsi directory after Windows installation. This postinst.cmd file, in turn, runs all the scripts found in the opsi/postinst.d directory. For additional information about this process, see section opsi and custom Directories.
Integrating Drivers
Ideally, a Windows installation should be seamless, with all devices on the computer functioning correctly. However, it’s not uncommon to encounter situations where most components work fine, but specific ones, like the Bluetooth interface of a notebook, may not. Even in cases where everything operates as expected, there might be better or more recent hardware drivers available. Hardware manufacturers, including Lenovo and Dell, often recommend their proprietary drivers and make them available for download.
| For detailed guidance on how to integrate these manufacturer-specific drivers, refer to the section Simplified Driver Integration. |
Providing Installation Media
Copy the contents of the Windows installation DVD to /var/lib/opsi/depot/<productid>/installfiles and adjust the access rights or the owner:
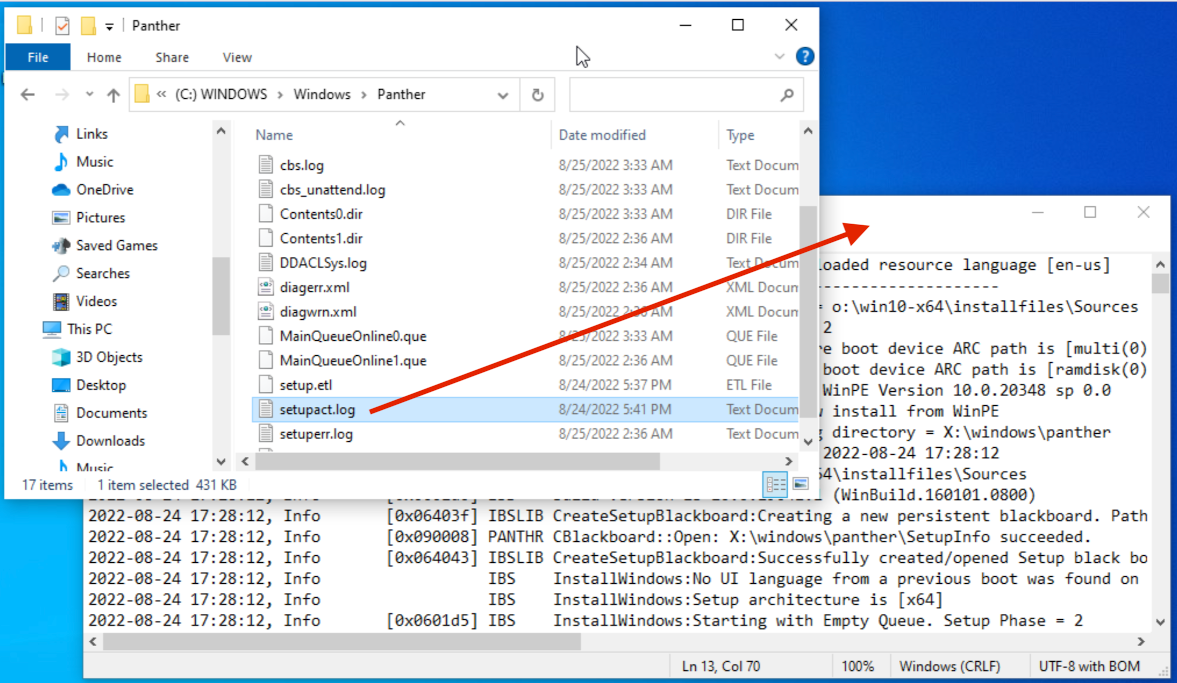
opsi-set-rights /var/lib/opsi/depot/<productid>/installfilesLogfiles
Here’s an overview of the key logfiles generated during the OS installation process:
-
c:\Windows\Panther\setupact.log:
This log captures details up to the end of setup phase 4 and runs under WinPE. -
c:\Windows\Panther\setupact.err:
This is the error log for events up to the end of setup phase 4, also running under WinPE. -
c:\Windows\Panther\UnattendGC\setupact.log:
This log covers the Specialize phase of the installation. -
c:\Windows\Panther\UnattendGC\setupact.err:
The error log for the Specialize phase is stored here. -
c:\Windows\System32\winevt\Logs\*:
This directory contains several event logs. -
c:\Windows\ntbtlog.txt:
This is a log file that Windows generates during the startup process, provided it’s enabled.
Entering the Windows Product Key
| If you have acquired the License Management module, you can conveniently manage your Windows product keys through this extension. The Netboot product for OS installation automatically detects the presence of this module and inquires the OPSI server for a suitable license pool. If available, it retrieves the Windows product key from there. |
In case you do not have the license management module or prefer not to use it for managing Windows product keys, you can manually enter the key via the Management Interface opsi-configed:
-
Select a client from the left sidebar.
-
Navigate to the Netboot products tab.
-
Choose the desired Netboot product, such as win10-x64.
-
On the right-hand side, expand the Property configuration and scroll down to the productkey entry.
-
Click in the Property value column.
-
In the dialog that opens, enter the product key and click the plus sign to add it.
-
The green checkmark will now appear in red; click on it to save the changes and close the dialog.
-
Finally, to save the changes in the backend, click on the red checkmark located in the top left-hand corner.
image::common:product-key.png["You can enter the Windows Product Key via the Product Properties.", pdfwidth=80%, width=800
Alternatively, you can set a standard product key for all clients within your OPSI depot. To do this in opsi-configed, follow these steps:
-
Click on the Depot configuration tile located at the top right.
-
Navigate to the Default properties tab.
-
Select the Netboot product you wish to set the key for, such as win10-x64.
-
On the right-hand side, expand Edit properties on depot(s) and scroll down to the productkey entry.
-
Click in the Property value column.
-
In the dialog that appears, enter the product key and click the plus sign to add it.
-
The green checkmark will turn red; click on it to save the changes and close the dialog.
-
Finally, to ensure the changes are applied in the backend, click on the red checkmark located in the top left-hand corner.
Starting the Windows Installation
To initiate the Windows installation, in the opsi-configed management interface, select the client for installation and switch to the Netboot products tab. Set the netboot product you wish to install, such as win10-x64, to setup in the Requested action column. Then click on the red checkmark in the top left-hand corner, which will turn green again.
Following this, the client will load a Linux boot image over the network during booting. Confirm the PC reinstallation in the boot menu, and the process should then proceed automatically until the Windows login screen is displayed.
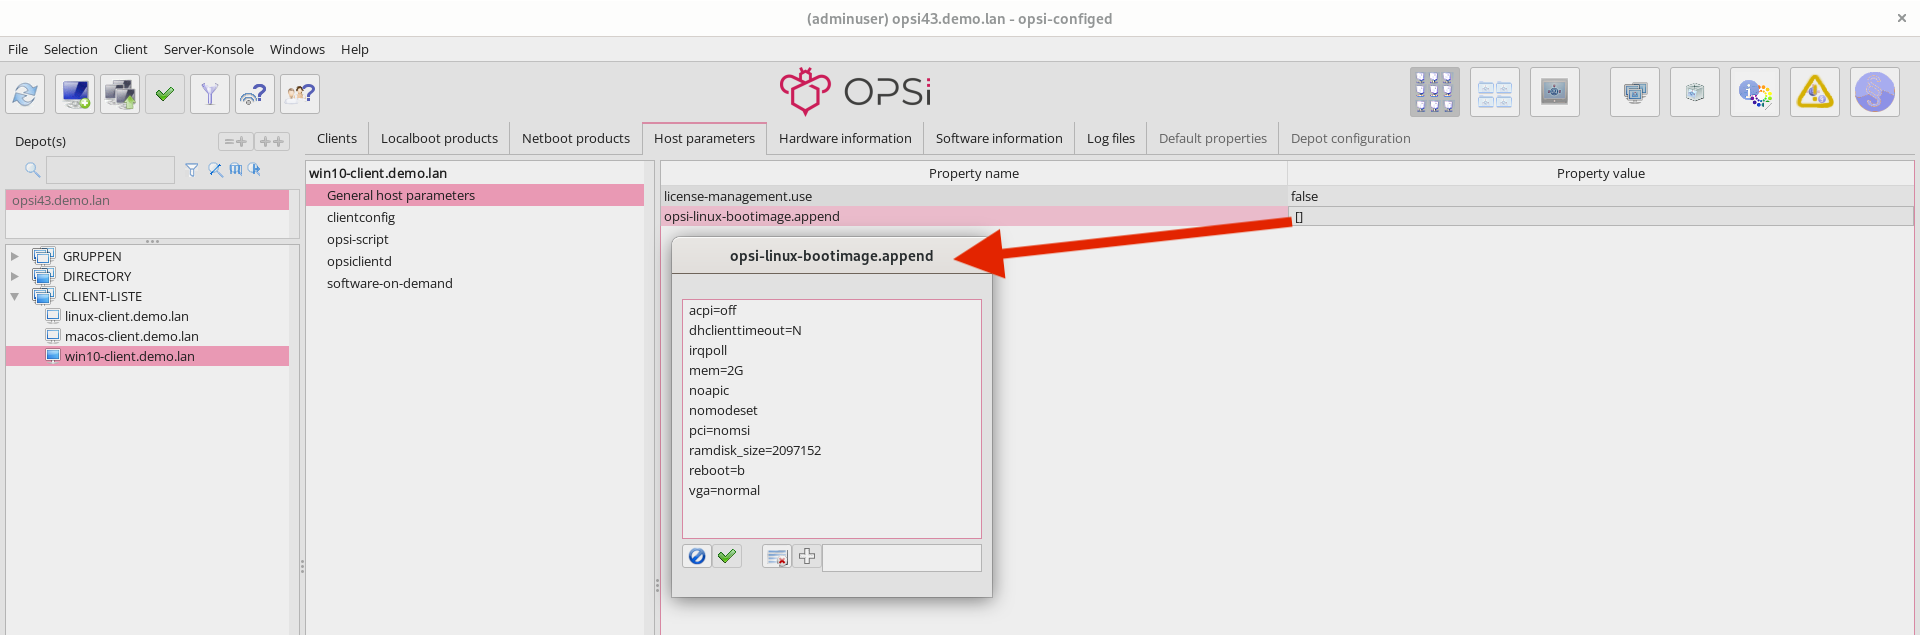
If you encounter a black screen after the boot image loads or if the network card isn’t working correctly, you might need to adjust the start parameters for the boot image to match your hardware. Select the opsi-linux-bootimage.append entry on the Host parameters tab in the opsi-configed management interface and click in the Property value column (see the section Parameters for the Linux Boot Image.
|
| Please be careful with clients that have a large hard disk. On non-UEFI systems, the maximum partition size is limited to 2 TB! Creating a larger partition on such systems will cause the installation to fail. To address this, you can either create multiple partitions or opt to install the UEFI extension. |
Structure of Netboot Products
This section provides an overview of the structure of the Windows netboot products designed for unattended installation.
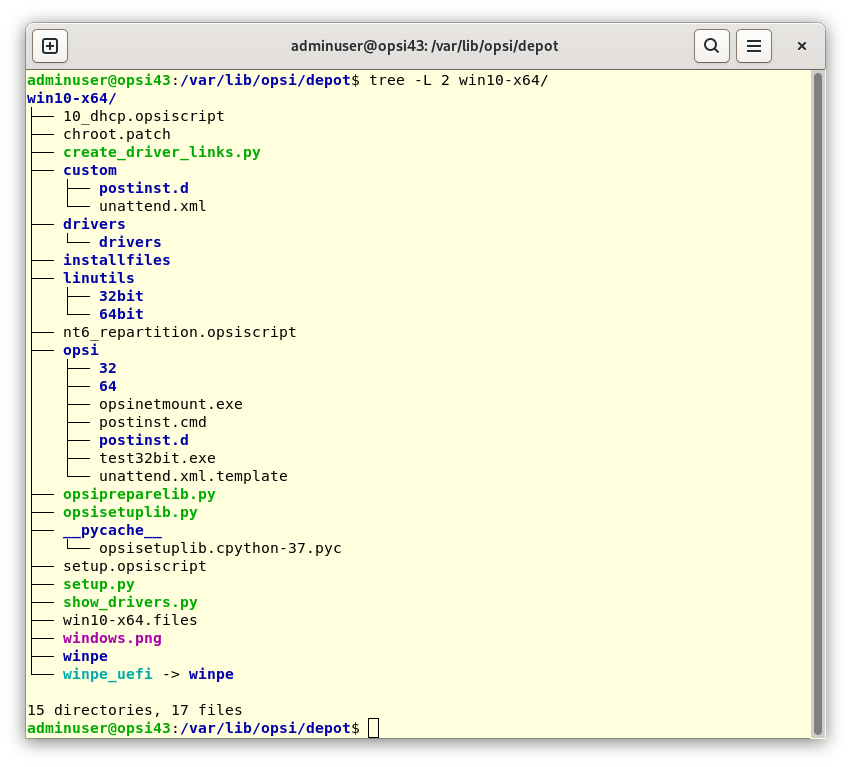
Directory Tree (Overview)
Netboot products for automated Windows installations consist of various directories and files, which can vary depending on the Windows version being installed.
installfiles and winpe Directories
-
installfiles:
This directory contains the content of the installation medium. -
winpe:
This directory stores a bootable WinPE image.
opsi and custom Directories
These two directories are integral to controlling the operating system installation process. During installation, these directories work in tandem, with the files in the custom directory taking precedence.
Be aware that updates may overwrite the contents of the opsi directory, so it’s advisable not to make any changes in this directory. Instead, place your customizations in the custom directory, which remains unaffected during updates.
|
In the postinst.d subdirectory, you’ll find scripts that are executed after the OS installation via postinst.cmd. These scripts perform a variety of tasks, such as installing the client agent to enable OPSI to install application software. The scripts are processed in alphabetical order, which is why they are numbered (for example, 05_copy_drivers.cmd, 10_dhcp.cmd, 20_try.ps1, etc.).
For your custom scripts, use the custom/postinst.d directory. When naming these files, use numbers between 11_ and 19_ (such as 13_myscript.cmd). The range from 01_ to 10_ is reserved for scripts provided by opsi.org/uib. The script named 99_cleanup.cmd is always the last one to run and is responsible for restarting the computer.
drivers Directory
This directory is used for driver integration and is described in the section Simplified Driver Integration.
Scripts and other Files
In the top-level of the product directory, you’ll find several other files:
-
setup.py:
This script is the main installation script executed by the boot image. -
<productid>.files:
This file lists details about the files and directories within the product directory, including their size and checksums. It is generated automatically and should not be manually altered. -
create_driver_links.py:
This script creates links between the drivers and the directories of the netboot product. -
show_drivers.py:
This script facilitates the integration of drivers. The process for this is described in more detail in the upcoming section (Simplified Driver Integration).
Simplified Driver Integration
When managing a pool of Windows computers that require drivers not included in the standard Windows installation, it’s often necessary, and sometimes even crucial, to integrate these drivers directly into the installation process. This is especially true for network devices, as a Windows system without network connectivity can be challenging to manage remotely.
OPSI simplifies the process of providing such drivers. All you need to do is place the drivers in the appropriate directory on the depot server. A script then scans these driver directories and compiles a catalog. The boot image uses this catalog to automatically detect and integrate the correct drivers. This method is effective for a range of drivers, including standard drivers, USB drivers, HD audio drivers, and drivers for hard disk controllers (also known as text mode drivers).
Integrating drivers into the installation process involves:
-
The driver is copied to the local hard disk (
c:\drv\<num>). -
The Windows setup is instructed by the
unattend.xmlfile to search for suitable drivers in the directories located beneathc:\drv\.
Windows requires drivers in a specific format on the OPSI server. Only driver directories that contain at least one .inf file are compatible. This file describes the driver for the Windows setup program. Formats like setup.exe, .zip files, or other packaged drivers are not suitable for this purpose!
|
There are several methods to supply drivers for OS installation with opsi:
Assigning Drivers automatically
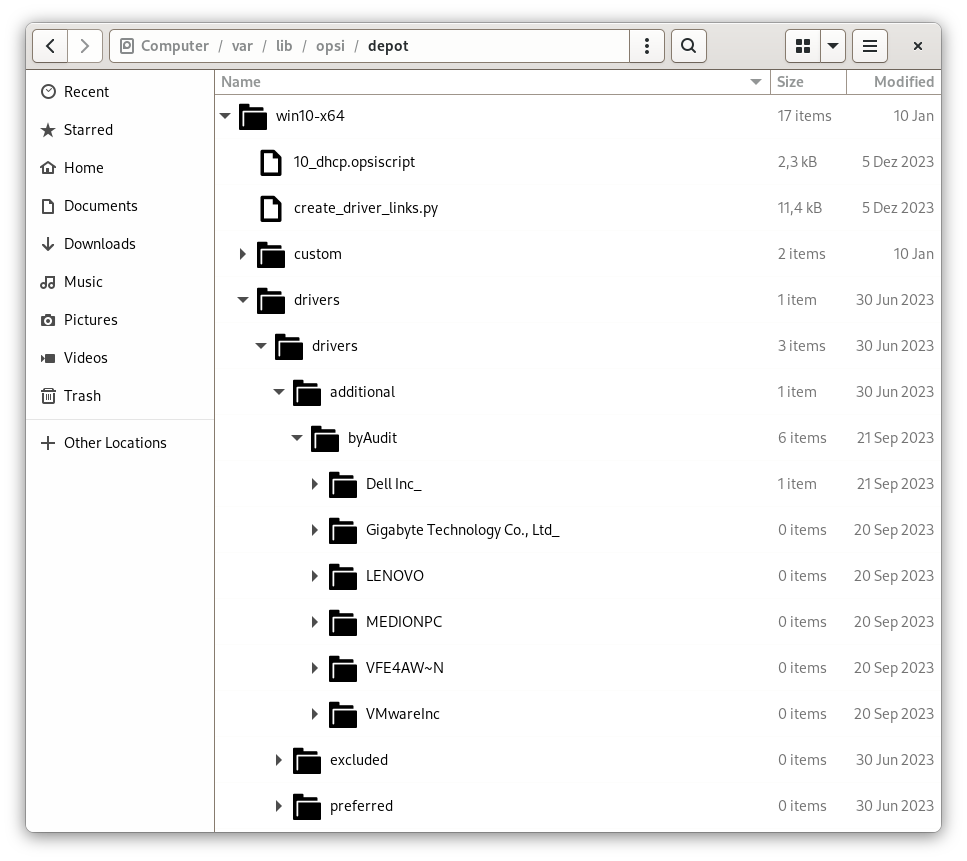
The preferred method for assigning drivers is through the OPSI hardware inventory, as outlined in the section Inventory (hwaudit/swaudit). Using this approach, OPSI scans the directory <productid>/drivers/drivers/additional/byAudit for a folder name matching the <vendor> identified during the hardware inventory. Within the <vendor> folder, OPSI then looks for a directory name that aligns with the <model> found during the hardware inventory.
If OPSI locates such a directory, it is treated as if the drivers were manually assigned via the product property additional_drivers (refer to section Assigning Drivers manually for more details).
|
Drivers can be provided through the management interface opsi-configed, tab Hardware information. For more information on automated driver integration, please refer to the section Integrating Drivers automatically.
|
The OPSI Linux boot image processes the drivers in the following order:
-
OPSI initially searches in the directory
<vendor>/<model> (<sku>). -
If no relevant files are found there, OPSI then checks the
<system vendor>/<system model>directory. -
As a last resort, OPSI searches within
<motherboard vendor>/<motherboard model>.
It’s worth noting that some vendors use model names that can be problematic for this automatic method via hwaudit, especially names containing special characters like / or : that are not allowed in file or directory names. For instance, a directory named 5000/6000/7000 might be required. To address this, OPSI internally substitutes certain special characters with an underscore (_): <, >, ?, ", :, |, \, /, and *. Therefore, in the example mentioned, OPSI would create and automatically assign a directory named 5000_6000_7000, even though the hardware inventory may have provided a different name.
Assigning Drivers manually
Drivers intended for installation regardless of their identification via PCI or USB IDs should be placed in separate directories under <productid>/drivers/drivers/additional; the naming and depth of this directory structure are flexible. The additional_drivers product property (explained in section Assigning Drivers manually) allows you to assign one or more paths from the <productid>/drivers/drivers/additional folder to a client.
OPSI recursively searches directories listed in the additional_drivers product property and includes all drivers found therein. It also follows symbolic links, which can be used to create separate directories for specific computer models, like dell-optiplex-815.
|
If OPSI locates a driver for an existing PCI device (or for HD audio, USB) in the directories specified via additional_drivers, it will not include a driver for this device from drivers/preferred/ (see section Special Drivers) or drivers/. Therefore, additional_drivers is particularly useful for incorporating drivers that cannot be identified through the standard driver recognition process (detailed in section Drivers' Priority).
General Drivers
When dealing with highly diverse hardware configurations, employing general driver packages can be a practical approach. These packages are placed in the <productid>/drivers/drivers directory. OPSI identifies these drivers as compatible with the specific hardware based on their PCI IDs (or USB or HD audio IDs) as detailed in the driver’s description file, and subsequently incorporates them into the Windows setup process.
Special Drivers
For hardware-specific drivers that are not directly assigned, you can source them from the device manufacturers' websites. These additional or verified drivers should be placed in their distinct directories (where the name and structure depth are not critical) under <productid>/drivers/drivers/preferred. OPSI identifies these drivers as suitable for the hardware by referencing their PCI IDs (or USB or HD audio IDs) in the driver’s description file. It gives precedence to these drivers over those stored in <productid>/drivers/drivers and integrates them into the Windows setup.
If there are multiple drivers for a single PCI ID in the preferred directory, it may cause issues with driver allocation. In such scenarios, it’s necessary to assign drivers directly to a specific client to ensure correct installation and functionality.
|
Using the drivers Directory
Within the drivers directory of the Netboot product, you can store both manually and automatically added drivers.
OPSI processes these drivers in a specific order, assigning varying levels of priority to each.
Drivers' Priority
Drivers integrated through the product property additional_drivers or via inventory data from <productid>/drivers/driversadditional/byAudit are given the highest priority by opsi. Initially, OPSI uses PCI, USB, or HD audio identifiers to determine if there is a suitable driver for the hardware in these directories. If a matching driver isn’t found there, OPSI then proceeds to search the other directories (<productid>/drivers/drivers/preferred and <productid>/drivers/drivers).
Adding and testing Drivers
Following the addition of a driver or any modification within the <productid>/drivers/drivers directory (or its subdirectories), execute this command in the root directory of the Netboot product. This ensures that the rights are correctly set:
opsi-set-rights ./driversWhen you have stored drivers in the <productid>/drivers/drivers or <productid>/drivers/drivers/preferred directories, it’s essential to run the ./create_driver_links.py script. This script scans the directories, creating a series of links that facilitate the assignment of drivers to the corresponding hardware. Drivers from the preferred directory are given precedence by this script.
The setup.py script examines the hardware of the computer being installed and identifies the necessary drivers. Subsequently, it copies these drivers to the hard disk and modifies the unattend.xml file accordingly.
If hardware inventory data is available for a client, you can use the show_drivers.py script. It provides an output showing which drivers the boot image would select for installation based on PCI IDs, USB IDs, HD audio IDs, and additional_drivers (or byAudit). It also indicates any hardware components for which a driver is not yet available:
./show_drivers.py <clientname>Check the output from show_drivers.py to confirm the inclusion of the necessary drivers.
Sometimes, driver directories from manufacturers might encompass drivers for various operating systems (like Windows 10, Windows 11, etc.) or configurations (SATA, SATA-Raid, etc.). OPSI does not differentiate between these. If you think a recognized driver is not appropriate, relocate it to the <productid>/drivers/exclude directory. OPSI does not consider drivers in this location for integration. After moving the driver, rerun ./create_driver_links.py or ./show_drivers.py.
|
show_drivers.py Output (Examples)
./show_drivers.py pcdummy

PCI-Devices
   [(Standardsystemgeräte), PCI Standard-PCI-zu-PCI-Brücke]
      No driver - device directory  /var/lib/opsi/depot/<productid>/drivers/pciids/1022/9602 not found
   [ATI Technologies Inc., Rage Fury Pro (Microsoft Corporation)]
      Using build-in windows driver
   [(Standard-IDE-ATA/ATAPI-Controller), Standard-Zweikanal-PCI-IDE-Controller]
      /var/lib/opsi/depot/<productid>/drivers/drivers/D/M/N/123
   [Realtek Semiconductor Corp., Realtek RTL8168C(P)/8111C(P) PCI-E Gigabit Ethernet NIC]
      /var/lib/opsi/depot/<productid>/drivers/drivers/preferred/realtek_gigabit_net_8111_8168b
   [IEEE 1394 OHCI-konformer Hostcontroller-Hersteller, OHCI-konformer IEEE 1394-Hostcontroller]
      No driver - device directory '/var/lib/opsi/depot/<productid>/drivers/pciids/197B/2380' not found
   [Advanced Micro Devices, Inc., AMD AHCI Compatible RAID Controller]
      /var/lib/opsi/depot/<productid>/drivers/drivers/preferred/ati_raid_sb7xx
   [(Standard-USB-Hostcontroller), Standard OpenHCD USB-Hostcontroller]
      No driver - device directory '/var/lib/opsi/depot/<productid>/drivers/pciids/1002/4397' not found
   [ATI Technologies Inc, ATI SMBus]
      /var/lib/opsi/depot/<productid>/drivers/drivers/preferred/ati_smbus

USB-Devices
   [(Standard-USB-Hostcontroller), USB-Verbundgerät]
      /var/lib/opsi/depot/<productid>/drivers/drivers/preferred/brother_844x_pGerb
   [Microsoft, USB-Druckerunterstützung]
      /var/lib/opsi/depot/<productid>/drivers/drivers/preferred/brother_844x_pGerb

Additional drivers
   [ati_hdaudio_azalia]
     /var/lib/opsi/depot/<productid>/drivers/drivers/additional/ati_hdaudio_azalia
Example for a client with additional_drivers:
 ./show_drivers.py e5800
Manually selected drivers (additional)
   [hp_e5800]
      [/var/lib/opsi/depot/<productid>/drivers/drivers/additional/hp_e5800/sp52852/Vista64/HDXHPAI3.inf]
      [/var/lib/opsi/depot/<productid>/drivers/drivers/additional/hp_e5800/sp52852/Vista64/HDX861A.inf]
      [/var/lib/opsi/depot/<productid>/drivers/drivers/additional/hp_e5800/sp52852/Vista64/HDXHPAI1.inf]
      [/var/lib/opsi/depot/<productid>/drivers/drivers/additional/hp_e5800/sp52852/Vista64/HDXCPC.inf]
      [/var/lib/opsi/depot/<productid>/drivers/drivers/additional/hp_e5800/sp52852/Vista64/HDXHPAI2.inf]
      [/var/lib/opsi/depot/<productid>/drivers/drivers/additional/hp_e5800/sp50134/autorun.inf]
      [/var/lib/opsi/depot/<productid>/drivers/drivers/additional/hp_e5800/sp50134/ibxHDMI/IntcDAud.inf]
      [/var/lib/opsi/depot/<productid>/drivers/drivers/additional/hp_e5800/sp50134/HDMI/IntcHdmi.inf]
      [/var/lib/opsi/depot/<productid>/drivers/drivers/additional/hp_e5800/sp50134/Graphics/kit24890.inf]
      [/var/lib/opsi/depot/<productid>/drivers/drivers/additional/hp_e5800/sp50134/IIPS/Impcd.inf]
      [/var/lib/opsi/depot/<productid>/drivers/drivers/additional/hp_e5800/sp54284/Realtek 64bit/hp64win7.inf]

PCI-Devices
   [8086:27C8]  Intel : Intel(R) N10/ICH7 Family USB Universal Host Controller - 27C8
      /var/lib/opsi/depot/<productid>/drivers/drivers/preferred/R293337/WIN7
   [8086:27DA]  Intel : Intel(R) N10/ICH7 Family SMBus Controller - 27DA
      /var/lib/opsi/depot/<productid>/drivers/drivers/preferred/R293337/WIN7
   [8086:27C9]  Intel : Intel(R) N10/ICH7 Family USB Universal Host Controller - 27C9
      /var/lib/opsi/depot/<productid>/drivers/drivers/preferred/R293337/WIN7
   [8086:27DF]  Intel : Intel(R) ICH7 Family Ultra ATA Storage Controllers - 27DF
      /var/lib/opsi/depot/<productid>/drivers/drivers/preferred/R293337/WIN7
   [8086:27CA]  Intel : Intel(R) N10/ICH7 Family USB Universal Host Controller - 27CA
      /var/lib/opsi/depot/<productid>/drivers/drivers/preferred/R293337/WIN7
   [8086:2E30]  Intel : Intel(R) 4 Series Chipset Processor to I/O Controller - 2E30
      /var/lib/opsi/depot/<productid>/drivers/drivers/not_preferred/x64/C/Intel/1
   [8086:27CB]  Intel : Intel(R) N10/ICH7 Family USB Universal Host Controller - 27CB
      /var/lib/opsi/depot/<productid>/drivers/drivers/preferred/R293337/WIN7
   [8086:2E32]  Intel Corporation : Intel(R) G41 Express Chipset
      Manually selected [hp_e5800] /var/lib/opsi/depot/<productid>/drivers/drivers/additional/hp_e5800/sp50134/Graphics
   [8086:27CC]  Intel : Intel(R) N10/ICH7 Family USB2 Enhanced Host Controller - 27CC
      /var/lib/opsi/depot/<productid>/drivers/drivers/preferred/R293337/WIN7
   [8086:244E]  Intel : Intel(R) 82801 PCI-Brücke - 244E
      Using build-in windows driver
      This driver will not be integrated, because same device already integrated in: '/var/lib/opsi/depot/<productid>n/drivers/drivers/not_preferred/x64/C/Intel/1/dmi_pci.inf'
   [8086:27D0]  Intel : Intel(R) N10/ICH7 Family PCI Express Root Port - 27D0
      /var/lib/opsi/depot/<productid>/drivers/drivers/preferred/R293337/WIN7
   [8086:27B8]  Intel : Intel(R) ICH7 Family LPC Interface Controller - 27B8
      /var/lib/opsi/depot/<productid>/drivers/drivers/preferred/R293337/WIN7
   [8086:27D2]  Intel : Intel(R) N10/ICH7 Family PCI Express Root Port - 27D2
      /var/lib/opsi/depot/<productid>/drivers/drivers/preferred/R293337/WIN7
   [8086:27C0]  Intel : Intel(R) N10/ICH7 Family Serial ATA Storage Controller - 27C0
      /var/lib/opsi/depot/<productid>/drivers/drivers/preferred/R293337/WIN7
   [8086:27D8]  Microsoft : High Definition Audio-Controller
      No driver - device directory '/var/lib/opsi/depot/<productid>/drivers/pciids/8086/27D8' not found
   [10EC:8136]  Realtek : Realtek RTL8102E/RTL8103E-Familie-PCI-E-Fast-Ethernet-NIC (NDIS 6.20)
      Manually selected [hp_e5800] /var/lib/opsi/depot/<productid>/drivers/drivers/additional/hp_e5800/sp54284/Realtek 64bit

USB-Devices
   [0461:0010]  (Standardsystemgeräte) : USB-Eingabegerät
      No driver - vendor directory '/var/lib/opsi/depot/<productid>/drivers/usbids/0461' not found
   [0461:4D20]  (Standardsystemgeräte) : USB-Eingabegerät
      No driver - vendor directory '/var/lib/opsi/depot/<productid>/drivers/usbids/0461' not found
   [058F:6366]  Kompatibles USB-Speichergerät : USB-Massenspeichergerät
      No driver - vendor directory '/var/lib/opsi/depot/<productid>/drivers/usbids/058F' not found
   [0461:0010]  (Standard-USB-Hostcontroller) : USB-Verbundgerät
      No driver - vendor directory '/var/lib/opsi/depot/<productid>/drivers/usbids/0461' not found

HD-Audio-Devices
   [10EC:0662]  Realtek High Definition Audio
      Manually selected [hp_e5800] /var/lib/opsi/depot/<productid>/drivers/drivers/additional/hp_e5800/sp52852/Vista64
Example for a client with byAudit:
 ./show_drivers.py pctry5detlef
Manually selected drivers (additional)
   [/var/lib/opsi/depot/<productid>/drivers/drivers/additional/byAudit/nvidia/awrdacpi]
      [/var/lib/opsi/depot/<productid>/drivers/drivers/additional/byAudit/nvidia/awrdacpi/pctry5detlef/Display/Radeon X300-X550-X1050 Series Secondary (Microsoft Corporation - WDDM)/atiilhag.inf]
      [/var/lib/opsi/depot/<productid>/drivers/drivers/additional/byAudit/nvidia/awrdacpi/pctry5detlef/Display/Radeon X300-X550-X1050 Series (Microsoft Corporation - WDDM)/atiilhag.inf]
      [/var/lib/opsi/depot/<productid>/drivers/drivers/additional/byAudit/nvidia/awrdacpi/pctry5detlef/MEDIA/Realtek AC'97 Audio/oem21.inf]

PCI-Devices
   [1002:5B70]  ATI Technologies Inc. : Radeon X300/X550/X1050 Series Secondary (Microsoft Corporation - WDDM)
      Manually selected [/var/lib/opsi/depot/<productid>/drivers/drivers/additional/byAudit/nvidia/awrdacpi] /var/lib/opsi/depot/<productid>/drivers/drivers/additional/byAudit/nvidia/awrdacpi/pctry5detlef/Display/Radeon X300-X550-X1050 Series Secondary (Microsoft Corporation - WDDM)
      Multiple selected [/var/lib/opsi/depot/<productid>/drivers/drivers/additional/byAudit/nvidia/awrdacpi] /var/lib/opsi/depot/<productid>/drivers/drivers/additional/byAudit/nvidia/awrdacpi/pctry5detlef/Display/Radeon X300-X550-X1050 Series (Microsoft Corporation - WDDM)
   [10DE:0053]  (Standard-IDE-ATA/ATAPI-Controller) : Standard-Zweikanal-PCI-IDE-Controller
      No driver - device directory '/var/lib/opsi/depot/<productid>/drivers/pciids/10DE/0053' not found
   [10DE:005D]  (Standardsystemgeräte) : PCI Standard-PCI-zu-PCI-Brücke
      No driver - device directory '/var/lib/opsi/depot/<productid>/drivers/pciids/10DE/005D' not found
   [1022:1100]  AMD : AMD HyperTransport(tm)-Konfiguration
      Using build-in windows driver
   [10DE:0054]  (Standard-IDE-ATA/ATAPI-Controller) : Standard-Zweikanal-PCI-IDE-Controller
      /var/lib/opsi/depot/<productid>/drivers/drivers/preferred/fsc__esprimo_p625/FTS_NVIDIASATAAHCIDRIVERVISTA64V103042MCP78__1026963/NVIDIA_SATA_AHCI_DRIVER_Vista64_V10.3.0.42_MCP78 (textmode capable)
   [1022:1101]  AMD : AMD-Adresszuordnungskonfiguration
      Using build-in windows driver
   [10DE:0055]  (Standard-IDE-ATA/ATAPI-Controller) : Standard-Zweikanal-PCI-IDE-Controller
      /var/lib/opsi/depot/<productid>/drivers/drivers/preferred/fsc__esprimo_p625/FTS_NVIDIASATAAHCIDRIVERVISTA64V103042MCP78__1026963/NVIDIA_SATA_AHCI_DRIVER_Vista64_V10.3.0.42_MCP78 (textmode capable)
   [1022:1102]  AMD : AMD DRAM und HyperTransport(tm)-Nachverfolgungsmoduskonfiguration
      Using build-in windows driver
   [10DE:0057]  NVIDIA : NVIDIA nForce-Netzwerkcontroller
      Using build-in windows driver
   [1022:1103]  AMD : Sonstige AMD-Konfiguration
      Using build-in windows driver
   [10DE:0059]  Realtek : Realtek AC'97 Audio
      Manually selected [/var/lib/opsi/depot/<productid>/drivers/drivers/additional/byAudit/nvidia/awrdacpi] /var/lib/opsi/depot/<productid>/drivers/drivers/additional/byAudit/nvidia/awrdacpi/pctry5detlef/MEDIA/Realtek AC'97 Audio
   [10DE:005E]  NVIDIA : NVIDIA nForce4 HyperTransport-Brücke
      /var/lib/opsi/depot/<productid>/drivers/drivers/preferred/ga-ma78-pcbon4/chipset_win7-64/SMBUS
   [104C:8025]  Texas Instruments : OHCI-konformer Texas Instruments 1394-Hostcontroller
      No driver - device directory '/var/lib/opsi/depot/<productid>/drivers/pciids/104C/8025' not found
   [10DE:005A]  (Standard-USB-Hostcontroller) : Standard OpenHCD USB-Hostcontroller
      No driver - device directory '/var/lib/opsi/depot/<productid>/drivers/pciids/10DE/005A' not found
   [10DE:0050]  (Standardsystemgeräte) : PCI Standard-ISA-Brücke
      No driver - device directory '/var/lib/opsi/depot/<productid>/drivers/pciids/10DE/0050' not found
   [10DE:005B]  (Standard-USB-Hostcontroller) : Standard PCI-zu-USB erweiterter Hostcontroller
      No driver - device directory '/var/lib/opsi/depot/<productid>/drivers/pciids/10DE/005B' not found
   [1002:5B60]  ATI Technologies Inc. : Radeon X300/X550/X1050 Series (Microsoft Corporation - WDDM)
      Manually selected [/var/lib/opsi/depot/<productid>/drivers/drivers/additional/byAudit/nvidia/awrdacpi] /var/lib/opsi/depot/<productid>/drivers/drivers/additional/byAudit/nvidia/awrdacpi/pctry5detlef/Display/Radeon X300-X550-X1050 Series Secondary (Microsoft Corporation - WDDM)
      Multiple selected [/var/lib/opsi/depot/<productid>/drivers/drivers/additional/byAudit/nvidia/awrdacpi] /var/lib/opsi/depot/<productid>/drivers/drivers/additional/byAudit/nvidia/awrdacpi/pctry5detlef/Display/Radeon X300-X550-X1050 Series (Microsoft Corporation - WDDM)
   [10DE:0052]  NVIDIA : NVIDIA nForce PCI-Systemverwaltung
      Using build-in windows driver
   [10DE:005C]  (Standardsystemgeräte) : PCI Standard-PCI-zu-PCI-Brücke
      No driver - device directory '/var/lib/opsi/depot/<productid>/drivers/pciids/10DE/005C' not found

USB-Devices
   [1241:1111]  (Standardsystemgeräte) : USB-Eingabegerät
      No driver - vendor directory '/var/lib/opsi/depot/<productid>/drivers/usbids/1241' not found

HD-Audio-Devices
   No devices installed
Additional Tips and Information
The Network Driver Interface Specification (NDIS) is a protocol created jointly by Microsoft and 3Com for network card integration. The following NDIS versions have been implemented:
-
NDIS 6.0: Used in Windows Vista.
-
NDIS 6.1: For Windows Vista SP1, Server 2008, Windows Embedded Compact 7, Windows Embedded Compact 2013.
-
NDIS 6.20: Applicable to Windows 7, Microsoft Windows Server 2008 R2.
-
NDIS 6.30: Found in Windows 8, Windows Server 2012.
-
NDIS 6.40: Integrated in Windows 8.1, Windows Server 2012 R2.
-
NDIS 6.50: Used in Windows 10, Version 1507.
-
NDIS 6.51: For Windows 10, version 1511.
-
NDIS 6.60: Covers Windows 10 and Windows Server 2016, version 1607.
-
NDIS 6.70: Applicable to Windows 10, version 1703.
-
NDIS 6.80: Found in Windows 10, version 1709.
-
NDIS 6.81: Integrated in Windows 10, version 1803.
-
NDIS 6.82: Used in Windows 10 and Windows Server 2019, version 1809.
-
NDIS 6.83: For Windows 10, version 1903.
Be aware that some chipset drivers include description files listing numerous hardware components but do not actually provide drivers for them. This scenario is evident with files like cougar.inf or ibexahci.inf from Intel. When such a directory with "pseudo drivers" is assigned via additional_drivers or byAudit, the hardware is recognized as "supported" by opsi, and it ceases to search for drivers in the preferred directory.
SATA drivers and SATA RAID drivers are linked to the same PCI identifier. However, a SATA RAID driver is not compatible with systems that use a single disk setup.
Check the output of ./show_drivers.py very carefully before proceeding with the automatic OS installation!
|