Dynamic Depot Assignment
Introduction
With the standard multi-depot support in opsi, the clients are permanently assigned to the respective depots. This can be extended by a mechanism with which a client can recognize from which depot it can best obtain its software. The specific implementation of a sensible algorithm for this depends on the respective environment and is therefore configurable. Assignment according to IP addresses is the simplest and most suitable solution in many areas. In other network topologies, this is not sufficient.
To offer the option, that the client can detect the suitable depot according to the current network conditions, it must be ensured, that the alternative depots are synchronized, which means they offer the same software packages. In practice the depots will not be synchronized at all times. So the list depots offered to a client is limited to those depots, which are synchronized with the master depot of the client. The master depot of a client is the depot, to which the client is assigned to. The master depot thus determines which software and which version can be installed on the client.
Our concept for this is as follows:
The opsi config server provides a client script,which is transferred to the client and interpreted there if necessary. This script determines which of the available depots is used. For this client script is defined: the interface with which the script gets the list of available servers and the current client configuration (IP address, netmask, gateway) and to return the result of the selection procedure. Furthermore there are interfaces for logging and information about the ongoing process.
The specific implementation of this script can easily be adapted to the requirements of the particular opsi environment.
Resulting from this concept, the sequence of a client connection then looks as follows:
-
The client reports to the opsi config server via the web service.
-
The opsi config server sends the client the list of software packages to be installed.
-
The opsi config server transmits to the client the script for detecting the best depot and the list of available depots.
-
The client executes the script and uses it to determine the best depot.
-
The client connects to the selected depot to get the required software packages.
-
The installation status is reported back to the opsi config server.
Configuration
To activate the dynamic depot selection, the host parameter clientconfig.depot.dynamic must be set to true.
This can be client-specific, depot-specific or global.
In addition, the clientconfig.depot.selection_mode parameter can be used to select
which algorithm is to be used to determine the best depot.
The following selection options are available:
- latency
-
The depot with the lowest network latency (ping) is used.
- master_and_latency
-
Like
latency, but only depots that are assigned to the master depot of the client viamasterDepotIdare considered. - network_address
-
The depot whose configured network address (
networkAddress) matches the current IP address of the client is used. - random
-
The depot is selected at random.
Editing depot properties
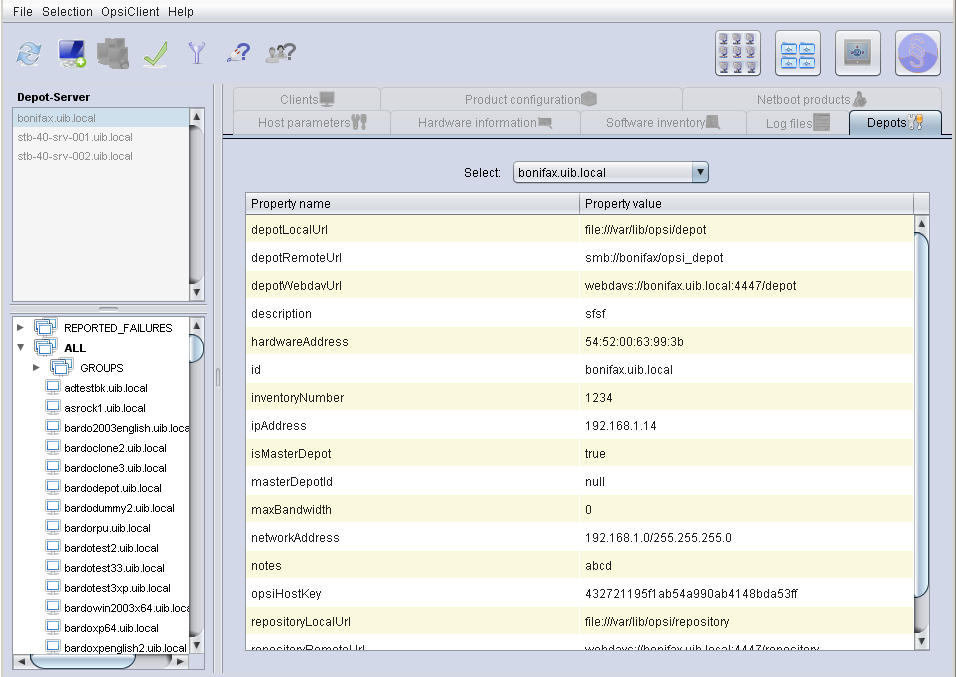
The properties of a depot can be changed in the opsi Management Interface as well as on the command line.

On the command line the depot properties can be shown with the method host_getObjects. Here e.g. for the depot 'dep1.uib.local'.
opsi-cli jsonrpc execute host_getObjects [] '{"id":"dep1.uib.local"}'This example results in the following output:
[
          {
          "masterDepotId" : "masterdepot.uib.local",
          "ident" : "dep1.uib.local",
          "networkAddress" : "192.168.101.0/255.255.255.0",
          "description" : "Depot 1 Master Depot",
          "inventoryNumber" : "",
          "ipAddress" : "192.168.105.1",
          "repositoryRemoteUrl" : "webdavs://dep1.uib.local:4447/repository",
          "depotLocalUrl" : "file:///var/lib/opsi/depot",
          "isMasterDepot" : true,
          "notes" : "",
          "hardwareAddress" : "52:54:00:37:c6:8b",
          "maxBandwidth" : 0,
          "repositoryLocalUrl" : "file:///var/lib/opsi/repository",
          "opsiHostKey" : "6a13da751fe76b9298f4ede127280809",
          "type" : "OpsiDepotserver",
          "id" : "dep1.uib.local",
          "depotWebdavUrl" : "webdavs://dep1.uib.local:4447/depot",
          "depotRemoteUrl" : "smb://dep1/opsi_depot"
          }
]
To edit the depot properties from the command line, the output is written to a file:
opsi-cli jsonrpc execute host_getObjects [] '{"id":"dep1.uib.local"}' > /tmp/depot_config.jsonThe resulting file (/tmp/depot_config.json) can now be edited and written back with the following command:
opsi-cli jsonrpc execute host_createObjects < /tmp/depot_config.jsonThe depot properties, which are relevant in the context of dynamic depot allocation are:
-
isMasterDepot
Must betruefor assigning a client to this depot. Iffalseis entered here, no clients can be assigned, but the depot is still used in the dynamic depot assignment. -
networkAddress
Network addresses for which this depot is responsible. The network address can be specified in two notations:-
network/netmask, example: 192.168.101.0/255.255.255.0
-
network/maskbits, example: 192.168.101.0/24
-
Whether the networkAddress is actually evaluated to determine the depot depends on the algorithm in the selection script.
Synchronization of depots
To keep the depots in sync, opsi provides several tools:
-
opsi-package-manager -
opsi-package-updater
When installing an opsi package, the opsi-package-manager can be instructed to install the package not only on the current server but on all known depots by using the parameter -d ALL. Example:
opsi-package-manager -i opsi-template_1.0-20.opsi -d ALLBy using the parameter -D, opsi-package-manager can be instructed to list the differences between depots. A list of depots must be specified with the -d option or all known depots must be selected with -d ALL. Example:
opsi-package-manager -D -d ALLopsi-package-manager is also the tool used for a 'push' synchronization.
On the other hand, the tool opsi-package-updater is intended to synchronize depots using the 'pull' method.
opsi-package-updater can run on the depots as a cronjob.
This enables easy automation.
Please refer to the chapter opsi-package-updater for further information on the configuration.
If a package is installed on a opsi-Server with opsi-package-manager -i (without -d), it does not end up in the repository directory. In order for it to be copied there, you can either specify the name of the depot during installation with -d or explicitly instruct the upload to the repository directory with opsi-package-manager -u <name of the package>.
|
Please also note the description of the two tools in the corresponding chapters of the opsi manual.