Secondary Sections
The secondary sections can be called from any primary section but have a different syntax. The syntax is derived from the functional requirements and library conditions and conventions for the specific purposes. Therefore from a secondary section, no further section can be called.
Secondary sections are specific each for a certain functional area. This refers to the object of the functionality, e.g. file system in general, the Windows registry, or XML files. But it refers even more to the apparatus that is internally applied. This may be demonstrated by the the variants of the batch sections (which call external programs or scripts).
The functional context is mirrored in the specific syntax of the particular section type.
Calling secondary sections
In most cases a secondary section is called by calling the section header as a statement. As a 'statement' means here: no return value is expected.
Example:
shellInAnIcon_say_hello

[shellInAnIcon_say_hello]
echo "Hello World"
In the case that you have to call the section with modifiers you have to add these modifiers behind the statement as text (no variables are allowed here):
shellInAnIcon_say_hello /timeoutseconds 20

[shellInAnIcon_say_hello]
echo "Hello World"
If you want to examine the output or return values of a section you may use one of the following functions:
-
getOutStreamFromSection(<section with params>)
forShellScript(ShellInAnIcon),ExecWithandExecPythoncalls. See also getOutStreamFromSection -
getreturnListFromSection(<section with params>)
forXMLPatchsections andopsiServiceCallsections. See also getReturnListFromSection
set $list$ = getOutStreamFromSection("shellInAnIcon_say_hello /timeoutseconds 20")

[shellInAnIcon_say_hello]
echo "Hello World"
Using this functions, the complete call of the section (inclusive all parameters and modifiers) has to be one string expression. This gives you the possibility to use variables and functions as part of the section call.
If you want to use this advantages without catching the out streams you may use the following statement:
executeSection(<string expr with section call>`)` //since 4.12.3.9 [W/L/M]
within this statement you may call the following section types:
-
winbatch
-
registry
-
ShellScript
-
ExecWith, ExecPython
-
Files
Files Sections
A Files section mainly offers functions which correspond to copy commands of the underlying operating system. The surplus value when using the opsi-script commands is the detailed logging and checking of all operations when necessary. If wanted overwriting of files can be forbidden if newer versions of a file (e.g. a newer dll-file) are already installed on the system.
Example
A simple Files section could be:
[Files_do_some_copying]
copy -sV "p:\install\instnsc\netscape\*.*" "C:\netscape"
copy -sV "p:\install\instnsc\windows\*.*" "%SYSTEMROOT%"
These commands cause that all files of the directory
'p:\install\instnsc\netscape' are copied to the directory C:\netscape, and then all files from p:\install\instnsc\windows to the windows system directory (its value is automatically inserted into the constant name %SYSTEMROOT%).
Option -s means that all subdirectories are copied as well, -V activates the version control for library files.
Modifier
In most cases a Files section will be called without parameters.
There are only some special uses of Files sections where the target of copy actions is set or changed in a certain specified way. We have got the two optional parameters
-
/AllUserProfiles//since 4.12.4.27 [W/L/M] -
/AllNTUserProfiles(discouraged) -
/AllNTUserSendTo[W]
Both variants mean:
The called Files section is executed once for each local user.
Every copy command in the section is associated with an user specific target directory.
In case other we need to build other user specific path names we can use the automatically set variable %UserProfileDir% or since opsi-script version 4.11.2 %CurrentProfileDir%.
With option /AllUserProfiles (resp. /AllNTUserProfiles) the user specific target directory for copy actions is the user profile directory (that is usually denoted by the username and is by default situated as a subdirectory of the userappdata directory. In case of option /AllNTUserSendTo the target directory is the path of the user specific 'SendTo' folder (for links of the windows explorer context menu).
The exact rule for determining the target path for a copy command has three parts:
-
If only the source of a copy action is specified the files are copied directly into the user target directory. We have syntax
copy <source file(s)>
It be equivalent as
copy <source file(s)> "%UserProfileDir%"
or since 4.11.2
copy <source file(s)> "%CurrentProfileDir%" -
If some targetdir is specified and targetdir is a relative path description (starting neither with a drive name nor a backslash) then targetdir is regard as the name of a subdirectory of the user specific directory. I.e.
copy <source file(s)> <targetdir>
is interpreted like:
copy <source file(s)> "%UserProfileDir%\targetdir"
or since 4.11.2
copy <source file(s)> "%CurrentProfileDir%\targetdir"
The use of %CurrentProfileDir% has the advantage that you may the same 'Files' section with /AllUserProfiles if it is not running as 'userLoginScript' (in 'Machine' script mode) and without /AllUserProfiles if it is running as 'userLoginScript' (in 'Login' script mode).
-
If targetdir is an absolute path it is used as the static target path of the copy action.
There are also the Options:
-
/32Bit(Default) -
/64Bit -
/SysNative
which manipulate the 'file redirection' on 64 Bit systems. For more details see opsi-script-64bit
Commands
In a Files section the following commands are defined:
-
Copy[W/L/M] -
Delete/Del[W/L/M] -
SourcePath -
CheckTargetPath[W/L/M] -
chmod[L/M] -
hardlink[W/L/M] -
symlink[W/L/M] -
rename[W/L/M] -
move[W/L/M] -
zipfile[W/L/M] -
unzipfile[W/L/M]
Copy and Delete roughly correspond the the Windows shell commands xcopy resp. del.
SourcePath and CheckTargetPath set origin and destination of the forthcoming copy actions (as if we would open two explorer windows for copy actions between them). If the target path does not exist it will be created.
The syntax definitions are:
-
Copy[-svdunxwnrh] <source(mask)> <target path>The source files can be denoted explicitly, using the wild card sign (”* ”) or by a directory name.
The <target path> is always understood as a directory name. Renaming by copying is not possible. If the target path does not exist it will be created (if needed a hierarchy of directories). The optional options of the Copy command mean (the ordering is insignificant):
-
s→ We recursive into subdirectories. [W/L/M] -
e→ Empty Subdirectories.
If there are empty subdirectories in the source path they will be created in the target directory as well. -
V→ Version checking [W]
A newer version of a windows library file is not overwritten by an older one (according primarily to the internal version counting of the file). If there are any doubts regarding the priority of the files a warning is added to the logfile. -
v→ (do not use)
With Version checking: [W]
Deprecated: Don’t use it on Systems higher than win2k. Because it checks not only against the target directory but also against %System%. use-Vinstead. -
d→ With date check: [W]
A newer .exe file is not overwritten by an older one. -
u→ We are only updating files: [W]
A file is not copied if there is a newer or equally old file of the same name. -
x→ x-tract (do not use) [W]
Use the commandunzipinstead ofcopy -x.
If a file is a zip archive it will be unpacked (Xtracted) on copying.
Caution: Zip archives are not characterized by its name but by an internal definition. E.g. a java jar file is a zip file. If it is unpacked the application call will not work. -
w→ weak [W]
We respect any write protection of a file such proceeding "weakly" (in opposite to the default behaviour which is to try to use administrator privileges and overwrite a write protected file). -
n→ no over write [W]
Existing files are not overwritten. -
c→ continue [W]
If a system file is in use, then it can be overwritten only after a reboot. The opsi-script default behaviour is therefore that a file in use will be marked for overwriting after the next reboot, AND the opsi-script reboot flag is set. Setting the copy option-cturns the automatic reboot off. Instead normal processing continues, the copying will be completed only when a reboot is otherwise triggered. -
r→ read-only Attribute [W]
If a copied file has a read-only attribute it is set again (in opposite to the default behaviour which is to eliminate read-only attributs). -
h→ follow symlinks [L] //since 4.11.6.14
At Linux symlinks to files or directories will be resolved before copy. So not the symlink but its target will be copied.
-
-
Delete[-sfd[n]r[c]] <path>
or
-
Delete[-sfd[n]r[c]] <source(mask)>deletes files and directories.
Possible options are (with arbitrary ordering)
-
s→ subdirectories
We recurse into subdirectories. Everything that matches the path name or the source mask is deleted.The command
delete -s c:\opsi
Do not mean: remove the directory 'c:\opsi' recursive, but it means: delete starting frm 'c:\' all occurences of 'opsi'. This may lead to a complete hard disk scan.
If you want to delete the directory 'c:\opsi' recursive use the command:
delete -s c:\opsi\
by using a trailing backslash you define that 'opsi' is a directory.
It is safer to use the commanddelinstead. -
f→ force
forces to delete read only files -
r→ del on reboot [W] since 4.12.4.3 If a file is in use, it can not be deleted at Windows. With the optionrin this case the file will be marked for deletion at the next reboot. If this is done then opsi-script default behaviour is also that the opsi-script reboot flag is set. This leads to a reboot after the script is finished. see also option:c -
c→ continue with out reboot [W]+ If a file is in use, it can not be deleted at Windows. With the optionrin this case the file will be marked for deletion at the next reboot. If this is done then opsi-script default behaviour is also that the opsi-script reboot flag is set. Setting the copy option-cturns the automatic reboot off. Instead normal processing continues, the deleting will be completed only when a reboot is otherwise triggered. Optioncmake no sense withoutrand will be ignored. -
d [n]→ date
Only files of age n days or older are deleted. n defaults to 1.-
del[Options] <path[/mask]] //since 4.11.2.1
Works likedeletebut on
del -s -f c:\not-exists
if c:\not-exists not exists it do not search complete c:\ for not-exits
-
Example (you may forget the trailing Backslash):
del -sf c:\delete_this_dir
-
SourcePath= < source directory>
Sets <source directory> as default directory for the followingCopyand (!)Deletecommands. -
CheckTargetPath= <target directory>
Sets <target directory> as default directory forCopycommand . If the specified path does not exist it will be created.
-
chmod<mode> <path> //since 4.11.4.1 [L]
Sets the access rights for <path> to <mode>.
Since opsi-script 4.12.5, <mode> supports different formats :-
the numerical (octal) representation (ex: "755") (since 4.11.4.1)
-
the '-rwxrwxrwx' mode format (ex: "-r—r—r--", "--wx-w-r-x")
-
the 'ugo=+-rwx' mode format (ex: "ugo=rwx", "ug+r", "go-wx")
Please respect the order of both the 'rwx' (read, write, execute) and the 'ugo' (user, group, others).
Do not forget the '-' in the beginning of the -rwxrwxrwx format. -
-
hardlink<existing file> <new file> // since 4.11.5 [W/L/M]
A existing <new file> will be over written.
hardlinkworks only on filesystems that support hard links like NTFS and standard Linux filesystems. -
symlink<existing file> <new file> // since 4.11.5 [W/L/M]
A existing <new file> will be over written.
At Windows issymlinkonly available since NT6 and up ! -
rename<old filename> <new filename> // since 4.11.5 [W/L/M]
move<old filename> <new filename> // since 4.11.5 [W/L/M]
There is no difference betweenrenameandmove, that are just two names for the same function
A existing <new file> will be over written.
Since 4.12.4.31 it is also possible to move or rename directories.
Windows: <new filename> may be located in a differen directory or volume / disk. In the second case (different volume / disk) the file will be copied and than the original file will be deleted.
If it is not possible to create the target file becaus the file is in use, then it can be overwritten only after a reboot. The opsi-script default behaviour is therefore that a file in use will be marked for overwriting after the next reboot, AND the opsi-script reboot flag is set. Setting the copy option-cturns the automatic reboot off. Instead normal processing continues, the copying will be completed only when a reboot is otherwise triggered.
Creating Junctions at Windows is not supported right now.
Linux: <new filename> may be located in a different directory but not in a different filesystem. The Option-cwill be ignored at Linux.
Example:
[Files_link_move]
hardlink "$HomeTestFiles$\files\dummy.txt" "$HomeTestFiles$\files\hardlink.txt"
symlink "$HomeTestFiles$\files\dummy.txt" "$HomeTestFiles$\files\symlink.txt"
rename "$HomeTestFiles$\files\temp\dummy2.txt" "$HomeTestFiles$\files\temp\rename.txt"
move "$HomeTestFiles$\files\temp\dummy2.txt" "$HomeTestFiles$\files\temp\move.txt"
zipfile <source dir> <zip file> // since 4.12.1 [W/L/M]
unzipfile <zip file> <target dir> [<encoding>]// since 4.12.1 [W/L/M]
Example:
[Files_zip_unzip]
zipfile "$HomeTestFiles$\" "%opsiTmpDir%\testdir.zip"
zipfile "$HomeTestFiles$\dummy.msi" "%opsiTmpDir%\testfile.zip"
Del -s -f "$HomeTestFiles$\"
checktargetpath = "$HomeTestFiles$\"
unzipfile "%opsiTmpDir%\testdir.zip" "$HomeTestFiles$\"
unzipfile "%opsiTmpDir%\testfile.zip" "$HomeTestFiles$\"
If umlauts in filenames of the unzipped files are not displayed properly,
set the optional third encoding parameter of unzipfile as described below. If the filenames have different encoding, we recommend to repack the archive with 'utf8' encoded filenames (using 7zip for instance).
|
Since version 4.12.13, zipfile per default uses 'utf8' for encoding filenames with umlauts. This is for ZIP archives the recommended encoding for umlauts in filenames.
Since version 4.12.13, unzipfile per default unzips archives containing files with umlauts in the filenames with correctly encoded filenames. According to the ZIP specification, only codepage 'cp437' or 'utf8' is permitted as encoding for file names with umlauts. If the zip archive complies with the specification and uses 'cp437' or 'utf8' for file name encoding, this will be recognized by default during unpacking and the umlauts are set correctly in the file names of the unpacked files.
But not all ZIP archives follow the specification and might use a different encoding for the file names. If unzipfile does not correctly generate file names with umlauts, version 4.12.13 provides an optional third parameter, to specify the encoding of the file names in the archive:
unzipfile <zip file> <target dir> [<encoding>] // since 4.12.13 [W/L/M]
Example:
[Files_zip_unzip]
unzipfile "%opsiTmpDir%\testfile.zip" "$HomeTestFiles$\" "cp850"
This example specifies, that the filenames inside testfile.zip are encoded in codepage 'cp850'. In this case unzipfile will convert the filenames from 'cp850' to system codepage.
| Use the third parameter for filename encoding only if necessary. Do not set 'cp437' or 'utf8' as a third parameter. These encodings are handled by default. |
For allowed encodings see opsi-script encoding
In very rare cases the archive filenames could be using different encodings. In that case the archive has to be repacked with 'utf8' encoded filenames. For instance by using the program '7zip', which can unzip archives with mixed filename encodings and then zip again as 'utf8'.
Patches-Sections [W/L/M]
A Patches section modifies a property file in ini file format. I. e. a file that consists of sections which are a sequence of entries constructed as settings '<variable> = <value>'. where sections are characterized by headings which are bracketed names like '[sectionname]'.
Example
Patches_DUMMY.INI $HomeTestFiles$+"\dummy.ini"

[Patches_dummy.ini]
add [secdummy] dummy1=add1
add [secdummy] dummy2=add2
add [secdummy] dummy3=add3
add [secdummy] dummy4=add4
add [secdummy] dummy5=add5
add [secdummy] dummy6=add6
set [secdummy] dummy2=set1
addnew [secdummy] dummy1=addnew1
change [secdummy] dummy3=change1
del [secdummy] dummy4
Replace dummy6=add6 replace1=replace1
produces the following log:
Execution of Patches_DUMMY.INI
      FILE C:\tmp\testFiles\dummy.ini
      Info: This file does not exist and will be created
  addEntry [secdummy] dummy1=add1
    addSection [secdummy]
      done
      done
  addEntry [secdummy] dummy2=add2
      done
  addEntry [secdummy] dummy3=add3
      done
  addEntry [secdummy] dummy4=add4
      done
  addEntry [secdummy] dummy5=add5
      done
  addEntry [secdummy] dummy6=add6
      done
  setEntry [secdummy] dummy2=set1
    Entry      dummy2=add2
    changed to dummy2=set1
  addNewEntry [secdummy] dummy1=addnew1
    appended entry
  changeEntry [secdummy] dummy3=change1
    entry      dummy3=add3
    changed to dummy3=change1
  delEntry [secdummy] dummy4
    in section secdummy deleted  dummy4=add4
  replaceEntrydummy6=add6 replace1=replace1
    replaced in line 7
  C:\tmp\testFiles\dummy.ini saved back
For more examples, please check the OPSI standard product 'opsi-script-test' and in this product the part '$Flag_winst_patches$ = "on"'
Call Parameter
The name of the file to be patched is passed as a parameter.
There are optional modifiers:
-
/AllUserProfiles(old synonym:/AllNTUserProfiles)
If a patch section is called with this modifier, then all directories under%UserProfileDir%will be patched, which means that this patch is performed for all user profiles.
When a 'Patches' is called within a[ProfileActions]section, then the modifier/AllUserProfilesis implicit. In logscript mode,%UserProfileDir%will be interpreted as%CurrentProfileDir%.
(Since Version 4.11.3.2) -
/encoding <encoding>//since 4.12.4.17 [W/L/M]
You can add an encoding parameter for the 'Patches' section. This is needed if the file that you want to modify is not in system encoding. Example :
Patches_my_win_ini "C:/my_file.ini" /encoding "utf16le"
For allowed encodings see opsi-script encoding
Commands
For a Patches section, we have commands:
-
add -
set -
addnew -
change -
del -
delsec -
replace
Each command refers to some section of the file which is to be patched. The name of this section is specified in brackets [] (which do here not mean "syntactically optional"!!).
In detail:
-
add [<section name>`]` <variable1>=<value1>
This command adds an entry of kind <variable1> = <value1> to section <section name> if there is yet no entry for <variable1> in this section. Otherwise nothing is written. If the section does not exist it will be created. -
set [<section name>`]<variable1> `=<value1>
If there is no entry for <variable1> in section <section name> the setting <variable1> = <value1> is added. Otherwise, the first entry <variable1> = <valueX> is changed to <variable1> = <value1>. -
addnew [<section name>`]<variable1> `=<value1>
No matter if there is an entry for <variable1> in section <section name> the setting <variable1> = <value1> is added. -
change [<section name>`]<variable1> `=<value1>
Only if there is any entry for <variable1> in section <section name> it is changed to <variable1> = <value1>. -
del [<section name>`]` <variable1>=<value1>
resp.
del [<section name>`]` <variable1>
removes all entries <variable1> = <value1> resp. all entries for <variable1> in section <section name>. -
delsec [<section name>`]`
removes the section <section name>. -
replace<variable1>`=<value1> <variable2>=`<value2>
means that <variable1> = <value1> will be replaced by <variable2> = <value2> in all sections of the ini file. There must be no spaces in the value or around the equal signs.
PatchHosts Sections [W/L/M]
By virtue of a PatchHosts section we are able to modify a hosts file which is to understand as any file with lines having format
'IPadress hostName aliases # comment'
'Aliases' and 'comment' (and the comment separator #) are optional. A line may also be a comment line starting with # .
The file which is to be modified can be given as parameter of a 'PatchHosts' call. If there is no parameter a file named HOSTS is searched in the directories c:\nfs, c:\windows and %systemroot%\system32\drivers\etc. If no such file is found the 'PatchHosts' call terminates with an error.
In a PatchHosts section there are defined commands:
-
setAddr -
setName -
setAlias -
delAlias -
delHost -
setComment
Example:
PatchHosts_add $HomeTestFiles$+"\hosts"

[PatchHosts_add]
setAddr ServerNo1 111.111.111.111
setName 222.222.222.222 ServerNo2
setAlias ServerNo1 myServerNo1
setAlias 222.222.222.222 myServerNo2
setComment myServerNo2 Hallo Welt
produces the following log:
Execution of PatchHosts_add
   FILE C:\tmp\testFiles\hosts
  Set ipAddress 111.111.111.111 Hostname "ServerNo1"
  Set Hostname "ServerNo2" for ipAddress 222.222.222.222
  Alias "myServerNo1" set for entry "ServerNo1"
  Alias "myServerNo2" set for entry "222.222.222.222"
  SetComment of Host "myServerNo2" to "Hallo Welt"
  C:\tmp\testFiles\hosts saved back
For more examples, please check the OPSI standard product 'opsi-script-test' and in this product the part '$Flag_winst_patch_hosts$ = "on"'.
In detail:
-
setaddr<hostname> <ipaddresse>
sets the IP address for host <hostname> to <IPaddress>. If there is no entry for hostname as yet it will be created. -
setname<ipaddresse> <hostname>
sets the hostname for the given IP address. If there is no entry for the IP address as yet it will be created. -
setalias<hostname> <alias>
adds an alias for the host <hostname>. -
setalias<IPadresse> <alias>
adds an alias name for the host with IP address <IPadress>. -
delalias<hostname> <alias>
removes the alias name <alias> for the host <hostname> . -
delalias<IPadresse> <alias>
removes the alias name <alias> for the host with IP address <IPadress>. -
delhost<hostname> removes the complete entry for the host with name <hostname>. -
delhost<IPadresse>
removes the complete entry for the host with IP address <IPadress>. -
setComment<ident> <comment>
writes <comment> after the comment sign for the host with hostname, IP address or alias name <ident>.
IdapiConfig Sections
A IdapiConfig section were designed to write parameters in idapi*.cfg files which are used by the Borland Database Engine.
This section type is not supported any more.
PatchTextFile Sections [W/L/M]
A PatchTextFile section offers a variety of options to patch arbitrary configuration files which are given as common text files (i.e. they can be treated line by line).
An essential tool for working on text files is the check if a specific line is contained in a given file. For this purpose we have got the Boolean functions Line_ExistsIn and LineBeginning_ExistsIn (cf. Boolean Expressions).
Parameter
The text file which is to be treated is given as parameter.
There are optional modifiers:
-
/AllUserProfiles(old synonym:/AllNTUserProfiles)
If a 'PatchTextFile' section is called with this modifier and the path of the file to be patched contains the constant%UserProfileDir%, the patch section will be executed for all the profiles.
For a 'PatchTextFile' section which is called from a[ProfileActions]section in the 'Machine' mode the modifier/AllUserProfilesis implied. In the 'Loginscript' Mode the%UserProfileDir%is interpreted as%CurrentProfileDir%.
(since version 4.11.3.5) -
/encoding <encoding>//since 4.12.4.17 [W/L/M]
You can add an encoding parameter for the PatchTextFile section. This is needed if the file that you want to modify is not in system encoding. Example :
PatchTextFile_my_txt "C:/my_file.text" /encoding "utf16le"
For allowed encodings see opsi-script encoding
Commands
We have got two commands especially for patching Mozilla preferences files plus the two deprecated and more restricted older versions of these commands:
-
Set_Mozilla_Pref("<preference type>", "<preference key>", "<preference value>")
sets for <preference type> the value associated with "<preference variable>" to "<preference value>".
'preference type' takes any value.
In current Mozilla preference files there are expressions like
'user_pref("<key>", "<value>")
pref("<key>", "<value>")
lock_pref("<key>", "<value>")
defaultPref("<key>", "<value>")
lock_pref("<key>", "<value>")
clearPref("<key>", "<value>")'
Each of them, in fact, any (javascript) function call of the form
'functionname (String1, String2)'
can be patched with this command by setting the appropriate string for <preference type> (that is, resp. for functionname), If an entry starting with "functionname (String1" exists in the treated file, it will be patched (and left at its place). Otherwise a new line will be appended. Unusually in opsi-script, all strings are case sensitive. -
Set_Netscape_User_Pref("<preference variable>", "<value>")
sets the line of the given user preference file for the variable <preference variable> to value <value>. The ASCII ordering of the file will be rebuilt.
(Deprecated!) -
AddStringListElement_To_Mozilla_Pref ("<preference type>", "<preference variable>", "<add value>")
appends an element to a list entry in the given preference file. It is checked if the value that should be added is already contained in the list (then it will not be added). -
AddStringListElement_To_Netscape_User_Pref ("<preference variable>", "<add values list>")
(Deprecated!)
The other commands of 'PatchTextFile' sections are not file type specific. All operations are based on the concept that a line pointer exists which can be moved from top of the file i.e. above the top line down to the bottom (line).
There are three search commands:
-
FindLine <search string>
Finds a line that matches complete (is identic) to <search string>. -
FindLine_StartingWith <search string>
Finds a line that starts with <search string>. -
FindLine_Containing <search string>
Finds a line that contains <search string>.
Each command starts searching at the current position of the line pointer. If they find a matching line the line pointer is moved to it. Otherwise the line pointer keeps its position.
The search is not case sensitive.
<search string> - as all other String references in the following commands - are String surrounded by single or double citation marks.
-
GoToTop
move the line pointer to the top line.
(when we count lines it has to be noted that this commands move the line pointer above the top line). We step any - positive or negative - number of lines through the file by
-
AdvanceLine [line count]
move the line pointer at [line count] lines forward or backward. -
GoToBottom
Advancing to the bottom line
By the following command :
-
DeleteTheLine
we delete the line at which the line pointer is directed if there is such a line (if the line pointer has position top, nothing is deleted) -
DeleteAllLines_StartingWith <search string>
deleting all lines which begin with <search string> -
AddLine <line>orAdd_Line <line>
The line is appended to the file. -
InsertLine <line>orInsert_Line <line>
<line> is inserted at the position of the line pointer. -
AppendLine <line>`or `Append_Line <line>
<line> is appended after the line at which the pointer is directed. -
Append_File <file name>
reads the file and appends its lines to the edited file. -
Subtract_File <file name>
removes the beginning lines of the edited file as long as they are identical with the lines of file <file name>. -
SaveToFile <file name>
writes the edited lines as a file <file name>. -
Sorted
causes that the edited lines are (ASCII) ordered. -
setKeyValueSeparator<separator char> //since 4.11.4.4
sets for key/value pairs (commandsetValueByKey) the separator char (Default is '=') -
setValueByKey<keystr> <valuestr> //since 4.11.4.4
looks for a key/value pair with the key <keystr> and set here as value <valuestr>. Is <keystr> not found, the entry will be created at the cursor position. -
searchAndReplace<searchstr> <replacestr> //since 4.11.4.6
searches for <search str> and replaces it with <replace str>. Works globally on the text file and is case-insensitive
LinkFolder Sections [W/L/M]
In a LinkFolder section start menus entries as well as desktop links are managed.
LinkFolder Sections in Windows
E.g. the following section creates a folder named "acrobat“ in the common start menu (shared by all users):
[LinkFolder_Acrobat]
set_basefolder common_programs

set_subfolder "acrobat"
set_link
  name: Acrobat Reader
  target: C:\Programme\adobe\Acrobat\reader\acrord32.exe
  parameters:
  working_dir: C:\Programme\adobe\Acrobat\reader
  icon_file:
  icon_index:
  shortcut:
end_link
In a 'LinkFolder' section first must be defined, in which virtual system folder the subsequent instructions are to operate. This expression defines the base folder:
set_basefolder '<virtual system folder>'
Virtual system folders to be used are:
'desktop, sendto, startmenu, startup, programs, desktopdirectory, common_startmenu, common_programs, common_startup, common_desktopdirectory'
These folders are virtual, for it depends on the operating system (and version), what the resulting physical directory name is.
In the context of standard 'maschine' installations, only the virtual system folders starting with common_ are relevant.
The system folders 'desktop, sendto, startmenu, startup, programs, desktopdirectory' can only be used in the context of a logged on user respectively in a 'userLoginScript' in the context of the OPSI extension 'user Profile Management'.
The folders are 'virtual' since the operating system (resp. registry entries) determine the real places of them in the file system.
Second, we have to open a subfolder of the selected virtual folder:
set_subfolder <folder path>
The subfolder name is to be interpreted as a path name with the selected virtual system folder as root. If some link shall be directly placed into the system folder we have to write
set_subfolder ""
In the third step, we can start setting links. The command is a multi line expression starting with
set_link
and finished by
end_link.
Between these lines the link parameters are defined in the following format:
set_link
name: [link name]
target: <complete program path>
parameters: [command line parameters of the program]
working_dir: [working directory]
icon_file: [icon file path]
icon_index: [position of the icon in the icon file]
shortcut: [keyboard shortcut for calling the target]
end_link
The 'target' name is the only essential entry. The other entries have default values:
-
namedefaults to the program name. -
`parameters`defaults to a empty string.
-
icon_filedefaults to the 'target'. -
icon_indexdefaults to 0. -
'shortcut' defaults to empty. // since 4.11.6.7
shortcutmay be a combination of ['shift','alt','ctrl'] (not case sensitiv) divided by '" "' (Space) , '"-"' (minus char),'"+"' (plus char) and a 'Key' or a 'Virtual Key Code'.
The 'Key' is a letter ('A' - 'Z') or a numeral ('0' - '9'). All other Keys must be given by there 'Virtual Key Code' identifier.
Keep in mind that ashortcutrefernces the keys and not there contry specific layout. The KeyVK_OEM_3is on an english keyboard the char ';' and on a german the letter 'Ö'.
Examples for allowed shurtcuts:-
'O' (The Key 'O')
-
'VK_O' (The Key 'O')
-
'Ctrl-O' (The combination 'Ctrl O')
-
'Ctrl-Alt-Shift-O' (The combination 'Ctrl Alt Shift O')
-
'Ctrl+Alt+Shift+O' (The combination 'Ctrl Alt Shift O')
-
'Ctrl Alt Shift O' (The combination 'Ctrl Alt Shift O')
-
'Ctrl-Alt-Shift-VK_O' (The combination 'Ctrl Alt Shift O')
-
'Ctrl-Alt-Shift-VK_F12' (The combination 'Ctrl Alt Shift F12')
-
|
If the referenced target does not lie on an mounted share at the moment of link creation windows shortens its name to the 8.3 format. Workaround: Create a correct link when the share is connected. Copy the ready link file to a location which exists at script runtime. Let this file be the target. |
-
delete_element<Linkname>
remove a link from the open folder. -
delete_subfolder<Folderpath>
folder is removed from the base virtual folder
Examples
set $list2$ = createStringList ('common_startmenu', 'common_programs', 'common_startup', 'common_desktopdirectory')
for $var$ in $list2$ do LinkFolder_Dummy

[LinkFolder_Dummy]
set_basefolder $var$
set_subfolder "Dummy"
set_link
	name: Dummy
	target: C:\Programme\PuTTY\putty.exe
	parameters:
	working_dir: C:\Programme\PuTTY
	icon_file:
	icon_index:
end_link
produces the following log:
Set  $list2$ = createStringList ('common_startmenu', 'common_programs', 'common_startup', 'common_desktopdirectory')
    retrieving strings from createStringList [switch to loglevel 7 for debugging]
        (string   0)common_startmenu
        (string   1)common_programs
        (string   2)common_startup
        (string   3)common_desktopdirectory

    retrieving strings from $list2$ [switch to loglevel 7 for debugging]
        (string   0)common_startmenu
        (string   1)common_programs
        (string   2)common_startup
        (string   3)common_desktopdirectory


~~~~~~ Looping through:  'common_startmenu', 'common_programs', 'common_startup', 'common_desktopdirectory'

  Execution of LinkFolder_Dummy
    Base folder is the COMMON STARTMENU folder
    Created "Dummy" in the COMMON STARTMENU folder
      ShellLink "Dummy" created

  Execution of LinkFolder_Dummy
    Base folder is the COMMON PROGRAMS folder
    Created "Dummy" in the COMMON PROGRAMS folder
      ShellLink "Dummy" created

  Execution of LinkFolder_Dummy
    Base folder is the COMMON STARTUP folder
    Created "Dummy" in the COMMON STARTUP folder
      ShellLink "Dummy" created

  Execution of LinkFolder_Dummy
    Base folder is the COMMON DESKTOPDIRECTORY folder
    Created "Dummy" in the COMMON DESKTOPDIRECTORY folder
      ShellLink "Dummy" created

~~~~~~ End Loop
For more examples, please check the OPSI standard product 'opsi-script-test' and in this product the part '$Flag_winst_link_folder$ = "on"'.
LinkFolder-Sections in Linux
LinkFolder sections are supported also on Linux since version 4.11.5.2.
Possible bas folders are:
common_programs,common_autostart,desktop, autostart
Subfolder is always "" (empty).
The Link Option icon_index is ignored.
As additional Link Option we have: link_categories.
Here you may use the following values seperated and terminated by a semicolon:
AudioVideo, Audio, Video, Development, Education, Game, Graphics, Network, Office, Settings, System, Utility
The LinkFolder Sektion will work at Linux with different Desktop systems
XML2 Section [W/L/M]
A popular way to keep configuration data or data at all is a file in XML document format. Its syntax follows the conventions as defined in the XML (or "Extended Markup Language") specification (http://www.w3.org/TR/xml/).
opsi-script offers two different ways to handle XML files:
-
The
xml2sections that are described in this chapter
Since opsi-script version 4.12.1 -
The deprecated, still working (but only at windows)
XMLPatchsections (XMLPatch Sections) and functions which are more powerful but also more complicated than the newerxml2methods. So we recommend to use thexml2sections and functions.
The xml2 implementation is divided in
-
the
xml2section as described over here, with the goal to make it easy to manipulate xml data -
the
xml2functions with the target to analyze given xml data
see also : XML related functions (XML2)
see also : XML2 Functions
XML structure and wording
Let’s have a look at a simple xml file:
<?xml version="1.0" encoding="UTF-8"?>
<rootnode>
    <node_level-1_number-1>
        <node_level-2_A color="blue">Hello World</node_level-2_A>
        <node_level-2_B color="green" count="65">
        </node_level-2_B>
        <node_level-2_C>
        </node_level-2_C>
    </node_level-1_number-1>
    <node_level-1_number-2>
    </node_level-1_number-2>
</rootnode>
To describe the structure in this xml file we use the following wording:
-
xml file
A file that contains xml data. -
xml header
XML meta data at the beginning of an xml file, in our example:
<?xml version="1.0" encoding="UTF-8"?> -
node
The xml node starts with an open element<followed by an identifier and>and ends with the close element<\followed by the same identifier and>. Example:
<mynode><\mynode>
If (like in the example above) there is no additional information, this node can also be written as:
<mynode\>
In the open element the identifier may be followed by one or moreattributes.
Between the open and the close element you may find thenodetext. -
root node
The base node of the xml tree. In our example:
<rootnode> -
attributeis a key/value pair that is part of the open element and comes after the node identifier, like:
color="blue"in<node_level-2_A color="blue"> -
nodetext
is text that may come between the open and the close element, like :
Hello Worldin<node_level-2_A color="blue">Hello World</node_level-2_A> -
xml2path
is an OPSI xml2 specific notation to give a path through the xml tree.
Example:<node_level-1_number-1> // </node_level-2_B>
It is the sequence of nodes below the root node. -
xml2stringlist
The opsi-script xml2 functions do not work directly on an xml file, but on a stringlist representation of this file or parts of it (a node).
So with the functiongetXml2DocumentFromFile(<path to xml file>`)` you get a stringlist that contains the representation of the content of this file in anxml2stringlist. This variable may be used to analyze thexml2stringlistby other xml2 functions.
The result of those functions may be also a stringlist from typexml2stringlist.
In fact thexml2stringlistis a stringlist that contains the content of the xml file in a special format and without the header. But do not try to construct it without usinggetXml2DocumentFromFileorgetXml2Document.
see : XML2 Functions
CallParameter
The name of the file to be patched is passed as a parameter.
Example:
xml2_test "%scriptpath%\dummy.xml"
If the given file does not exist, it will be created.
While creating the file as name of the root node, we use the value of the command rootNodeOnCreate = <node name>. If this command is missing in the section, the fall back is the root node name: 'rootnode'. (since 4.12.4.27)
There are optional modifiers:
-
/AllUserProfiles// since 4.12.4.27
If anXML2section is called with this modifier, then all directories under%UserProfileDir%will be patched, which means that this patch is performed for all user profiles.
When anXML2section is called within a[ProfileActions]section, then the modifier/AllUserProfilesis implicit. In logscript mode,%UserProfileDir%will be interpreted as%CurrentProfileDir%. -
/encoding <encoding>//since 4.12.4.27 [W/L/M]
By default the given XML file is expected in the encoding "UTF-8".
You can add an encoding parameter for the 'XML2' section. This is needed if the file that you want to modify is not in "UTF-8" encoding. Example :
XML2_my_xml "C:/my_file.xml" /encoding "utf16le"
For allowed encodings see opsi-script encoding
Commands
The idea of the syntax here is based on the command syntax of other patch sections like registry or patches in opsi-script.
There exist the following commands:
-
strictMode =(true/false) ; Default: false -
openNode<xml2 path> -
SetAttribute<attr name> <attr value> -
AddAttribute<attr name> <attr value> -
DeleteAttribute<attr name> -
addNewNode<node name> -
setNodeText<string> -
DeleteNode<xml2 path> -
gotoParentNode -
rootNodeOnCreate= <node name> // since 4.12.4.27 -
setNodePair<keyNodeName> <keyNodeTextContent> <valueNodeName> <valueNodeTextContent> // since 4.12.4.28
In detail:
The first step is to navigate to the node where we like to change things.
-
strictMode =(true/false) ; Default: false -
openNode<xml2 path>
Open the given path as actual node. If the path does not exist, it will be created. -
DeleteNode<xml2 path>
The <xml2 path> is the path to our target node.
It may have two different forms, according to the value of 'strictMode':
-
<xml2 path>
strictMode =false(Default):
A line of xml node names without any attributes seprated by '` // ’.
Example:
`node_level-1_number-1 // node_level-2_B ` -
<xml2 path>
strictMode =true:
A line of xml node names with all existing attributes seprated by '` //'.
Example:
`node_level-1_number-1 // node_level-2_B color="green" count="65"
All other commands operate on an opened xml node.
-
SetAttribute<attr name> <attr value>
At the actual node, set <attr value> as value of <attr name>. If <attr name> does not exist, it will be created. -
AddAttribute<attr name> <attr value>
If the attribute <attr name> does not exist at the actual node, it will be created with <attr value> as value. If <attr name> already exists, nothing will be changed. -
DeleteAttribute<attr name>
If the attribute <attr name> exists at the actual node, it will be deleted. -
addNewNode<node name>
Create at the actual node a new sub node <node name> and make this new node to the actual node. -
setNodeText<string>
Set <string> as thenodetextof the actual node. -
gotoParentNode
Make the parent node to the actual node. -
*
setNodePair<keyNodeName> <keyNodeTextContent> <valueNodeName> <valueNodeTextContent> // since 4.12.4.28
Creates a <dict> entry like it is used in the Apple info.plist files:
<dict>
  <key>CFBundleExecutable</key>
  <string>opsi-script</string>
  <key>CFBundleIdentifier</key>
  <string>org.opsi.opsi-script</string>
  <key>CFBundleName</key>
  <string>opsi-script</string>
  <key>CFBundleShortVersionString</key>
  <string>4.12.4.35</string>
</dict>
Example:
setNodePair "key" "CFBundleShortVersionString" "string" "4.12.4.35"XML2 Examples
We assume we have a file dummy.xml with the content:
<?xml version="1.0" encoding="UTF-8"?>
<rootnode>
    <node_level-1_number-1>
        <node_level-2_A color="blue">Hello World</node_level-2_A>
        <node_level-2_B color="green" count="65">
        </node_level-2_B>
        <node_level-2_C>
        </node_level-2_C>
    </node_level-1_number-1>
    <node_level-1_number-2>
    </node_level-1_number-2>
</rootnode>
The following code:
comment "Testing: "
message "opennode not existing node"
set $xml2strictMode$ = 'false'
set $xml2nodepath$ ='node_level-1_number-1 // node_level-2_B // node_level-3_A'
set $xml2changeValue$ = '"color" "yellow"'
set $xml2cmdLine1$ = "strictMode = "+$xml2strictMode$
set $xml2cmdLine2$ = "openNode '"+$xml2nodepath$+"'"
set $xml2cmdLine3$ = "SetAttribute "+$xml2changeValue$
XML2_dummy_xml $HomeTestFiles$+"\dummy.xml"
set $ConstTest$ = "yellow"
set $list1$ = loadTextFile($HomeTestFiles$+"\dummy.xml")
set $tmp$ = takeFirstStringContaining($list1$,"node_level-3_A")
set $CompValue$ = takeString(1, splitString ($tmp$, '"'))
if ($ConstTest$ = $CompValue$)
	comment "passed"
else
	set $TestResult$ = "not o.k."
	LogWarning "failed"
endif
set $ConstTest$ = "yellow"
set $list1$ = getXml2DocumentFromFile($HomeTestFiles$+"\dummy.xml")
set $list2$ = xml2GetFirstChildNodeByName($list1$,"node_level-3_A")
set $CompValue$ = getXml2AttributeValueByKey($list2$,"color")
if ($ConstTest$ = $CompValue$)
	comment "passed"
else
	set $TestResult$ = "not o.k."
	LogWarning "failed"
endif

[XML2_dummy_xml]
$xml2cmdLine1$
$xml2cmdLine2$
$xml2cmdLine3$
$xml2cmdLine4$
$xml2cmdLine5$
$xml2cmdLine6$
$xml2cmdLine7$
$xml2cmdLine8$
$xml2cmdLine9$
message "opennode not existing node"
; The call
XML2_dummy_xml $HomeTestFiles$+"\dummy.xml"
; Test 1
set $ConstTest$ = "yellow"
set $list1$ = loadTextFile($HomeTestFiles$+"\dummy.xml")
set $tmp$ = takeFirstStringContaining($list1$,"node_level-3_A")
set $CompValue$ = takeString(1, splitString ($tmp$, '"'))
if ($ConstTest$ = $CompValue$)
comment "passed"
else
set $TestResult$ = "not o.k."
LogWarning "failed"
endif
; Test 2
set $ConstTest$ = "yellow"
set $list1$ = getXml2DocumentFromFile($HomeTestFiles$+"\dummy.xml")
set $list2$ = xml2GetFirstChildNodeByName($list1$,"node_level-3_A")
set $CompValue$ = getXml2AttributeValueByKey($list2$,"color")
if ($ConstTest$ = $CompValue$)
comment "passed"
else
set $TestResult$ = "not o.k."
LogWarning "failed"
endif
[XML2_dummy_xml]
strictMode = false
openNode 'node_level-1_number-1 // node_level-2_B // node_level-3_A'
SetAttribute "color" "yellow"produces e.g the log:
message opennode not existing node
Set  $xml2nodepath$ ='node_level-1_number-1 // node_level-2_B // node_level-3_A'
  The value of the variable "$xml2nodepath$" is now: "node_level-1_number-1 // node_level-2_B // node_level-3_A"
Set  $xml2changeValue$ = '"color" "yellow"'
  The value of the variable "$xml2changeValue$" is now: ""color" "yellow""
Set  $xml2cmdLine1$ = "strictMode = "+$xml2strictMode$
  The value of the variable "$xml2cmdLine1$" is now: "strictMode = false"
Set  $xml2cmdLine2$ = "openNode '"+$xml2nodepath$+"'"
  The value of the variable "$xml2cmdLine2$" is now: "openNode 'node_level-1_number-1 // node_level-2_B // node_level-3_A'"
Set  $xml2cmdLine3$ = "SetAttribute "+$xml2changeValue$
  The value of the variable "$xml2cmdLine3$" is now: "SetAttribute "color" "yellow""

  try to open File: c:\opsi.org\tmp\testFiles\dummy.xml
  try to load File: c:\opsi.org\tmp\testFiles\dummy.xml
  File: c:\opsi.org\tmp\testFiles\dummy.xml read
  success: create xmldoc from file: c:\opsi.org\tmp\testFiles\dummy.xml
  StrictMode is set to : False
  We will OpenNode : node_level-1_number-1 // node_level-2_B // node_level-3_A
  begin to open nodepath  : node_level-1_number-1 // node_level-2_B // node_level-3_A
  -- pathes.Count: 3
  path element 1 : node_level-1_number-1
  thisnodename
  leavingPath node_level-1_number-1
  node 1: nodename node_level-1_number-1
  begin to get node  nodename: node_level-1_number-1 with attributes:
  Found node 1: nodename: node_level-1_number-1
  path element 2 : node_level-2_B
  thisnodename
  leavingPath node_level-2_B
  node 2: nodename node_level-2_B
  begin to get node  nodename: node_level-2_B with attributes:
  Found node 2: nodename: node_level-2_B
  path element 3 : node_level-3_A
  thisnodename
  leavingPath node_level-3_A
  node 3: nodename node_level-3_A
  begin to get node  nodename: node_level-3_A with attributes:
  opennode: node not found 3: nodename: node_level-3_A
  actNode=nil; opennode: node not found, maybe 3: nodename: node_level-3_A
  nodepath does not exists - try to create: node_level-1_number-1 // node_level-2_B // node_level-3_A
  begin to make node with path: node_level-1_number-1 // node_level-2_B // node_level-3_A and  TEXT_CONTENT:
  actNodeSet <> nil
  begin to open nodepath  : node_level-1_number-1 // node_level-2_B // node_level-3_A
  -- pathes.Count: 3
  path element 1 : node_level-1_number-1
  thisnodename
  leavingPath node_level-1_number-1
  node 1: nodename node_level-1_number-1
  actnode: rootnode
  begin to get node  nodename: node_level-1_number-1 with attributes:
  node(s) found with name node_level-1_number-1: 1

  1 -> find attributes for node node_level-1_number-1, number of attributes 0
  all attributes have to fit, nodename node_level-1_number-1
  actnodeset after retrieving key/value

  actNodeSet:
     node 0 elementname: "node_level-1_number-1"
  Non-null element(s) in act node set: 1
  result true, actNode and newnode is node_level-1_number-1
  Found node 1: nodename: node_level-1_number-1
  path element 2 : node_level-2_B
  thisnodename
  leavingPath node_level-2_B
  node 2: nodename node_level-2_B
  actnode: node_level-1_number-1
  begin to get node  nodename: node_level-2_B with attributes:
  node(s) found with name node_level-2_B: 1

  1 -> find attributes for node node_level-2_B, number of attributes 0
  all attributes have to fit, nodename node_level-2_B
  Attribute count mismatch: given by path: 0 but node has: 2
  actnodeset after retrieving key/value

  actNodeSet:
  Non-null element(s) in act node set: 0
  result false, actnode is nil, lenght of actNodeSet is 0
  makeNodePathWithTextContent: node not found 2: nodename: node_level-2_B, Node will be created
  begin to make node with nodename: node_level-2_B
  path element 3 : node_level-3_A
  thisnodename
  leavingPath node_level-3_A
  node 3: nodename node_level-3_A
  actnode: node_level-2_B
  makeNodePathWithTextContent: node not found 3: nodename: node_level-3_A, Node will be created
  begin to make node with nodename: node_level-3_A
  actNode know node 3: nodename: node_level-3_A
  successfully created nodepath: node_level-1_number-1 // node_level-2_B // node_level-3_A
  We will setAttribute : color : yellow
  begin setAttribute name: color, value: yellow
  setAttribute, create attribute with name: color value: yellow
  successfully setAttribute : color : yellow
  try to open File: c:\opsi.org\tmp\testFiles\dummy.xml
  file saved: c:\opsi.org\tmp\testFiles\dummy.xml
  successful written xmldoc to file: c:\opsi.org\tmp\testFiles\dummy.xml
  Set  $ConstTest$ = "yellow"
    The value of the variable "$ConstTest$" is now: "yellow"
  Set  $list1$ = loadTextFile($HomeTestFiles$+"\dummy.xml")
    The value of the variable "$list1$" is now:
    (string   0)<?xml version="1.0" encoding="utf-8"?>
    (string   1)<rootnode>
    (string   2)  <node_level-1_number-1>
    (string   3)    <node_level-2_A color="blue">Hello World</node_level-2_A>
    (string   4)    <node_level-2_B color="green" count="65"/>
    (string   5)    <node_level-2_C/>
    (string   6)    <node_level-2_B>
    (string   7)      <node_level-3_A color="yellow"/>
    (string   8)    </node_level-2_B>
    (string   9)  </node_level-1_number-1>
    (string  10)  <node_level-1_number-2/>
    (string  11)</rootnode>
  Set  $tmp$ = takeFirstStringContaining($list1$,"node_level-3_A")
    The value of the variable "$tmp$" is now: "      <node_level-3_A color="yellow"/>"
  Set  $CompValue$ = takeString(1, splitString ($tmp$, '"'))
    The value of the variable "$CompValue$" is now: "yellow"
  If
  $ConstTest$ = $CompValue$   <<< result true
  ($ConstTest$ = $CompValue$)   <<< result true
Then
  comment: passed
Else
EndIf
Set  $ConstTest$ = "yellow"
  The value of the variable "$ConstTest$" is now: "yellow"
Set  $list1$ = getXml2DocumentFromFile($HomeTestFiles$+"\dummy.xml")
  The value of the variable "$list1$" is now:
  (string   0)
  (string   1)<rootnode>
  (string   2)  <node_level-1_number-1>
  (string   3)    <node_level-2_A color="blue">Hello World</node_level-2_A>
  (string   4)    <node_level-2_B color="green" count="65"/>
  (string   5)    <node_level-2_C/>
  (string   6)    <node_level-2_B>
  (string   7)      <node_level-3_A color="yellow"/>
  (string   8)    </node_level-2_B>
  (string   9)  </node_level-1_number-1>
  (string  10)  <node_level-1_number-2/>
  (string  11)</rootnode>
Set  $list2$ = xml2GetFirstChildNodeByName($list1$,"node_level-3_A")
  The value of the variable "$list2$" is now:
  (string   0)
  (string   1)<node_level-3_A color="yellow"/>
Set  $CompValue$ = getXml2AttributeValueByKey($list2$,"color")
  The value of the variable "$CompValue$" is now: "yellow"
If
  $ConstTest$ = $CompValue$   <<< result true
  ($ConstTest$ = $CompValue$)   <<< result true
Then
  comment: passed
Else
EndIf
The following code:
message "addNewNode"
set $xml2strictMode$ = 'false'
set $xml2nodepath$ ='node_level-1_number-1 // node_level-2_C'
set $xml2changeValue$ = '"node_level-3_C"'
set $xml2cmdLine1$ = "strictMode = "+$xml2strictMode$
set $xml2cmdLine2$ = "openNode '"+$xml2nodepath$+"'"
set $xml2cmdLine3$ = "addNewNode "+$xml2changeValue$
set $xml2cmdLine4$ = 'SetAttribute "node" "new"'
XML2_dummy_xml $HomeTestFiles$+"\dummy.xml"
set $ConstTest$ = '<node_level-3_C node="new"/>'
set $list1$ = loadTextFile($HomeTestFiles$+"\dummy.xml")
set $tmp$ = takeFirstStringContaining($list1$,"node_level-3_C")
set $CompValue$ = Trim($tmp$)
if ($ConstTest$ = $CompValue$)
	comment "addNewNode passed"
else
	set $TestResult$ = "not o.k."
	LogWarning "addNewNode failed"
endif
set $ConstTest$ = "new"
set $list1$ = getXml2DocumentFromFile($HomeTestFiles$+"\dummy.xml")
set $list2$ = xml2GetFirstChildNodeByName($list1$,"node_level-3_C")
set $CompValue$ = getXml2AttributeValueByKey($list2$,"node")
if ($ConstTest$ = $CompValue$)
	comment "passed"
else
	set $TestResult$ = "not o.k."
	LogWarning "failed"
endif


[XML2_dummy_xml]
$xml2cmdLine1$
$xml2cmdLine2$
$xml2cmdLine3$
$xml2cmdLine4$
$xml2cmdLine5$
$xml2cmdLine6$
$xml2cmdLine7$
$xml2cmdLine8$
$xml2cmdLine9$
produces e.g the log:
message addNewNode
Set  $xml2nodepath$ ='node_level-1_number-1 // node_level-2_C'
  The value of the variable "$xml2nodepath$" is now: "node_level-1_number-1 // node_level-2_C"
Set  $xml2changeValue$ = '"node_level-3_C"'
  The value of the variable "$xml2changeValue$" is now: ""node_level-3_C""
Set  $xml2cmdLine1$ = "strictMode = "+$xml2strictMode$
  The value of the variable "$xml2cmdLine1$" is now: "strictMode = true"
Set  $xml2cmdLine2$ = "openNode '"+$xml2nodepath$+"'"
  The value of the variable "$xml2cmdLine2$" is now: "openNode 'node_level-1_number-1 // node_level-2_C'"
Set  $xml2cmdLine3$ = "addNewNode "+$xml2changeValue$
  The value of the variable "$xml2cmdLine3$" is now: "addNewNode "node_level-3_C""
Set  $xml2cmdLine4$ = 'SetAttribute "node" "new"'
  The value of the variable "$xml2cmdLine4$" is now: "SetAttribute "node" "new""

  try to open File: c:\opsi.org\tmp\testFiles\dummy.xml
  try to load File: c:\opsi.org\tmp\testFiles\dummy.xml
  File: c:\opsi.org\tmp\testFiles\dummy.xml read
  success: create xmldoc from file: c:\opsi.org\tmp\testFiles\dummy.xml
  StrictMode is set to : True
  We will OpenNode : node_level-1_number-1 // node_level-2_C
  begin to open nodepath  : node_level-1_number-1 // node_level-2_C
  -- pathes.Count: 2
  path element 1 : node_level-1_number-1
  thisnodename
  leavingPath node_level-1_number-1
  node 1: nodename node_level-1_number-1
  begin to get node  nodename: node_level-1_number-1 with attributes:
  node(s) found with name node_level-1_number-1: 1

  1 -> find attributes for node node_level-1_number-1, number of attributes 0
  all attributes have to fit, nodename node_level-1_number-1
  actnodeset after retrieving key/value

  actNodeSet:
     node 0 elementname: "node_level-1_number-1"
  Non-null element(s) in act node set: 1
  result true, actNode and newnode is node_level-1_number-1
  Found node with attributes_strict1: nodename: node_level-1_number-1
  path element 2 : node_level-2_C
  thisnodename
  leavingPath node_level-2_C
  node 2: nodename node_level-2_C
  begin to get node  nodename: node_level-2_C with attributes:
  node(s) found with name node_level-2_C: 1

  1 -> find attributes for node node_level-2_C, number of attributes 0
  all attributes have to fit, nodename node_level-2_C
  actnodeset after retrieving key/value

  actNodeSet:
     node 0 elementname: "node_level-2_C"
  Non-null element(s) in act node set: 1
  result true, actNode and newnode is node_level-2_C
  Found node with attributes_strict2: nodename: node_level-2_C
  actNode know node 2: nodename: node_level-2_C
  successfully opend node: node_level-1_number-1 // node_level-2_C
  We will addNewNode : node_level-3_C
  begin to make node with nodename: node_level-3_C attributeName:  attributeValue:
  successfully addNewNode: node_level-3_C
  We will setAttribute : node : new
  begin setAttribute name: node, value: new
  setAttribute, create attribute with name: node value: new
  successfully setAttribute : node : new
  try to open File: c:\opsi.org\tmp\testFiles\dummy.xml
  file saved: c:\opsi.org\tmp\testFiles\dummy.xml
  successful written xmldoc to file: c:\opsi.org\tmp\testFiles\dummy.xml
  Set  $ConstTest$ = '<node_level-3_C node="new"/>'
    The value of the variable "$ConstTest$" is now: "<node_level-3_C node="new"/>"
  Set  $list1$ = loadTextFile($HomeTestFiles$+"\dummy.xml")
    The value of the variable "$list1$" is now:
    (string   0)<?xml version="1.0" encoding="utf-8"?>
    (string   1)<rootnode>
    (string   2)  <node_level-1_number-1>
    (string   3)    <node_level-2_A color="blue">Hello World</node_level-2_A>
    (string   4)    <node_level-2_B color="green" count="65"/>
    (string   5)    <node_level-2_C>
    (string   6)      <node_level-3_C node="new"/>
    (string   7)    </node_level-2_C>
    (string   8)  </node_level-1_number-1>
    (string   9)  <node_level-1_number-2/>
    (string  10)</rootnode>
  Set  $tmp$ = takeFirstStringContaining($list1$,"node_level-3_C")
    The value of the variable "$tmp$" is now: "      <node_level-3_C node="new"/>"
  Set  $CompValue$ = Trim($tmp$)
    The value of the variable "$CompValue$" is now: "<node_level-3_C node="new"/>"
  If
  $ConstTest$ = $CompValue$   <<< result true
  ($ConstTest$ = $CompValue$)   <<< result true
Then
  comment: addNewNode passed
Else
EndIf
Set  $ConstTest$ = "new"
  The value of the variable "$ConstTest$" is now: "new"
Set  $list1$ = getXml2DocumentFromFile($HomeTestFiles$+"\dummy.xml")
  The value of the variable "$list1$" is now:
  (string   0)
  (string   1)<rootnode>
  (string   2)  <node_level-1_number-1>
  (string   3)    <node_level-2_A color="blue">Hello World</node_level-2_A>
  (string   4)    <node_level-2_B color="green" count="65"/>
  (string   5)    <node_level-2_C>
  (string   6)      <node_level-3_C node="new"/>
  (string   7)    </node_level-2_C>
  (string   8)  </node_level-1_number-1>
  (string   9)  <node_level-1_number-2/>
  (string  10)</rootnode>
Set  $list2$ = xml2GetFirstChildNodeByName($list1$,"node_level-3_C")
  The value of the variable "$list2$" is now:
  (string   0)
  (string   1)<node_level-3_C node="new"/>
Set  $CompValue$ = getXml2AttributeValueByKey($list2$,"node")
  The value of the variable "$CompValue$" is now: "new"
If
  $ConstTest$ = $CompValue$   <<< result true
  ($ConstTest$ = $CompValue$)   <<< result true
Then
  comment: passed
Else
EndIf
For further examples see the product 'opsi-script-test'
expecially the file sub-scripts/xml2test.opsiscript
XMLPatch Sections [W]
Warning: This section is deprecated.
It will be not removed, but it is frozen and not under further development.
Also this section is Windows only and will never be ported to any other OS.
We recommend to use the XML2 Section and XML2 Functions instead.
Today, the most popular way to keep configuration data or data at all is a file in XML document format. Its syntax follows the conventions as defined in the XML (or "Extended Markup Language") specification (http://www.w3.org/TR/xml/).
opsi-script offers XMLPatch sections for editing XML documents.
With the actions defined for this section type opsi-script can
-
'select' (and optionally create) sets of elements of a XML document according to a path description
-
'patch' all elements of a selected element set
-
'return' the names and/or attributes of the selected elements to the calling section
Parameter
When calling an XMLPatch section the document path name is given as parameter, e.g.
XMLPatch_mozilla_mimetypes $mozillaprofilepath$ + "\mimetypes.rdf"
Structure of a XML Document
A XML document logically describes a "tree" which starting from a "root" - therefore named document root– grows into branches. Every branch is labelled a node. The sub nodes of some node are called children or child nodes of their parent node.
In XML, the tree is constructed from elements. The beginning of any element description is marked by a tag (similarly as in HTML) i.e. a specific piece of text which is set into a pair of angle brackets ("<“ ">“, The end of the element description is defined by the the same tag text but now bracket by "</“ and „>“. If an element has no subordinated elements then there is no space needed between start tag and end tag. In this case the two tags can be combined to one with end bracket "/>“.
This sketch shows a simple "V"-tree - just one branching at the root level, rotated so that the root is top: ~~ | root node (level 0) / \ node 1 and node 2 both on level 1 . . implicitly given end nodes below level 1 ~~ This tree could be described in XML in the following way:
<?xml version="1.0"?>
<root>
    <node_level_1_no_1>
    </node_level_1_no_1>
    <node_level_1_no_2>
    </node_level_1_no_2>
</root>
The first line has to declare the XML version used. The rest of lines describe the tree.
So long the structure seems to be simple. But yet we have only "main nodes" each defining an element of the tree and marked by a pair of tags. But each main node may have subnodes of several kinds.
Of course, an element may have subordered elements, e.g. we may have subnodes A to C of node 1:
<node_level_1_no_1>
    <node_level_2_A>
    </node_level_2_A>
    <node_level_2_B>
    </node_level_2_B>
    <node_level_2_C>
    </node_level_2_c>
</node_level_1_no_1>
If there are no subordinated elements an element can have subordinated text. Then it is said that the element has a subordinated text node. Example
<node_level_1_no_2>hello world
</node_level_1_no_2>
A line break placed in the text node is now interpreted as part of the text where otherwise it is only a means of displaying XML structure. To avoid a line break belonging to "hello world" we have to write
<node_level_1_no_2>hello world</node_level_1_no_2>Every element (no matter if it has subordinated elements or subordinated text) is constituted as a main node with specific tags. It can be further specified by attributes, so called attribute nodes. For example, there may be attributes "colour" or "angle" that distinguish different nodes of level 1.
<node_level_1_no_1 colour="green" angle="65"
</node_level_1_no_1>
For selecting a set of elements any kind of information can be used:
-
the element level,
-
the element names that are traversed when descending the tree (the "XML path"),
-
names and values of the used attributes,
-
the ordering of attributes,
-
the ordering of elements,
-
other relationships of elements,
-
the textual content of elements (resp. their subordinated text nodes).
In opsi-script, selection based on criteria (1) to (3) and (7) is implemented
Options for Selection a Set of Elements
Before any operation on the contents of a XML file the precise set of elements has to be determined on which it will be operated. The set is constructed step by step by defining the allowed paths through the XML tree. The finally remaining end points of the paths define the selected set.
The basic opsi-script command is
-
OpenNodeSet
There two formats for defining the allowed paths a short and a long format .
The more explicit syntax may be seen in the following example (for a more complex example cookbook-patchxml):
openNodeSet
  documentroot
  all_childelements_with:
   elementname:"define"
  all_childelements_with:
    elementname:"handler"
    attribute: extension value="doc"
  all_childelements_with:
    elementname:"application"
endThe same node set is given by the line:
openNodeSet 'define /handler value="doc"/application /'In this syntax, the slash separates the steps into to the tree structure which are denoted in the more explicit syntax each by an own description.
Given the explicit syntax we may select elements by the textual content of elements:
openNodeSet

  documentroot
  all_childelements_with:
  all_childelements_with:
    elementname:"description"
    attribute:“type“ value=“browser“
    attribute:“name“ value=“mozilla“
  all_childelements_with:
    elementname:"linkurl"
    text:"http://www.mozilla.org"
endIn the exemplary descriptions of XML tree traversals there remain several questions.
-
Shall an element be accepted if the element name and the listed attributes match but other attributes exist?
-
Is the search meant to give one single result value, that is should the resulting element set have no more than one element (and otherwise, the XML file is to considered as erroneous)?
-
Conversely, is it meant that a traversal shall at any rate lead to some result, i.e. do we have to create the element if no matching element exists?
To answer these questions explicitly there are parameters for the OpenNodeSet command. The following lines show the default settings which can be varied by changing the Boolean values:
  - error_when_no_node_existing false
  - warning_when_no_node_existing true
  - error_when_nodecount_greater_1 false
  - warning_when_nodecount_greater_1 false
  - create_when_node_not_existing false
  - attributes_strict false
With short syntax, parametrizing precedes the OpenNodeSet command and holds for all levels of the XML tree. With the explicit syntax the parameters may be set directly after the OpenNodeSet command or be newly set for each level. In particular the option „create when node not existing“ may be set for some levels but not for all.
Patch Actions
There exists a bundle of commands which operate on a selected element set
-
for setting and removing attributes
-
for removing elements
-
for text setting..
In detail:
-
SetAttribute"attribute name" value="attribute value"
sets the specified attribute for each element in the opened set to the specified value. In the attribute does not exist it will be created.
Example:SetAttribute "name" value="OpenOffice Writer"
On the contrary, the command
-
AddAttribute"attribute name" value="attribute value"
sets the specified attribute only to the specified value if it does not exists beforehand. An existing attribute keeps its value. E.g. the command
AddAttribute "name" value="OpenOffice Writer"
would not overwrite the value if there was named another program before.
By
* DeleteAttribute "attribute name"
we remove the specified attribute from each element of the selected element set.
The command
* DeleteElement "element name"
removes all elements with main node name (tag name) element name from the opened element set.
Finally there exist two commands for setting resp. adding text nodes.:
-
SetText"Text"
and
-
AddText"Text"
Example:
SetText "rtf"
transforms the element
'<fileExtensions>doc<fileExtensions>'
into
'<fileExtensions>rtf<fileExtensions>'
By
SetText ""
we remove the text node completely.
The variant
AddText "rtf"
sets the text only if there was no text node given.
Returning Lists to the Caller
A XMLPatch section may return the retrieved informations to the calling primary section. The result always is a String list, and to get it, the call must done via the String list function getReturnListFromSection. E.g. we may have the following String list setting in an Actions section where we use a XMLPatch_mime section
DefStringList $list1$
set $list1$=getReturnListFromSection ('XMLPatch_mime "c:\mimetypes.rdf"')
Inside the XMLPatch section we have return commands that determine the content of returned String list:
-
return elements+ fills the selected elements completely (element name and attributes) into the return list. -
return attributes
produces a list of the attributes. -
return elementnames
produces a list of the element names. -
return attributenamesgives a list only of the attribute names. -
return text
list all textual content of the selected elements. -
return counting
gives a report with numerical informations: line 0 contains the number of selected elements, line 1 the number of attributes.
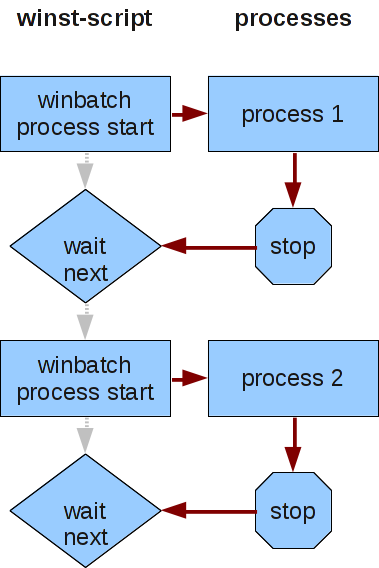
WinBatch-Sections [W/L/M]
In a WinBatch section any windows executable can be started.
E.g, we may start some existing setup program by the following line in a WinBatch section
[winbatch_install]
"%scriptpath%\setup.exe"
Winbatch section are desingned to start programs (*.exe) directly.
To call data files that are connected to programs is deprecated but still supported. If you do this you will get a deprecated warning. Example:
ok: notepad.exe test.txt
deprecated (not ok): test.txt
Call Parameter (Modifier)
There a several parameters of the WinBatch call which determine if (or how long) opsi-script shall be wait for the started programs returning.
-
/WaitOnClose
Is the default
opsi-script waits for every initiated process to come back. -
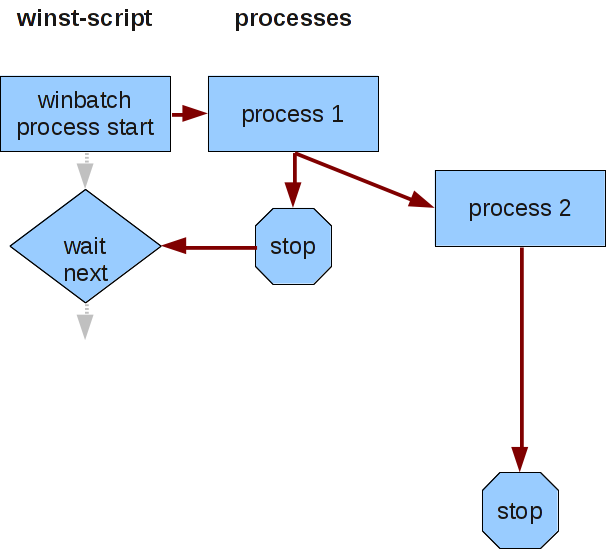
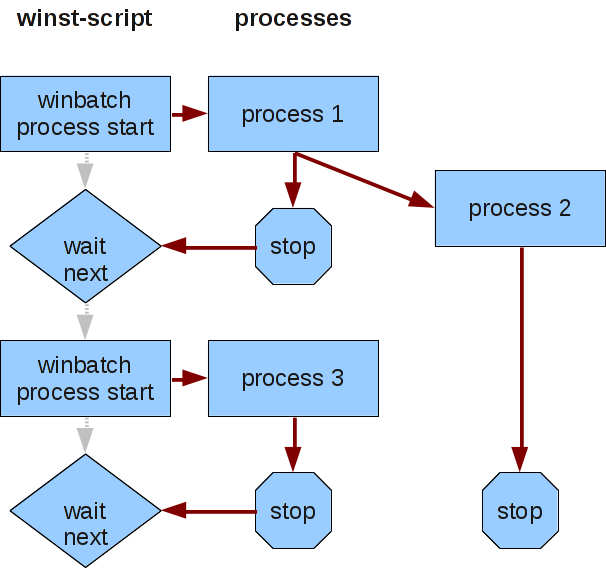
/LetThemGo
This is the contrary to/WaitOnClose. It is used if opsi-script shall proceed while the started processes run in their own threads. -
/WaitSeconds[number of seconds]
If a call includes the parameter /WaitSeconds [number of seconds], then opsi-script is waiting for [number of seconds] before proceeding. In the default configuration, we also wait for any programs that are currently running to finish. If we combine the parameter /WaitSeconds with the option/LetThemGo, then opsi-script continues processing after the waiting time is finished. -
/WaitForProcessEnding<program name>
Waits for the process called <program name> to end.
Should be combined with/TimeOutSeconds.
Explanation:
When starting an external process from a winbatch call, the opsi-script waits for the current process to finish before executing the next command in the script.
-
/32Bit//since 4.11.3.5 [W]
This is the default. The paths within the section are assumed to be 32 bit pathes.
Example:c:\windows\system32\regedit.execalls (even when running on a 64 bit system) the 32 bit 'regedit.exe'. -
/64Bit//since 4.11.3.5 [W]
The paths within the section are assumed to be 64 bit paths.
Example:c:\windows\system32\regedit.exeexecutes (running on a 64 bit system) the 64 bit 'regedit.exe'. -
/SysNative//since 4.11.3.5 [W]
The paths within the section are assigned according to the OS architecture interpretiert.
Example:c:\windows\system32\regedit.exerunning on a 64bit system calls the 64 bit 'regedit.exe' and running on a 32 bit system the 32 bit 'regedit.exe'.
Example:
Winbatch_add_reg /64Bit
[Winbatch_add_reg]
"c:\windows\system32\regedit.exe" /s "%scriptpath%\my64.reg"-
/RunAsLoggedonUser//since 4.11.3.5 [W]
This is available only in the context of 'userLoginScripts'. The program is executed as the user, who has just logged on. This modifier has the following limitation:-
insufficient tested on NT6 and possibly of limited effect.
-
There are some external programs which start another process and then end without waiting for their child process to end. From the point of view of opsi-script, the process is ended and the next command could be started.
If you run an uninstall program and a setup program in sequence and the uninstall program works with such a child process, you can have conflicting processes running because the uninstallation and installation processes are running at the same time.
Using the modifier /WaitForProcessEnding helps to avoid such a situation.
-
/TimeOutSeconds<seconds>
A timeout setting. After waiting <seconds>, opsi-script will end the process.
Since version 4.11.3, /TimeOutSeconds may be used without a waiting condition (e.g./WaitForProcessEnding) but not in combination with/WaitSeconds.
Since version 4.11.4.6 the time progress from start until timeout is displayed by the progressbar.
Example:
Winbatch_uninstall /WaitForProcessEnding "uninstall.exe" /TimeOutSeconds 20
[Winbatch_uninstall]
"%ScriptPath%\uninstall_starter.exe"
-
/RunElevated[W]
Starts a process that has a security token with elevated privileges. This modifier has the following restrictions:-
For NT5 it does not change anything.
-
A process started with this modifier has no network access. So you should copy a program to a temporary local directory, but do not start it from a network share.
-
You may see problems while using the graphical interface. Therefore true silent installations are the better choice in this case.
-
Functions only in the context of opsi-script.
-
-
getLastExitCode
Returns a string that contains the value of the exitcode of the the process that was last called by a WinBatch / ShellScript / ExecWith section.
When using a ShellScript or ExecWith section, you will normally get the exitcode of the interpreter that was called. To get the exitcode of your script you have to define it explicitly. -
/RunAsLoggedOnUser// since 4.11.3.5 [W] ; works only inside 'userLoginScripts' -
/32Bitor/64Bitor/SysNative//since 4.11.3.5 [W]
These modifiers control if the path to a called program is interpreted as 32 or 64 Bit Path. So if want for example call a%system%\cmd.exeyou call a 32 bit program by default. If you use the /64bit modifier you will get with the same call the 64 bit version. -
/WaitForWindowAppearing[window title] [W]
resp.
/WaitForWindowVanish[window title] [W]
Both are deprecated. Please use/WaitForProcessEnding
The first option means that opsi-script waits until any process lets pop up a window with title [window title]. With the second option opsi-script is waiting as long as a certain window (1) appeared on the desktop and (2) disappeared again.
WARNING: These options only know windows of 32-bit programms
ShellScript section (since 4.12.10.0) [W/L/M]
The ShellScript section (formerly called ShellBatch/ShellInAnIcon/ShellScript/DosInAnIcon) is primarily used to integrate existing command line routines and shell scripts into opsi-script or for tasks which cannot be fulfilled by opsi-script commands. A possible window of the called command line interpreter (cmd under Windows, bash under Linux/MacOs) is not displayed.
| The previous section names ShellBatch/ShellInAnIcon/ShellScript/DosInAnIcon still work, but we recommend not to use them anymore. |
A ShellScript section is converted into a temporary file 'opsiscript<random>.cmd' (Windows) or 'opsiscript<random>.sh' (Linux/MacOS) when the opsi-script is processed. The file is then executed with the (standard) command line interpreter of the operating system (cmd under Windows, bash under Linux/MacOs). Therefore, all shell commands can be used in a ShellScript section.
The ShellScript section offers the following advantages over executing a pure shell script using the command line interpreter:
-
opsi-script variables or constants in the ShellScript section are replaced with their content before execution and can thus be used easily within shell scripts.
-
The output of the shell script is saved in the logfile.
-
The output of the shell script can be transferred to a string list and processed further.
-
The output of the shell script can be displayed in a separate window (parameter
/showoutput). Closing this window, e.g. by a user, has no effect on further processing of the shell script.
| opsi-script waits for the ShellScript section to finish before the opsi-script is processed further. Do not use commands that wait for input. |
Parameter
There are two kinds of parameters which may be passed to the section call:
-
Parameters which are directly passed to the called batch file.
-
Parameter which modify the way opsi-script will handle the section.
The calling syntax is:
Sektionsname [batch parameter] [winst [modifier]]
Possible opsi-script modifier are (since 4.11.1):
-
/32bit -
/64bit -
/Sysnative -
/showoutput// since 4.11.4.6 -
/LetThemGo// since 4.12.10.0
It is used if opsi-script shall proceed while the started shell run in their own threads. The _opsi-scrip script continues to run without waiting for the shell script to exit and the shell to close.
*/encoding <encoding> //since 4.12.4.17 [W/L/M]
By default the content of the section will be stored to a temporary file in system encoding. This is in the most cases the best choice. If you really knows what you are doing, you may change the encoding of the stored temporary file:
You can add an encoding parameter after the WINST keyword.
Example :
ShellScript_do_encoding_example WINST /encoding "utf8"For allowed encodings see opsi-script encoding
Since 4.12.4.0 the following modifiers may be used that are well known from winbatch sections and are explained over there: Call Parameter (Modifier)
-
/runElevated[W] -
/TimeoutSeconds <number> -
/WaitForProcessEnding <string> -
/LetThemGo
These opsi-script modifier have to be separated by the key word winst from the other parameters.
Other parameters of a ShellScript section are directly passed as quasi command line parameters to the Windows shell script.
For example, we may call ShellScript_1 in Actions section to get a "Hello World" from the DOS echo command:
[Actions]
ShellScript_1 today we say "Hello World"

[ShellScript_1]
@echo off
echo %1 %2 %3 %4
pause
the execution of the Dos-Batch command echo with parameters 'today we say "Hello World"'.
The next example will be on a 64 bit system executed in a 64 bit cmd.exe and gives the output 'today we say':
[Actions]
ShellScript_1 today we say winst /64bit

[ShellScript_1]
@echo off
echo %1 %2 %3 %4
pause
Since Version 4.11.5 not only string constants but also string variables are allowed as parameters (but no string functions)
Example:
Code from opsi-script-test:
comment "Testing parameters for ShellBatch"
set $ConstTest$ = "Hello world"
set $list$ = getOutStreamFromSection('ShellScript_with_parameter world')
set $CompValue$ = takeString(2,$list$)
if ($ConstTest$ = $CompValue$)
	comment "ShellBatch parameter passed"
else
	set $TestResult$ = "not o.k."
	LogWarning "ShellBatch parameter failed"
endif

comment "Testing parameters for ShellBatch"
set $ConstTest$ = "Hello world"
set $tmp$ = "world"
set $list$ = getOutStreamFromSection('ShellScript_with_parameter $tmp$')
set $CompValue$ = takeString(2,$list$)
if ($ConstTest$ = $CompValue$)
	comment "ShellBatch parameter passed"
else
	set $TestResult$ = "not o.k."
	LogWarning "ShellBatch parameter failed"
endif
produce the log:
comment: Testing parameters for ShellBatch
Set  $ConstTest$ = "Hello world"
  The value of the variable "$ConstTest$" is now: "Hello world"
Set  $list$ = getOutStreamFromSection('ShellScript_with_parameter world')

  ShellScript_with_parameter
    c:\opsi.org\tmp\_opsiscript_Kj23Ej02.cmd saved back
    Executing "cmd.exe" /C c:\opsi.org\tmp\_opsiscript_Kj23Ej02.cmd world
    ExitCode 0

                output:
                ------------

                C:\Windows\system32>echo Hello world
                Hello world

    The file: c:\opsi.org\tmp\_opsiscript_Kj23Ej02.cmd has been deleted
    retrieving strings from getOutStreamFromSection [switch to loglevel 7 for debugging]
        (string   0)
        (string   1)C:\Windows\system32>echo Hello world
        (string   2)Hello world

Set  $CompValue$ = takeString(2,$list$)
    retrieving strings from $list$ [switch to loglevel 7 for debugging]
        (string   0)
        (string   1)C:\Windows\system32>echo Hello world
        (string   2)Hello world

  The value of the variable "$CompValue$" is now: "Hello world"
If
  $ConstTest$ = $CompValue$   <<< result true
  ($ConstTest$ = $CompValue$)   <<< result true
Then
  comment: ShellBatch parameter passed
Else
EndIf

comment: Testing parameters for ShellBatch
Set  $ConstTest$ = "Hello world"
  The value of the variable "$ConstTest$" is now: "Hello world"
Set  $tmp$ = "world"
  The value of the variable "$tmp$" is now: "world"
Set  $list$ = getOutStreamFromSection('ShellScript_with_parameter $tmp$')

  ShellScript_with_parameter
    c:\opsi.org\tmp\_opsiscript_Kz50Gi50.cmd saved back
    Executing "cmd.exe" /C c:\opsi.org\tmp\_opsiscript_Kz50Gi50.cmd world
    ExitCode 0

                output:
                ------------

                C:\Windows\system32>echo Hello world
                Hello world

    The file: c:\opsi.org\tmp\_opsiscript_Kz50Gi50.cmd has been deleted
    retrieving strings from getOutStreamFromSection [switch to loglevel 7 for debugging]
        (string   0)
        (string   1)C:\Windows\system32>echo Hello world
        (string   2)Hello world

Set  $CompValue$ = takeString(2,$list$)
    retrieving strings from $list$ [switch to loglevel 7 for debugging]
        (string   0)
        (string   1)C:\Windows\system32>echo Hello world
        (string   2)Hello world

  The value of the variable "$CompValue$" is now: "Hello world"
If
  $ConstTest$ = $CompValue$   <<< result true
  ($ConstTest$ = $CompValue$)   <<< result true
Then
  comment: ShellBatch parameter passed
Else
EndIf
Catch the output
The output of the shell commands can be captured by using the string list function getOutStreamFromSection() from the opsi-script-scripts main-section
see also:
Simple String Values generated from String Lists or Files).
If the return list shall be evaluated programmatically it is advised to use the '@' prefix of commands. Such we suppress the repetition of the command line in the output which may different formats dependent on system configurations.
Registry-Sections [W]
By a Registry section call we can create, patch and delete entries in the Windows registry. As usual, opsi-script logs every operation in detail as long as logging is not turned off.
Examples
Let us set some registry variables by a call to the section Registry_TestPatch where the section is given by
[Registry_TestPatch]
openkey [HKEY_LOCAL_MACHINE\SOFTWARE\opsi.org\Test]
set "Testvar1"  = "test value"
set "Testvar2" = REG_DWORD:0001
For further examples see the product 'opsi-script-test' and there look at '$Flag_subregistry$ = "on"'
Call Parameters
-
The standard call of a Registry section has no parameters. This is sufficient as long as the operations aim at the standard registry of a Windows system and all entries can be defined using a globally defined registry path.
-
/AllUserProfilessince 4.12.10.0 (/AllNTUserDatsis deprecated)
opsi-script also offers that the patch commands of a Registry section are automatically executed "for all users" which are locally defined. I.e. the patches are made for all user branches of the local registry. This interpretation of the section is evoked by the parameter/AllUserProfiles./AllNTUserDatsis deprecated but still works.
Further parameters control which syntactical variant of the Registry section shall be valid:
-
/regedit
The parameter/regeditdeclares that the syntax corresponds the export file syntax of the Windows Registry Editor regedit. Such, the lines of a regedit export file may directly be used as a Registry resp. the file itself can serve as an external section (see Registry Sections in Regedit Format). -
/addReg
Similarly, the parameter/addRegdeclares that the Registry section syntax is that of an inf-file (as used e.g. for driver installations) (see Registry Sections in AddReg Format).
These not opsi-script specific syntactical variants are not defined in this manual since they usually will be generated programmatically.
There are also the Options:
-
/32Bit -
/64Bit -
/SysNative
which manipulate the 'registry write redirection' on 64 Bit systems. (see opsi-script-64bit).
Commands
The default syntax of a Registry section is oriented at the command syntax of other patch operations in opsi-script.
There exist the following commands:
-
OpenKey -
Set -
Add -
Supp -
GetMultiSZFromFile -
SaveValueToFile -
DeleteVar -
DeleteKey -
ReconstructFrom -
Flushkey
In detail:
-
OpenKey<registry key>
opens the specified key for reading and (if the user has the necessary privileges) for writing. If the key does not exist it will be created.
The registry key is denoted by a registry path name. Under regular circumstances it starts with one of the "high keys" which build the top level of the registry tree data structure (above the "root" ). These are: 'HKEY_CLASSES_ROOT, HKEY_CURRENT_USER, HKEY_LOCAL_MACHINE, HKEY_USERS, HKEY_CURRENT_CONFIG' which may optionally be written as 'HKCR, HKCU, HKLM, HKU'.
In opsi-script syntax of the registry path name, the elements of a path are separated by single backslashs.
All other commands operate on an opened registry key.
-
Set<varname> = <value>
sets the registry variable <varname> to value <value>. <varname> as well as <value> are strings and have to be enclosed in citations marks. A non-existing variable will be created. As default data typ normally 'REG_SZ' is used. But if <value> contains a percent char ('%') 'REG_EXPAND_SZ' will be used instead.
The empty variable "" denotes the standard entry of a registry key.
If some registry variable shall be created or set where the data type should be explicitly given, we have to use the extended variant of the Set command:
-
Set<varname> = <registry type>:<value>
sets the registry variable <varname> to value <value> of type <registry type>. The following registry types are supported:- 'REG_SZ'
-
(string)
- 'REG_EXPAND_SZ'
-
(a string containing substrings which the operating system shall expand e.g.)
- 'REG_DWORD'
-
(32-bit numbers; decimal or 0xhex)
- 'REG_QWORD'
-
(64-bit numbers; decimal or 0xhex) // since 4.12.6
- 'REG_BINARY'
-
(binary values usually given as two-digit hex numbers 00 01 02 .. 0F 10 ..)
- 'REG_MULTI_SZ'
-
(string value arrays, in opsi-script we have to use "|" as separator)
An example for setting a REG_MULTI_SZ:
set "myVariable" = REG_MULTI_SZ:"A|BC|de"
To construct a multistring we may put the strings as lines in a file and read it using GetMultiSZFromFile (cf. below).
Example for set with different registry data types:
set "var1" = "my string"
set "var2" = REG_SZ:"my string"
set "var3" = REG_EXPAND_SZ:"%ProgramFiles%"
set "var4" = REG_DWORD:123	; Decimal
set "var5" = REG_DWORD:0x7b	; Hexadecimal
; REG_QWORD is supported since 4.12.6
set "var6" = REG_QWORD:59049772908	; Decimal
set "var7" = REG_QWORD:0xDBFA4076C	; Hexadecimal
set "var8" = REG_BINARY:00 01 02 0F 10
set "var9" = REG_MULTI_SZ:"A|BC|de"-
Add<varname> = <value>resp.
Add<varname> = <registry type> <value>
are analogous to theSetcommands with the difference that entries are only added but values of existing variables not changed. -
Supp<varname> <list separator> <supplement>
This command interprets the string value of variable <varname>, a list of values separated by <list separator> and adds the string <supplement> to this list (if it not already contained). If <supplement> contains the <list separator> it is split into single strings, and the procedure is applied to each single string.
A typical use is adding entries to a path variable (which is defined in the registry).
Suppkeeps the original string variant (REG_EXPAND_SZ or REG_SZ).
Example:
The environment Path is determined by the value for the variable Path as defined inside the registry key
+ 'KEY_LOCAL_MACHINE\SYSTEM\CurrentControlSet\Control\Session Manager\Environment'
+ To add some entries to the path definition we have to get access to this key via an OpenKey. Then we can apply e.g.
+
supp "Path" ; "C:\utils;%JAVABIN%"
+ in order to supplement the path by '"C:\utils"' and '"%JAVABIN%"'.
+ (Windows expands %JAVABIN% to the correct path name if %JAVABIN% exists as variable and the String is a REG_EXPAND_SZ.)
+ Whom read the old value of Path from the environment variable, write this value to the registry value - and are then able to work with the registry variable:
+
[Actions]
DefVar $Path$
set $Path$ = EnvVar ("Path")
Registry_PathPatch

[Registry_PathPatch]
openkey [HKEY_LOCAL_MACHINE\SYSTEM\CurrentControlSet\control\Session Manager\Environment]
set "Path"="$Path$"
supp "Path"; "c:\orawin\bin"
The environment variable gets a changed value after a reboot or after a call of UpdateEnvironment see: UpdateEnvironment
|
-
GetMultiSZFromFile<varname> <filename>
reads the lines of a file and puts them together building a Multistring. -
SaveValueToFile<varname> <filename>
exports the referred (String or MultiSZ) value as file <filename> lines (each String forming a line). -
DeleteVar<Varname>
removes the entry with variable <varname> from the opened key. -
DeleteKey<Registrykey>
deletes the registry key recursively including all subkeys and contained variables. The registry key is defined as for OpenKey.Example:
[Registry_Keydel] deletekey [HKCU\Environment\subkey1] -
ReconstructFrom<filename>
(deprecated) -
FlushKey
ensures that all entries of a key are saved on hard drive, not only in memory (is automatically done when closing a key, therefore in particular when a registry section is left).
Registry Sections to Patch 'All NTUser.dat'
A Registry section called with parameter /AllNTUserdats is executed for every local user.
To this end, for all local users (as permanent storage for the registry branch 'HKEY_Users') the files 'NTUser.dat' are searched one by one and temporarily loaded into a subkey of some registry branch. The commands of the registry section are executed for this subkey, then the subkey is unloaded. As result, the stored 'NTUser.dat' is changed.
The mechanism does not work for a logged in user. For, his 'NTUser.dat' is already in use, and the request to load it produces an error. To do the changes for him as well, the commands of the Registry additionally are executed on the 'HKEY_Users' branch for the logged in user.
There is a 'NTUser.dat' for 'Default User' which serves as template for newly created users in the future. Therefore the patches are prepared for them as well.
The Registry section syntax remains unchanged. But the key pathes are interpreted relatively. This means leave away the main key
In the following example the registry entry for variable 'FileTransferEnabled' is de facto set for all 'HKEY_Users\XX\Software…' successive for all XX (all users) on the machine:
[Registry_AllUsers]
openkey [Software\ORL\WinVNC3]
set "FileTransferEnabled"=reg_dword:0x00000000
Since opsi-script version 4.11.2 you may give the root key 'HKEY_CURRENT_USER' at the openkey command.
Example:
[Registry_AllUsers]
openkey [HKEY_CURRENT_USER\Software\ORL\WinVNC3]
set "FileTransferEnabled"=reg_dword:0x00000000
This has the folloing advantages:
-
The syntax is easier to understand.
-
The same registry section may be used with '/AllNtuserdats' and in a 'userLoginScript'
Registry Sections in Regedit Format
If a Registry section is called with parameter /regedit the section is not expected in opsi-script standard format but in the format as produced by the Windows regedit tool.
The export files generated by regedit have - not regarding the head line - ini file format. Example:
Windows Registry Editor Version 5.00

[HKEY_LOCAL_MACHINE\SOFTWARE\opsi.org]

[HKEY_LOCAL_MACHINE\SOFTWARE\opsi.org\general]
"bootmode"="BKSTD"
"windomain"=""
"opsiconf"=dword:00000001

[HKEY_LOCAL_MACHINE\SOFTWARE\opsi.org\shareinfo]
"user"="pcpatch"
"pcpatchpass"=""
"depoturl"="\\\\bonifax\\opt_pcbin\\install"
"configurl"="\\\\bonifax\\opt_pcbin\\pcpatch"
"utilsurl"="\\\\bonifax\\opt_pcbin\\utils"
"utilsdrive"="p:"
"configdrive"="p:"
"depotdrive"="p:"
The sections denote registry keys to be opened. Each line describes some variable setting like the set command in a opsi-script registry section.
But, we cannot really have an internal opsi-script section that is constructed from another sections. Therefore Registry section with parameter /regedit can only be given as external section or by the function call loadTextFile, e.g.
registry "%scriptpath%/opsiorgkey.reg" /regeditWith Windows XP the registry editor regedit does not produce Regedit4-Format but a new format that is indicated by the head line
'"Windows Registry Editor Version 5.00"'
In this format, Windows offers some additional value types. But more important, the export file is now generated in Unicode. opsi-script sections processing is based on Delphi libraries which use 8 bit Strings. To work with a regedit 5 export the coding therefore has to converted. This can be done manually, e.g. by a suitable editor. But we may also feed the original file to opsi-script using the String list function loadUnicodeTextFile. E.g., if printerconnections.reg be a unicode based export, we can call regedit in the following form which does the necessary code conversion on the fly:
registry loadUnicodeTextFile("%scriptpath%/opsiorgkey.reg") /regeditA registry patch using regedit format can as well be executed "for all NT users" similarly as the common opsi-script registry section. That is, a path like '[HKEY_CURRENT_USER\Software\ORL]' is to replaced by the relative '[Software\ORL].'
Registry Sections in AddReg Format
A Registry section can be called with parameter /addReg. Then its syntax follows the principles of the '[AddReg]' sections in inf files as used e.g. for driver installations.
E.g.:
[Registry_ForAcroread]
HKCR,".fdf","",0,"AcroExch.FDFDoc"
HKCR,".pdf","",0,"AcroExch.Document"HKCR,"PDF.PdfCtrl.1","",0,"Acr"
OpsiServiceCall Sections [W/L/M]
This type of section allows to retrieve information – or set data – via the OPSI service. There are three options for determining a connection to an OPSI service:
-
Per default it is assumed that the script is executed in the standard OPSI installation environment. I.e., we already have a connection to an OPSI service and can use it.
-
We set the url of the service to which we want to connect as a section parameter and supply as well the required username and password as section parameters.
-
We demand an interactive login to the service (predefining only the service url and, optionally, the username).
Retrieved data may be returned as a String list and then used for scripting purposes.
Call Parameters
|
There is a standard webservice connection. This is established at the start of the opsi-script via the opsi-client-agent on the existing connection to the current opsi-server. If no call parameters are specified, the standard connection is applied. If it’s not specified, then the call fails. There are a number of call parameters that create a new connection. This new connection will be the default connection. That means, that subsequent calls without parameters use this connection until it is explicitly changed again, or the product script has been processed. A new product starts the original webservice connection again. |
The call parameters that change the standard connection:
-
/interactive
-
/serviceurl /username /password
-
/opsiclientd
Restore of the original connection:
With the opsiServiceCall section with a parameter call /preloginservice the standard connection will be restore to the previous value. Alternatively one can also make a
call to the statement without an actual existing section:
opsiServiceCall /preloginservice
The parameter call:
The call parameters determine which OPSI service will be addressed and set the connection parameters if needed.
Connection parameters can be defined via
-
/serviceurl<url to the OPSI web service> -
/username<web service username> -
/password<web service user password>
If these parameters are defined (or at least one of them), an attempt is made to connect to the mentioned service URL and, if successful, then this will be the default connection.
The additional option
-
/interactive
raises an interactive connect. The user will be asked for confirming the connection data and supplying the password. Of course, this option cannot be used in scripts which shall be executed fully automatically.
If no connection parameters are supplied opsi-script assumes that an existing connection shall be reused.
If no connection parameters are given and the interactive option is not specified (neither at this call nor at a call earlier in the script) it is assumed that we are in a standard OPSI boot process and, already having a connection to an OPSI service, we try to address it.
-
/preloginservice
In the case that we had a connection to a secondary OPSI service we may (re)set the connection to the standard OPSI service via the option -
/opsiclientd//since 4.11.2.1
calls the localhosts opsiclientd -
/opsiclientd-once//since 4.11.6.11
Calls the webservice from the local opsiclientd and sets back after the call, the standard connection once again to the original value.
Section Format
An opsiServiceCall, which uses an existing connection to an opsi-service, is defined by its method name and a list of parameters.
Both are defined in the section body. It has format
"timeout":<seconds>
"method":<method name>
"params":[
	<params>
	]
The line "timeout":<seconds> is optional.
It is only needed by calling methods that run very long (> 90 seconds). It is available since 4.12.4.35.
'<params>' is a (possibly empty) list of strings (comma-seperated). Since OPSI 4.12.4.37 it is also possible to write the following values in '<params>' without quotation marks (as in JSON syntax): numbers, boolean values, arrays, objects and null. Use the parameters as required by the specified method.
E.g. we may have a section call where the required methodname and the (empty) list of parameters is set:
[opsiservicecall_clientIdsList]
"timeout":50
"method":"getClientIds_list"
"params":[]
The section call produces the list of names (IDs) of all local OPSI clients.
If the list shall be exploited for other than test purposes the section call can be used in a string list expression:
E.g.:
DefStringList $result$
Set $result$=getReturnListFromSection("opsiservicecall_clientIdsList")
The usage of GetReturnListFromSection is documented in the string list function chapter of this manual (see opsi-script-stringlist-create-by-section).
A hash – in this case a string list, where each item is a pair name=value – is produced by the following OPSI service call:
[opsiservicecall_hostHash]
"method": "getHost_hash"
"params": [
	"pcbon8.uib.local"
]Dealing with JSON objects from the web service requires a basic understanding of JSON, the OPSI objects and the JSON-related methods in opsi-script. See also: JSON-RPC-API
In the code shown below, you can get objects from the service.
In this example, all productOnClient objects that belong to the current computer will be retrieved (% opsiserviceUser% are in the service context of the FGDN of the client) and are localboot products, by which the action request is set to 'setup'.
DefStringlist $resultlist$
set $resultlist$ = getReturnListFromSection("opsiServiceCall_get_productOnClient_setup_objects")
[opsiServiceCall_get_productOnClient_setup_objects]
"method": "productOnClient_getObjects"
"params": [
          "[]",
          '{"clientId":"%opsiserviceUser%","productType":"LocalbootProduct","actionRequest":"setup"}',
          ]
The result is a JSON Array String which is in the first line of $resultlist$.
You can also restore (changed) objects.
The following example clarifies the principle:
The string variable $ArrayStr$ must contain a valid JSON array.
DefVar $ArrayStr$
(...)
[opsiServiceCall_updatePOC]
"method": "productOnClient_updateObjects"
"params": [
          '$ArrayStr$'
]ExecPython Sections [W/L/M]
'ExecPython' sections are basically Shell-Sections (like 'ShellScript') which call the – on the system installed – python script interpreter. It takes the section content as python script, and the section call parameter as parameters for the script.
Example:
The following example demonstrates a execPython call with a list of parameters for that are printed by the python commands.
The call may look like
execpython_hello -a "option a" -b "option b" "there we are"

[execpython_hello]
import sys
print "we are working in path: ", a
if len(sys.argv) > 1 :
	for arg in sys.argv[1:] :
		print arg
else:
  print "no arguments"


print "hello"
The print command output will be caught and written to the logfile. So we get in the log
output:
 ------------
-a
option a
-b
option b
there we are
       hello
Observe that the loglevel must be set at least to info (that is 1) if these outputs shall really find their way to the logfile.
Interweaving a Python Script with the opsi-script Script
An execPython section is integrated with the surrounding opsi-script script by four kinds of shared data:
-
A parameter list is transferred to the python script.
-
Everything that is printed by the python script is written into the opsi-script log.
-
The opsi-script script substitution mechanism for constants and variables when entering a section does its expected work for the execPython section.
-
The output of an execPython section can be caught into a stringlist and then used in the ongoing opsi-script script.
An example for the first two ways of interweaving the python script with the opsi-script script is already given above. We extend it to retrieve the values of some opsi-script constants or variables.
[execpython_hello]
import sys
a = "%scriptpath%"
print "we are working in path: ", a
print "my host ID is ", "%hostID%"
if len(sys.argv) > 1 :
	for arg in sys.argv[1:] :
		print arg
else:
  print "no arguments"

print "the current loglevel is ", "$loglevel$"
print "hello"
Of course, the '$loglevel$' variable has to be set beforehand in the Actions section:
DefVar $LogLevel$
set $loglevel$ = getLoglevel
Finally, in order to being able to use of some results of the section output, we produce it into a stringlist variable by calling the execPython section in the following way:
DefStringList pythonresult
Set pythonResult = GetOutStreamFromSection('execpython_hello -a "opt a“')ExecWith Sections [W/L/M]
'ExecWith' sections are more general than 'ExecPython' or 'ShellScript' sections: Which program interprets the section lines given is determined by a parameter of the section call.
E.g, if we have some call
execPython_hello -a "hello" -b "world"where
-a "hello" -b "world"
are parameters that are passed to the python script, we get the following completely equivalent ExecWith call:
execWith_hello "python" PASS -a "hello" -b "world" WINST /EscapeStringsThe option '/EscapeStrings' is automatically used in an ExecPython section and means that backslashes in String variables and constants are duplicated before interpretation by the the called program.
Calling parameters (Modifier)
In general, we have the call syntax:
ExecWith_SECTION PROGRAM PROGRAMPARAS pass PASSPARAS winst WINSTOPTSEach of the expressions 'PROGRAM, PROGRAMPARAS, PASSPARAS, WINSTOPTS' may be an arbitrary String expression, or just a String constant (without citation marks).
The key words PASS and WINST may be missing if the respective parts do not exist.
The following opsi-script-options are available:
-
/EscapeStrings -
/LetThemGo -
/32Bit
This is the default. The interpreter path is assumed to be a 32 bit path.
Example:c:\windows\system32\WindowsPowerShell\v1.0\powershell.execalls (also when running on a 64 bit system) the 32 bit 'powershell.exe'. -
/64Bit
The interpreter path is assumed to be a 64 bit path.
Example:c:\windows\system32\WindowsPowerShell\v1.0\powershell.execalls (on a 64 bit system) the 64 bit 'powershell.exe'. -
/SysNative
The given interpreter path is assigned accoring to the OS architecture.
Example:c:\windows\system32\WindowsPowerShell\v1.0\powershell.execalls on a 64 bit system the 64 bit 'powershell.exe' and running on a 32bit system the 32 bit 'powershell.exe'. -
/encoding <encoding>//since 4.12.4.17 [W/L/M]
By default the content of the section will be stored to a temporary file in system encoding. This is in the most cases the best choice. If you really know what you are doing, you may change the encoding of the stored temporary file:
You can add an encoding parameter after the WINST keyword. Example:ExecWith_open "C:\myProgram.exe" WINST /encoding "utf8"For allowed encodings see opsi-script encoding
Like with ExecPython sections, the output of an ExecWith section may be captured into a String list via the function getOutStreamFromSection.
The first one declares that the backslash in opsi-script variables and constants is C-like escaped. The second one has the effect (as for 'WinBatch' calls) that the called program starts its work in a new thread while opsi-script is continuing to interpret its script.
Since Version 4.11.3.5, if the interpreter path contains 'powershell.exe', the temporary file is saved with the extension .ps1.
Notes on PowerShell
-
Execution of scripts
For PowerShell the script execution is disabled by default. So you have to enable it before you can use ExecWith with PowerShell. To achieve that there are two options: Either call the section usingExecWith_name "powershell.exe" -ExecutionPolicy Bypassto temporarily allow execution or enable it permanently usingShellScriptbeforehand.
Since: 4.12.4.35: If the execution policyAllSignedis detected, the PowerShell will be modified from calling the temporay script by-Fileto-Command Get-Content -Path <tempfilename> | Out-String | Invoke-Expression. In this mode the execution policy is ignored. In this mode any givenPASSPARASare also ignored.
Example:ShellScript_setpolicy ExecWith_powershell powershell.exe set $exitcode$ = getLastExitcode if not ($exitcode$ = "0") comment "powershell script failed" endif [ShellScript_setpolicy] echo "powershell set-executionpolicy RemoteSigned ..." powershell.exe set-executionpolicy RemoteSigned exit %ERRORLEVEL% [ExecWith_powershell] echo "powershell opsi-script-test" if ($?) {Exit(0)} else {Exit(1)} -
Get-Partition
The output of the PowerShell commandGet-Partitioncontains NULL characters\u0000in the columnDriveLetterwhere there is no drive letter. This leads in opsi-script to problems with directly reading the output ofGet-Partition. If you like to use the output ofGet-Partitionin your script, we recommend the solution:DefStringlist $ResultList$ PowershellCall('Get-Partition > "%opsiUserTmpDir%\Get-Partition.txt"') Set $ResultList$ = LoadTextFile("%opsiUserTmpDir%\Get-Partition.txt")Here, the output of
Get-Partitionis written to a file first and so the problem with the NULL characters is handled.
More Examples
The following call is meant to refer to a section which is an autoit3 script that waits for some upcoming window (therefore the option /letThemGo is used) in order to close it:
ExecWith_close "%SCRIPTPATH%\autoit3.exe" WINST /letThemGoA simple
ExecWith_edit_me "notepad.exe" WINST /letThemGocalls notepad and opens the section lines in it (but without any line that is starting with a semicolon since opsi-script regards such lines as comments and eliminates them before handle).
The following example call the 64Bit version of the powershell.exe.
ExecWith_do_64bit_stuff "%System%\WindowsPowerShell\v1.0\powershell.exe" winst /64BitFor further examples watch the product 'opsi-script-test' and there especially '$Flag_autoit3_test$ = "on"'.
LDAPsearch Sections [W]
A LDAPsearch section defines a search request to a LDAP directory, executes it and receives (and possibly caches) the response.
Before dwelling on the opsi-script commands we do some explanations.
In subsection we give an example of the most probable usage of a LDAPsearch. The following subsections describe the syntax
LDAP – Protocol, Service, Directory
LDAP, the "Lightweight Directory Access Protocol", is, as the name indicates, a defined way of communication to a directory. This directory is (or may be) hierarchically organized. That is, the directory is a hierarchical data base, or a tree of content.
A LDAP service implements the protocol. A directory that can be accessed via a LDAP service is called a LDAP directory.
For instance, let’s have a look at some part of the LDAP directory tree of an OPSI server with LDAP backend (as shown by the Open Source tool JXplorer):
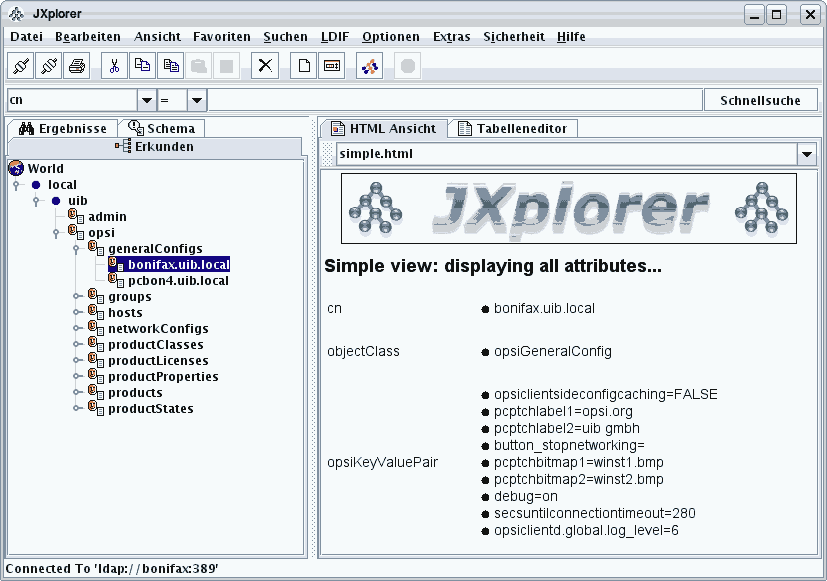
A LDAP search request is a query to a LDAP directory via a LDAP service. The response returns some content from the directory.
Basically the search request has to describe the path in the directory tree which leads to the interesting piece of information. The path is the distinguished name (dn), composed of the names of the nodes (the "relative distinguished names"), which build the path, for instance:
'local/uib/opsi/generalConfigs/bonifax.uib.local'
Since each node is conceived as an instance of some structural object class, the path description is usually given in the following form: with indication of the classes (and starting with the last path element) :
'cn=bonifax.uib.local,cn=generalConfigs,cn=opsi,dc=uib,dc=local'
The path in a query is not necessarily "complete", and not leading to a unique leaf of the tree. On the contrary, partial paths are common.
But even if the path descends to a unique leaf, the leaf may contain several values. Each node of the tree has one or more classes as attribute types. To each one or may values may be associated.
For a given query path, we therefore may be interested
-
in the node set whose elements – the so called LDAP objects – match the given path,
-
the set of attributes that belong the nodes,
-
and the values that are associated to all of them.
Obviously, handling the amount of possibly returned response information is the main challenge when dealing with LDAP searches.
The following section shows the documentation of a LDAPsearch roughly corresponding to the screenshot above as executed by opsi-script.
Example
Using the opsi-script section ldapsearch_generalConfigs:
[ldapsearch_generalConfigs]
targethost: bonifax
dn: cn=generalConfigs,cn=opsi,dc=uib,dc=local
we will get a answer like this:
Result: 0
 Object: cn=generalConfigs,cn=opsi,dc=uib,dc=local
  Attribute: cn
	generalConfigs
  Attribute: objectClass
	organizationalRole
Result: 1
  Object: cn=pcbon4.uib.local,cn=generalConfigs,cn=opsi,dc=uib,dc=local
  Attribute: cn
	pcbon4.uib.local
  Attribute: objectClass
	opsiGeneralConfig
  Attribute: opsiKeyValuePair
	test2=test
	test=a b c d
Result: 2
  Object: cn=bonifax.uib.local,cn=generalConfigs,cn=opsi,dc=uib,dc=local
  Attribute: objectClass
	opsiGeneralConfig
  Attribute: cn
	bonifax.uib.local
  Attribute: opsiKeyValuePair
	opsiclientsideconfigcaching=FALSE
	pcptchlabel1=opsi.org
	pcptchlabel2=uib gmbh
	button_stopnetworking=
	pcptchbitmap1=winst1.bmp
	pcptchbitmap2=winst2.bmp
	debug=on
	secsuntilconnectiontimeout=280
	opsiclientd.global.log_level=
There are several opsi-script options to manage and reduce the complexity of the evaluation of such responses.
LDAPsearch Call Parameters
Two kinds of LDAPsearch parameters,
-
cache options
-
output options
are defined for the call of LDAPsearch section.
The 'cache options' are:
-
/cache -
/cached -
/free -
(no cache option)
If there is no cache option specified, the response of the LDAP search request is not saved for further usages.
By the /cache option, the response is cached for further evaluations, the /cached option refers to the last cached response which is reused instead of starting a new search, the /free option clears the cache explicitly (may only be useful for searches with extreme large responses).
The 'output options' are:
-
/objects -
/attributes -
/values -
(no output option)
The output options determine the String list that is produced when a LDAPsearch section is called via getReturnlistFromSection:
-
If no output option is specified the returned list is the complete LDAP response.
-
The options objects, attributes and values restrict the output to object, attribute or value lines of the LDAP response respectively.
Observe that in the produced lists the object an attribute belongs to is only identifiable if only one object is returned in the object list, and likewise the object and the attribute to which a value is subsumed are only identifiable if there is only attribute remaining in the attributes list.
Such the proceeding is, that the LDAPsearch is specified up to that degree, that at most one object and one attribute is returned. This can be checked by a count call on the objects and the attributes return list. Then any value found belongs to the dn and the attribute specified.
The repeated utilization of the same LDAP response can be done without relevant time costs by using the cache/cached options.
How to Narrow the Search
An example may show how we can narrow the search to pin down a specific result from a LDAP directory.
We start with the call of 'ldapsearch_generalConfigs' as above, only adding the cache parameter.
ldapsearch_generalconfigs /cache
executes the query and caches the response for further utilization.
Then, the call
getReturnlistFromSection("ldapsearch_generalconfigs /cached /objects")
produces the list
cn=generalconfigs,cn=opsi,dc=uib,dc=local
cn=pcbon4.uib.local,cn=generalconfigs,cn=opsi,dc=uib,dc=local
cn=bonifax.uib.local,cn=generalconfigs,cn=opsi,dc=uib,dc=local
If we narrow the tree selection by
[ldapsearch_generalConfigs]
targethost: bonifax
dn: cn=bonifax.ubi.local,cn=generalConfigs,cn=opsi,dc=uib,dc=local
and start again, then in the objects list, we indeed retain just
cn=bonifax.uib.local,cn=generalconfigs,cn=opsi,dc=uib,dc=localThe corresponding attributes list contains three elements:
objectclass
cn
opsikeyvaluepair
In order to get the values associated to a single attribute we have to confine the query once more:
[ldapsearch_generalConfigs]
targethost: bonifax
dn: cn=bonifax.ubi.local,cn=generalConfigs,cn=opsi,dc=uib,dc=local
attribute: opsiKeyValuePair
The result now produced is an attributes list containing only one element. The corresponding values list looks like
opsiclientsideconfigcaching=false
pcptchlabel1=opsi.org
pcptchlabel2=uib gmbh
button_stopnetworking=
pcptchbitmap1=winst1.bmp
pcptchbitmap2=winst2.bmp
debug=on
secsuntilconnectiontimeout=280
opsiclientd.global.log_level=6
There are no LDAP means to reduce this result furthermore!
(But the opsi-script function getValue (key, list) (cf. Simple String Values generated from String Lists or Files) may help in this case: E.g.
getValue ("secsuntilconnectiontimeout", list)
would produces the requested number).
By the function count (list) we can check if we succeeded with the narrowing of the search request. In most circumstances, we would like that its result be "1".
LDAPsearch Section Syntax
A LDAPsearch section comprises the specifications:
-
targethost:
The server hosting the LDAP directory (service) must be named. -
user:
username to be applied. Since 4.11.3.5 -
password:
user password to be applied. Since 4.11.3.5 -
targetport:
If the port of the LDAP service is not the default (389), it can be declared at this place. If the specification is missing, the default port is used.
Since 4.12.4.29: Using the port 636 turns also using connection via SSL on. -
dn:
Here, the distinguished name, the "search path", for the search request can be given. -
typesonly:
Default "false", that is, values are retrieved. -
filter:
A filter for LDAP search has a LDAP specific syntax that is not checked by opsi-script. Default is "(objectclass=*)" -
attributes:
A comma separated list of attribute names may be given. The default is to take any attribute.
Examples
A short and rather realistic example shall end this section:
'$founditems$' be a StringList variable and '$opsiClient$' a String variable. The call of 'getReturnlistFromSection' fetches the results of the section 'ldapsearch_hosts'. The following code fragment returns the unique result for $opsiDescription$ if it exists. It reports an error if the search produces an unexpected result:
set $opsiClient$ = "test.uib.local"
set $founditems$ = getReturnlistFromSection("ldapsearch_hosts /values")

DefVar $opsiDescription$
set $opsiDescription$ = ""
if count(founditems) = "1"
  set $opsiDescription$ = takeString(0, founditems)
else
  if count(founditems) = "0"
    comment "No result found")
  else
    logError "No unique result for LdAPsearch for client " + $opsiclient$
  endif
endif


[ldapsearch_hosts]
targethost: opsiserver
targetport:
dn: cn=$opsiclient$,cn=hosts,cn=opsi,dc=uib,dc=local
typesOnly: false
filter: (objectclass=*)
attributes: opsiDescription
Example with user / password
comment ""
comment "------------------------------"
comment "Testing: "
comment "user / password"
Set $LdapHost$ = "vmix7.uib.local"
Set $LdapPort$ = "389"
Set $LdapUser$ = "cn=Administrator,cn=Users,dc=uib,dc=local"
Set $LdapPassword$ = "Linux123"
Set $LdapResultType$ = "objects"
Set $LdapSearchDn$ = "cn=Users,dc=uib,dc=local"
Set $LdapSearchAttributes$ = "name,objectClass"
Set $LdapFilter$ = "(&(objectclass=*))"

markErrorNumber
set $list1$ = getReturnListFromSection("ldapsearch_users /" + $LdapResultType$)
if errorsOccurredSinceMark > 0
	comment "failed while ldapsearch"
	set $TestResult$ = "not o.k."
else
	comment "passed"
endif

[ldapsearch_users]
targethost: $LdapHost$
targetport: $LdapPort$
user: $LdapUser$
password: $LdapPassword$
dn: $LdapSearchDn$
attributes: $LdapSearchAttributes$
filter: $LdapFilter$
For further examples watch the product 'opsi-script-test' and there especially '$Flag_winst_ldap_search$ = "on"'